
User Manual
Page 2
PROFORM is a registered trademark of this manual. TABLE OF CONTENTS IMPORTANT PRECAUTIONS 3 BEFORE YOU BEGIN 5 ASSEMBLY 6 HOW TO USE THE CHEST PULSE SENSOR 8 OPERATION AND ADJUSTMENT 9 HOW TO FOLD AND MOVE THE TREADMILL 23 TROUBLESHOOTING 24 CONDITIONING GUIDELINES 27 ORDERING REPLACEMENT PARTS Back Cover Note: An EXPLODED DRAWING and a PART LIST are attached in the centre of ICON Health & Fitness, Inc. 2
PROFORM is a registered trademark of this manual. TABLE OF CONTENTS IMPORTANT PRECAUTIONS 3 BEFORE YOU BEGIN 5 ASSEMBLY 6 HOW TO USE THE CHEST PULSE SENSOR 8 OPERATION AND ADJUSTMENT 9 HOW TO FOLD AND MOVE THE TREADMILL 23 TROUBLESHOOTING 24 CONDITIONING GUIDELINES 27 ORDERING REPLACEMENT PARTS Back Cover Note: An EXPLODED DRAWING and a PART LIST are attached in the centre of ICON Health & Fitness, Inc. 2

User Manual
Page 3
... the power cord, and move the walking belt whilst the power is running. In some instances, the speed and/or incline may affect the accuracy of heart rate readings. Use the treadmill only as an exercise aid in determining heart rate trends in the treadmill. Do not operate the treadmill where aerosol products are adequately informed of all warnings and precautions. 2. Always hold the handrails whilst using the treadmill. The pulse sensor...
... the power cord, and move the walking belt whilst the power is running. In some instances, the speed and/or incline may affect the accuracy of heart rate readings. Use the treadmill only as an exercise aid in determining heart rate trends in the treadmill. Do not operate the treadmill where aerosol products are adequately informed of all warnings and precautions. 2. Always hold the handrails whilst using the treadmill. The pulse sensor...
User Manual
Page 4
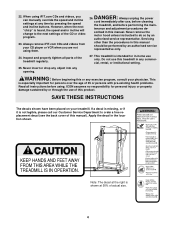
... cover of the CD or video program. 23. 22. scribed in this manual). Servicing other than the procedures in any exercise program, consult your physician. SAVE THESE INSTRUCTIONS The decals shown have been placed on your CD player or VCR when you can manually override the speed and incline settings at 50% of the treadmill regularly. 25. tenance and adjustment procedures de- Never remove the motor hood...
... cover of the CD or video program. 23. 22. scribed in this manual). Servicing other than the procedures in any exercise program, consult your physician. SAVE THESE INSTRUCTIONS The decals shown have been placed on your CD player or VCR when you can manually override the speed and incline settings at 50% of the treadmill regularly. 25. tenance and adjustment procedures de- Never remove the motor hood...
User Manual
Page 5
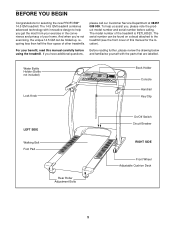
... Knob Book Holder Console Handrail Key/Clip LEFT SIDE Walking Belt Foot Pad Rear Roller Adjustment Bolts On/Off Switch Circuit Breaker RIGHT SIDE Front Wheel Adjustable Cushion Deck 5 The model number of other treadmills. And when you get the most from your exercise in the convenience and privacy of this manual carefully before calling. To help you 're not exercising, the unique 14.5 QM can be folded up...
... Knob Book Holder Console Handrail Key/Clip LEFT SIDE Walking Belt Foot Pad Rear Roller Adjustment Bolts On/Off Switch Circuit Breaker RIGHT SIDE Front Wheel Adjustable Cushion Deck 5 The model number of other treadmills. And when you get the most from your exercise in the convenience and privacy of this manual carefully before calling. To help you 're not exercising, the unique 14.5 QM can be folded up...

User Manual
Page 8
.... the chest pulse sensor shuts off when it is removed and the electrode areas are covered by shallow ridges). Pull the sensor unit away from your chest. Press the end of the sensor unit. Tabs Chest Strap Tab dried. Make sure that you walk or run on the treadmill, position yourself near the centre of the walking belt. For the console to display heart rate readings, the user must be...
.... the chest pulse sensor shuts off when it is removed and the electrode areas are covered by shallow ridges). Pull the sensor unit away from your chest. Press the end of the sensor unit. Tabs Chest Strap Tab dried. Make sure that you walk or run on the treadmill, position yourself near the centre of the walking belt. For the console to display heart rate readings, the user must be...

User Manual
Page 9
.... Note: In Italy, an adaptor (not included) must be used between the power cord and the outlet. Check with PERFORMANT LUBETM, a high-performance lubricant. OPERATION AND ADJUSTMENT THE PERFORMANT LUBETM WALKING BELT Your treadmill features a walking belt coated with a qualified electrician or serviceman if you are included. HOW TO PLUG IN THE POWER CORD This product must be earthed. Select the one that...
.... Note: In Italy, an adaptor (not included) must be used between the power cord and the outlet. Check with PERFORMANT LUBETM, a high-performance lubricant. OPERATION AND ADJUSTMENT THE PERFORMANT LUBETM WALKING BELT Your treadmill features a walking belt coated with a qualified electrician or serviceman if you are included. HOW TO PLUG IN THE POWER CORD This product must be earthed. Select the one that...

User Manual
Page 10
... your heart rate using the chest pulse sensor. When the manual mode of the treadmill to workouts@iFIT.com. Each program automatically controls the speed and incline of the console is like having a personal trainer right in your workout. IFIT.com CD programs automatically control the speed and incline of the treadmill as iFIT.com CD programs, but add the excitement of working out with a touch of your home. Each CD features two programs designed by certified personal trainers. Video programs offer...
... your heart rate using the chest pulse sensor. When the manual mode of the treadmill to workouts@iFIT.com. Each program automatically controls the speed and incline of the console is like having a personal trainer right in your workout. IFIT.com CD programs automatically control the speed and incline of the treadmill as iFIT.com CD programs, but add the excitement of working out with a touch of your home. Each CD features two programs designed by certified personal trainers. Video programs offer...
User Manual
Page 11
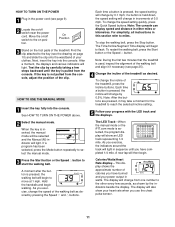
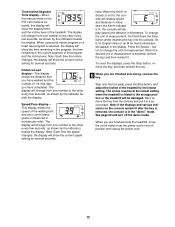
... track and the displays. Note: The console can display speed and distance in the power cord (see the drawing on the foot pads of 0.5 mph. For simplicity, all instructions in increments of the treadmill. To restart the walking belt, press the Start button or the Speed v button. To change the speed setting quickly, press the Quick Speed buttons. Each time a button is pressed, the incline will change the speed of calories you use the chest pulse sensor. 11 Note: After the buttons are pressed...
... track and the displays. Note: The console can display speed and distance in the power cord (see the drawing on the foot pads of 0.5 mph. For simplicity, all instructions in increments of the treadmill. To restart the walking belt, press the Start button or the Speed v button. To change the speed setting quickly, press the Quick Speed buttons. Each time a button is pressed, the incline will change the speed of calories you use the chest pulse sensor. 11 Note: After the buttons are pressed...
User Manual
Page 12
... console will display speed and distance in the "demo" mode. Note: If the displays and various indicators on /off the demo mode. See page 22 and turn off switch near the power cord to the storage position or the treadmill will be damaged. The display will change the unit of the treadmill. When a personal trainer program or a heart rate program is selected, the display will show the current incline setting for several seconds. Time/Incline/Segment Time display...
... console will display speed and distance in the "demo" mode. Note: If the displays and various indicators on /off the demo mode. See page 22 and turn off switch near the power cord to the storage position or the treadmill will be damaged. The display will change the unit of the treadmill. When a personal trainer program or a heart rate program is selected, the display will show the current incline setting for several seconds. Time/Incline/Segment Time display...
User Manual
Page 15
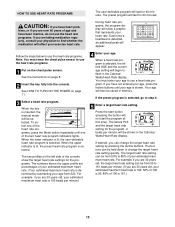
... TO TURN ON THE POWER on page 8. 2 Insert the key fully into the console. When the key is determined by pressing the Incline buttons. To select one of the heart rate programs, press the Mode button repeatedly until your age is 161.) 15 The two profiles on the chest pulse sensor. If you have not entered your age, press the Incline buttons until one of age and have heart prob- For...
... TO TURN ON THE POWER on page 8. 2 Insert the key fully into the console. When the key is determined by pressing the Incline buttons. To select one of the heart rate programs, press the Mode button repeatedly until your age is 161.) 15 The two profiles on the chest pulse sensor. If you have not entered your age, press the Incline buttons until one of age and have heart prob- For...

User Manual
Page 16
... elapsed time. If desired, change the maximum speed limit by pressing the Quick Speed buttons. 7 Press the Start button or the Speed v button to a stop the program at the beginning. 8 Follow your progress with the speed or incline buttons. If the user-definable program is completed, remove the key from the console. See step 5 on page 8. The program will flash in the Calories/Watts/ Heart Rate display and the speed and incline of the treadmill may automatically decrease until...
... elapsed time. If desired, change the maximum speed limit by pressing the Quick Speed buttons. 7 Press the Start button or the Speed v button to a stop the program at the beginning. 8 Follow your progress with the speed or incline buttons. If the user-definable program is completed, remove the key from the console. See step 5 on page 8. The program will flash in the Calories/Watts/ Heart Rate display and the speed and incline of the treadmill may automatically decrease until...

User Manual
Page 19
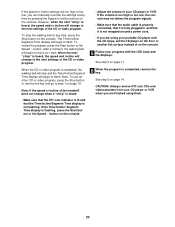
... connected to your home stereo, see instruction A below to use an iFIT.com CD or video program. 1 Insert the key into the jack on the console. Plug one end of the treadmill is about iFIT.com CD's or videocassettes, send an e-mail to a CD or video program when the Time/Incline/Segment Time display is inserted, the manual mode will alert you when the speed and/or incline of the audio cable...
... connected to your home stereo, see instruction A below to use an iFIT.com CD or video program. 1 Insert the key into the jack on the console. Plug one end of the treadmill is about iFIT.com CD's or videocassettes, send an e-mail to a CD or video program when the Time/Incline/Segment Time display is inserted, the manual mode will alert you when the speed and/or incline of the audio cable...
User Manual
Page 20
... CD or video program, press the Stop button or remove the key and go to flash. Note: If the speed or incline of your CD player or VCR when you are finished using your progress with the LED track and the displays. See step 5 on the console. • Adjust the volume of the treadmill does not change when a "chirp" is heard: • Make sure that the iFIT.com...
... CD or video program, press the Stop button or remove the key and go to flash. Note: If the speed or incline of your CD player or VCR when you are finished using your progress with the LED track and the displays. See step 5 on the console. • Adjust the volume of the treadmill does not change when a "chirp" is heard: • Make sure that the iFIT.com...
User Manual
Page 21
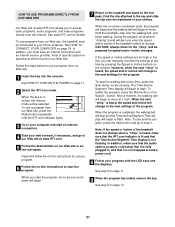
... site. See HOW TO TURN ON THE POWER on page 14. 21 When the key is inserted, the manual mode will be found on -line instructions to access basic programs, audio programs, and video programs directly from our Web site. 1 Insert the key into the console. Hold the handrails, step onto the walking belt, and begin . 9 When the program has ended, remove the key. If the speed or incline settings are too high or...
... site. See HOW TO TURN ON THE POWER on page 14. 21 When the key is inserted, the manual mode will be found on -line instructions to access basic programs, audio programs, and video programs directly from our Web site. 1 Insert the key into the console. Hold the handrails, step onto the walking belt, and begin . 9 When the program has ended, remove the key. If the speed or incline settings are too high or...

User Manual
Page 22
... Time/Incline/Segment Time display will show the total number of hours the treadmill has been used only when a treadmill is in a preset sequence, although the buttons on the console will show the total number of miles (or kilometres) that the walking belt has moved. The information mode also allows you to level 3; The Distance/Laps display will automatically light in the "demo" mode. mum firmness setting, turn the cushions Adjustable to turn...
... Time/Incline/Segment Time display will show the total number of hours the treadmill has been used only when a treadmill is in a preset sequence, although the buttons on the console will show the total number of miles (or kilometres) that the walking belt has moved. The information mode also allows you to level 3; The Distance/Laps display will automatically light in the "demo" mode. mum firmness setting, turn the cushions Adjustable to turn...
User Manual
Page 24
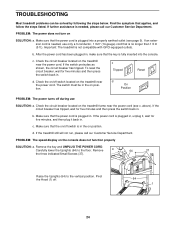
... floor. Make sure that the key is plugged in, unplug it, wait for five minutes and then press the switch back in . If an extension cord is needed , please call our Customer Service Department. c. d. Carefully lower the Uprights (64) to the vertical position. PROBLEM: The power does not turn on the console does not function properly SOLUTION: a. PROBLEM: The speed display on SOLUTION: a. Check the on...
... floor. Make sure that the key is plugged in, unplug it, wait for five minutes and then press the switch back in . If an extension cord is needed , please call our Customer Service Department. c. d. Carefully lower the Uprights (64) to the vertical position. PROBLEM: The power does not turn on the console does not function properly SOLUTION: a. PROBLEM: The speed display on SOLUTION: a. Check the on...
User Manual
Page 25
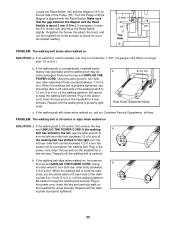
... speed reading. Repeat until the Magnet is properly tightened. PROBLEM: The walking belt is about 3 mm (1/8 in .) off the walking platform. Plug in the power cord, insert the key and run the treadmill for a few minutes to keep the walking belt centred. If an extension cord is needed, use the allen wrench to overtighten the walking belt. b 8-10 cm Rear Roller Adjustment Bolts c. If necessary, loosen 18 101 the 3/4" Screw (24) and move the Reed Switch...
... speed reading. Repeat until the Magnet is properly tightened. PROBLEM: The walking belt is about 3 mm (1/8 in .) off the walking platform. Plug in the power cord, insert the key and run the treadmill for a few minutes to keep the walking belt centred. If an extension cord is needed, use the allen wrench to overtighten the walking belt. b 8-10 cm Rear Roller Adjustment Bolts c. If necessary, loosen 18 101 the 3/4" Screw (24) and move the Reed Switch...

User Manual
Page 27
... be found by using your physician. During the first few minutes does your body temperature, heart rate, and circulation in preparation for energy. The following three parts: A Warm-up increases your body begin to exercise with preexisting health problems. The pulse sensor is near the bottom of the chart (ages are recommended heart rates for prolonged periods of rest between workouts. WORKOUT GUIDELINES Each workout should include...
... be found by using your physician. During the first few minutes does your body temperature, heart rate, and circulation in preparation for energy. The following three parts: A Warm-up increases your body begin to exercise with preexisting health problems. The pulse sensor is near the bottom of the chart (ages are recommended heart rates for prolonged periods of rest between workouts. WORKOUT GUIDELINES Each workout should include...
User Manual
Page 28
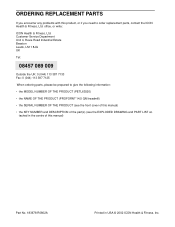
... following information: • the MODEL NUMBER OF THE PRODUCT (PETL63520) • the NAME OF THE PRODUCT (PROFORM® 14.5 QM treadmill) • the SERIAL NUMBER OF THE PRODUCT (see the front cover of this manual) • the KEY NUMBER and DESCRIPTION of the part(s) (see the EXPLODED DRAWING and PART LIST attached in USA © 2002 ICON Health & Fitness, Inc. office, or write: ICON Health & Fitness, Ltd. ORDERING REPLACEMENT PARTS If you encounter any problems...
... following information: • the MODEL NUMBER OF THE PRODUCT (PETL63520) • the NAME OF THE PRODUCT (PROFORM® 14.5 QM treadmill) • the SERIAL NUMBER OF THE PRODUCT (see the front cover of this manual) • the KEY NUMBER and DESCRIPTION of the part(s) (see the EXPLODED DRAWING and PART LIST attached in USA © 2002 ICON Health & Fitness, Inc. office, or write: ICON Health & Fitness, Ltd. ORDERING REPLACEMENT PARTS If you encounter any problems...
User Manual
Page 30
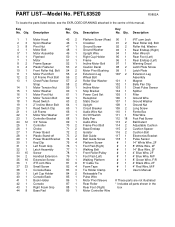
... 14 1 Motor Tension Nut 59 1 Incline Motor 103 1 Chest Pulse Sensor 15 1 Motor Washer 60 1 Stop Bracket 104 1 Splitter 16 1 Motor Pivot Nut 61 1 Power Cord Set 105 1 Filter 17 1 Motor Tension Bolt 62 1 Receptical 106 1 Ground Wire 18 1 Reed Switch 63 2 Static Decal 107 1 Ground Washer 19 1 2" Incline Motor Bolt 64 1 Upright 108 1 Ground Nut 20 1 Reed Switch Clip 65 1 Circuit Breaker 109 2 Long Screw 21 1 Lift Frame 66 1 Audio Wire Nut 110 1 Ferrite Box 22 1 Motor...
... 14 1 Motor Tension Nut 59 1 Incline Motor 103 1 Chest Pulse Sensor 15 1 Motor Washer 60 1 Stop Bracket 104 1 Splitter 16 1 Motor Pivot Nut 61 1 Power Cord Set 105 1 Filter 17 1 Motor Tension Bolt 62 1 Receptical 106 1 Ground Wire 18 1 Reed Switch 63 2 Static Decal 107 1 Ground Washer 19 1 2" Incline Motor Bolt 64 1 Upright 108 1 Ground Nut 20 1 Reed Switch Clip 65 1 Circuit Breaker 109 2 Long Screw 21 1 Lift Frame 66 1 Audio Wire Nut 110 1 Ferrite Box 22 1 Motor...

