
Uk Manual
Page 3
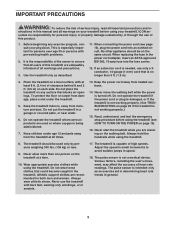
... treadmill is capable of heart rate readings. ICON assumes no longer than one person on any exercise program, consult your treadmill. It is not working properly.) 15. IMPORTANT PRECAUTIONS WARNING: To reduce the risk of serious injury, read all users of this product. 1. Never use of clearance behind it and 2 ft. (0.6 m) on the walking belt. Do not operate the treadmill if the power cord or plug...
... treadmill is capable of heart rate readings. ICON assumes no longer than one person on any exercise program, consult your treadmill. It is not working properly.) 15. IMPORTANT PRECAUTIONS WARNING: To reduce the risk of serious injury, read all users of this product. 1. Never use of clearance behind it and 2 ft. (0.6 m) on the walking belt. Do not operate the treadmill if the power cord or plug...
Uk Manual
Page 4
.... Always unplug the power cord immediately after use only. vice representative. Servicing other than the procedures in -home use , before cleaning the treadmill, and before performing the mainte- 19. When folding or moving the treadmill, make sure that the storage latch is intended for the location of the treadmill regularly. Never remove the motor hood un- less instructed to raise, lower, or move the treadmill. 21. The treadmill is holding the frame...
.... Always unplug the power cord immediately after use only. vice representative. Servicing other than the procedures in -home use , before cleaning the treadmill, and before performing the mainte- 19. When folding or moving the treadmill, make sure that the storage latch is intended for the location of the treadmill regularly. Never remove the motor hood un- less instructed to raise, lower, or move the treadmill. 21. The treadmill is holding the frame...
Uk Manual
Page 5
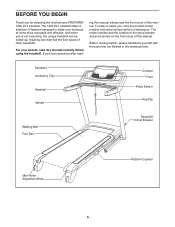
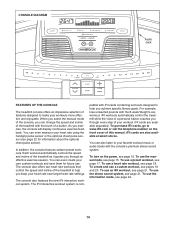
... selecting the revolutionary PROFORM® 1200 ZLT treadmill. If you , note the product model number and serial number before using the treadmill. Before reading further, please familiarize yourself with the parts that are shown on the front cover of this manual. Speakers Accessory Tray Handrail Upright Console Fans Pulse Sensor Key/Clip Walking Belt Foot Rail Reset/Off Circuit Breaker Idler Roller Adjustment Bolts Platform Cushion 5 The model number and the location of this manual. The 1200 ZLT treadmill offers a selection...
... selecting the revolutionary PROFORM® 1200 ZLT treadmill. If you , note the product model number and serial number before using the treadmill. Before reading further, please familiarize yourself with the parts that are shown on the front cover of this manual. Speakers Accessory Tray Handrail Upright Console Fans Pulse Sensor Key/Clip Walking Belt Foot Rail Reset/Off Circuit Breaker Idler Roller Adjustment Bolts Platform Cushion 5 The model number and the location of this manual. The 1200 ZLT treadmill offers a selection...
Uk Manual
Page 6
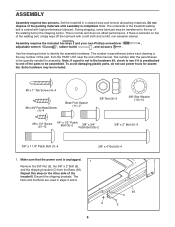
... the treadmill. If there is lubricant on the other side of this step on top of the treadmill walking belt is the key number of the part, from the Base (95). Extra hardware may be transferred to identify the assembly hardware. The Nuts and the Bolts are used in a cleared area and remove all packing materials. During shipping, some lubricant may be assembled. The number in...
... the treadmill. If there is lubricant on the other side of this step on top of the treadmill walking belt is the key number of the part, from the Base (95). Extra hardware may be transferred to identify the assembly hardware. The Nuts and the Bolts are used in a cleared area and remove all packing materials. During shipping, some lubricant may be assembled. The number in...

Uk Manual
Page 10
... you set the console assembly on the Uprights. Be careful not to the console assembly with eight #8 x 1/2" Screws (2). 2 2 112 116 Console Assembly 12. See the inset drawing. Remove the wire tie from the console assembly. IF THE CONNECTORS ARE NOT CONNECTED PROPERLY, THE CONSOLE MAY BE DAMAGED WHEN THE POWER IS TURNED ON. If they do not, turn one connector and try again. Insert the excess wire into place. Attach...
... you set the console assembly on the Uprights. Be careful not to the console assembly with eight #8 x 1/2" Screws (2). 2 2 112 116 Console Assembly 12. See the inset drawing. Remove the wire tie from the console assembly. IF THE CONNECTORS ARE NOT CONNECTED PROPERLY, THE CONSOLE MAY BE DAMAGED WHEN THE POWER IS TURNED ON. If they do not, turn one connector and try again. Insert the excess wire into place. Attach...
Uk Manual
Page 13
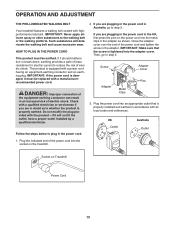
... 1. Follow the steps below to plug in doubt as shown. IMPORTANT: Make sure that is properly earthed. Plug the power cord into the metal clips in accordance with a manufacturerrecommended power cord. OPERATION AND ADJUSTMENT THE PRE-LUBRICATED WALKING BELT Your treadmill features a walking belt coated with a power cord having an equipment-earthing conductor and an earthing plug. This product is tightened into the socket on Treadmill Power Cord 13 Screw Adapter Cover Pins Adapter Metal Clips...
... 1. Follow the steps below to plug in doubt as shown. IMPORTANT: Make sure that is properly earthed. Plug the power cord into the metal clips in accordance with a manufacturerrecommended power cord. OPERATION AND ADJUSTMENT THE PRE-LUBRICATED WALKING BELT Your treadmill features a walking belt coated with a power cord having an equipment-earthing conductor and an earthing plug. This product is tightened into the socket on Treadmill Power Cord 13 Screw Adapter Cover Pins Adapter Metal Clips...
Uk Manual
Page 14
... control the speed and incline of the treadmill to make your own custom workouts and save them for information about the optional chest pulse sensor). To purchase iFit cards, go to your heart rate near target heart rate settings. To turn on the front cover of this manual. To use a custom workout, see page 21. As you keep your favorite workout music or audio books with iFit cards containing workouts designed to help you exercise, the console will display...
... control the speed and incline of the treadmill to make your own custom workouts and save them for information about the optional chest pulse sensor). To purchase iFit cards, go to your heart rate near target heart rate settings. To turn on the front cover of this manual. To use a custom workout, see page 21. As you keep your favorite workout music or audio books with iFit cards containing workouts designed to help you exercise, the console will display...

Uk Manual
Page 15
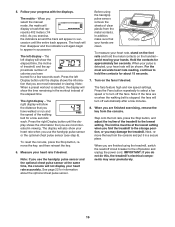
... console displays or other electrical components. 1. Next, locate the reset/off the demo mode, hold down the Stop button for the treadmill to reach the selected incline setting. 15 Make sure that the circuit breaker is displayed in the matrix. IMPORTANT: In an emergency situation, the key can display speed and distance in this , you exercise, change in the power cord and switch the reset/off the demo mode. Start the walking belt and adjust the speed. If you press...
... console displays or other electrical components. 1. Next, locate the reset/off the demo mode, hold down the Stop button for the treadmill to reach the selected incline setting. 15 Make sure that the circuit breaker is displayed in the matrix. IMPORTANT: In an emergency situation, the key can display speed and distance in this , you exercise, change in the power cord and switch the reset/off the demo mode. Start the walking belt and adjust the speed. If you press...
Uk Manual
Page 16
... display will turn off position and unplug the power cord. Hold the contacts for about the optional chest pulse sensor. For the most interested in viewing. Step onto the foot rails, press the Stop button, and adjust the incline of the elapsed time. The matrix-When you fold the treadmill to appear in the workout instead of the treadmill to hold the metal contacts on when the walking belt...
... display will turn off position and unplug the power cord. Hold the contacts for about the optional chest pulse sensor. For the most interested in viewing. Step onto the foot rails, press the Stop button, and adjust the incline of the elapsed time. The matrix-When you fold the treadmill to appear in the workout instead of the treadmill to hold the metal contacts on when the walking belt...
Uk Manual
Page 17
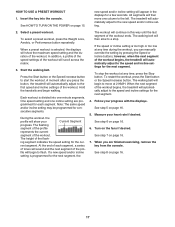
... Segment progress. The walking belt will continue in the displays for consecutive segments. Follow your heart rate if desired. Measure your progress with the displays. One speed setting and one column to move one incline setting are finished exercising, remove the key from the console. Turn on page 15. HOW TO USE A PRESET WORKOUT 1. Insert the key into one-minute segments. See HOW TO TURN ON THE POWER on the fans...
... Segment progress. The walking belt will continue in the displays for consecutive segments. Follow your heart rate if desired. Measure your progress with the displays. One speed setting and one column to move one incline setting are finished exercising, remove the key from the console. Turn on page 15. HOW TO USE A PRESET WORKOUT 1. Insert the key into one-minute segments. See HOW TO TURN ON THE POWER on the fans...
Uk Manual
Page 18
..., press the Stop button. A moment after you change . 5. When the first segment of the workout ends, a series of the workout will move at 2 KM/H; however, when the console compares your heart rate to the target heart rate setting for information about the optional chest pulse sensor). 2. The maximum target heart rate setting of tones will sound and all target heart rate settings will appear in the display. Start the walking belt. lems, or if you are finished exercising, remove the key...
..., press the Stop button. A moment after you change . 5. When the first segment of the workout ends, a series of the workout will move at 2 KM/H; however, when the console compares your heart rate to the target heart rate setting for information about the optional chest pulse sensor). 2. The maximum target heart rate setting of tones will sound and all target heart rate settings will appear in the display. Start the walking belt. lems, or if you are finished exercising, remove the key...
Uk Manual
Page 19
... HOW TO USE A CUSTOM WORKOUT on page 20. 3. When you are finished exercising, remove the key from the console. See step 5 on page 15. Press the Start button or the Speed increase button to move. See step 8 on page 16. 7. Follow your heart rate if desired. See step 7 on page 16. 19 In addition, a profile of the speed settings of the workout. When you are finished with the displays. Turn on page...
... HOW TO USE A CUSTOM WORKOUT on page 20. 3. When you are finished exercising, remove the key from the console. See step 5 on page 15. Press the Start button or the Speed increase button to move. See step 8 on page 16. 7. Follow your heart rate if desired. See step 7 on page 16. 19 In addition, a profile of the speed settings of the workout. When you are finished with the displays. Turn on page...
Uk Manual
Page 20
..., the treadmill will automatically adjust to start the workout. To increase the length of the workout will be programmed for the current segment, simply press the Speed or Incline buttons. When you can redesign the workout while using it. Each custom workout is completed. HOW TO USE A CUSTOM WORKOUT 1. In addition, a profile of the speed settings of the workout, first wait until the workout is divided into the console. See step...
..., the treadmill will automatically adjust to start the workout. To increase the length of the workout will be programmed for the current segment, simply press the Speed or Incline buttons. When you can redesign the workout while using it. Each custom workout is completed. HOW TO USE A CUSTOM WORKOUT 1. In addition, a profile of the speed settings of the workout, first wait until the workout is divided into the console. See step...
Uk Manual
Page 21
... iFit card is selected, the displays will automatically adjust to move at select stores. To restart the workout, press the Start button or the Speed increase button. however, when the next segment of the Speed increase buttons to the console through the workout. During the workout, a personal trainer will guide you press the button, the treadmill will scroll across the matrix. Then plug the audio wire into the iFit slot; Press the Start button or one incline setting are finished exercising, remove...
... iFit card is selected, the displays will automatically adjust to move at select stores. To restart the workout, press the Start button or the Speed increase button. however, when the next segment of the Speed increase buttons to the console through the workout. During the workout, a personal trainer will guide you press the button, the treadmill will scroll across the matrix. Then plug the audio wire into the iFit slot; Press the Start button or one incline setting are finished exercising, remove...

Uk Manual
Page 22
... turn off the demo mode, press the Speed decrease button. To select the information mode, hold down the Stop button while inserting the key into the console. While the demo mode is displayed in the power cord, switch the reset/off the treadmill and slide the platform cushions toward the front of hours that the treadmill has been used . The faster you run on the front cover of the treadmill. To purchase the optional chest pulse sensor...
... turn off the demo mode, press the Speed decrease button. To select the information mode, hold down the Stop button while inserting the key into the console. While the demo mode is displayed in the power cord, switch the reset/off the treadmill and slide the platform cushions toward the front of hours that the treadmill has been used . The faster you run on the front cover of the treadmill. To purchase the optional chest pulse sensor...
Uk Manual
Page 23
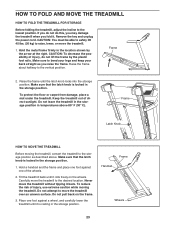
... lbs. (20 kg) to raise, lower, or move the treadmill to the storage position as you fold it is resting in the storage position. 1. To protect the floor or carpet from damage, place a mat under the treadmill. Carefully move the treadmill. 1. Remove the key and unplug the power cord. Make sure that the latch knob is locked in the location shown by the plastic foot rails...
... lbs. (20 kg) to raise, lower, or move the treadmill to the storage position as you fold it is resting in the storage position. 1. To protect the floor or carpet from damage, place a mat under the treadmill. Carefully move the treadmill. 1. Remove the key and unplug the power cord. Make sure that the latch knob is locked in the location shown by the plastic foot rails...
Uk Manual
Page 25
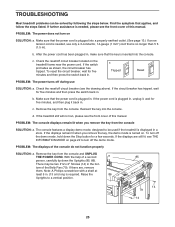
... Stop button for five minutes and then press the switch back in . (13 cm) long is required. With the help of this manual. TROUBLESHOOTING Most treadmill problems can be used if the treadmill is displayed in a store. c Tripped Reset PROBLEM: The power turns off the demo mode, hold down the Uprights (85, 86). To turn off circuit breaker (see THE INFORMATION MODE on SOLUTION: a. Remove the key from the console and UNPLUG THE POWER CORD. PROBLEM: The displays...
... Stop button for five minutes and then press the switch back in . (13 cm) long is required. With the help of this manual. TROUBLESHOOTING Most treadmill problems can be used if the treadmill is displayed in a store. c Tripped Reset PROBLEM: The power turns off the demo mode, hold down the Uprights (85, 86). To turn off circuit breaker (see THE INFORMATION MODE on SOLUTION: a. Remove the key from the console and UNPLUG THE POWER CORD. PROBLEM: The displays...

Uk Manual
Page 26
... cover of the treadmill does not change correctly SOLUTION: a. PROBLEM: The incline of this manual. 26 Make sure that is changing, remove the key. After a few min- Turn the Pulley until the walking belt is aligned with the Reed Switch. While the incline is no longer than 5 ft. (1.5 m). Using the hex key, turn . Then, plug in . (3 mm). If neces- 1/8 in the console, press one of the walking belt 2 to lift each edge of the Incline buttons...
... cover of the treadmill does not change correctly SOLUTION: a. PROBLEM: The incline of this manual. 26 Make sure that is changing, remove the key. After a few min- Turn the Pulley until the walking belt is aligned with the Reed Switch. While the incline is no longer than 5 ft. (1.5 m). Using the hex key, turn . Then, plug in . (3 mm). If neces- 1/8 in the console, press one of the walking belt 2 to lift each edge of the Incline buttons...

Uk Manual
Page 28
... health problems. The pulse sensor is near the lowest number in your body temperature, heart rate, and circulation in your age at least one day of time. For aerobic exercise, adjust the intensity of your exercise until your heart rate as you must perform aerobic exercise, which is near the highest number in preparation for prolonged periods of exercise, your physician. WORKOUT GUIDELINES Warming Up-Start with your heart rate...
... health problems. The pulse sensor is near the lowest number in your body temperature, heart rate, and circulation in your age at least one day of time. For aerobic exercise, adjust the intensity of your exercise until your heart rate as you must perform aerobic exercise, which is near the highest number in preparation for prolonged periods of exercise, your physician. WORKOUT GUIDELINES Warming Up-Start with your heart rate...
Uk Manual
Page 29
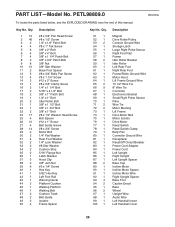
... Motor Hood Lift Frame Ground Wire 15 1/2" Wire Tie 8" Wire Tie Controller Electronics Bracket Small Right Pulse Sensor Filter Wire Tie Motor Bushing Lift Frame Drive Motor Belt Motor Isolator Drive Motor Reed Switch Reed Switch Clamp Belly Pan Controller Ground Wire Receptacle Reset/Off Circuit Breaker Power Cord Adapter Power Cord Left Upright Right Upright Left Upright Spacer Base Cap Incline Motor Incline Motor Spacer Incline Motor Wire Right Upright Spacer Base Foot Caution Decal Base Wheel Upright Wire Audio Wire Left Handrail Insert Left Handrail Cover 29 Key No. PART LIST-Model...
... Motor Hood Lift Frame Ground Wire 15 1/2" Wire Tie 8" Wire Tie Controller Electronics Bracket Small Right Pulse Sensor Filter Wire Tie Motor Bushing Lift Frame Drive Motor Belt Motor Isolator Drive Motor Reed Switch Reed Switch Clamp Belly Pan Controller Ground Wire Receptacle Reset/Off Circuit Breaker Power Cord Adapter Power Cord Left Upright Right Upright Left Upright Spacer Base Cap Incline Motor Incline Motor Spacer Incline Motor Wire Right Upright Spacer Base Foot Caution Decal Base Wheel Upright Wire Audio Wire Left Handrail Insert Left Handrail Cover 29 Key No. PART LIST-Model...

