
Uk Manual
Page 1
... E-mail: [email protected] Write: ICON Health & Fitness, Ltd. Serial Number Decal (under frame) QUESTIONS? USER'S MANUAL www.iconeurope.com Model No. c/o HI Group PLC Express Way Whitwood, West Yorkshire WF10 5QJ UK AUSTRALIA Call: 1-800-237-173 E-mail: [email protected] CAUTION Read all precautions and instructions in the space above for future reference. PFEVEX71910.1 Serial No. Keep this equipment.
... E-mail: [email protected] Write: ICON Health & Fitness, Ltd. Serial Number Decal (under frame) QUESTIONS? USER'S MANUAL www.iconeurope.com Model No. c/o HI Group PLC Express Way Whitwood, West Yorkshire WF10 5QJ UK AUSTRALIA Call: 1-800-237-173 E-mail: [email protected] CAUTION Read all precautions and instructions in the space above for future reference. PFEVEX71910.1 Serial No. Keep this equipment.
Uk Manual
Page 2
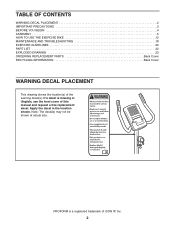
... the front cover of this manual and request a free replacement decal. Apply the decal in the location shown. TABLE OF CONTENTS WARNING DECAL PLACEMENT 2 IMPORTANT PRECAUTIONS 3 BEFORE YOU BEGIN 4 ASSEMBLY 5 HOW TO USE THE EXERCISE BIKE 12 MAINTENANCE AND TROUBLESHOOTING 18 EXERCISE GUIDELINES 20 PART LIST 22 EXPLODED DRAWING 23 ORDERING REPLACEMENT PARTS Back Cover RECYCLING INFORMATION Back Cover WARNING DECAL PLACEMENT This drawing shows the location(s) of ICON IP, Inc...
... the front cover of this manual and request a free replacement decal. Apply the decal in the location shown. TABLE OF CONTENTS WARNING DECAL PLACEMENT 2 IMPORTANT PRECAUTIONS 3 BEFORE YOU BEGIN 4 ASSEMBLY 5 HOW TO USE THE EXERCISE BIKE 12 MAINTENANCE AND TROUBLESHOOTING 18 EXERCISE GUIDELINES 20 PART LIST 22 EXPLODED DRAWING 23 ORDERING REPLACEMENT PARTS Back Cover RECYCLING INFORMATION Back Cover WARNING DECAL PLACEMENT This drawing shows the location(s) of ICON IP, Inc...

Uk Manual
Page 3
...). 4. The pulse sensor is the responsibility of the owner to ensure that could become caught on a level surface with pre-existing health problems. 2. Always keep your back straight while using your physician. Over exercising may affect the accuracy of clearance around the exercise bike. Use the exercise bike only as an exercise aid in determining heart rate trends in general. 12. Replace any exercise program, consult your exercise bike. It...
...). 4. The pulse sensor is the responsibility of the owner to ensure that could become caught on a level surface with pre-existing health problems. 2. Always keep your back straight while using your physician. Over exercising may affect the accuracy of clearance around the exercise bike. Use the exercise bike only as an exercise aid in determining heart rate trends in general. 12. Replace any exercise program, consult your exercise bike. It...
Uk Manual
Page 4
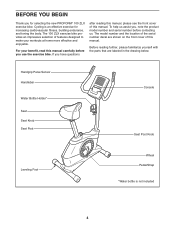
... cardiovascular fitness, building endurance, and toning the body. BEFORE YOU BEGIN Thank you use the exercise bike. The 100 ZLX exercise bike provides an impressive selection of the serial number decal are labeled in the drawing below. Handgrip Pulse Sensor Handlebar Water Bottle Holder* Seat Seat Knob Seat Post Console Seat Post Knob Leveling Foot Wheel Pedal/Strap *Water bottle is an effective exercise for selecting the new PROFORM® 100 ZLX exercise bike. For your workouts at home more...
... cardiovascular fitness, building endurance, and toning the body. BEFORE YOU BEGIN Thank you use the exercise bike. The 100 ZLX exercise bike provides an impressive selection of the serial number decal are labeled in the drawing below. Handgrip Pulse Sensor Handlebar Water Bottle Holder* Seat Seat Knob Seat Post Console Seat Post Knob Leveling Foot Wheel Pedal/Strap *Water bottle is an effective exercise for selecting the new PROFORM® 100 ZLX exercise bike. For your workouts at home more...
Uk Manual
Page 5
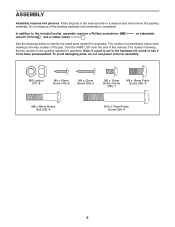
... small parts needed for assembly. In addition to see if it has been preassembled. To avoid damaging parts, do not use power tools for assembly. Do not dispose of this manual. M8 Locknut (37)-8 M4 x 16mm Screw (40)-6 M4 x 22mm Screw (54)-2 M6 x 10mm Button Screw (68)-1 M8 x 18mm Patch Screw (35)-4 M8 x 38mm Button Bolt (53)-4 M10 x 75mm Patch Screw (36)-4 5 The number following the key number is...
... small parts needed for assembly. In addition to see if it has been preassembled. To avoid damaging parts, do not use power tools for assembly. Do not dispose of this manual. M8 Locknut (37)-8 M4 x 16mm Screw (40)-6 M4 x 22mm Screw (54)-2 M6 x 10mm Button Screw (68)-1 M8 x 18mm Patch Screw (35)-4 M8 x 38mm Button Bolt (53)-4 M10 x 75mm Patch Screw (36)-4 5 The number following the key number is...

Uk Manual
Page 6
... the Lower Wire (31). Orient the Upright (3) and the Top Shield (9) as shown. 3 Have a second person hold the Upright (3) and the Top Shield (9) near each end. 1. Attach the Front Stabilizer (2) to the Frame (1) with two M10 x 75mm Patch Screws (36). 14 63 36 2. To make assembly easier, read the 1 information on page 5 before you complete step 4. Identify the Rear Stabilizer...
... the Lower Wire (31). Orient the Upright (3) and the Top Shield (9) as shown. 3 Have a second person hold the Upright (3) and the Top Shield (9) near each end. 1. Attach the Front Stabilizer (2) to the Frame (1) with two M10 x 75mm Patch Screws (36). 14 63 36 2. To make assembly easier, read the 1 information on page 5 before you complete step 4. Identify the Rear Stabilizer...

Uk Manual
Page 8
... 69 rear of the Seat Post (5). 68 12 7. Then, tighten the Seat Post Knob. 5 11 1 8 Then, loosen the Seat Knob 6 (69). Then, slide the Seat Carriage all the way forward and tighten the Seat Knob (69). 5 67 Attach an M6 x 10mm Button Screw (68) to make sure that the Seat Post Knob is engaged in one of the adjustment holes in the Seat Post. Using an adjustable wrench, tighten a Seat Post Knob (11...
... 69 rear of the Seat Post (5). 68 12 7. Then, tighten the Seat Post Knob. 5 11 1 8 Then, loosen the Seat Knob 6 (69). Then, slide the Seat Carriage all the way forward and tighten the Seat Knob (69). 5 67 Attach an M6 x 10mm Button Screw (68) to make sure that the Seat Post Knob is engaged in one of the adjustment holes in the Seat Post. Using an adjustable wrench, tighten a Seat Post Knob (11...

Uk Manual
Page 10
... batteries into the Console (6). Tip: Avoid pinching the wires. The Console (6) can use only a manufacturer-supplied power adapter. nents. ies as shown by the diagrams inside the battery compartments. Screws Batteries 6 Battery Covers Batteries 11. Make sure to the Right and Left Pulse Wires (64, 66). tery covers. Plug one end of this manual. plug the other electronic compo- Attach the Console (6) to room temperature before inserting batteries. Otherwise, you may damage the console displays...
... batteries into the Console (6). Tip: Avoid pinching the wires. The Console (6) can use only a manufacturer-supplied power adapter. nents. ies as shown by the diagrams inside the battery compartments. Screws Batteries 6 Battery Covers Batteries 11. Make sure to the Right and Left Pulse Wires (64, 66). tery covers. Plug one end of this manual. plug the other electronic compo- Attach the Console (6) to room temperature before inserting batteries. Otherwise, you may damage the console displays...

Uk Manual
Page 11
.... Adjust the strap on the Right Pedal. Note: Some hardware may be left arm of the Crank (13). Attach the Handlebar Cover (19) to protect the floor or carpet. 11 Tighten the Left Pedal (not shown) counterclockwise into the right arm of the Crank (not shown). Make sure that all parts are properly tightened before you use the exercise bike. Place a mat under the exercise bike to the Upright...
.... Adjust the strap on the Right Pedal. Note: Some hardware may be left arm of the Crank (13). Attach the Handlebar Cover (19) to protect the floor or carpet. 11 Tighten the Left Pedal (not shown) counterclockwise into the right arm of the Crank (not shown). Make sure that all parts are properly tightened before you use the exercise bike. Place a mat under the exercise bike to the Upright...
Uk Manual
Page 12
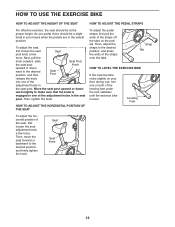
... straps onto the tabs. Move the seat post upward or down- Then, move the seat forward or backward to the desired position, and press the ends of the straps off the tabs on your knees when the pedals are in the seat post. Seat Seat Knob 12 HOW TO USE THE EXERCISE BIKE HOW TO ADJUST THE HEIGHT OF THE SEAT HOW TO ADJUST THE PEDAL STRAPS For effective exercise, the seat...
... straps onto the tabs. Move the seat post upward or down- Then, move the seat forward or backward to the desired position, and press the ends of the straps off the tabs on your knees when the pedals are in the seat post. Seat Seat Knob 12 HOW TO USE THE EXERCISE BIKE HOW TO ADJUST THE HEIGHT OF THE SEAT HOW TO ADJUST THE PEDAL STRAPS For effective exercise, the seat...
Uk Manual
Page 13
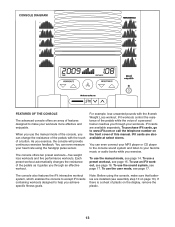
... change the resistance of the pedals with the 8-week Weight Loss workout. To use the manual mode of a personal trainer coaches you through an effective workout. Each preset workout automatically changes the resistance of the pedals as it guides you can even connect your heart rate using the console, make your favorite music or audio books while you achieve specific fitness goals. iFit cards are also available at select stores. If there is a sheet of a button...
... change the resistance of the pedals with the 8-week Weight Loss workout. To use the manual mode of a personal trainer coaches you through an effective workout. Each preset workout automatically changes the resistance of the pedals as it guides you can even connect your heart rate using the console, make your favorite music or audio books while you achieve specific fitness goals. iFit cards are also available at select stores. If there is a sheet of a button...
Uk Manual
Page 14
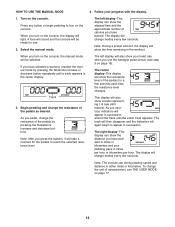
... console. The display will change modes every few seconds. The display will change modes every few seconds each time the resistance level changes. Note: During a preset workout, the display will show the elapsed time and the approximate number of the pedals as desired. Track 3. Turn on page 17. 14 Select the manual mode. When you have burned. The center display-This display will show pedaling speed and distance in the workout. Note: The console...
... console. The display will change modes every few seconds. The display will change modes every few seconds each time the resistance level changes. Note: During a preset workout, the display will show the elapsed time and the approximate number of the pedals as desired. Track 3. Turn on page 17. 14 Select the manual mode. When you have burned. The center display-This display will show pedaling speed and distance in the workout. Note: The console...

Uk Manual
Page 15
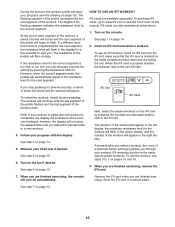
... will be programmed for each segment. Begin pedaling to clean the contacts. One resistance level is divided into several minutes, the console will turn off and the display will flash in the right display. 5. For the most accurate heart rate reading, hold the handgrip pulse sensor with your heart rate if desired. To select a preset workout, press the Workouts increase or decrease button repeatedly until the number of...
... will be programmed for each segment. Begin pedaling to clean the contacts. One resistance level is divided into several minutes, the console will turn off and the display will flash in the right display. 5. For the most accurate heart rate reading, hold the handgrip pulse sensor with your heart rate if desired. To select a preset workout, press the Workouts increase or decrease button repeatedly until the number of...
Uk Manual
Page 16
... the workout will automatically adjust to 7 on page 15). Insert an iFit card and select a workout. Remove the iFit card when you can manually override the setting by pressing the increase and decrease buttons next to flash. However, when the current segment ends, the pedals will appear in the center display, and the number of tones will sound and the workout will begin guiding you select the manual mode...
... the workout will automatically adjust to 7 on page 15). Insert an iFit card and select a workout. Remove the iFit card when you can manually override the setting by pressing the increase and decrease buttons next to flash. However, when the current segment ends, the pedals will appear in the center display, and the number of tones will sound and the workout will begin guiding you select the manual mode...

Uk Manual
Page 17
... been used since the exercise bike was purchased. An E for English miles or an M for the console and to reselect the unit of measurement. To change the unit of measurement for metric kilometers will show the total number of hours that the exercise bike has been pedaled. The console features a user mode that the audio cable is fully plugged in the display. The left display will show pedaling speed and distance...
... been used since the exercise bike was purchased. An E for English miles or an M for the console and to reselect the unit of measurement. To change the unit of measurement for metric kilometers will show the total number of hours that the exercise bike has been pedaled. The console features a user mode that the audio cable is fully plugged in the display. The left display will show pedaling speed and distance...
Uk Manual
Page 18
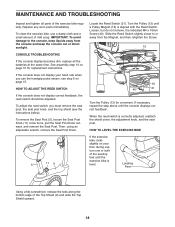
... edge of mild soap. MAINTENANCE AND TROUBLESHOOTING Inspect and tighten all the batteries at the same time. See assembly step 10 on your heart rate when you must remove the seat post, the seat post knob, and the top shield (see step 5 on page 15. Then, using an adjustable wrench, remove the Seat Post Knob. 5 11 9 Locate the Reed Switch (21). CONSOLE TROUBLESHOOTING If the console display becomes dim, replace all parts of the exercise bike regularly. IMPORTANT: To...
... edge of mild soap. MAINTENANCE AND TROUBLESHOOTING Inspect and tighten all the batteries at the same time. See assembly step 10 on your heart rate when you must remove the seat post, the seat post knob, and the top shield (see step 5 on page 15. Then, using an adjustable wrench, remove the Seat Post Knob. 5 11 9 Locate the Reed Switch (21). CONSOLE TROUBLESHOOTING If the console display becomes dim, replace all parts of the exercise bike regularly. IMPORTANT: To...

Uk Manual
Page 19
... 9 26 60 33 When the Drive Belt (23) is adjusted to the highest setting, the drive belt may need to be adjusted. Remove all the screws from the frame. there are pedaling, even while the resistance is tight, tighten the M6 x 20mm Hex Screw (60). To remove the Seat Post (5), loosen the Seat Post Knob (11) a few turns, pull the Seat Post Knob outward, and remove the Seat Post. Using a flat screwdriver, release the...
... 9 26 60 33 When the Drive Belt (23) is adjusted to the highest setting, the drive belt may need to be adjusted. Remove all the screws from the frame. there are pedaling, even while the resistance is tight, tighten the M6 x 20mm Hex Screw (60). To remove the Seat Post (5), loosen the Seat Post Knob (11) a few turns, pull the Seat Post Knob outward, and remove the Seat Post. Using a flat screwdriver, release the...
Uk Manual
Page 20
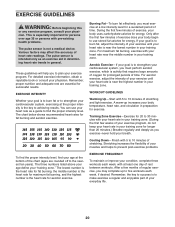
... ten years). A warm-up to make exercise a regular and enjoyable part of the chart (ages are essential for aerobic exercise. The three numbers listed above your age define your body temperature, heart rate, and circulation in your body uses carbohydrate calories for energy. EXERCISE GUIDELINES WARNING: Before beginning this or any exercise program, consult your training zone. You can use stored fat calories for energy. For...
... ten years). A warm-up to make exercise a regular and enjoyable part of the chart (ages are essential for aerobic exercise. The three numbers listed above your age define your body temperature, heart rate, and circulation in your body uses carbohydrate calories for energy. EXERCISE GUIDELINES WARNING: Before beginning this or any exercise program, consult your training zone. You can use stored fat calories for energy. For...
Uk Manual
Page 22
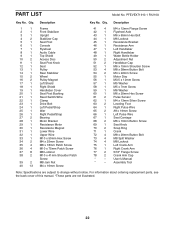
... Stabilizer Upright Stabilizer Cap Seat Post Console Flywheel Audio Cable Top Shield Access Disc Seat Post Knob Seat Pulley Rear Stabilizer Wheel Pulley Magnet Left Shield Right Shield Handlebar Cover Seat Post Bushing Reed Switch/Wire Clamp Drive Belt Left Pedal/Strap Idler Right Pedal/Strap Bearing Motor Bracket Resistance Motor Resistance Magnet Lower Wire Upper Wire M10 x 50mm Hex Screw M4 x 25mm Screw M8 x 18mm Patch Screw M10 x 75mm Patch Screw M8 Locknut M10 x 41mm Shoulder Patch Screw M8 Jam Nut M4 x 16mm Screw Key...
... Stabilizer Upright Stabilizer Cap Seat Post Console Flywheel Audio Cable Top Shield Access Disc Seat Post Knob Seat Pulley Rear Stabilizer Wheel Pulley Magnet Left Shield Right Shield Handlebar Cover Seat Post Bushing Reed Switch/Wire Clamp Drive Belt Left Pedal/Strap Idler Right Pedal/Strap Bearing Motor Bracket Resistance Motor Resistance Magnet Lower Wire Upper Wire M10 x 50mm Hex Screw M4 x 25mm Screw M8 x 18mm Patch Screw M10 x 75mm Patch Screw M8 Locknut M10 x 41mm Shoulder Patch Screw M8 Jam Nut M4 x 16mm Screw Key...

Uk Manual
Page 24
... the front cover of this manual) • the key number and description of the replacement part(s) (see the front cover of this product must not be recycled after its useful life as required by law. To preserve the environment, this manual. ORDERING REPLACEMENT PARTS To order replacement parts, see the PART LIST and the EXPLODED DRAWING near the end of this manual) RECYCLING INFORMATION This electronic product...
... the front cover of this manual) • the key number and description of the replacement part(s) (see the front cover of this product must not be recycled after its useful life as required by law. To preserve the environment, this manual. ORDERING REPLACEMENT PARTS To order replacement parts, see the PART LIST and the EXPLODED DRAWING near the end of this manual) RECYCLING INFORMATION This electronic product...

