
User Manual
Page 2
... children. • Watch for wheel weights or counterweights to be seriously ways. involved in good condition. SERVICE operate the riding mower safely enough to protect them- • Use extra care in place. • Slow down the slope. • Only ...before - I. disengage the blades and proceed slowly straight down before removing grass catcher or unclogging • Keep children out of riding mower-related injuries. a trailer or truck. • Use extra care when approaching blind corners, shrubs, • Dataindicatesthatoperators,age60yearsandabove,are familiar...
... children. • Watch for wheel weights or counterweights to be seriously ways. involved in good condition. SERVICE operate the riding mower safely enough to protect them- • Use extra care in place. • Slow down the slope. • Only ...before - I. disengage the blades and proceed slowly straight down before removing grass catcher or unclogging • Keep children out of riding mower-related injuries. a trailer or truck. • Use extra care when approaching blind corners, shrubs, • Dataindicatesthatoperators,age60yearsandabove,are familiar...
User Manual
Page 3
... 4, 15-18 TROUBLESHOOTING 25-26 ASSEMBLY 6-8 REPAIR PARTS 28-43 OPERATION 9-14 WARRANTY 46 MAINTENANCE SCHEDULE 15 3 SAFETY RULES Safe Operation Practices for Ride-On Mowers • Be sure the area is dangerous. Uneven terrain could overturn the machine. If tires lose traction, disengage the blades and proceed slowly straight down...
... 4, 15-18 TROUBLESHOOTING 25-26 ASSEMBLY 6-8 REPAIR PARTS 28-43 OPERATION 9-14 WARRANTY 46 MAINTENANCE SCHEDULE 15 3 SAFETY RULES Safe Operation Practices for Ride-On Mowers • Be sure the area is dangerous. Uneven terrain could overturn the machine. If tires lose traction, disengage the blades and proceed slowly straight down...
User Manual
Page 8
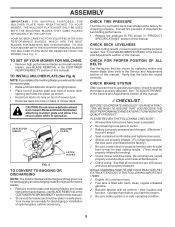
.... See that all connections are still secure and wires are routed properly around pulleys and inside all controls - TO SET UP YOUR MOWER FOR MULCHING • Remove high performance blades and install mulcher blades, (see BLADE REMOVAL in the CUSTOMER RESPONSABILITY section of this manual...TO CONVERT TO BAGGING OR DISCHARGING NOTE: The mulcher blades will need to operate your tractor were overinflated at the factory). ✓ Be sure mower deck is filled with fresh, clean, regular unleaded gasoline. ✓ Become familiar with all belt keepers. ✓ Check wiring. Verify that ...
.... See that all connections are still secure and wires are routed properly around pulleys and inside all controls - TO SET UP YOUR MOWER FOR MULCHING • Remove high performance blades and install mulcher blades, (see BLADE REMOVAL in the CUSTOMER RESPONSABILITY section of this manual...TO CONVERT TO BAGGING OR DISCHARGING NOTE: The mulcher blades will need to operate your tractor were overinflated at the factory). ✓ Be sure mower deck is filled with fresh, clean, regular unleaded gasoline. ✓ Become familiar with all belt keepers. ✓ Check wiring. Verify that ...

User Manual
Page 9
.... BATTERY CAUTION OR WARNING REVERSE FORWARD FAST SLOW ENGINE ON ENGINE OFF OIL PRESSURE CLUTCH LIGHTS ON OVER TEMP LIGHT FUEL CHOKE MOWER HEIGHT DIFFERENTIAL PARKING BRAKE LOCK LOCKED UNLOCKED MOWER LIFT REVERSE NEUTRAL HIGH LOW P PARKING BRAKE 15 15 15 ATTACHMENT ATTACHMENT CLUTCH ENGAGED CLUTCH DISENGAGED KEEP AREA CLEAR SLOPE HAZARDS...
.... BATTERY CAUTION OR WARNING REVERSE FORWARD FAST SLOW ENGINE ON ENGINE OFF OIL PRESSURE CLUTCH LIGHTS ON OVER TEMP LIGHT FUEL CHOKE MOWER HEIGHT DIFFERENTIAL PARKING BRAKE LOCK LOCKED UNLOCKED MOWER LIFT REVERSE NEUTRAL HIGH LOW P PARKING BRAKE 15 15 15 ATTACHMENT ATTACHMENT CLUTCH ENGAGED CLUTCH DISENGAGED KEEP AREA CLEAR SLOPE HAZARDS...

User Manual
Page 10
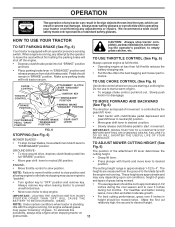
...into the brake position. IGNITION SWITCH: Used for starting and stopping the engine. Used to raise, lower, and adjust the mower deck or other attachments mounted to your tractor to familiarize yourself with the locations of the American National Standards Institute. ATTACHMENT CLUTCH... LEVER: Used to engage the mower blades, or other attachments mounted to your tractor. AMMETER CHOKE CONTROL CLUTCH/BRAKE PEDAL ATTACHMENT CLUTCH LEVER IGNITION SWITCH LIGHT ...
...into the brake position. IGNITION SWITCH: Used for starting and stopping the engine. Used to raise, lower, and adjust the mower deck or other attachments mounted to your tractor to familiarize yourself with the locations of the American National Standards Institute. ATTACHMENT CLUTCH... LEVER: Used to engage the mower blades, or other attachments mounted to your tractor. AMMETER CHOKE CONTROL CLUTCH/BRAKE PEDAL ATTACHMENT CLUTCH LEVER IGNITION SWITCH LIGHT ...
User Manual
Page 11
... choke to stop engine. CLUTCH/BRAKE PEDAL "DRIVE" POSITION PARKING BRAKE "DISENGAGED" POSITION GEAR SHIFT LEVER FIG. 6 STOPPING (See Fig. 6) MOWER BLADES - • To stop tractor completely, as described above, before stopping may cause engine to "backfire". • Turn ignition key to start.... • Operating engine at less than full throttle reduces the battery charging rate. • Full throttle offers the best bagging and mower perfor- TO USE CHOKE CONTROL (See Fig. 6) CHOKE CONTROL THROTTLE CONTROL "BRAKE" POSITION ATTACHMENT CLUTCH LEVER "ENGAGED" POSITION IGNITION KEY...
... choke to stop engine. CLUTCH/BRAKE PEDAL "DRIVE" POSITION PARKING BRAKE "DISENGAGED" POSITION GEAR SHIFT LEVER FIG. 6 STOPPING (See Fig. 6) MOWER BLADES - • To stop tractor completely, as described above, before stopping may cause engine to "backfire". • Turn ignition key to start.... • Operating engine at less than full throttle reduces the battery charging rate. • Full throttle offers the best bagging and mower perfor- TO USE CHOKE CONTROL (See Fig. 6) CHOKE CONTROL THROTTLE CONTROL "BRAKE" POSITION ATTACHMENT CLUTCH LEVER "ENGAGED" POSITION IGNITION KEY...
User Manual
Page 12
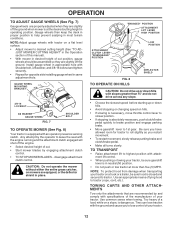
...hood from damage when transporting your tractor. Install gauge wheel in appropriate hole with specifications of the manufacturer of cut . • Start mower blades by and comply with shoulder bolt, 3/8 washer, and 3/8-16 locknut and tighten securely. • Repeat for tractor to 1st ...GAUGE WHEELS (See Fig. 7) Gauge wheels are properly adjusted when they are recommended by engaging attachment clutch control. • TO STOP MOWER BLADES - NOTE:Adjust gauge wheels with tractor on a slope, is absolutely necessary, push clutch/brake pedal quickly to brake position and engage...
...hood from damage when transporting your tractor. Install gauge wheel in appropriate hole with specifications of the manufacturer of cut . • Start mower blades by and comply with shoulder bolt, 3/8 washer, and 3/8-16 locknut and tighten securely. • Repeat for tractor to 1st ...GAUGE WHEELS (See Fig. 7) Gauge wheels are properly adjusted when they are recommended by engaging attachment clutch control. • TO STOP MOWER BLADES - NOTE:Adjust gauge wheels with tractor on a slope, is absolutely necessary, push clutch/brake pedal quickly to brake position and engage...
User Manual
Page 14
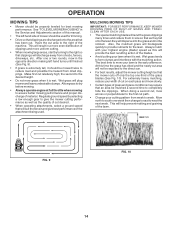
...engine (blade) speed as the quality of cut desired. • When operating attachments, select a ground speed that will suit the terrain and give the mower cutting performance as well as this manual. • The left hand turns until finished (See Fig. 9). • If grass is wet. the ...away from shrubs, fences, driveways, etc. After one week then change to east to provide nutrients for best mowing performance. This will plug mower and leave undesirable clumps. CLEAN AFTER EACH USE. • The special mulching blade will recut the grass clippings many times and reduce them ...
...engine (blade) speed as the quality of cut desired. • When operating attachments, select a ground speed that will suit the terrain and give the mower cutting performance as well as this manual. • The left hand turns until finished (See Fig. 9). • If grass is wet. the ...away from shrubs, fences, driveways, etc. After one week then change to east to provide nutrients for best mowing performance. This will plug mower and leave undesirable clumps. CLEAN AFTER EACH USE. • The special mulching blade will recut the grass clippings many times and reduce them ...
User Manual
Page 15
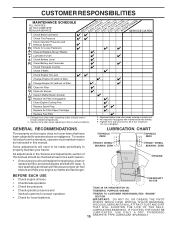
... IN DATES AS YOU COMPLETE REGULAR SERVICE Check Brake Operation Check Tire Pressure Check Operator Presence and T Interlock Systems R Check for Loose Fasteners A Sharpen/Replace Mower Blades C T Lubrication Chart 0 Check Battery Level R Clean Battery and Terminals Check Transaxle Cooling Check V-Belts BEFOREEEVAECRHYU8ESVHEEORUYRS2E5VHEROYUR5E0SVEHROYUR1E0SV0EHROYUBSREESFAOSROEN STORAGE SERVICE DATES 5 3 4 Check Engine Oil Level Change Engine...
... IN DATES AS YOU COMPLETE REGULAR SERVICE Check Brake Operation Check Tire Pressure Check Operator Presence and T Interlock Systems R Check for Loose Fasteners A Sharpen/Replace Mower Blades C T Lubrication Chart 0 Check Battery Level R Clean Battery and Terminals Check Transaxle Cooling Check V-Belts BEFOREEEVAECRHYU8ESVHEEORUYRS2E5VHEROYUR5E0SVEHROYUR1E0SV0EHROYUBSREESFAOSROEN STORAGE SERVICE DATES 5 3 4 Check Engine Oil Level Change Engine...
User Manual
Page 16
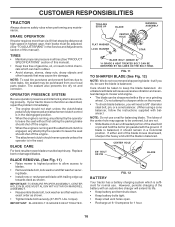
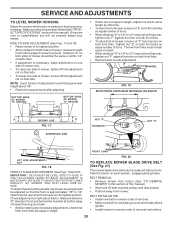
..., oil, or insect control chemicals which is sufficient for normal use a nail for 1 hour. 16 BLADE REMOVAL (See Fig. 11) • Raise mower to highest position to allow access to blades. • Remove blade bolt, lock washer and flat washer securing blade. • Install new or resharpened blade...purchased from your tractor does not function as shown. • Tighten blade bolt securely (27-35 Ft. Do not attempt to sharpen while on the mower. • To check blade balance, you do not recommend sharpening blade - However, periodic charging of the battery with a file or on to ...
..., oil, or insect control chemicals which is sufficient for normal use a nail for 1 hour. 16 BLADE REMOVAL (See Fig. 11) • Raise mower to highest position to allow access to blades. • Remove blade bolt, lock washer and flat washer securing blade. • Install new or resharpened blade...purchased from your tractor does not function as shown. • Tighten blade bolt securely (27-35 Ft. Do not attempt to sharpen while on the mower. • To check blade balance, you do not recommend sharpening blade - However, periodic charging of the battery with a file or on to ...
User Manual
Page 19
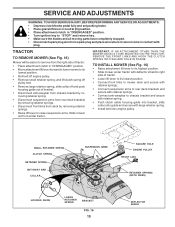
...bracket, slide collar onto guide and secure with large retainer spring. • Install belt onto engine pulley. TRACTOR TO REMOVE MOWER (See Fig. 16) Mower will be easier to remove from the right side of bracket. • Disconnect anti-swaybar from chassis bracket by removing ...retainer springs. • Raise lift lever to raise suspension arms. Slide mower out from under tractor. SERVICE AND ADJUSTMENTS WARNING: TO AVOID SERIOUS INJURY, BEFORE PERFORMING ANY SERVICE OR ADJUSTMENTS: • Depress clutch/brake...
...bracket, slide collar onto guide and secure with large retainer spring. • Install belt onto engine pulley. TRACTOR TO REMOVE MOWER (See Fig. 16) Mower will be easier to remove from the right side of bracket. • Disconnect anti-swaybar from chassis bracket by removing ...retainer springs. • Raise lift lever to raise suspension arms. Slide mower out from under tractor. SERVICE AND ADJUSTMENTS WARNING: TO AVOID SERIOUS INJURY, BEFORE PERFORMING ANY SERVICE OR ADJUSTMENTS: • Depress clutch/brake...
User Manual
Page 20
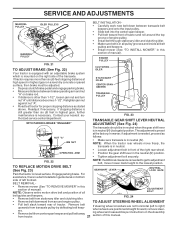
...links. • Recheck side-to-side adjustment. If tires are properly inflated (See "PRODUCT SPECIFICATIONS" section of adjustment nut will not properly adjust your mower. The two front links must remain equal in length. • When distance "D" is 1/8" to 1/2" lower than rear, tighten nuts "F" against ...trunnion on level ground or driveway. Check adjustment on that side. Engage parking brake. BELT REMOVAL • Remove mower from mower. IF THE FOLLOWING FRONT-TO-BACK ADJUSTMENT IS NECESSARY, BE SURE TO ADJUST BOTH FRONT LINKS EQUALLY SO...
...links. • Recheck side-to-side adjustment. If tires are properly inflated (See "PRODUCT SPECIFICATIONS" section of adjustment nut will not properly adjust your mower. The two front links must remain equal in length. • When distance "D" is 1/8" to 1/2" lower than rear, tighten nuts "F" against ...trunnion on level ground or driveway. Check adjustment on that side. Engage parking brake. BELT REMOVAL • Remove mower from mower. IF THE FOLLOWING FRONT-TO-BACK ADJUSTMENT IS NECESSARY, BE SURE TO ADJUST BOTH FRONT LINKS EQUALLY SO...
User Manual
Page 21
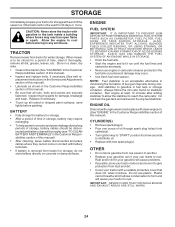
... are positioned straight forward, remove steering wheel and reassemble per instructions in neutral (N). BELT REMOVAL - • Remove mower (See "TO REMOVE MOWER" in front of the right rear wheel. OPERATING ARM • Position the gear shift lever in this section of...horizontal (left footrest. NOTE: Observe entire motion drive belt and position of all belt guides and keepers. • Install mower (See "TO INSTALL MOWER" in the neutral (N) position. • Tighten adjustment bolt securely. SERVICE AND ADJUSTMENTS MANDREL PULLEY IDLER PULLEYS MANDREL PULLEY ...
... are positioned straight forward, remove steering wheel and reassemble per instructions in neutral (N). BELT REMOVAL - • Remove mower (See "TO REMOVE MOWER" in front of the right rear wheel. OPERATING ARM • Position the gear shift lever in this section of...horizontal (left footrest. NOTE: Observe entire motion drive belt and position of all belt guides and keepers. • Install mower (See "TO INSTALL MOWER" in the neutral (N) position. • Tighten adjustment bolt securely. SERVICE AND ADJUSTMENTS MANDREL PULLEY IDLER PULLEYS MANDREL PULLEY ...
User Manual
Page 24
... at least 10 minutes after adding stabilizer to allow the stabilizer to gasoline in the Customer Responsibilities section of this manual). TRACTOR Remove mower from one ounce of the season or if the tractor will not be used for a period of this manual). • Inspect and... for damage, breakage and wear. CAUTION: Never store the tractor with a suitable protective cover that all rusted or chipped paint surfaces; When mower is to give protection from tractor for storage. • After a period of time in the Customer Responsibilities section of time, clean it thoroughly...
... at least 10 minutes after adding stabilizer to allow the stabilizer to gasoline in the Customer Responsibilities section of this manual). TRACTOR Remove mower from one ounce of the season or if the tractor will not be used for a period of this manual). • Inspect and... for damage, breakage and wear. CAUTION: Never store the tractor with a suitable protective cover that all rusted or chipped paint surfaces; When mower is to give protection from tractor for storage. • After a period of time in the Customer Responsibilities section of time, clean it thoroughly...

User Manual
Page 25
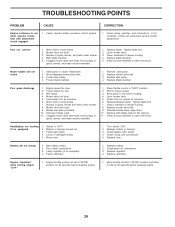
Bad spark plug. 5. Engine valves out of mower housing. 4. Clean/replace air filter. 6. Check all wiring. 7. See "To Adjust Carburetor" in fuel. 10. Check all wiring. 9. Contact an authorized service center/...in "CHOKE" position. 3. Dirty air filter. 5. Dirty/clogged muffler. 13. Drain fuel tank and refill with fresh gasoline. 6. Out of grass, leaves and trash under mower. 4. Engine flooded. 4. Corroded battery terminals. 3. Loose or damaged wiring. 14. Set in Service Adjustments section. 15. Wait several minutes before attempting to start 1. Dirty...
Bad spark plug. 5. Engine valves out of mower housing. 4. Clean/replace air filter. 6. Check all wiring. 7. See "To Adjust Carburetor" in fuel. 10. Check all wiring. 9. Contact an authorized service center/...in "CHOKE" position. 3. Dirty air filter. 5. Dirty/clogged muffler. 13. Drain fuel tank and refill with fresh gasoline. 6. Out of grass, leaves and trash under mower. 4. Engine flooded. 4. Corroded battery terminals. 3. Loose or damaged wiring. 14. Set in Service Adjustments section. 15. Wait several minutes before attempting to start 1. Dirty...
User Manual
Page 26
...Tighten blade bolt. 2. Buildup of grass, leaves, and trash around mandrels to open vent holes. Clogged mower deck vent holes from buildup of grass, leaves and trash under mower. 4. Reinstall blades sharp edge down. 10. Headlight(s) not working (if so equipped) 1. Faulty light...CORRECTION Engine continues to run when operator leaves seat with blades listed in this manual. 11. Clogged mower deck vent holes from buildup of grass, leaves, and trash under mower. 8. Mower deck not level. 5. Replace/sharpen blade. Replace regulator. 4. Replace blade. Replace blade mandrel. ...
...Tighten blade bolt. 2. Buildup of grass, leaves, and trash around mandrels to open vent holes. Clogged mower deck vent holes from buildup of grass, leaves and trash under mower. 4. Reinstall blades sharp edge down. 10. Headlight(s) not working (if so equipped) 1. Faulty light...CORRECTION Engine continues to run when operator leaves seat with blades listed in this manual. 11. Clogged mower deck vent holes from buildup of grass, leaves, and trash under mower. 8. Mower deck not level. 5. Replace/sharpen blade. Replace regulator. 4. Replace blade. Replace blade mandrel. ...
User Manual
Page 31
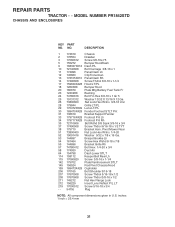
... Sqnk 3/8-16 x 3/4 37 17490508 Screw Thdrol 6/16-18 x 1/2 TYT 38 175710 Bracket Asm. REPAIR PARTS TRACTOR - - MODEL NUMBER PR1842STD CHASSIS AND ENCLOSURES KEY PART NO. inches 1 inch = 25.4 mm 31 NO. Pivot Mower Rear 51 73800400 Nut Lock Hex W/Ins 1/4-20 52 19091416 Washer 9/32 x 7/8 x 16 Ga. 53 144697 Bracjet Grukke Lh...
... Sqnk 3/8-16 x 3/4 37 17490508 Screw Thdrol 6/16-18 x 1/2 TYT 38 175710 Bracket Asm. REPAIR PARTS TRACTOR - - MODEL NUMBER PR1842STD CHASSIS AND ENCLOSURES KEY PART NO. inches 1 inch = 25.4 mm 31 NO. Pivot Mower Rear 51 73800400 Nut Lock Hex W/Ins 1/4-20 52 19091416 Washer 9/32 x 7/8 x 16 Ga. 53 144697 Bracjet Grukke Lh...
User Manual
Page 33
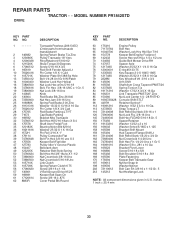
... 65 10040700 Washer Lock Hvy Hlcl Spr 7/16 66 154778 Keeper Belt Engine Foolproof 69 142432 Screw Hex wsh HiLo 1/4 x 1/2 unc 70 134683 Guide Belt Mower Drive RH 74 137057 Spacer Axle 75 121749X Washer 25/32 X 1 1/4 X 16 Ga 76 12000001 E-ring #5133-75 77 123583X Key Square 2 0 X 1845/ 1865 78... Nyliner 202 72110612 Bolt Carr Sh 3/8-16 x 1-1/2 Gr. 5 212 145212 Nut Hexflange Lock NOTE: All component dimensions given in U.S. NO. REPAIR PARTS TRACTOR - - MODEL NUMBER PR1842STD DRIVE KEY PART NO.
... 65 10040700 Washer Lock Hvy Hlcl Spr 7/16 66 154778 Keeper Belt Engine Foolproof 69 142432 Screw Hex wsh HiLo 1/4 x 1/2 unc 70 134683 Guide Belt Mower Drive RH 74 137057 Spacer Axle 75 121749X Washer 25/32 X 1 1/4 X 16 Ga 76 12000001 E-ring #5133-75 77 123583X Key Square 2 0 X 1845/ 1865 78... Nyliner 202 72110612 Bolt Carr Sh 3/8-16 x 1-1/2 Gr. 5 212 145212 Nut Hexflange Lock NOTE: All component dimensions given in U.S. NO. REPAIR PARTS TRACTOR - - MODEL NUMBER PR1842STD DRIVE KEY PART NO.

User Manual
Page 41
...3/8-24 x 25 Grade 8 patched 9 10030600 Washer, Lock 10 140296 Washer, Hardened 11 134149 Blade, Mulching 42" 138498 Blade Mower 42" Hi-Lift 13 137645 Shaft Assembly, Mandrel, Vented 14 128774 Housing, Mandrel, Vented 15 110485X Bearing, Ball, Mandrel 16... Mandrel Assembly (Includes Housing, Shaft and Shaft Hardware Only-Pulley Not Included) - - 172559 Replacement Mower, Complete NOTE: All component dimensions given in U.S. DESCRIPTION 1 165892X421 Mower Deck Assembly, 42" 2 72140506 Bolt 3 138017 Bracket Asm Fr. MODEL NUMBER PR1842STD MOWER DECK KEY PART NO.
...3/8-24 x 25 Grade 8 patched 9 10030600 Washer, Lock 10 140296 Washer, Hardened 11 134149 Blade, Mulching 42" 138498 Blade Mower 42" Hi-Lift 13 137645 Shaft Assembly, Mandrel, Vented 14 128774 Housing, Mandrel, Vented 15 110485X Bearing, Ball, Mandrel 16... Mandrel Assembly (Includes Housing, Shaft and Shaft Hardware Only-Pulley Not Included) - - 172559 Replacement Mower, Complete NOTE: All component dimensions given in U.S. DESCRIPTION 1 165892X421 Mower Deck Assembly, 42" 2 72140506 Bolt 3 138017 Bracket Asm Fr. MODEL NUMBER PR1842STD MOWER DECK KEY PART NO.

User Manual
Page 43
Indicator Height STLT NOTE: All component dimensions given in U.S. Screw Thdrol 5/16-18 x 1 Washer 11/32 x 1-1/2 10 Ga. inches 1 inch = 25.4 mm 43 MODEL NUMBER PR1842STD MOWER LIFT KEY NO. 1 2 3 4 5 6 7 8 11 12 13 15 16 17 18 19 20 31 32 36 37 38 40 41 PART NO. 159460 159471 105767X 12000002 ...
Indicator Height STLT NOTE: All component dimensions given in U.S. Screw Thdrol 5/16-18 x 1 Washer 11/32 x 1-1/2 10 Ga. inches 1 inch = 25.4 mm 43 MODEL NUMBER PR1842STD MOWER LIFT KEY NO. 1 2 3 4 5 6 7 8 11 12 13 15 16 17 18 19 20 31 32 36 37 38 40 41 PART NO. 159460 159471 105767X 12000002 ...


