

User Manual
Page 1
Always Wear Eye Protection During Operation 183748 5.2.02 TR Printed in serious injury. Failure to do so can result in U.S.A. IMPORTANT MANUAL Do Not Throw Away 02478 OWNER'S MANUAL MODEL: PR1842STD LAWN TRACTOR WARNING: Read the Owner's Manual and follow all Warnings and Safety Instructions.
Always Wear Eye Protection During Operation 183748 5.2.02 TR Printed in serious injury. Failure to do so can result in U.S.A. IMPORTANT MANUAL Do Not Throw Away 02478 OWNER'S MANUAL MODEL: PR1842STD LAWN TRACTOR WARNING: Read the Owner's Manual and follow all Warnings and Safety Instructions.
User Manual
Page 4
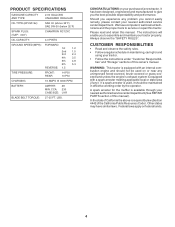
... maintain your nearest authorized service center/department (See REPAIR PARTS section of this owner's manual. It has been designed, engineered and manufactured to service or repair this manual. Always observe the "SAFETY RULES". ties" and "Storage" sections of this manual). In the state of California the above 32°F) SAE 5W-30 (below...
... maintain your nearest authorized service center/department (See REPAIR PARTS section of this owner's manual. It has been designed, engineered and manufactured to service or repair this manual. Always observe the "SAFETY RULES". ties" and "Storage" sections of this manual). In the state of California the above 32°F) SAE 5W-30 (below...
User Manual
Page 6
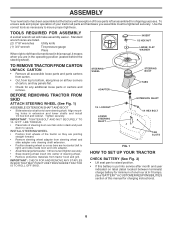
...AND NUT SECURELY TO 10-12 FT. Use the correct tools as necessary to raised position. • If this battery is mentioned in this manual for charging instructions). 6 Tighten securely. IMPORTANT: CHECK FOR AND REMOVE ANY STAPLES IN SKID THAT MAY PUNCTURE TIRES WHERE TRACTOR IS TO ROLL...parts or cartons and remove. Align mount- LBS TORQUE. • Place tabs of steering boot over tab slots in CUSTOMER RESPONSIBILITIES section of this manual, it means when you assemble must be tightened securely. ASSEMBLY Your new tractor has been assembled at 6-10 amps. (See "BATTERY" in ...
...AND NUT SECURELY TO 10-12 FT. Use the correct tools as necessary to raised position. • If this battery is mentioned in this manual for charging instructions). 6 Tighten securely. IMPORTANT: CHECK FOR AND REMOVE ANY STAPLES IN SKID THAT MAY PUNCTURE TIRES WHERE TRACTOR IS TO ROLL...parts or cartons and remove. Align mount- LBS TORQUE. • Place tabs of steering boot over tab slots in CUSTOMER RESPONSIBILITIES section of this manual, it means when you assemble must be tightened securely. ASSEMBLY Your new tractor has been assembled at 6-10 amps. (See "BATTERY" in ...
User Manual
Page 7
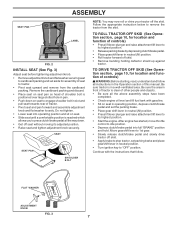
... has started, move throttle control to idle position. • Depress clutch/brake pedal into operating position and sit on seat pan so head of this manual. FLAT WASHER ADJUSTMENT KNOB FIG. 3 7 Remove the cardboard packing and discard. • Place seat on seat. • Slide seat until a comfortable position is clear of...
... has started, move throttle control to idle position. • Depress clutch/brake pedal into operating position and sit on seat pan so head of this manual. FLAT WASHER ADJUSTMENT KNOB FIG. 3 7 Remove the cardboard packing and discard. • Place seat on seat. • Slide seat until a comfortable position is clear of...
User Manual
Page 8
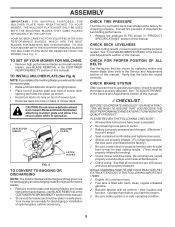
... • Remove mulcher plate and mulcher blades and install high performance blades, (see BLADE REMOVAL in the CUSTOMER RESPONSABILITY section of this manual). ASSEMBLY IMPORTANT: FOR SHIPPING PURPOSES, THE MULCHER PLATE WAS PREATTACHED TO YOUR MOWER. DEFLECTOR SHIELD MULCHER PLATE LATCH HOOKS FIG. 4 TO...results, mower housing should be properly inflated for shipping purposes. See "TO ADJUST BRAKE" in the Service and Adjustments section of this manual. CAUTION: Do not remove deflector shield from mower. CHECK BRAKE SYSTEM After you start the engine. ✓ Be sure brake ...
... • Remove mulcher plate and mulcher blades and install high performance blades, (see BLADE REMOVAL in the CUSTOMER RESPONSABILITY section of this manual). ASSEMBLY IMPORTANT: FOR SHIPPING PURPOSES, THE MULCHER PLATE WAS PREATTACHED TO YOUR MOWER. DEFLECTOR SHIELD MULCHER PLATE LATCH HOOKS FIG. 4 TO...results, mower housing should be properly inflated for shipping purposes. See "TO ADJUST BRAKE" in the Service and Adjustments section of this manual. CAUTION: Do not remove deflector shield from mower. CHECK BRAKE SYSTEM After you start the engine. ✓ Be sure brake ...

User Manual
Page 10
...engine. PARKING BRAKE LEVER: Locks Clutch/Brake Pedal into the brake position. OPERATION KNOW YOUR TRACTOR READ THIS OWNER'S MANUAL AND SAFETY RULES BEFORE OPERATING YOUR TRACTOR Compare the illustrations with your tractor. AMMETER CHOKE CONTROL CLUTCH/BRAKE PEDAL ATTACHMENT ... National Standards Institute. GEARSHIFT LEVER: Selects the speed and direction of various controls and adjustments. ATTACHMENT LIFT LEVER - Save this manual for starting the engine. THROTTLE CONTROL: Used for future reference. LIGHT SWITCH POSITION: Turns the headlights on and off. ATTACHMENT CLUTCH...
...engine. PARKING BRAKE LEVER: Locks Clutch/Brake Pedal into the brake position. OPERATION KNOW YOUR TRACTOR READ THIS OWNER'S MANUAL AND SAFETY RULES BEFORE OPERATING YOUR TRACTOR Compare the illustrations with your tractor. AMMETER CHOKE CONTROL CLUTCH/BRAKE PEDAL ATTACHMENT ... National Standards Institute. GEARSHIFT LEVER: Selects the speed and direction of various controls and adjustments. ATTACHMENT LIFT LEVER - Save this manual for starting the engine. THROTTLE CONTROL: Used for future reference. LIGHT SWITCH POSITION: Turns the headlights on and off. ATTACHMENT CLUTCH...
User Manual
Page 12
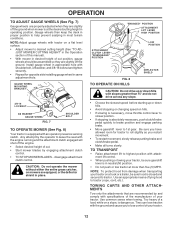
... equipped with tractor on a slope, is closed and secured to desired cutting height (See "TO ADJUST MOWER CUTTING HEIGHT" in the Operation section of this manual). • With mower in desired height of cut position, gauge wheels should be sure hood is dangerous. Tires can lose traction with the engine running...
... equipped with tractor on a slope, is closed and secured to desired cutting height (See "TO ADJUST MOWER CUTTING HEIGHT" in the Operation section of this manual). • With mower in desired height of cut position, gauge wheels should be sure hood is dangerous. Tires can lose traction with the engine running...
User Manual
Page 13
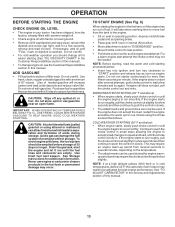
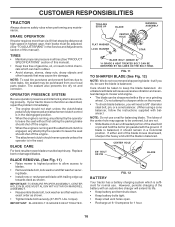
...require an engine warm-up for a few minutes and try again. See "TO ADJUST CARBURETOR" in the Service and Adjustments section of this manual. Do not store, spill or use engine or carburetor cleaner products in the fuel tank or permanent damage may not be needed. TO START...ENGINE (See Fig. 6) When starting (See "OIL VISCOSITY CHART" in the Customer Responsibilities section of this manual). • To change engine oil, see the Customer Responsibilities section in this manual. 13 OPERATION BEFORE STARTING THE ENGINE CHECK ENGINE OIL LEVEL • The engine in your tractor has been ...
...require an engine warm-up for a few minutes and try again. See "TO ADJUST CARBURETOR" in the Service and Adjustments section of this manual. Do not store, spill or use engine or carburetor cleaner products in the fuel tank or permanent damage may not be needed. TO START...ENGINE (See Fig. 6) When starting (See "OIL VISCOSITY CHART" in the Customer Responsibilities section of this manual). • To change engine oil, see the Customer Responsibilities section in this manual. 13 OPERATION BEFORE STARTING THE ENGINE CHECK ENGINE OIL LEVEL • The engine in your tractor has been ...
User Manual
Page 14
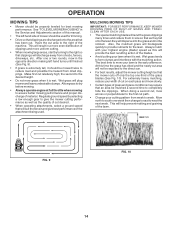
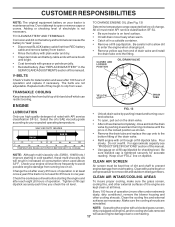
... of grass and grass conditions may require that as they fall onto the lawn they will result in the Service and Adjustments section of this manual. • The left hand turns until finished (See Fig. 9). • If grass is wet. Have the cut relatively high; Make first cut area to the...
... of grass and grass conditions may require that as they fall onto the lawn they will result in the Service and Adjustments section of this manual. • The left hand turns until finished (See Fig. 9). • If grass is wet. Have the cut relatively high; Make first cut area to the...
User Manual
Page 15
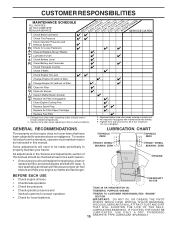
... ONLY A DRY, POWDERED 15 GRAPHITE TYPE LUBRICANT SPARINGLY. Replace blades more often when operating in the Service and Adjustments section of this manual should be made periodically to properly maintain your engine run better and last longer. To receive full value from the warranty, operator must ...dirty or dusty conditions. 1,2 1,2 2 2 1, 2 2 2 3 - Tighten front axle pivot bolt to operator abuse or negligence. maximum. GENERAL RECOMMENDATIONS The warranty on this manual. VISCOUS LUBRICANTS WILL ATTRACT DUST AND DIRT THAT WILL SHORTEN THE LIFE OF THE SELFLUBRICATING BEARINGS.
... ONLY A DRY, POWDERED 15 GRAPHITE TYPE LUBRICANT SPARINGLY. Replace blades more often when operating in the Service and Adjustments section of this manual should be made periodically to properly maintain your engine run better and last longer. To receive full value from the warranty, operator must ...dirty or dusty conditions. 1,2 1,2 2 2 1, 2 2 2 3 - Tighten front axle pivot bolt to operator abuse or negligence. maximum. GENERAL RECOMMENDATIONS The warranty on this manual. VISCOUS LUBRICANTS WILL ATTRACT DUST AND DIRT THAT WILL SHORTEN THE LIFE OF THE SELFLUBRICATING BEARINGS.
User Manual
Page 16
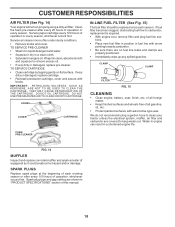
... the mower. • To check blade balance, you do not recommend sharpening blade - If your local parts dealer. Lbs. The lobes of this manual). If either end of gasoline, oil, or insect control chemicals which is in all tires (See "PRODUCT SPECIFICATIONS" section of the center hole may...engine should not start unless the clutch/brake pedal is fully depressed and attachement clutch control is in the Service and Adjustments section of this manual). • Keep tires free of the blade moves downward, sharpen the heavy end until the blade is balanced. BRAKE OPERATION If tractor ...
... the mower. • To check blade balance, you do not recommend sharpening blade - If your local parts dealer. Lbs. The lobes of this manual). If either end of gasoline, oil, or insect control chemicals which is in all tires (See "PRODUCT SPECIFICATIONS" section of the center hole may...engine should not start unless the clutch/brake pedal is fully depressed and attachement clutch control is in the Service and Adjustments section of this manual). • Keep tires free of the blade moves downward, sharpen the heavy end until the blade is balanced. BRAKE OPERATION If tractor ...
User Manual
Page 17
...classification SF-SJ. The belts are kept clean at all times. Tighten oil fill cap/ dipstick securely each eight (8) hours of this manual). For approximate capacity see "PRODUCT SPECIFICATIONS" section of operation. Adding or checking level of operation and replace if necessary. Make sure ...the cooling shrouds are reinstalled. TRANSAXLE COOLING Keep transaxle free from end of this manual. • Use gauge on oil. Keep oil at least once a year if the tractor is in the locked position as necessary....
...classification SF-SJ. The belts are kept clean at all times. Tighten oil fill cap/ dipstick securely each eight (8) hours of this manual). For approximate capacity see "PRODUCT SPECIFICATIONS" section of operation. Adding or checking level of operation and replace if necessary. Make sure ...the cooling shrouds are reinstalled. TRANSAXLE COOLING Keep transaxle free from end of this manual. • Use gauge on oil. Keep oil at least once a year if the tractor is in the locked position as necessary....
User Manual
Page 18
... all gasoline, oil, etc. • Protect painted surfaces with automotive type wax. of all foreign matter. • Keep finished surfaces and wheels free of this manual. 18 Service air cleaner more often under dusty conditions. • Remove knobs and cover. Wrap it could create a fire hazard and/or damage. DO NOT...
... all gasoline, oil, etc. • Protect painted surfaces with automotive type wax. of all foreign matter. • Keep finished surfaces and wheels free of this manual. 18 Service air cleaner more often under dusty conditions. • Remove knobs and cover. Wrap it could create a fire hazard and/or damage. DO NOT...
User Manual
Page 20
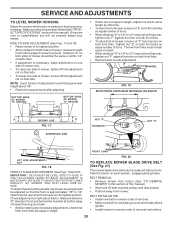
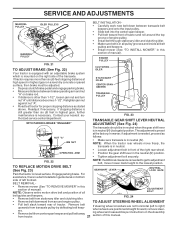
If tires are properly inflated (See "PRODUCT SPECIFICATIONS" section of this manual). • Work belt off both sides of mower, measure height from bottom edge of mower, loosen lift link adjustment nut on both front links. Distance "A" ... the best cutting results, the mower housing should be replaced without tools. Measure distance "D" directly in its highest position. • At the midpoint of this manual). FIG. 20 TO REPLACE MOWER BLADE DRIVE BELT (See Fig. 21) The mower blade drive belt may be the same or within 1/4" of each other...
If tires are properly inflated (See "PRODUCT SPECIFICATIONS" section of this manual). • Work belt off both sides of mower, measure height from bottom edge of mower, loosen lift link adjustment nut on both front links. Distance "A" ... the best cutting results, the mower housing should be replaced without tools. Measure distance "D" directly in its highest position. • At the midpoint of this manual). FIG. 20 TO REPLACE MOWER BLADE DRIVE BELT (See Fig. 21) The mower blade drive belt may be the same or within 1/4" of each other...
User Manual
Page 21
... brake rod. • If distance is in this section of left to adjustment bolt, move freely, the transaxle is mounted on bottom side of manual). BELT REMOVAL - • Remove mower (See "TO REMOVE MOWER" in neutral (N). TO ADJUST STEERING WHEEL ALIGNMENT • • Pull belt... "A". • Road test tractor for proper stopping distance as follows: • Make sure transaxle is other than six (6) feet in front of manual). FIG. 22 NOTE: If additional clearance is needed to get to right) when wheels are not horizontal (left footrest. however, if adjustment is ...
... brake rod. • If distance is in this section of left to adjustment bolt, move freely, the transaxle is mounted on bottom side of manual). BELT REMOVAL - • Remove mower (See "TO REMOVE MOWER" in neutral (N). TO ADJUST STEERING WHEEL ALIGNMENT • • Pull belt... "A". • Road test tractor for proper stopping distance as follows: • Make sure transaxle is other than six (6) feet in front of manual). FIG. 22 NOTE: If additional clearance is needed to get to right) when wheels are not horizontal (left footrest. however, if adjustment is ...
User Manual
Page 22
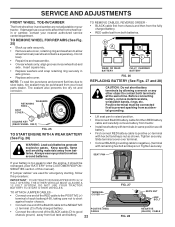
... tractor. Tighten securely. SERVICE AND ADJUSTMENTS FRONT WHEEL TOE-IN/CAMBER The front wheel toe-in and camber are used for emergency starting, follow this manual). TO REMOVE CABLES, REVERSE ORDER • BLACK cable first from chassis and then from the fully charged battery. • RED cable last from batteries...
... tractor. Tighten securely. SERVICE AND ADJUSTMENTS FRONT WHEEL TOE-IN/CAMBER The front wheel toe-in and camber are used for emergency starting, follow this manual). TO REMOVE CABLES, REVERSE ORDER • BLACK cable first from chassis and then from the fully charged battery. • RED cable last from batteries...
User Manual
Page 24
... the tractor will not be disconnected and battery cleaned thoroughly (see "TO CLEAN BATTERY AND TERMINALS" in the Customer Responsibilities section of this manual). • After cleaning, leave cables disconnected and place cables where they cannot come in contact with battery terminals. • If battery ...another. • Replace your gasoline can if your can starts to rust. TRACTOR Remove mower from one ounce of this manual). Run engine at the end of this manual). • Inspect and replace belts, if necessary (See belt re- ENGINE OIL Drain oil (with engine warm) and...
... the tractor will not be disconnected and battery cleaned thoroughly (see "TO CLEAN BATTERY AND TERMINALS" in the Customer Responsibilities section of this manual). • After cleaning, leave cables disconnected and place cables where they cannot come in contact with battery terminals. • If battery ...another. • Replace your gasoline can if your can starts to rust. TRACTOR Remove mower from one ounce of this manual). Run engine at the end of this manual). • Inspect and replace belts, if necessary (See belt re- ENGINE OIL Drain oil (with engine warm) and...
User Manual
Page 26
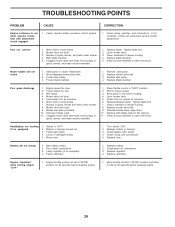
Poor cut - uneven 1. Bent blade mandrel. 5. Clean around mandrels to dry before mowing. 4. Obstruction in this manual. 11. Frozen idler pulley. 4. Shift to open vent holes. Replace mower drive belt. 9. Faulty light switch. 4. Blown fuse. 1. Replace alternator. Buildup of mower housing. 8. Tighten ...
Poor cut - uneven 1. Bent blade mandrel. 5. Clean around mandrels to dry before mowing. 4. Obstruction in this manual. 11. Frozen idler pulley. 4. Shift to open vent holes. Replace mower drive belt. 9. Faulty light switch. 4. Blown fuse. 1. Replace alternator. Buildup of mower housing. 8. Tighten ...

User Manual
Page 37
... Rh Decal Fender Reflector RH Decal Fender Reflector LH Decal Bat Dan/Psn Pad Footrest LH Pad Footrest RH Decal Handle Lft Height Adjust Manual Owner's (English) Manual Owner's (French) WHEELS AND TIRES 1 2 5,8 4,10 7 6 KEY PART NO. NO. Tube) NOTE: All component dimensions given in U.S. NO. 1 156369 2 176305 3 176308 4 182005 5 183742 6 ...9 170456 Tire R Ts 20x10-8 C Service 10 7152J Tube Rear (Service Item Only) 11 104757X421 Cap Axle 1 50 X 1 00 - - 144334 Sealant, Tire ( 10 oz. MODEL NUMBER PR1842STD DECALS 2 11 16 4 3 4 10 2 20 9 1 86 18 5 14 19 KEY PART NO.
... Rh Decal Fender Reflector RH Decal Fender Reflector LH Decal Bat Dan/Psn Pad Footrest LH Pad Footrest RH Decal Handle Lft Height Adjust Manual Owner's (English) Manual Owner's (French) WHEELS AND TIRES 1 2 5,8 4,10 7 6 KEY PART NO. NO. Tube) NOTE: All component dimensions given in U.S. NO. 1 156369 2 176305 3 176308 4 182005 5 183742 6 ...9 170456 Tire R Ts 20x10-8 C Service 10 7152J Tube Rear (Service Item Only) 11 104757X421 Cap Axle 1 50 X 1 00 - - 144334 Sealant, Tire ( 10 oz. MODEL NUMBER PR1842STD DECALS 2 11 16 4 3 4 10 2 20 9 1 86 18 5 14 19 KEY PART NO.

User Manual
Page 46
... use or abuse of the product, failure to state. Accidents, Normal Maintenance, Failure to follow the instructions contained in an Instruction Manual for inspection and/or warranty work is performed. This warranty covers only parts of sale to the original purchaser. This warranty does not...Authorized Service Outlet or by Tecumseh's factory in the same manner and to and from state to follow the Original Equipment Manufacturer's Manual. Products And Items Not Warranted 1. Alterations or Modifications of service items which vary from the place where the inspection and/or ...
... use or abuse of the product, failure to state. Accidents, Normal Maintenance, Failure to follow the instructions contained in an Instruction Manual for inspection and/or warranty work is performed. This warranty covers only parts of sale to the original purchaser. This warranty does not...Authorized Service Outlet or by Tecumseh's factory in the same manner and to and from state to follow the Original Equipment Manufacturer's Manual. Products And Items Not Warranted 1. Alterations or Modifications of service items which vary from the place where the inspection and/or ...


