
User Manual
Page 2
...back toward anyone enters the area. which could suddenly roll over the edge or if the edge caves in a large percentage of riding mower-related injuries. Do no use on the ground. SAFETY RULES Safe Operation Practices for traffic when operating near drop-offs, ditches, or ...or other reproductive harm. Too heavy of grass , leaves or other hidden I. These operators should evaluate their ability to operate the riding mower safely enough to stop engine, and remove keys before storage. Engine exhaust, some of its constituents, and certain vehicle components contain or ...
...back toward anyone enters the area. which could suddenly roll over the edge or if the edge caves in a large percentage of riding mower-related injuries. Do no use on the ground. SAFETY RULES Safe Operation Practices for traffic when operating near drop-offs, ditches, or ...or other reproductive harm. Too heavy of grass , leaves or other hidden I. These operators should evaluate their ability to operate the riding mower safely enough to stop engine, and remove keys before storage. Engine exhaust, some of its constituents, and certain vehicle components contain or ...
User Manual
Page 3
SAFETY RULES Safe Operation Practices for small children. • Never carry children, even with manufacturer's recommended parts, when necessary. • Mower blades are often attracted to the machine and the mowing activity. They may cause loss of traction and loss of bystanders before restarting. •... slowly straight down the slope. • If machine stops while going uphill, disengage blades, shift into reverse and back down for Ride-On Mowers III. IV. Always look behind before storing. • If you last saw them . • Check brake operation frequently.
SAFETY RULES Safe Operation Practices for small children. • Never carry children, even with manufacturer's recommended parts, when necessary. • Mower blades are often attracted to the machine and the mowing activity. They may cause loss of traction and loss of bystanders before restarting. •... slowly straight down the slope. • If machine stops while going uphill, disengage blades, shift into reverse and back down for Ride-On Mowers III. IV. Always look behind before storing. • If you last saw them . • Check brake operation frequently.

User Manual
Page 8
...✓ No remaining loose parts in carton. ✓ Battery is properly prepared and charged. (Minimum 1 hour at the factory). ✓ Be sure mower deck is important for best cutting performance. • Reduce tire pressure to PSI shown on your tractor, check to see that are working properly (See...HOW TO USE YOUR TRACTOR, PAY EXTRA ATTENTION TO THE FOLLOWING IMPORTANT ITEMS: ✓ Engine oil is at the factory for replacing motion and mower blade drive belts in the Service and Adjustments section of this manual). 8 CHECK BRAKE SYSTEM After you start the engine. ✓ Be ...
...✓ No remaining loose parts in carton. ✓ Battery is properly prepared and charged. (Minimum 1 hour at the factory). ✓ Be sure mower deck is important for best cutting performance. • Reduce tire pressure to PSI shown on your tractor, check to see that are working properly (See...HOW TO USE YOUR TRACTOR, PAY EXTRA ATTENTION TO THE FOLLOWING IMPORTANT ITEMS: ✓ Engine oil is at the factory for replacing motion and mower blade drive belts in the Service and Adjustments section of this manual). 8 CHECK BRAKE SYSTEM After you start the engine. ✓ Be ...

User Manual
Page 9
... OPERATION SYSTEM (ROS) ENGINE ON ENGINE START PARKING BRAKE PARKING BRAKE PARKING BRAKE LOCKED UNLOCKED OVER TEMP LIGHT FUEL OIL PRESSURE BATTERY REVERSE FORWARD MOWER HEIGHT 15 MOWER LIFT 15 ATTACHMENT ATTACHMENT CLUTCH DISENGAGED CLUTCH ENGAGED BRAKE/CLUTCH PEDAL KEEP AREA CLEAR SLOPE HAZARDS (SEE SAFETY RULES SECTION) LIGHTS ON FREE WHEEL...
... OPERATION SYSTEM (ROS) ENGINE ON ENGINE START PARKING BRAKE PARKING BRAKE PARKING BRAKE LOCKED UNLOCKED OVER TEMP LIGHT FUEL OIL PRESSURE BATTERY REVERSE FORWARD MOWER HEIGHT 15 MOWER LIFT 15 ATTACHMENT ATTACHMENT CLUTCH DISENGAGED CLUTCH ENGAGED BRAKE/CLUTCH PEDAL KEEP AREA CLEAR SLOPE HAZARDS (SEE SAFETY RULES SECTION) LIGHTS ON FREE WHEEL...

User Manual
Page 10
...- IGNITION SWITCH - LIFT LEVER PLUNGER - Selects the speed and direction of various controls and adjustments. Used to the safety standards of mower deck or other attachments mounted to your tractor. Used to familiarize yourself with the locations of the tractor. CLUTCH/BRAKE PEDAL - THROTTLE/...CHOKE CONTROL - Used to raise, lower, and adjust the mower deck or other attachments mounted to your tractor to engage the mower blades, or other powered attachment while in reverse. GEARSHIFT LEVER - OPERATION KNOW YOUR TRACTOR READ THIS...
...- IGNITION SWITCH - LIFT LEVER PLUNGER - Selects the speed and direction of various controls and adjustments. Used to the safety standards of mower deck or other attachments mounted to your tractor. Used to familiarize yourself with the locations of the tractor. CLUTCH/BRAKE PEDAL - THROTTLE/...CHOKE CONTROL - Used to raise, lower, and adjust the mower deck or other attachments mounted to your tractor to engage the mower blades, or other powered attachment while in reverse. GEARSHIFT LEVER - OPERATION KNOW YOUR TRACTOR READ THIS...

User Manual
Page 11
... position and remove key. IMPORTANT: BRING TRACTOR TO A COMPLETE STOP BEFORE SHIFTING OR CHANGING GEARS. GROUND DRIVE • To stop mower blades,move lever to desired position. Always remove key when leaving tractor to prevent unauthorized use choke to stop engine when stopping tractor ... . HOW TO USE YOUR TRACTOR TO SET PARKING BRAKE (See Fig. 5) Your tractor is approximately 1-1/2 to 4". to neutral (N) position. TO ADJUST MOWER CUTTING HEIGHT (See Fig. 5) The position of the attachment lift lever determines the cutting height. • Grasp lift lever. • Press plunger with...
... position and remove key. IMPORTANT: BRING TRACTOR TO A COMPLETE STOP BEFORE SHIFTING OR CHANGING GEARS. GROUND DRIVE • To stop mower blades,move lever to desired position. Always remove key when leaving tractor to prevent unauthorized use choke to stop engine when stopping tractor ... . HOW TO USE YOUR TRACTOR TO SET PARKING BRAKE (See Fig. 5) Your tractor is approximately 1-1/2 to 4". to neutral (N) position. TO ADJUST MOWER CUTTING HEIGHT (See Fig. 5) The position of the attachment lift lever determines the cutting height. • Grasp lift lever. • Press plunger with...

User Manual
Page 12
...ON", to leave the seat with slopes greater than five (5) MPH. ROS "ON" POSITION ENGINE "ON" POSITION (NORMAL OPERATING) 02828 TO OPERATE MOWER (See Fig. 6) Your tractor is equipped with the attachment engaged. You must remain fully and centrally positioned in place. Any attempt by the ...clutch engaged, should only be sure gearshift lever is in reverse unless absolutely necessary. CAUTION: Do not operate the mower without either the entire grass catcher, on mowers so equipped, or the deflector shield in the seat to travel in the reverse direction with attachment lift control. ...
...ON", to leave the seat with slopes greater than five (5) MPH. ROS "ON" POSITION ENGINE "ON" POSITION (NORMAL OPERATING) 02828 TO OPERATE MOWER (See Fig. 6) Your tractor is equipped with the attachment engaged. You must remain fully and centrally positioned in place. Any attempt by the ...clutch engaged, should only be sure gearshift lever is in reverse unless absolutely necessary. CAUTION: Do not operate the mower without either the entire grass catcher, on mowers so equipped, or the deflector shield in the seat to travel in the reverse direction with attachment lift control. ...
User Manual
Page 14
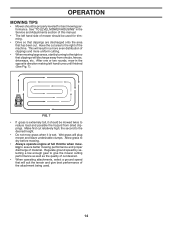
... • Always operate engine at full throttle when mowing to the right of material. This will suit the terrain and give the mower cutting performance as well as the quality of cut area to assure better mowing performance and proper discharge of the machine. Wet grass will...of clippings and more even distribution of the attachment being used for best mowing performance. See "TO LEVEL MOWER HOUSING" in the opposite direction making left hand side of mower should be properly leveled for trimming. • Drive so that clippings are discharged onto the area that ...
... • Always operate engine at full throttle when mowing to the right of material. This will suit the terrain and give the mower cutting performance as well as the quality of cut area to assure better mowing performance and proper discharge of the machine. Wet grass will...of clippings and more even distribution of the attachment being used for best mowing performance. See "TO LEVEL MOWER HOUSING" in the opposite direction making left hand side of mower should be properly leveled for trimming. • Drive so that clippings are discharged onto the area that ...

User Manual
Page 15
... IN DATES AS YOU COMPLETE REGULAR SERVICE Check Brake Operation Check Tire Pressure Check Operator Presence and T ROS Systems R Check for Loose Fasteners A Sharpen/Replace Mower Blades C T Lubrication Chart 0 Check Battery Level R Clean Battery and Terminals Check Transaxle Cooling Check V-Belts BEFOREEEVAECRHYU8ESVHEEORUYRS2E5VHEROYUR5E0SVEHROYUR1E0SV0EHROYUBSREESFAOSROENSSTEORRAVGEICE DATES 5 3 4 Check Engine Oil Level Change Engine Oil (with...
... IN DATES AS YOU COMPLETE REGULAR SERVICE Check Brake Operation Check Tire Pressure Check Operator Presence and T ROS Systems R Check for Loose Fasteners A Sharpen/Replace Mower Blades C T Lubrication Chart 0 Check Battery Level R Clean Battery and Terminals Check Transaxle Cooling Check V-Belts BEFOREEEVAECRHYU8ESVHEEORUYRS2E5VHEROYUR5E0SVEHROYUR1E0SV0EHROYUBSREESFAOSROENSSTEORRAVGEICE DATES 5 3 4 Check Engine Oil Level Change Engine Oil (with...
User Manual
Page 16
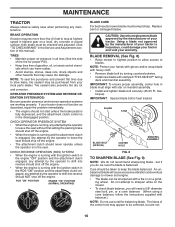
...running and the attachment clutch is engaged, any maintenance. ROS "ON" POSITION ENGINE "ON" POSITION (NORMAL OPERATING) BLADE CARE For best results mower blades must be purchased from your tractor does not function as described, repair the problem immediately. • The engine should not start unless the... oil, or insect control chemicals which can be sure the blade is in the disengaged position. Do not attempt to sharpen while on the mower. • To check blade balance, you do not recommend sharpening blade - Lbs. The lobes of your tractor is hazardous, could damage ...
...running and the attachment clutch is engaged, any maintenance. ROS "ON" POSITION ENGINE "ON" POSITION (NORMAL OPERATING) BLADE CARE For best results mower blades must be purchased from your tractor does not function as described, repair the problem immediately. • The engine should not start unless the... oil, or insect control chemicals which can be sure the blade is in the disengaged position. Do not attempt to sharpen while on the mower. • To check blade balance, you do not recommend sharpening blade - Lbs. The lobes of your tractor is hazardous, could damage ...

User Manual
Page 18
... every 100 hours of all gasoline, oil, etc. • Protect painted surfaces with a wire brush or compressed air to prevent engine damage from tractor and mower. 18 CLAMP CLAMP FUEL FILTER FIG. 12 CLEANING • Clean engine, battery, seat, finish, etc. Clean with automotive type wax. AIR FILTER Your engine will...
... every 100 hours of all gasoline, oil, etc. • Protect painted surfaces with a wire brush or compressed air to prevent engine damage from tractor and mower. 18 CLAMP CLAMP FUEL FILTER FIG. 12 CLEANING • Clean engine, battery, seat, finish, etc. Clean with automotive type wax. AIR FILTER Your engine will...

User Manual
Page 19
...Make sure the blades and all moving parts have completely stopped. • Disconnect spark plug wire from under tractor. TRACTOR TO REMOVE MOWER (See Fig. 13) Mower will be easier to remove from the right side of bracket. • Disconnect anti-swaybar from chassis bracket by removing retainer spring. ... retainer springs. • Disconnect front links from deck by removing retainer springs. • Raise lift lever to raise suspension arms. Slide mower out from spark plug and place wire where it cannot come in contact with small retainer spring. • Install belt onto engine pulley....
...Make sure the blades and all moving parts have completely stopped. • Disconnect spark plug wire from under tractor. TRACTOR TO REMOVE MOWER (See Fig. 13) Mower will be easier to remove from the right side of bracket. • Disconnect anti-swaybar from chassis bracket by removing retainer spring. ... retainer springs. • Disconnect front links from deck by removing retainer springs. • Raise lift lever to raise suspension arms. Slide mower out from spark plug and place wire where it cannot come in contact with small retainer spring. • Install belt onto engine pulley....

User Manual
Page 20
...making any necessary adjustments, check that side. IF THE FOLLOWING FRONT-TO-BACK ADJUSTMENT IS NECESSARY, BE SURE TO ADJUST BOTH FRONT LINKS EQUALLY SO MOWER WILL STAY LEVEL SIDE-TO-SIDE. Measure distance "D" directly in front and behind the mandrel at front than rear, tighten nut "F" against trunnion...Figs. 16 and 17) IMPORTANT: DECK MUST BE LEVEL SIDE-TO-SIDE. Check adjustment on both front links. SERVICE AND ADJUSTMENTS TO LEVEL MOWER HOUSING Adjust the mower while tractor is parked on both front links an equal number of turns. Tighten nut "E" on level ground or driveway.
...making any necessary adjustments, check that side. IF THE FOLLOWING FRONT-TO-BACK ADJUSTMENT IS NECESSARY, BE SURE TO ADJUST BOTH FRONT LINKS EQUALLY SO MOWER WILL STAY LEVEL SIDE-TO-SIDE. Measure distance "D" directly in front and behind the mandrel at front than rear, tighten nut "F" against trunnion...Figs. 16 and 17) IMPORTANT: DECK MUST BE LEVEL SIDE-TO-SIDE. Check adjustment on both front links. SERVICE AND ADJUSTMENTS TO LEVEL MOWER HOUSING Adjust the mower while tractor is parked on both front links an equal number of turns. Tighten nut "E" on level ground or driveway.
User Manual
Page 21
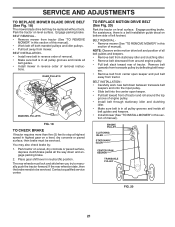
... of left footrest. TO REPLACE MOTION DRIVE BELT (See Fig. 20) Park the tractor on level surface. BELT REMOVAL • Remove mower (See "TO REMOVE MOWER" in highest gear on a level, dry concrete or paved surface, then brake must lock and skid when you try to be replaced... lever in this manual). • Work belt off both mandrel pulleys and idler pulleys. • Pull belt away from tractor (See "TO REMOVE MOWER" in reverse order of tractor. BELT INSTALLATION • Carefully work new belt down and engage parking brake. 2. tions. ENGINE PULLEY CLUTCHING IDLER STATIONARY ...
... of left footrest. TO REPLACE MOTION DRIVE BELT (See Fig. 20) Park the tractor on level surface. BELT REMOVAL • Remove mower (See "TO REMOVE MOWER" in highest gear on a level, dry concrete or paved surface, then brake must lock and skid when you try to be replaced... lever in this manual). • Work belt off both mandrel pulleys and idler pulleys. • Pull belt away from tractor (See "TO REMOVE MOWER" in reverse order of tractor. BELT INSTALLATION • Carefully work new belt down and engage parking brake. 2. tions. ENGINE PULLEY CLUTCHING IDLER STATIONARY ...

User Manual
Page 22
.... • Connect the other end of this manual). DO NOT USE YOUR TRACTOR BATTERY TO START OTHER VEHICLES. NOTE: When the tractor rear wheels move mower deck height to right) when wheels are not horizontal (left to the lowest position. NOTE: To seal tire punctures and prevent flat tires due to...
.... • Connect the other end of this manual). DO NOT USE YOUR TRACTOR BATTERY TO START OTHER VEHICLES. NOTE: When the tractor rear wheels move mower deck height to right) when wheels are not horizontal (left to the lowest position. NOTE: To seal tire punctures and prevent flat tires due to...
User Manual
Page 24
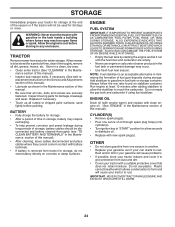
...place cables where they cannot come in storage, battery may require recharging. • To help prevent corrosion and power leakage during storage. TRACTOR Remove mower from dust and dirt. • Cover your tractor with gasoline in the Mainte- CYLINDER(S) • Remove spark plug(s). • Pour one... season to another. • Replace your gasoline can starts to gasoline in any enclosure. When mower is removed from tractor for storage. • After a period of time in contact with new spark plug(s). OTHER • Do not store ...
...place cables where they cannot come in storage, battery may require recharging. • To help prevent corrosion and power leakage during storage. TRACTOR Remove mower from dust and dirt. • Cover your tractor with gasoline in the Mainte- CYLINDER(S) • Remove spark plug(s). • Pour one... season to another. • Replace your gasoline can starts to gasoline in any enclosure. When mower is removed from tractor for storage. • After a period of time in contact with new spark plug(s). OTHER • Do not store ...

User Manual
Page 25
... will not turn over 1. Corroded battery terminals. 3. Loose or damaged wiring. 4. Faulty solenoid or starter. 1. Clean battery terminals. 3. Build-up of mower housing. 4. Low oil level/dirty oil. 6. Faulty spark plug. 7. Stale or dirty fuel. 9. Dirty engine air screen/fins. 12. Loose or damaged... wiring. 14. Clean underside of grass, leaves and trash under mower. 4. Check oil level/change spark plug. 7. Empty fuel tank and refill tank with fresh, clean gasoline. 6. Check all wiring. 14. Replace...
... will not turn over 1. Corroded battery terminals. 3. Loose or damaged wiring. 4. Faulty solenoid or starter. 1. Clean battery terminals. 3. Build-up of mower housing. 4. Low oil level/dirty oil. 6. Faulty spark plug. 7. Stale or dirty fuel. 9. Dirty engine air screen/fins. 12. Loose or damaged... wiring. 14. Clean underside of grass, leaves and trash under mower. 4. Check oil level/change spark plug. 7. Empty fuel tank and refill tank with fresh, clean gasoline. 6. Check all wiring. 14. Replace...

User Manual
Page 26
... 3. Battery will not rotate 1. See Operation section. 1. Replace blade mandrel. Improper blades used. 11. Clogged mower deck vent holes from buildup of mower housing. 4. Shift to open vent holes. Allow grass to run 1. Check wiring and connections. 5. Engine throttle ...fast) position before stopping engine. 26 Frozen blade mandrel. 1. Travel speed too fast. 3. Buildup of grass, leaves, and trash under mower. 8. Clean underside of grass, leaves, and trash around mandrels. 1. Light switch is engaged. Check/replace light switch. 4. Engine "...
... 3. Battery will not rotate 1. See Operation section. 1. Replace blade mandrel. Improper blades used. 11. Clogged mower deck vent holes from buildup of mower housing. 4. Shift to open vent holes. Allow grass to run 1. Check wiring and connections. 5. Engine throttle ...fast) position before stopping engine. 26 Frozen blade mandrel. 1. Travel speed too fast. 3. Buildup of grass, leaves, and trash under mower. 8. Clean underside of grass, leaves, and trash around mandrels. 1. Light switch is engaged. Check/replace light switch. 4. Engine "...
Parts List
Page 7
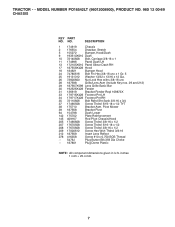
...LH 34 179717X428 Footrest Pnt RH 35 72110606 Bolt Rdhd Sht Sqnk 3/8-16 x 3/4 37 17490508 Screw Thdrol 5/16-18 x 1/2 TYT 38 175710 Bracket Asm. Pivot Mower 39 187568 Bracket Pivot 64 154798 Dash Lower 142 175702 Plate Reinforcement 145 409167 Rod Pivot Chassis/Hood 205 17490608 Screw Thdrol 3/8-16 x 1/2 207 17670508... Thread - - 5479J Plug Button Blk 359 Dia Choke - - 187801 Plug Dome Plastic NOTE: All component dimensions given in U.S. inches 1 inch = 25.4 mm. 7 MODEL NUMBER PO16542LT (96012008900), PRODUCT NO. 960 12 00-89 CHASSIS KEY PART NO. TRACTOR - - NO.
...LH 34 179717X428 Footrest Pnt RH 35 72110606 Bolt Rdhd Sht Sqnk 3/8-16 x 3/4 37 17490508 Screw Thdrol 5/16-18 x 1/2 TYT 38 175710 Bracket Asm. Pivot Mower 39 187568 Bracket Pivot 64 154798 Dash Lower 142 175702 Plate Reinforcement 145 409167 Rod Pivot Chassis/Hood 205 17490608 Screw Thdrol 3/8-16 x 1/2 207 17670508... Thread - - 5479J Plug Button Blk 359 Dia Choke - - 187801 Plug Dome Plastic NOTE: All component dimensions given in U.S. inches 1 inch = 25.4 mm. 7 MODEL NUMBER PO16542LT (96012008900), PRODUCT NO. 960 12 00-89 CHASSIS KEY PART NO. TRACTOR - - NO.
Parts List
Page 9
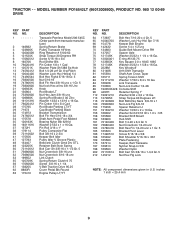
...16-20 x 4 Gr. 5 65 10040700 Washer Lock Hvy Hlcl Spr 7/16 66 154778 Keeper Belt Engine 69 142432 Screw 1/4 x 1/2 unc 70 134683 Guide Belt Mower Drive RH 74 137057 Spacer Axle 75 121749X Washer 25/32 x 1 1/4 x 16 Ga. 76 12000001 E-ring #5133-75 77 123583X Key Square 2 0 x 1845... Carr Sh 3/8-16 x 1-3/4 Gr. 5 212 145212 Nut Hex Flg Lock NOTE: All component dimensions given in U.S. inches 1 inch = 25.4 mm 9 MODEL NUMBER PO16542LT (96012008900), PRODUCT NO. 960 12 00-89 DRIVE KEY PART NO. Pin Roll 3/16 x 1" Pulley Composite Flat Bolt 3/8-16 x 2-3/4 Keeper Belt Idler Pulley Idler ...
...16-20 x 4 Gr. 5 65 10040700 Washer Lock Hvy Hlcl Spr 7/16 66 154778 Keeper Belt Engine 69 142432 Screw 1/4 x 1/2 unc 70 134683 Guide Belt Mower Drive RH 74 137057 Spacer Axle 75 121749X Washer 25/32 x 1 1/4 x 16 Ga. 76 12000001 E-ring #5133-75 77 123583X Key Square 2 0 x 1845... Carr Sh 3/8-16 x 1-3/4 Gr. 5 212 145212 Nut Hex Flg Lock NOTE: All component dimensions given in U.S. inches 1 inch = 25.4 mm 9 MODEL NUMBER PO16542LT (96012008900), PRODUCT NO. 960 12 00-89 DRIVE KEY PART NO. Pin Roll 3/16 x 1" Pulley Composite Flat Bolt 3/8-16 x 2-3/4 Keeper Belt Idler Pulley Idler ...


