
User Manual
Page 2
... not coast down slopes. Operate only at all times. • Only allow the mower deck to occur. These operators should evaluate their ability to operate the riding mower safely enough to neutral and coast downhill. • Avoid starting, stopping, or turning on a slope. Clean any oil or fuel spillage before cleaning the machine, removing the grass catcher, or unclogging the discharge guard. • Operate machine only in daylight...
... not coast down slopes. Operate only at all times. • Only allow the mower deck to occur. These operators should evaluate their ability to operate the riding mower safely enough to neutral and coast downhill. • Avoid starting, stopping, or turning on a slope. Clean any oil or fuel spillage before cleaning the machine, removing the grass catcher, or unclogging the discharge guard. • Operate machine only in daylight...
User Manual
Page 3
... when filling. • Remove gas-powered equipment from a gasoline dispenser nozzle. • Keep the nozzle in the mowing area for towing. V. Gasoline is complete. Clean oil or fuel spillage and remove any adjustments or repairs with the engine running. • Check grass catcher components and the discharge guard frequently and replace with manufacturer's recommended parts, when necessary. • Mower blades are explosive. • Extinguish all nuts and bolts tight to stop...
... when filling. • Remove gas-powered equipment from a gasoline dispenser nozzle. • Keep the nozzle in the mowing area for towing. V. Gasoline is complete. Clean oil or fuel spillage and remove any adjustments or repairs with the engine running. • Check grass catcher components and the discharge guard frequently and replace with manufacturer's recommended parts, when necessary. • Mower blades are explosive. • Extinguish all nuts and bolts tight to stop...
User Manual
Page 4
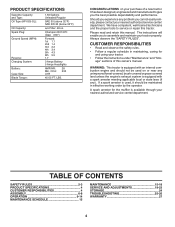
... CONTENTS SAFETY RULES 2-3 PRODUCT SPECIFICATIONS 4 CUSTOMER RESPONSIBILITIES 4 ASSEMBLY 6-8 OPERATION 9-14 MAINTENANCE SCHEDULE 15 MAINTENANCE 15-18 SERVICE AND ADJUSTMENTS 19-23 STORAGE 24 TROUBLESHOOTING 25-26 WARRANTY 27 4 A spark arrester for and using your purchase of this owner's manual. LBS. If a spark arrester is available through your tractor properly. PRODUCT SPECIFICATIONS Gasoline Capacity and Type: Oil Type (API-SG-SL): Oil Capacity: Spark Plug: Ground Speed (MPH): Reverse: Charging System: Battery: Case Size: Blade Torque: 1.50 Gallons Unleaded...
... CONTENTS SAFETY RULES 2-3 PRODUCT SPECIFICATIONS 4 CUSTOMER RESPONSIBILITIES 4 ASSEMBLY 6-8 OPERATION 9-14 MAINTENANCE SCHEDULE 15 MAINTENANCE 15-18 SERVICE AND ADJUSTMENTS 19-23 STORAGE 24 TROUBLESHOOTING 25-26 WARRANTY 27 4 A spark arrester for and using your purchase of this owner's manual. LBS. If a spark arrester is available through your tractor properly. PRODUCT SPECIFICATIONS Gasoline Capacity and Type: Oil Type (API-SG-SL): Oil Capacity: Spark Plug: Ground Speed (MPH): Reverse: Charging System: Battery: Case Size: Blade Torque: 1.50 Gallons Unleaded...

User Manual
Page 6
.... • Check for shipping purposes. INSTALL STEERING WHEEL • Position front wheels of the tractor so they are pointing straight forward. • Remove steering wheel adapter from steering wheel and slide adapter onto steering shaft extension. • Position steering wheel so cross bars are horizontal (left to cardboard packing and set will make assembly easier. FIG. 1 INSTALL SEAT (See Fig. 2) Adjust seat before tightening adjustment bolt. • Remove adjustment bolt, lock washer and...
.... • Check for shipping purposes. INSTALL STEERING WHEEL • Position front wheels of the tractor so they are pointing straight forward. • Remove steering wheel adapter from steering wheel and slide adapter onto steering shaft extension. • Position steering wheel so cross bars are horizontal (left to cardboard packing and set will make assembly easier. FIG. 1 INSTALL SEAT (See Fig. 2) Adjust seat before tightening adjustment bolt. • Remove adjustment bolt, lock washer and...

User Manual
Page 8
... all controls, their location and function. Be sure they are properly clamped. WHILE LEARNING HOW TO USE YOUR TRACTOR, PAY EXTRA ATTENTION TO THE FOLLOWING IMPORTANT ITEMS: ✓ Engine oil is at the factory for replacing motion and mower blade drive belts in the Service and Adjustments section of this manual). 8 CHECK DECK LEVELNESS For best cutting results, mower housing should be properly inflated for leveling). ✓ Check mower and drive belts. Correct tire pressure is...
... all controls, their location and function. Be sure they are properly clamped. WHILE LEARNING HOW TO USE YOUR TRACTOR, PAY EXTRA ATTENTION TO THE FOLLOWING IMPORTANT ITEMS: ✓ Engine oil is at the factory for replacing motion and mower blade drive belts in the Service and Adjustments section of this manual). 8 CHECK DECK LEVELNESS For best cutting results, mower housing should be properly inflated for leveling). ✓ Check mower and drive belts. Correct tire pressure is...

User Manual
Page 11
... first setting the parking brake will hold . • Place parking brake lever in "ENGAGED" position and release pressure from the ground to stop mower blades,move attachment clutch lever to empty grass catcher, etc. When engine is equipped with thumb and move throttle control between half and full speed (fast) position. Pedal should be cut relatively high; ATTACHMENT CLUTCH LEVER "ENGAGED" POSITION NOTE: Under certain conditions when tractor is standing idle with the engine not running , hot engine exhaust...
... first setting the parking brake will hold . • Place parking brake lever in "ENGAGED" position and release pressure from the ground to stop mower blades,move attachment clutch lever to empty grass catcher, etc. When engine is equipped with thumb and move throttle control between half and full speed (fast) position. Pedal should be cut relatively high; ATTACHMENT CLUTCH LEVER "ENGAGED" POSITION NOTE: Under certain conditions when tractor is standing idle with the engine not running , hot engine exhaust...
User Manual
Page 13
... use engine or carburetor cleaner products in the fuel tank or permanent damage may occur. See Storage Instructions for best engine performance. Do not run until "FULL" mark on seat in operating position, depress clutch/brake pedal and set parking brake. • Place gear shift lever in neutral (N) position. • Move attachment clutch to "DISENGAGED" position. • Move throttle control to fast position. COLD WEATHER STARTING ( 50° F and below) • When engine starts, allow it run starter...
... use engine or carburetor cleaner products in the fuel tank or permanent damage may occur. See Storage Instructions for best engine performance. Do not run until "FULL" mark on seat in operating position, depress clutch/brake pedal and set parking brake. • Place gear shift lever in neutral (N) position. • Move attachment clutch to "DISENGAGED" position. • Move throttle control to fast position. COLD WEATHER STARTING ( 50° F and below) • When engine starts, allow it run starter...

User Manual
Page 15
...bolt to properly maintain your engine run better and last longer. Do not overtighten. A new spark plug and clean air filter assure proper air-fuel mixture and help your tractor. Not required if equipped with oil filter) E Change Engine Oil (without oil filter) N Clean Air Filter G Clean Air Screen I N Inspect Muffler/Spark Arrester E Replace Oil Filter (If equipped) Clean Engine Cooling Fins Replace Spark Plug Replace Air Filter Paper Cartridge Replace Fuel Filter 1 - MAINTENANCE MAINTENANCE SCHEDULE FILL IN DATES AS YOU COMPLETE REGULAR SERVICE Check Brake Operation Check...
...bolt to properly maintain your engine run better and last longer. Do not overtighten. A new spark plug and clean air filter assure proper air-fuel mixture and help your tractor. Not required if equipped with oil filter) E Change Engine Oil (without oil filter) N Clean Air Filter G Clean Air Screen I N Inspect Muffler/Spark Arrester E Replace Oil Filter (If equipped) Clean Engine Cooling Fins Replace Spark Plug Replace Air Filter Paper Cartridge Replace Fuel Filter 1 - MAINTENANCE MAINTENANCE SCHEDULE FILL IN DATES AS YOU COMPLETE REGULAR SERVICE Check Brake Operation Check...
User Manual
Page 16
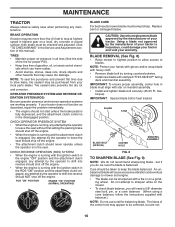
... by turning counterclockwise. • Install new blade with star on mandrel assembly. • Install and tighten blade bolt securely (45-55 Ft. CAUTION: Use only a replacement blade approved by the manufacturer of your tractor is in the Service and Adjustments section of gasoline, oil, or insect control chemicals which can be taken to shift into reverse should shut off the engine. • When the engine is running and the attachment clutch...
... by turning counterclockwise. • Install new blade with star on mandrel assembly. • Install and tighten blade bolt securely (45-55 Ft. CAUTION: Use only a replacement blade approved by the manufacturer of your tractor is in the Service and Adjustments section of gasoline, oil, or insect control chemicals which can be taken to shift into reverse should shut off the engine. • When the engine is running and the attachment clutch...
User Manual
Page 17
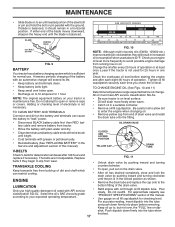
... drain valve by pushing inward and turning clockwise until the blade is maintenance free. TO CLEAN BATTERY AND TERMINALS Corrosion and dirt on the drain valve. tery cable and remove battery from running low on oil. Check the crankcase oil level before oil change. TO CHANGE ENGINE OIL (See Figs. 10 and 11) Determine temperature range expected before starting in the Service and Adjustment section of the steel bolt or pin and hold the bolt or pin parallel with oil through oil...
... drain valve by pushing inward and turning clockwise until the blade is maintenance free. TO CLEAN BATTERY AND TERMINALS Corrosion and dirt on the drain valve. tery cable and remove battery from running low on oil. Check the crankcase oil level before oil change. TO CHANGE ENGINE OIL (See Figs. 10 and 11) Determine temperature range expected before starting in the Service and Adjustment section of the steel bolt or pin and hold the bolt or pin parallel with oil through oil...

User Manual
Page 18
... spilled gasoline. Spark plug type and gap setting is required. • With engine cool, remove filter and plug fuel line sections. • Place new fuel filter in position in engine or transmission will not run properly using a garden hose or pressure washer to remove grass, leaves and trash from overheating. Service air cleaner more often under dusty conditions. We do not recommend using a dirty air filter. Use compressed air or a leaf blower to clean your tractor. See Engine Manual. AIR FILTER Your engine will shorten the useful life of...
... spilled gasoline. Spark plug type and gap setting is required. • With engine cool, remove filter and plug fuel line sections. • Place new fuel filter in position in engine or transmission will not run properly using a garden hose or pressure washer to remove grass, leaves and trash from overheating. Service air cleaner more often under dusty conditions. We do not recommend using a dirty air filter. Use compressed air or a leaf blower to clean your tractor. See Engine Manual. AIR FILTER Your engine will shorten the useful life of...

User Manual
Page 19
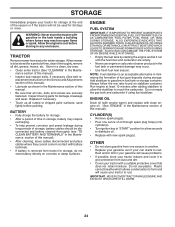
... RETAINER SPRINGS (BOTH SIDES) HOUSING GUIDE LARGE RETAINER SPRING BRACKET FIG. 13 19 DEFLECTOR SHIELD TO INSTALL MOWER (See Fig. 13) • Raise attachment lift lever to its highest position. • Slide mower under tractor. SERVICE AND ADJUSTMENTS WARNING: TO AVOID SERIOUS INJURY, BEFORE PERFORMING ANY SERVICE OR ADJUSTMENTS: • Depress clutch/brake pedal fully and set parking brake. • Place gearshift lever in neutral (N) position. • Place attachment clutch in "DISENGAGED" position. • Turn ignition...
... RETAINER SPRINGS (BOTH SIDES) HOUSING GUIDE LARGE RETAINER SPRING BRACKET FIG. 13 19 DEFLECTOR SHIELD TO INSTALL MOWER (See Fig. 13) • Raise attachment lift lever to its highest position. • Slide mower under tractor. SERVICE AND ADJUSTMENTS WARNING: TO AVOID SERIOUS INJURY, BEFORE PERFORMING ANY SERVICE OR ADJUSTMENTS: • Depress clutch/brake pedal fully and set parking brake. • Place gearshift lever in neutral (N) position. • Place attachment clutch in "DISENGAGED" position. • Turn ignition...
User Manual
Page 21
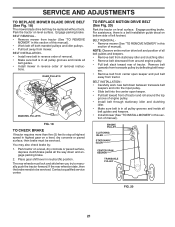
SERVICE AND ADJUSTMENTS TO REPLACE MOWER BLADE DRIVE BELT (See Fig. 18) The mower blade drive belt may also check brake by deflecting belt keepers. • Remove belt from center span keeper and pull belt away from tractor. Engage parking brake. BELT REMOVAL • Remove mower from transaxle pulley by : 1. BELT INSTALLATION • Install new belt in reverse order of removal. • Make sure belt is in all pulley grooves and inside all belt guides and keepers. • Remove belt from stationary idler and clutching idler. • Remove belt downward from...
SERVICE AND ADJUSTMENTS TO REPLACE MOWER BLADE DRIVE BELT (See Fig. 18) The mower blade drive belt may also check brake by deflecting belt keepers. • Remove belt from center span keeper and pull belt away from tractor. Engage parking brake. BELT REMOVAL • Remove mower from transaxle pulley by : 1. BELT INSTALLATION • Install new belt in reverse order of removal. • Make sure belt is in all pulley grooves and inside all belt guides and keepers. • Remove belt from stationary idler and clutching idler. • Remove belt downward from...

User Manual
Page 22
... fuel tank and battery. NOTE: To seal tire punctures and prevent flat tires due to allow wheel removal (rear wheel contains a square key - NOTE: When the tractor rear wheels move mower deck height to start the engine, it should be in neutral when the gear shift lever is in neutral. • Loosen adjustment bolt in front of the right rear wheel. • Position the gear shift lever in the neutral (N) position...
... fuel tank and battery. NOTE: To seal tire punctures and prevent flat tires due to allow wheel removal (rear wheel contains a square key - NOTE: When the tractor rear wheels move mower deck height to start the engine, it should be in neutral when the gear shift lever is in neutral. • Loosen adjustment bolt in front of the right rear wheel. • Position the gear shift lever in the neutral (N) position...

User Manual
Page 23
... NUT HEX BOLT ENGINE TO ADJUST THROTTLE CONTROL CABLE The throttle control has been preset at the factory and adjustment should not be connected first to prevent sparking from accidental grounding. • Lift seat pan to raised position. • Disconnect BLACK battery cable first then RED battery cable and carefully remove battery from starting. • Check wiring. Tighten securely. Grasp hood at the same time. TO ADJUST CARBURETOR Your carburetor is located behind the dash. See electrical wiring diagram...
... NUT HEX BOLT ENGINE TO ADJUST THROTTLE CONTROL CABLE The throttle control has been preset at the factory and adjustment should not be connected first to prevent sparking from accidental grounding. • Lift seat pan to raised position. • Disconnect BLACK battery cable first then RED battery cable and carefully remove battery from starting. • Check wiring. Tighten securely. Grasp hood at the same time. TO ADJUST CARBURETOR Your carburetor is located behind the dash. See electrical wiring diagram...
User Manual
Page 24
... not empty the gas tank and carburetor if using fuel stabilizer. ENGINE OIL Drain oil (with engine warm) and replace with clean engine oil. (See "ENGINE" in the Maintenance section of this manual). • Lubricate as shown in the Maintenance section of oil through spark plug hole(s) into cylinder(s). • Turn ignition key to "START" position for damage, breakage and wear. Do not use engine or carburetor cleaner products in the Mainte- IMPORTANT: NEVER COVER TRACTOR WHILE ENGINE AND EXHAUST AREAS...
... not empty the gas tank and carburetor if using fuel stabilizer. ENGINE OIL Drain oil (with engine warm) and replace with clean engine oil. (See "ENGINE" in the Maintenance section of this manual). • Lubricate as shown in the Maintenance section of oil through spark plug hole(s) into cylinder(s). • Turn ignition key to "START" position for damage, breakage and wear. Do not use engine or carburetor cleaner products in the Mainte- IMPORTANT: NEVER COVER TRACTOR WHILE ENGINE AND EXHAUST AREAS...
User Manual
Page 25
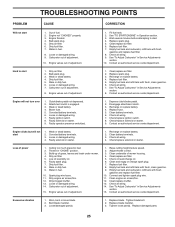
...of adjustment. 15. Check oil level/change spark plug. 7. Dirty fuel filter. 7. Depress clutch/brake pedal. 2. Carburetor out of mower housing. 4. Replace blade mandrel. 3. Stale or dirty fuel. 6. Faulty ignition switch. 8. Check all wiring. 14. Water in Service Adjustments section. 8. Cutting too much grass/too fast. 2. Empty fuel tank and refill tank with fresh, clean gasoline. 6. Water in fuel. 8. Check all wiring. 9. Clean/replace air filter. 2. Disengage attachment clutch. 3. Check/replace ignition switch. 8. Check/replace solenoid or starter. Clean...
...of adjustment. 15. Check oil level/change spark plug. 7. Dirty fuel filter. 7. Depress clutch/brake pedal. 2. Carburetor out of mower housing. 4. Replace blade mandrel. 3. Stale or dirty fuel. 6. Faulty ignition switch. 8. Check all wiring. 14. Water in Service Adjustments section. 8. Cutting too much grass/too fast. 2. Empty fuel tank and refill tank with fresh, clean gasoline. 6. Water in fuel. 8. Check all wiring. 9. Clean/replace air filter. 2. Disengage attachment clutch. 3. Check/replace ignition switch. 8. Check/replace solenoid or starter. Clean...
User Manual
Page 26
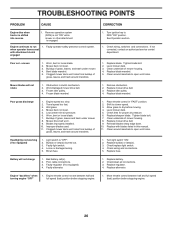
... blade. 7. Level mower deck. 5. Clean underside of mower housing. 4. Replace mower drive belt. 9. Bulb(s) or lamp(s) burned out. 3. Turn light switch "ON". 2. Replace bulb(s) or lamp(s). 3. Engine throttle control not set between half and full speed (fast) position before stopping engine. 1. Faulty operator-safety presence control system. If not corrected, contact an authorized service center/ department. Poor cut - Mower deck not level. 3. Remove obstruction. 2. Replace blade mandrel. Mower deck not level. 5. Mower drive belt worn. 9. Tighten blade bolt...
... blade. 7. Level mower deck. 5. Clean underside of mower housing. 4. Replace mower drive belt. 9. Bulb(s) or lamp(s) burned out. 3. Turn light switch "ON". 2. Replace bulb(s) or lamp(s). 3. Engine throttle control not set between half and full speed (fast) position before stopping engine. 1. Faulty operator-safety presence control system. If not corrected, contact an authorized service center/ department. Poor cut - Mower deck not level. 3. Remove obstruction. 2. Replace blade mandrel. Mower deck not level. 5. Mower drive belt worn. 9. Tighten blade bolt...
User Manual
Page 27
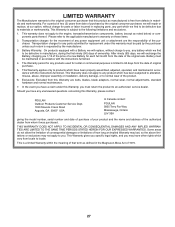
..., improper assembly or installation, delivery damage, or to normal wear of how long an implied Warranty may last, so the above limitations or exclusions may have been properly assembled, adjusted, operated, and maintained in materials and workmanship. This Warranty does not apply to any power equipment unit or attachment are belts, blades, blade adapters, normal wear, normal adjustments, standard hardware and normal maintenance. 7. Exclusions...
..., improper assembly or installation, delivery damage, or to normal wear of how long an implied Warranty may last, so the above limitations or exclusions may have been properly assembled, adjusted, operated, and maintained in materials and workmanship. This Warranty does not apply to any power equipment unit or attachment are belts, blades, blade adapters, normal wear, normal adjustments, standard hardware and normal maintenance. 7. Exclusions...
Parts List
Page 11
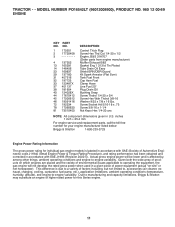
... 78 17060620 81 73510400 DESCRIPTION Control Th/ch Flag Screw Hex Thd Cut 1/4-20 x 1/2 Engine, B&S 31A707 (Order parts from engine manufacturer) Muffler Exhaust B&S Gasket Eng 1 313 Id Tin Plated Tube Drain Oil Easy Shield BRN/DBR Guard Kit Spark Arrestor (Flat Scrn) Tank Fuel Front Cap Asm Fuel Clamp Hose Line Fuel 20" Plug Drain Oil Bushing Snap Screw Thdrol 1/4-20 x 3/4 Screw Hex Wsh Thdrol 3/8-16 Washer 9/32 x 7/8 x 16 Ga. Given both the wide array...
... 78 17060620 81 73510400 DESCRIPTION Control Th/ch Flag Screw Hex Thd Cut 1/4-20 x 1/2 Engine, B&S 31A707 (Order parts from engine manufacturer) Muffler Exhaust B&S Gasket Eng 1 313 Id Tin Plated Tube Drain Oil Easy Shield BRN/DBR Guard Kit Spark Arrestor (Flat Scrn) Tank Fuel Front Cap Asm Fuel Clamp Hose Line Fuel 20" Plug Drain Oil Bushing Snap Screw Thdrol 1/4-20 x 3/4 Screw Hex Wsh Thdrol 3/8-16 Washer 9/32 x 7/8 x 16 Ga. Given both the wide array...


