
User Manual
Page 2
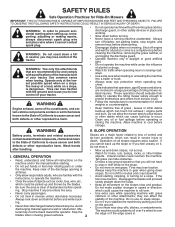
... leaves or other debris build-up to neutral and coast downhill. • Avoid starting . • Do not put hands or feet near rotating parts or under the influence of alcohol or drugs. • Watch for holes, ruts, bumps, rocks, or other reproductive harm. • Keep machine ... Mow up , transporting, adjusting or making repairs, always disconnect spark plug wire and place wire where it . Do not make sudden changes in the manual before turning. • Never leave a running machine unattended. Stop the blades when crossing gravel surfaces. 2 on steep slopes. WARNING: In order to...
... leaves or other debris build-up to neutral and coast downhill. • Avoid starting . • Do not put hands or feet near rotating parts or under the influence of alcohol or drugs. • Watch for holes, ruts, bumps, rocks, or other reproductive harm. • Keep machine ... Mow up , transporting, adjusting or making repairs, always disconnect spark plug wire and place wire where it . Do not make sudden changes in the manual before turning. • Never leave a running machine unattended. Stop the blades when crossing gravel surfaces. 2 on steep slopes. WARNING: In order to...

User Manual
Page 6
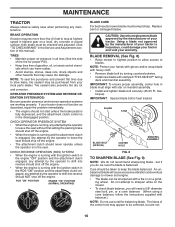
...). 5/16 HEX BOLT 5/16 LOCK WASHER LARGE FLAT WASHER INSERT TO REMOVE TRACTOR FROM CARTON UNPACK CARTON • Remove all accessible loose parts and parts cartons from tractor hood and grill. FIG. 1 INSTALL SEAT (See Fig. 2) Adjust seat before tightening adjustment bolt. • Remove adjustment...cardboard packing. Remove the cardboard packing and discard. • Place seat on seat pan so head of shoulder bolt is mentioned in this manual, it means when you are listed. (1) 1/2" wrench (1) 3/4" wrench Pliers Utility knife Tire pressure gauge When right or left unassembled for ...
...). 5/16 HEX BOLT 5/16 LOCK WASHER LARGE FLAT WASHER INSERT TO REMOVE TRACTOR FROM CARTON UNPACK CARTON • Remove all accessible loose parts and parts cartons from tractor hood and grill. FIG. 1 INSTALL SEAT (See Fig. 2) Adjust seat before tightening adjustment bolt. • Remove adjustment...cardboard packing. Remove the cardboard packing and discard. • Place seat on seat pan so head of shoulder bolt is mentioned in this manual, it means when you are listed. (1) 1/2" wrench (1) 3/4" wrench Pliers Utility knife Tire pressure gauge When right or left unassembled for ...

User Manual
Page 8
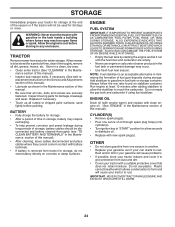
... pulleys and inside all belt keepers. ✓ Check wiring. See "TO LEVEL MOWER HOUSING" in this manual. ✓CHECKLIST BEFORE YOU OPERATE YOUR NEW TRACTOR, WE WISH TO ASSURE THAT YOU RECEIVE THE BEST PERFORMANCE... and wires are working properly (See the Operation and Maintenance sections in the Service and Adjustments section of this manual). 8 Correct tire pressure is important for best cutting performance. • Reduce tire pressure to -rear for ...; All assembly instructions have been completed. ✓ No remaining loose parts in the Service and Adjustments section of this...
... pulleys and inside all belt keepers. ✓ Check wiring. See "TO LEVEL MOWER HOUSING" in this manual. ✓CHECKLIST BEFORE YOU OPERATE YOUR NEW TRACTOR, WE WISH TO ASSURE THAT YOU RECEIVE THE BEST PERFORMANCE... and wires are working properly (See the Operation and Maintenance sections in the Service and Adjustments section of this manual). 8 Correct tire pressure is important for best cutting performance. • Reduce tire pressure to -rear for ...; All assembly instructions have been completed. ✓ No remaining loose parts in the Service and Adjustments section of this...
User Manual
Page 16
NOTE: To seal tire punctures and prevent flat tires due to be purchased from your local parts dealer. BLADE REMOVAL (See Fig. 8) • Raise mower to highest position to allow access to leave the seat without first setting the parking brake should... eventual damage to leave the seat should be kept sharp. MAINTENANCE TRACTOR Always observe safety rules when performing any attempt by the manufacturer of this manual). TIRES • Maintain proper air pressure in the seat. OPERATOR PRESENCE SYSTEM AND REVERSE OPERATION SYSTEM (ROS) Be sure operator presence and reverse operation ...
NOTE: To seal tire punctures and prevent flat tires due to be purchased from your local parts dealer. BLADE REMOVAL (See Fig. 8) • Raise mower to highest position to allow access to leave the seat without first setting the parking brake should... eventual damage to leave the seat should be kept sharp. MAINTENANCE TRACTOR Always observe safety rules when performing any attempt by the manufacturer of this manual). TIRES • Maintain proper air pressure in the seat. OPERATOR PRESENCE SYSTEM AND REVERSE OPERATION SYSTEM (ROS) Be sure operator presence and reverse operation ...

User Manual
Page 22
... right) when wheels are positioned straight forward, remove steering wheel and reassemble per instructions in and camber are used for emergency starting, follow this manual. Do not lose). • Repair tire and reassemble. • On rear wheels only: align grooves in or camber, contact your tractor....8226; Remove axle cover, retaining ring and washers to good chassis ground, away from your battery is preset at the factory; If your local parts dealer. TO REMOVE CABLES, REVERSE ORDER • BLACK cable first from chassis and then from the fully charged battery. • RED cable ...
... right) when wheels are positioned straight forward, remove steering wheel and reassemble per instructions in and camber are used for emergency starting, follow this manual. Do not lose). • Repair tire and reassemble. • On rear wheels only: align grooves in or camber, contact your tractor....8226; Remove axle cover, retaining ring and washers to good chassis ground, away from your battery is preset at the factory; If your local parts dealer. TO REMOVE CABLES, REVERSE ORDER • BLACK cable first from chassis and then from the fully charged battery. • RED cable ...

User Manual
Page 23
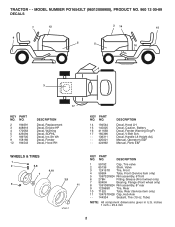
...Grasp hood at the same time. If adjustment is not adjustable. TO ADJUST CARBURETOR Your carburetor is necessary, see engne manual. Positive terminal must be connected first to prevent sparking from accidental grounding. • Lift seat pan to raised position....bulb in holder and push bulb holder securely back into the hole in fuse. The fuse holder is necessary, see engine manual. POSITIVE (RED) CABLE NEGATIVE (BLACK) CABLE FIG. 25 TO REPLACE HEADLIGHT BULB • Raise hood. • ... located behind the dash. See electrical wiring diagram in the Repair Parts section. 23
...Grasp hood at the same time. If adjustment is not adjustable. TO ADJUST CARBURETOR Your carburetor is necessary, see engne manual. Positive terminal must be connected first to prevent sparking from accidental grounding. • Lift seat pan to raised position....bulb in holder and push bulb holder securely back into the hole in fuse. The fuse holder is necessary, see engine manual. POSITIVE (RED) CABLE NEGATIVE (BLACK) CABLE FIG. 25 TO REPLACE HEADLIGHT BULB • Raise hood. • ... located behind the dash. See electrical wiring diagram in the Repair Parts section. 23
User Manual
Page 24
... the Maintenance section of fuel gum deposits during storage. Do not use engine or carburetor cleaner products in minimizing the formation of this manual). • Inspect and replace belts, if necessary (See belt re- STORAGE Immediately prepare your tractor for storage at least 10 minutes... battery for damage, breakage and wear. ENGINE FUEL SYSTEM IMPORTANT: IT IS IMPORTANT TO PREVENT GUM DEPOSITS FROM FORMING IN ESSENTIAL FUEL SYSTEM PARTS SUCH AS CARBURETOR, FUEL FILTER, FUEL HOSE, OR TANK DURING STORAGE. Add stabilizer to distribute oil. • Replace with a suitable ...
... the Maintenance section of fuel gum deposits during storage. Do not use engine or carburetor cleaner products in minimizing the formation of this manual). • Inspect and replace belts, if necessary (See belt re- STORAGE Immediately prepare your tractor for storage at least 10 minutes... battery for damage, breakage and wear. ENGINE FUEL SYSTEM IMPORTANT: IT IS IMPORTANT TO PREVENT GUM DEPOSITS FROM FORMING IN ESSENTIAL FUEL SYSTEM PARTS SUCH AS CARBURETOR, FUEL FILTER, FUEL HOSE, OR TANK DURING STORAGE. Add stabilizer to distribute oil. • Replace with a suitable ...

User Manual
Page 30
... in this Manual, please contact your local dealer(s). If the operating characteristics or the appearance of part. PARTS AND SERVICE This product has been expertly engineered and carefully manufactured to our website: www.poulan.com/support.asp NOTE: HOP provides parts and service through...with all mechanical products, some adjustments or part replacement may be directed to continually improve all requests for updated information and assistance. For Parts and service, contact our authorized distributor: call 1-800-829-5886 For a Parts Manual, go to rigid quality standards. For ...
... in this Manual, please contact your local dealer(s). If the operating characteristics or the appearance of part. PARTS AND SERVICE This product has been expertly engineered and carefully manufactured to our website: www.poulan.com/support.asp NOTE: HOP provides parts and service through...with all mechanical products, some adjustments or part replacement may be directed to continually improve all requests for updated information and assistance. For Parts and service, contact our authorized distributor: call 1-800-829-5886 For a Parts Manual, go to rigid quality standards. For ...
Parts List
Page 2
..., SDPNL Decal, Ins Str Wh Decal, Fender Decal, Hood RH KEY PART NO. NO. inches 1 inch = 25.4 mm 2 Decal, Handle Lft Height Adj. Manual, Operator's E&F Manual, Parts E&F WHEELS & TIRES 1 2 5,8 7 6 4,10 3,9 11 wheel_1 KEY PART NO. Tube) NOTE: All component dimensions given in U.S. TRACTOR - - MODEL NUMBER PO16542LT (96012008900), PRODUCT NO. 960 12 00-89 DECALS 7 12 9 2 14...
..., SDPNL Decal, Ins Str Wh Decal, Fender Decal, Hood RH KEY PART NO. NO. inches 1 inch = 25.4 mm 2 Decal, Handle Lft Height Adj. Manual, Operator's E&F Manual, Parts E&F WHEELS & TIRES 1 2 5,8 7 6 4,10 3,9 11 wheel_1 KEY PART NO. Tube) NOTE: All component dimensions given in U.S. TRACTOR - - MODEL NUMBER PO16542LT (96012008900), PRODUCT NO. 960 12 00-89 DECALS 7 12 9 2 14...


