Owner's Manual
Page 4
... Information Displays 29 Calling up Information Displays 29 Operating with the Information Display 2 of a DVD 30 - Selecting Audio, Subtitle and Angle Operating with the Information Display 1 of a DVD 32 - Preventing the Battery from a Specified Time - Changing the Mode Switch Setting - ...Selecting Repeat Range - Resetting the Microprocessor Key Finder 7 Using the Remote Controller 8 - What the Marks on DVDs Indicate - Switching Discs - Frame-by -Frame and Slow Motion Playback 24 - Switching Power OFF Disc (DVD/Video CD/CD) Playback ........ 19 - Loading the Magazine - ...
... Information Displays 29 Calling up Information Displays 29 Operating with the Information Display 2 of a DVD 30 - Selecting Audio, Subtitle and Angle Operating with the Information Display 1 of a DVD 32 - Preventing the Battery from a Specified Time - Changing the Mode Switch Setting - ...Selecting Repeat Range - Resetting the Microprocessor Key Finder 7 Using the Remote Controller 8 - What the Marks on DVDs Indicate - Switching Discs - Frame-by -Frame and Slow Motion Playback 24 - Switching Power OFF Disc (DVD/Video CD/CD) Playback ........ 19 - Loading the Magazine - ...
Owner's Manual
Page 5
... Code Chart 60 Terms 61 Installation 63 Connecting the Units 63 - Connecting the Power Cord - Installing the DVD Player Unit Installing the Remote Sensor 75 Appendix 77 Index 77 Specifications 78 2 Switching Discs Changing Initial Settings 40 Calling up the SET ... Audio Output Operating with the Information Display 1 of a Video CD 33 - Selecting the Picture Mode Operating with the Information Display 2 of Multi-DVD Player ........ 71 Installation 72 - Searching for a Desired Scene, Starting Playback from a Specified Time - Selecting Repeat Range - Setting the Code Number...
... Code Chart 60 Terms 61 Installation 63 Connecting the Units 63 - Connecting the Power Cord - Installing the DVD Player Unit Installing the Remote Sensor 75 Appendix 77 Index 77 Specifications 78 2 Switching Discs Changing Initial Settings 40 Calling up the SET ... Audio Output Operating with the Information Display 1 of a Video CD 33 - Selecting the Picture Mode Operating with the Information Display 2 of Multi-DVD Player ........ 71 Installation 72 - Searching for a Desired Scene, Starting Playback from a Specified Time - Selecting Repeat Range - Setting the Code Number...
Owner's Manual
Page 10
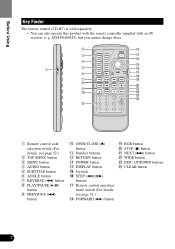
.../PAUSE (6) button o PREVIOUS (4) button !0 OPEN/CLOSE (0) button !1 Number buttons !2 RETURN button !3 POWER button !4 DISPLAY button !5 Joystick !6 STEP (e)/(E) buttons !7 Remote control operation mode switch (For details, see page 51.) !8 FORWARD (¡) button !9 RGB button @0 STOP (7) button @1 NEXT (¢) button @2 WIDE button @3... DISC UP/DOWN buttons @4 CLEAR button 7 Before Using Key Finder The remote control (CD-R7) is sold separately. • You can also operate this product with the remote controller supplied with an AV receiver (e.g.
.../PAUSE (6) button o PREVIOUS (4) button !0 OPEN/CLOSE (0) button !1 Number buttons !2 RETURN button !3 POWER button !4 DISPLAY button !5 Joystick !6 STEP (e)/(E) buttons !7 Remote control operation mode switch (For details, see page 51.) !8 FORWARD (¡) button !9 RGB button @0 STOP (7) button @1 NEXT (¢) button @2 WIDE button @3... DISC UP/DOWN buttons @4 CLEAR button 7 Before Using Key Finder The remote control (CD-R7) is sold separately. • You can also operate this product with the remote controller supplied with an AV receiver (e.g.
Owner's Manual
Page 11
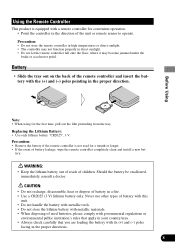
... and (-) poles pointing in the proper direction. CAUTION: • Do not recharge, disassemble, heat or dispose of battery leakage, wipe the remote controller completely clean and install a new bat- Never use other types of battery with this unit. • Do not handle the battery with ...materials. • When disposing of used for the first time, pull out the film protruding from the tray. Before Using Using the Remote Controller This product is not used batteries, please comply with governmental regulations or environmental public institution's rules that apply in your country/area....
... and (-) poles pointing in the proper direction. CAUTION: • Do not recharge, disassemble, heat or dispose of battery leakage, wipe the remote controller completely clean and install a new bat- Never use other types of battery with this unit. • Do not handle the battery with ...materials. • When disposing of used for the first time, pull out the film protruding from the tray. Before Using Using the Remote Controller This product is not used batteries, please comply with governmental regulations or environmental public institution's rules that apply in your country/area....
Owner's Manual
Page 20
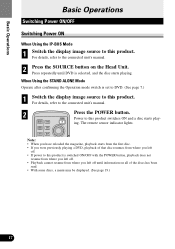
The remote sensor indicator lights. For details, refer to this product is selected, and the disc starts playing. When Using the STAND ALONE Mode Operate after confirming the Operation mode switch is set to DVD. (See page 7.) 1 Switch the display image source to the connected unit's manual. 2 Press...playback does not resume from where you left off. • Playback cannot resume from the first disc. • If you were previously playing a DVD, playback of the discs has been read. • With some discs, a menu may be displayed. (See page 19.) 17 Press repeatedly until...
The remote sensor indicator lights. For details, refer to this product is selected, and the disc starts playing. When Using the STAND ALONE Mode Operate after confirming the Operation mode switch is set to DVD. (See page 7.) 1 Switch the display image source to the connected unit's manual. 2 Press...playback does not resume from where you left off. • Playback cannot resume from the first disc. • If you were previously playing a DVD, playback of the discs has been read. • With some discs, a menu may be displayed. (See page 19.) 17 Press repeatedly until...
Owner's Manual
Page 21
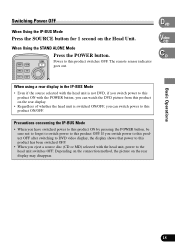
... the display shows that power to this product has been switched OFF. • When you can watch the DVD picture from this product on the rear display. • Regardless of whether the head unit is switched ON/OFF...using a rear display in the IP-BUS Mode • Even if the source selected with the head unit is not DVD, if you switch power to this product ON with the POWER button, you can switch power to this product ON/OFF.... rear display may disappear. 18 When Using the STAND ALONE Mode Press the POWER button. The remote sensor indicator goes out. Power to this product switches OFF.
... the display shows that power to this product has been switched OFF. • When you can watch the DVD picture from this product on the rear display. • Regardless of whether the head unit is switched ON/OFF...using a rear display in the IP-BUS Mode • Even if the source selected with the head unit is not DVD, if you switch power to this product ON with the POWER button, you can switch power to this product ON/OFF.... rear display may disappear. 18 When Using the STAND ALONE Mode Press the POWER button. The remote sensor indicator goes out. Power to this product switches OFF.
Owner's Manual
Page 54
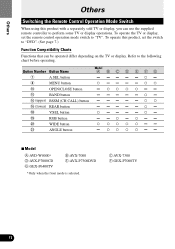
... the TV or display, set the switch to "DVD". (See page 7.) Function Compatibility Charts Functions that can use the supplied remote controller to perform some TV or display operations. Others Others Switching the Remote Control Operation Mode Switch When using this product, set the remote control operation mode switch to the following chart before...
... the TV or display, set the switch to "DVD". (See page 7.) Function Compatibility Charts Functions that can use the supplied remote controller to perform some TV or display operations. Others Others Switching the Remote Control Operation Mode Switch When using this product, set the remote control operation mode switch to the following chart before...

Owner's Manual
Page 55
When using this product, be sure to set the remote control code selection switch to "B" to "A". To operate this product with other Pioneer DVD players, set the remote control code selection switch to use the remote controller only for DVD operation, "A" and "B". Switching the Remote Control Code Selection Switch The remote controller has two remote codes for operation of those players. 52 Others
When using this product, be sure to set the remote control code selection switch to "B" to "A". To operate this product with other Pioneer DVD players, set the remote control code selection switch to use the remote controller only for DVD operation, "A" and "B". Switching the Remote Control Code Selection Switch The remote controller has two remote codes for operation of those players. 52 Others
Owner's Manual
Page 57
... MD) selected with the head unit, power to play just a desired track (ITS playback). This function differs slightly from ITS playback with remote control for DVD player. • When you have switched power to this unit ON by pressing the POWER button, power to this unit OFF. •...to this unit. With this unit. Switching Power ON When connected in the IP-BUS mode to a Pioneer Multi-Channel AV Master Unit (e.g. ITS Playback When connected to a head unit other than a Pioneer Multi-Channel AV Master Unit (e.g. For details, refer to the connected component's Owner's Manual. 2 ...
... MD) selected with the head unit, power to play just a desired track (ITS playback). This function differs slightly from ITS playback with remote control for DVD player. • When you have switched power to this unit ON by pressing the POWER button, power to this unit OFF. •...to this unit. With this unit. Switching Power ON When connected in the IP-BUS mode to a Pioneer Multi-Channel AV Master Unit (e.g. ITS Playback When connected to a head unit other than a Pioneer Multi-Channel AV Master Unit (e.g. For details, refer to the connected component's Owner's Manual. 2 ...
Owner's Manual
Page 58
.... Noise and other factors are pressed. The disc is incorrect. There is no sound. The unit does not operate correctly even when the appropriate remote control buttons are caus- Press the RESET button. (See ing the built-in microprocessor page 6.) to your video system. The....) The unit is low. Check connections. Confirm once more that all con- With some discs, 96 kHz output Switch the output setting to the correct remote control mode. (See pages 7, 51 and 52.) Battery power is performing Still, Slow Motion or Frame-ByFrame playback. There's no sound during Still, Slow...
.... Noise and other factors are pressed. The disc is incorrect. There is no sound. The unit does not operate correctly even when the appropriate remote control buttons are caus- Press the RESET button. (See ing the built-in microprocessor page 6.) to your video system. The....) The unit is low. Check connections. Confirm once more that all con- With some discs, 96 kHz output Switch the output setting to the correct remote control mode. (See pages 7, 51 and 52.) Battery power is performing Still, Slow Motion or Frame-ByFrame playback. There's no sound during Still, Slow...
Owner's Manual
Page 72
... IP-BUS STAND ALONE This Product Black Audio outputs Left (White) 15 cm (5/8 in.) Right (Red) Video output Yellow (FRONT VIDEO OUTPUT) 6 m (19 ft. 8 in.) Remote sensor (supplied with the CD-R7) RCA cable (sold separately) To audio inputs RCA cable (sold separately) To video input Display with RCA input jacks...
... IP-BUS STAND ALONE This Product Black Audio outputs Left (White) 15 cm (5/8 in.) Right (Red) Video output Yellow (FRONT VIDEO OUTPUT) 6 m (19 ft. 8 in.) Remote sensor (supplied with the CD-R7) RCA cable (sold separately) To audio inputs RCA cable (sold separately) To video input Display with RCA input jacks...
Owner's Manual
Page 78
Remote sensor (supplied with the CD-R7) Double-sided tape (supplied with the CD-R7) 75 High tempera- tures may result in damage to the unit. • Install within the transmission range of the remote sensor, and attach it may be subjected to direct sunlight. Stick the double-sided tape to the back of the remote control signal. Installation Installing the Remote Sensor Precaution: • Do not install on the dashboard where it to the center console.
Remote sensor (supplied with the CD-R7) Double-sided tape (supplied with the CD-R7) 75 High tempera- tures may result in damage to the unit. • Install within the transmission range of the remote sensor, and attach it may be subjected to direct sunlight. Stick the double-sided tape to the back of the remote control signal. Installation Installing the Remote Sensor Precaution: • Do not install on the dashboard where it to the center console.


