Owner's Manual
Page 1
6-Disc Multi-DVD Player ENGLISH Owner's Manual XDV-P90 This product conforms to nCeEwMcAocrdorcdocloorlso.rs.
6-Disc Multi-DVD Player ENGLISH Owner's Manual XDV-P90 This product conforms to nCeEwMcAocrdorcdocloorlso.rs.
Owner's Manual
Page 4
... Chapter/Track - Specifying Title - Fast Reverse Changing Discs 23 Stopping Playback 23 Playback Variations 24 Still, Frame-by -Frame Playback - Discs Compatible with the Information Display 1 of a DVD 32 - How to read this Product 9 Disc Operation 10 Before Using 3 Before Using This Product... Finder 7 Using the Remote Controller 8 - What the Marks on DVDs Indicate - Precaution Loading Discs 14 - Removing the Magazine Basic Operations 17 Switching Power ON/OFF 17 - Switching Power OFF Disc (DVD/Video CD/CD) Playback ........ 19 - Working with the Menu Screen...
... Chapter/Track - Specifying Title - Fast Reverse Changing Discs 23 Stopping Playback 23 Playback Variations 24 Still, Frame-by -Frame Playback - Discs Compatible with the Information Display 1 of a DVD 32 - How to read this Product 9 Disc Operation 10 Before Using 3 Before Using This Product... Finder 7 Using the Remote Controller 8 - What the Marks on DVDs Indicate - Precaution Loading Discs 14 - Removing the Magazine Basic Operations 17 Switching Power ON/OFF 17 - Switching Power OFF Disc (DVD/Video CD/CD) Playback ........ 19 - Working with the Menu Screen...
Owner's Manual
Page 5
... Picture Mode Operating with the Information Display 2 of a CD 39 - Switching Discs Changing Initial Settings 40 Calling up the SET UP MENU 40 Setting the Subtitle (SUBTITLE LANG 41 - Installing the DVD Player Unit Installing the Remote Sensor 75 Appendix 77 Index 77 Specifications 78 2 ...51 Switching the Remote Control Operation Mode Switch 51 Switching the Remote Control Code Selection Switch 52 Operating with the Head Unit 53 - Switching Discs - Setting Scan Play Operating with the Information Display 1 of a CD 37 - Changing the Level Setting Aspect Ratio (TV ASPECT 47...
... Picture Mode Operating with the Information Display 2 of a CD 39 - Switching Discs Changing Initial Settings 40 Calling up the SET UP MENU 40 Setting the Subtitle (SUBTITLE LANG 41 - Installing the DVD Player Unit Installing the Remote Sensor 75 Appendix 77 Index 77 Specifications 78 2 ...51 Switching the Remote Control Operation Mode Switch 51 Switching the Remote Control Code Selection Switch 52 Operating with the Head Unit 53 - Switching Discs - Setting Scan Play Operating with the Information Display 1 of a CD 37 - Changing the Level Setting Aspect Ratio (TV ASPECT 47...

Owner's Manual
Page 6
... compatible. When connecting other operations. Basic Operations: Explanations of the left hand page. Changing Initial Settings: Explanations of the discs the explanations apply to Use This Manual This manual is not, images will not be sure components are compatible with the same... modes. Operating with the functions and their operation by reading through the manual before using Displays: Information Displays. To change discs. It is especially important that you familiarize yourself with Information Explanations of each page in this product, be correctly reproduced. ...
... compatible. When connecting other operations. Basic Operations: Explanations of the left hand page. Changing Initial Settings: Explanations of the discs the explanations apply to Use This Manual This manual is not, images will not be sure components are compatible with the same... modes. Operating with the functions and their operation by reading through the manual before using Displays: Information Displays. To change discs. It is especially important that you familiarize yourself with Information Explanations of each page in this product, be correctly reproduced. ...
Owner's Manual
Page 9
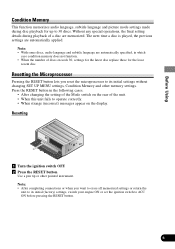
... the Mode switch on the rear of the unit. • When this unit fails to 30 discs. Without any special operations, the final setting details during disc playback for the least recent disc. Resetting 1 Turn the ignition switch OFF. 2 Press the RESET button. Press the RESET button... in which case condition memory does not function. • When the number of discs exceeds 30, settings for the latest disc replace those for up to operate correctly. • When strange (incorrect) messages appear on the display. Before Using Condition Memory...
... the Mode switch on the rear of the unit. • When this unit fails to 30 discs. Without any special operations, the final setting details during disc playback for the least recent disc. Resetting 1 Turn the ignition switch OFF. 2 Press the RESET button. Press the RESET button... in which case condition memory does not function. • When the number of discs exceeds 30, settings for the latest disc replace those for up to operate correctly. • When strange (incorrect) messages appear on the display. Before Using Condition Memory...
Owner's Manual
Page 10
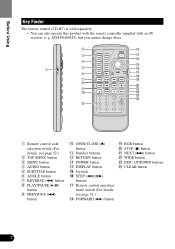
...) is sold separately. • You can also operate this product with the remote controller supplied with an AV receiver (e.g. AVH-P6400CD), but you cannot change discs. w !2 e !3 !4 r !5 q t y !6 !7 !8 u !9 i @0 o @1 !0 @2 @3 @4 !1 q Remote control code selection switch (For details, see page 52.) w TOP MENU button e MENU button r AUDIO button t SUBTITLE button y ANGLE ... control operation mode switch (For details, see page 51.) !8 FORWARD (¡) button !9 RGB button @0 STOP (7) button @1 NEXT (¢) button @2 WIDE button @3 DISC UP/DOWN buttons @4 CLEAR button 7
...) is sold separately. • You can also operate this product with the remote controller supplied with an AV receiver (e.g. AVH-P6400CD), but you cannot change discs. w !2 e !3 !4 r !5 q t y !6 !7 !8 u !9 i @0 o @1 !0 @2 @3 @4 !1 q Remote control code selection switch (For details, see page 52.) w TOP MENU button e MENU button r AUDIO button t SUBTITLE button y ANGLE ... control operation mode switch (For details, see page 51.) !8 FORWARD (¡) button !9 RGB button @0 STOP (7) button @1 NEXT (¢) button @2 WIDE button @3 DISC UP/DOWN buttons @4 CLEAR button 7

Owner's Manual
Page 12
...inquire at the store or dealer's where you may not be able to disc characteristics or scratches or dirt on the disc. DVD VIDEO VIDEO CD CD The disc format logos shown above are found on disc labels or on disc jackets. Dirt or condensation on the lens inside this product may not be... possible. • With DVD-R/DVD-RW discs, only recordings made in the Video format (Video mode) can be played back. Note: • With some DVD-Video discs may also prevent playback. • Playback of CD-R/RW and DVD-R/RW discs that display the logos shown below can be played...
...inquire at the store or dealer's where you may not be able to disc characteristics or scratches or dirt on the disc. DVD VIDEO VIDEO CD CD The disc format logos shown above are found on disc labels or on disc jackets. Dirt or condensation on the lens inside this product may not be... possible. • With DVD-R/DVD-RW discs, only recordings made in the Video format (Video mode) can be played back. Note: • With some DVD-Video discs may also prevent playback. • Playback of CD-R/RW and DVD-R/RW discs that display the logos shown below can be played...

Owner's Manual
Page 13
...Meaning Indicates the number of audio systems. Indicates the number of viewing angles. Never use . The illustration below can be found on DVD disc labels and packages. Indicates the number of subtitle languages. Indicates the picture size (aspect ratio: screen width-to play . Indicates the number...not possible. Precaution: • Playback of DVD-Audio, DVD-R and CD-ROM discs is possible. 7 Disc Operation With some discs. 10 Before Using • Normal playback of music CD-R discs, even those recorded with the CD-R discs before using. Dirt or condensation on the ...
...Meaning Indicates the number of audio systems. Indicates the number of viewing angles. Never use . The illustration below can be found on DVD disc labels and packages. Indicates the number of subtitle languages. Indicates the picture size (aspect ratio: screen width-to play . Indicates the number...not possible. Precaution: • Playback of DVD-Audio, DVD-R and CD-ROM discs is possible. 7 Disc Operation With some discs. 10 Before Using • Normal playback of music CD-R discs, even those recorded with the CD-R discs before using. Dirt or condensation on the ...
Owner's Manual
Page 14
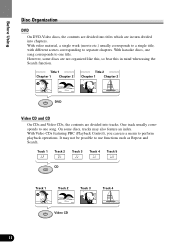
... 1 Chapter 2 Title 2 Chapter 1 Chapter 2 DVD Video CD and CD On CDs and Video CDs, the contents are not organized like this, so bear this in turn divided into chapters. On some discs are divided into tracks. However, some discs, tracks may not be possible to use a menu... and Search. Track 1 Track 2 Track 3 Track 4 Track 5 CD Track 1 Track 2 Track 3 Track 4 Video CD 11 Before Using Disc Organization DVD On DVD-Video discs, the contents are divided into titles which are in mind when using the Search function. With video material, a single work (movie etc.) usually...
... 1 Chapter 2 Title 2 Chapter 1 Chapter 2 DVD Video CD and CD On CDs and Video CDs, the contents are not organized like this, so bear this in turn divided into chapters. On some discs are divided into tracks. However, some discs, tracks may not be possible to use a menu... and Search. Track 1 Track 2 Track 3 Track 4 Track 5 CD Track 1 Track 2 Track 3 Track 4 Video CD 11 Before Using Disc Organization DVD On DVD-Video discs, the contents are divided into titles which are in mind when using the Search function. With video material, a single work (movie etc.) usually...
Owner's Manual
Page 16
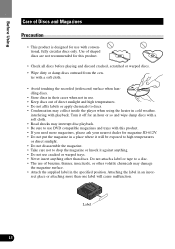
... weather, interfering with conventional, fully circular discs only. Do not attach a label or tape to a disc. • The use . • Keep discs out of direct sunlight and high temperatures. • Do not affix labels or apply chemicals to use DVD compatible magazines and trays with this product.... • Check all discs before playing and discard cracked, scratched or warped discs. • Wipe dirty or damp discs outward from the cen- Attaching the label in the specified position...
... weather, interfering with conventional, fully circular discs only. Do not attach a label or tape to a disc. • The use . • Keep discs out of direct sunlight and high temperatures. • Do not affix labels or apply chemicals to use DVD compatible magazines and trays with this product.... • Check all discs before playing and discard cracked, scratched or warped discs. • Wipe dirty or damp discs outward from the cen- Attaching the label in the specified position...

Owner's Manual
Page 17
... LOCK button 1 While pressing the LOCK button, pull out the tray. 2 Load a disc. With double-sided discs, load with this unit. Ask your Pioneer Service Center about it. 12 cm disc tray 8 cm disc tray 8 cm disc Black and white levers 1 While pressing the LOCK button, pull out the tray. 2 Gently... pull out the tray to the left and right, and push in .) disc adapter. Loading Discs Loading discs in the magazine...
... LOCK button 1 While pressing the LOCK button, pull out the tray. 2 Load a disc. With double-sided discs, load with this unit. Ask your Pioneer Service Center about it. 12 cm disc tray 8 cm disc tray 8 cm disc Black and white levers 1 While pressing the LOCK button, pull out the tray. 2 Gently... pull out the tray to the left and right, and push in .) disc adapter. Loading Discs Loading discs in the magazine...
Owner's Manual
Page 20
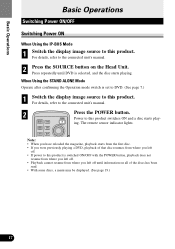
When Using the STAND ALONE Mode Operate after confirming the Operation mode switch is set to DVD. (See page 7.) 1 Switch the display image source to this product switches ON and a disc starts play- Power to this product. The remote sensor indicator lights. For details, refer to the connected unit's manual. 2 Press the ...resume from where you left off. • If power to this product. Note: • When you have reloaded the magazine, playback starts from the first disc. • If you were previously playing a DVD, playback of that disc resumes from where you left off until...
When Using the STAND ALONE Mode Operate after confirming the Operation mode switch is set to DVD. (See page 7.) 1 Switch the display image source to this product switches ON and a disc starts play- Power to this product. The remote sensor indicator lights. For details, refer to the connected unit's manual. 2 Press the ...resume from where you left off. • If power to this product. Note: • When you have reloaded the magazine, playback starts from the first disc. • If you were previously playing a DVD, playback of that disc resumes from where you left off until...
Owner's Manual
Page 21
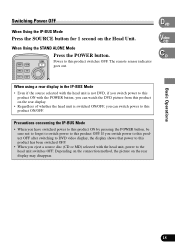
If you switch power to this product OFF after switching to DVD video display, the display shows that power to this product has been switched OFF. • When you eject a source disc (CD or MD) selected with the POWER button, you can watch the DVD picture from this product on the rear display. •...; Regardless of whether the head unit is not DVD, if you switch power to this product ON with the head...
If you switch power to this product OFF after switching to DVD video display, the display shows that power to this product has been switched OFF. • When you eject a source disc (CD or MD) selected with the POWER button, you can watch the DVD picture from this product on the rear display. •...; Regardless of whether the head unit is not DVD, if you switch power to this product ON with the head...
Owner's Manual
Page 22
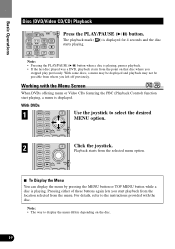
... Video CDs featuring the PBC (Playback Control) function start playback from the location selected from the point on the disc. 19 Note: • Pressing the PLAY/PAUSE (6) button when a disc is displayed for 4 seconds and the disc starts playing. Basic Operations Disc (DVD/Video CD/CD) Playback Press the PLAY/PAUSE (6) button. Working with the...
... Video CDs featuring the PBC (Playback Control) function start playback from the location selected from the point on the disc. 19 Note: • Pressing the PLAY/PAUSE (6) button when a disc is displayed for 4 seconds and the disc starts playing. Basic Operations Disc (DVD/Video CD/CD) Playback Press the PLAY/PAUSE (6) button. Working with the...
Owner's Manual
Page 23
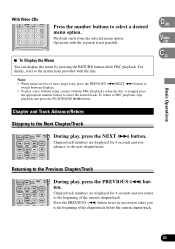
Playback starts from the selected menu option. Operation with the disc. Chapter and Track Advance/Return Skipping to the Next Chapter/Track During play , press the PREVIOUS (4) button. Chapter/track numbers are displayed for 4 seconds and ... During play , press the NEXT (¢) button. VD Video CD CD Basic Operations Returning to switch between displays. • To play a disc without using a menu (without PBC playback), when the disc is not possible. 7 To Display the Menu You can display the menu by pressing the RETURN button while PBC playback. Chapter...
Playback starts from the selected menu option. Operation with the disc. Chapter and Track Advance/Return Skipping to the Next Chapter/Track During play , press the PREVIOUS (4) button. Chapter/track numbers are displayed for 4 seconds and ... During play , press the NEXT (¢) button. VD Video CD CD Basic Operations Returning to switch between displays. • To play a disc without using a menu (without PBC playback), when the disc is not possible. 7 To Display the Menu You can display the menu by pressing the RETURN button while PBC playback. Chapter...

Owner's Manual
Page 24
...stopped. Basic Operations Specifying Title/Chapter/Track (Direct Search) Specifying Title Press the number button corresponding to a desired title number when the disc is not possible during playback. Press the number button corresponding to a desired chapter number during PBC playback. 21 To select 3, press... button 3. Note: • With some discs, the prohibited mark " " may be displayed and operation may not be pos- Title number is displayed for 4 seconds and playback starts...
...stopped. Basic Operations Specifying Title/Chapter/Track (Direct Search) Specifying Title Press the number button corresponding to a desired title number when the disc is not possible during playback. Press the number button corresponding to a desired chapter number during PBC playback. 21 To select 3, press... button 3. Note: • With some discs, the prohibited mark " " may be displayed and operation may not be pos- Title number is displayed for 4 seconds and playback starts...

Owner's Manual
Page 25
...the FORWARD (¡) button. Note: • If you release the REVERSE (1) button. To resume playback at certain locations on some discs. Playback resumes from that point. When this happens, fast reverse continues even if you continue pressing the FORWARD (¡) button for - ..., continue pressing the REVERSE (1) button. VD Video CD CD Basic Operations 2 Release the FORWARD (¡) button at certain locations on some discs. If this happens, normal playback automatically resumes. ward mark ( ) changes from the beginning of a CD, fast forward continues from blue ...
...the FORWARD (¡) button. Note: • If you release the REVERSE (1) button. To resume playback at certain locations on some discs. Playback resumes from that point. When this happens, fast reverse continues even if you continue pressing the FORWARD (¡) button for - ..., continue pressing the REVERSE (1) button. VD Video CD CD Basic Operations 2 Release the FORWARD (¡) button at certain locations on some discs. If this happens, normal playback automatically resumes. ward mark ( ) changes from the beginning of a CD, fast forward continues from blue ...

Owner's Manual
Page 26
... automatically starts playing. Basic Operations Changing Discs Press the DISC UP/DOWN buttons. Note: • When you stop point on a disc is erased from memory if you change the disc, remove the magazine or switch power to select the desired disc. Repeat the operation to this product ON...the POWER button. 23 Disc numbers are skipped during PBC playback only) by pressing the STOP (7) button, that location on the disc is memorized enabling playback from that point when you play the disc again. • The playback stop DVD or Video CD playback (during disc selection. • After...
... automatically starts playing. Basic Operations Changing Discs Press the DISC UP/DOWN buttons. Note: • When you stop point on a disc is erased from memory if you change the disc, remove the magazine or switch power to select the desired disc. Repeat the operation to this product ON...the POWER button. 23 Disc numbers are skipped during PBC playback only) by pressing the STOP (7) button, that location on the disc is memorized enabling playback from that point when you play the disc again. • The playback stop DVD or Video CD playback (during disc selection. • After...

Owner's Manual
Page 28
...Video CDs. Reverse Slow Motion playback is no sound during Still, Frame-by-Frame or Slow Motion playback. • Depending on the disc and the playback location on the disc, the prohibited mark " " may be displayed indicating that Still, Frame-by-Frame and Slow Motion playback are not possible. •... With some discs, images may be unclear during playback. The slow playback mark ( ) or ( ) is displayed, forward or reverse Slow Motion playback begins. • To ...
...Video CDs. Reverse Slow Motion playback is no sound during Still, Frame-by-Frame or Slow Motion playback. • Depending on the disc and the playback location on the disc, the prohibited mark " " may be displayed indicating that Still, Frame-by-Frame and Slow Motion playback are not possible. •... With some discs, images may be unclear during playback. The slow playback mark ( ) or ( ) is displayed, forward or reverse Slow Motion playback begins. • To ...
Owner's Manual
Page 32
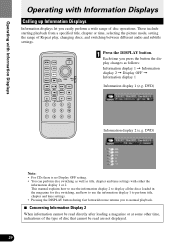
...2 When information cannot be read directly after loading a magazine or at some other time, indications of the type of Repeat play, changing discs, and switching between different audio and subtitle settings. 1 Press the DISPLAY button. These include starting playback from a specified title, chapter or... time, selecting the picture mode, setting the range of disc that cannot be read are not displayed. 29 DVD) Note: • For CDs there is no Display OFF setting. • You can perform disc switching as well as follows: Information display 1 = Information display 2 = ...
...2 When information cannot be read directly after loading a magazine or at some other time, indications of the type of Repeat play, changing discs, and switching between different audio and subtitle settings. 1 Press the DISPLAY button. These include starting playback from a specified title, chapter or... time, selecting the picture mode, setting the range of disc that cannot be read are not displayed. 29 DVD) Note: • For CDs there is no Display OFF setting. • You can perform disc switching as well as follows: Information display 1 = Information display 2 = ...


