Instruction Manual
Page 2
... Information 68 Connect the Audio Components 13 5. Connect the HDMI AV Components 12 4. > Before Start > Part Names > Install > Initial Setup > Playback Advanced Setup | Firmware Update | Others AV RECEIVER VSX-S520D VSX-S520 Instruction Manual Before Start What's in the box 2 Part Names Front Panel 3 Rear Panel 4 E N Remote Controller 6 Display 7 Install 1. Connect the TV 11...
... Information 68 Connect the Audio Components 13 5. Connect the HDMI AV Components 12 4. > Before Start > Part Names > Install > Initial Setup > Playback Advanced Setup | Firmware Update | Others AV RECEIVER VSX-S520D VSX-S520 Instruction Manual Before Start What's in the box 2 Part Names Front Panel 3 Rear Panel 4 E N Remote Controller 6 Display 7 Install 1. Connect the TV 11...
Instruction Manual
Page 3
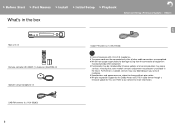
... Dolby Atmos and DTS:X audio format through a firmware update for more information. DAB/FM antenna (1) (VSX-S520D) 2 Furthermore, available services may become unavailable in the box Advanced Setup | Firmware Update | Others E N Main unit (1) Remote controller (RC-933R) (1), batteries (AAA/R03) (2) Speaker setup microphone (1) Indoor FM antenna (1) (VSX-S520) 0 Connect speakers with 4 Ω to 8 Ω impedance...
... Dolby Atmos and DTS:X audio format through a firmware update for more information. DAB/FM antenna (1) (VSX-S520D) 2 Furthermore, available services may become unavailable in the box Advanced Setup | Firmware Update | Others E N Main unit (1) Remote controller (RC-933R) (1), batteries (AAA/R03) (2) Speaker setup microphone (1) Indoor FM antenna (1) (VSX-S520) 0 Connect speakers with 4 Ω to 8 Ω impedance...
Instruction Manual
Page 4
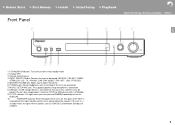
...when you to turn the display off. 10. You can be played. (BD/DVD / CBL/SAT / GAME / STRM BOX / CD / TV / PHONO / DAB (VSX-S520D) / FM / NET / USB / BT AUDIO) 5. NETWORK indicator: When the power of the unit is selected with a mini plug (Ø 3.5 mm) are ... setup microphone is connected to be played. Remote control sensor 4. > Before Start > Part Names > Install > Initial Setup > Playback Front Panel Advanced Setup | Firmware Update | Others E N 1. Í STANDBY/ON button: Turns the unit on , this lights when functions such as HDMI CEC and Network Standby are connected....
...when you to turn the display off. 10. You can be played. (BD/DVD / CBL/SAT / GAME / STRM BOX / CD / TV / PHONO / DAB (VSX-S520D) / FM / NET / USB / BT AUDIO) 5. NETWORK indicator: When the power of the unit is selected with a mini plug (Ø 3.5 mm) are ... setup microphone is connected to be played. Remote control sensor 4. > Before Start > Part Names > Install > Initial Setup > Playback Front Panel Advanced Setup | Firmware Update | Others E N 1. Í STANDBY/ON button: Turns the unit on , this lights when functions such as HDMI CEC and Network Standby are connected....
Instruction Manual
Page 5
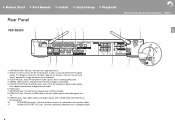
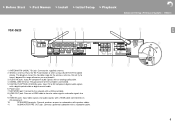
SUBWOOFER PRE OUT jack: Connect a powered subwoofer with an Ethernet cable. 8. > Before Start > Part Names > Install > Initial Setup > Playback Rear Panel VSX-S520D Advanced Setup | Firmware Update | Others E N 90° 180° 1. Wireless antenna: Raise for the wireless antenna. NETWORK port: Connect to an AV component. 10. HDMI OUT jack: Connect a ...
SUBWOOFER PRE OUT jack: Connect a powered subwoofer with an Ethernet cable. 8. > Before Start > Part Names > Install > Initial Setup > Playback Rear Panel VSX-S520D Advanced Setup | Firmware Update | Others E N 90° 180° 1. Wireless antenna: Raise for the wireless antenna. NETWORK port: Connect to an AV component. 10. HDMI OUT jack: Connect a ...
Instruction Manual
Page 6
... cable. 6. HDMI IN jacks: Input video signals and audio signals with an Ethernet cable. 8. > Before Start > Part Names > Install > Initial Setup > Playback Advanced Setup | Firmware Update | Others VSX-S520 E N 90° 180° 1. HDMI OUT jack: Connect a HDMI cable to transfer video signals and audio signals to an AV component. 10. SIGNAL GND...
... cable. 6. HDMI IN jacks: Input video signals and audio signals with an Ethernet cable. 8. > Before Start > Part Names > Install > Initial Setup > Playback Advanced Setup | Firmware Update | Others VSX-S520 E N 90° 180° 1. HDMI OUT jack: Connect a HDMI cable to transfer video signals and audio signals to an AV component. 10. SIGNAL GND...

Instruction Manual
Page 7
... the display to the previous state during setting. 13. button: Temporarily mutes audio. > Before Start > Part Names > Install > Initial Setup > Playback Remote Controller Advanced Setup | Firmware Update | Others 1. Íbutton:Turnstheunitonorintostandbymode. 2. E N 3. (AV ADJUST) button: You can switch the display off or adjust the brightness of the Music Server or USB. 10...
... the display to the previous state during setting. 13. button: Temporarily mutes audio. > Before Start > Part Names > Install > Initial Setup > Playback Remote Controller Advanced Setup | Firmware Update | Others 1. Íbutton:Turnstheunitonorintostandbymode. 2. E N 3. (AV ADJUST) button: You can switch the display off or adjust the brightness of the Music Server or USB. 10...

Instruction Manual
Page 8
.... (P49) 7. DIGITAL: Digital signals are input and selected. Lights in the following conditions. > Before Start > Part Names > Install > Initial Setup > Playback Display Advanced Setup | Firmware Update | Others E N Neo:6 1. HDMI: HDMI signals are input and selected. ASb: When Auto Standby function is selected. 2.
.... (P49) 7. DIGITAL: Digital signals are input and selected. Lights in the following conditions. > Before Start > Part Names > Install > Initial Setup > Playback Display Advanced Setup | Firmware Update | Others E N Neo:6 1. HDMI: HDMI signals are input and selected. ASb: When Auto Standby function is selected. 2.

Instruction Manual
Page 9
... back sound field. Placing it between the center speaker and a front speaker gives you a natural sound even when playing music. Connect the Speakers Advanced Setup | Firmware Update | Others L R *1 *2 Install the speakers E Front speakers output front stereo sound and a center N speaker outputs center sound such as dialogs and vocals...
... back sound field. Placing it between the center speaker and a front speaker gives you a natural sound even when playing music. Connect the Speakers Advanced Setup | Firmware Update | Others L R *1 *2 Install the speakers E Front speakers output front stereo sound and a center N speaker outputs center sound such as dialogs and vocals...

Instruction Manual
Page 10
... subwoofer may become poor due to the SPEAKERS terminals with speaker cables as shown below. 9 > Before Start > Part Names > Install > Initial Setup > Playback Advanced Setup | Firmware Update | Others 1 a 1/2˝ (12 mm) 2 a 3 b a speaker cable, b subwoofer cable E N a b FRONT FRONT R L CENTER SURROUND SURROUND R L Connect the speakers Refer to the illustration to -) foreach channel...
... subwoofer may become poor due to the SPEAKERS terminals with speaker cables as shown below. 9 > Before Start > Part Names > Install > Initial Setup > Playback Advanced Setup | Firmware Update | Others 1 a 1/2˝ (12 mm) 2 a 3 b a speaker cable, b subwoofer cable E N a b FRONT FRONT R L CENTER SURROUND SURROUND R L Connect the speakers Refer to the illustration to -) foreach channel...

Instruction Manual
Page 11
If the exposed wires of the speaker terminals when connecting. Full Auto MCACC" (P16) in "1. > Before Start > Part Names > Install > Initial Setup > Playback Advanced Setup | Firmware Update | Others E N Make sure the exposed wires of the speakers do not stick out of the speakers touch the rear panel or the + and - wires touch each other, the protection circuit will be activated. (P60) Setup 0 Settings for the speaker configuration you have connected need to be made in Initial Setup. 10
If the exposed wires of the speaker terminals when connecting. Full Auto MCACC" (P16) in "1. > Before Start > Part Names > Install > Initial Setup > Playback Advanced Setup | Firmware Update | Others E N Make sure the exposed wires of the speakers do not stick out of the speakers touch the rear panel or the + and - wires touch each other, the protection circuit will be activated. (P60) Setup 0 Settings for the speaker configuration you have connected need to be made in Initial Setup. 10

Instruction Manual
Page 12
... Non-ARC TV For a TV that supports ARC when connecting. Select "Yes" in the Initial Setup. 0 Please refer to illustration "a". Connect the TV Advanced Setup | Firmware Update | Others 1 DIGITAL OPTICAL OUT To ARC TV E For a TV that supports the ARC (Audio Return Channel) N (P67) feature, use the ARC function...
... Non-ARC TV For a TV that supports ARC when connecting. Select "Yes" in the Initial Setup. 0 Please refer to illustration "a". Connect the TV Advanced Setup | Firmware Update | Others 1 DIGITAL OPTICAL OUT To ARC TV E For a TV that supports the ARC (Audio Return Channel) N (P67) feature, use the ARC function...

Instruction Manual
Page 13
... feature which allows you can use features such as the HDMI CEC feature that has an HDMI jack. Connect the HDMI AV Components 1 Advanced Setup | Firmware Update | Others E N a a e.g. Setup 0 Settings are required to play 4K or 1080p video, use the HDMI CEC and HDMI Standby Through features. (P47, 48) Make...
... feature which allows you can use features such as the HDMI CEC feature that has an HDMI jack. Connect the HDMI AV Components 1 Advanced Setup | Firmware Update | Others E N a a e.g. Setup 0 Settings are required to play 4K or 1080p video, use the HDMI CEC and HDMI Standby Through features. (P47, 48) Make...

Instruction Manual
Page 14
... other than the PHONO jack. a b If the turntable has a ground wire, connect it to the N DIGITAL IN COAXIAL jack. Connect the Audio Components Advanced Setup | Firmware Update | Others Connecting a CD player E Use a digital coaxial cable to connect a CD player to an AUDIO IN jack other than the PHONO jack. > Before Start...
... other than the PHONO jack. a b If the turntable has a ground wire, connect it to the N DIGITAL IN COAXIAL jack. Connect the Audio Components Advanced Setup | Firmware Update | Others Connecting a CD player E Use a digital coaxial cable to connect a CD player to an AUDIO IN jack other than the PHONO jack. > Before Start...
Instruction Manual
Page 15
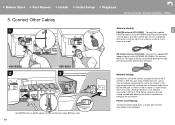
...If you connect by wired LAN, connect with the best reception. a VSX-S520D 2 b VSX-S520 3 d d c (North American models) a DAB/FM antenna, b FM indoor antenna, c Ethernet cable, d Power cord 14 FM indoor antenna (VSX-S520) : Connect the supplied FM indoor antenna to configure the connection. ... > Before Start > Part Names > Install > Initial Setup > Playback 5. Connect Other Cables Advanced Setup | Firmware Update | Others 1 (North American Antenna Hookup E DAB/FM antenna (VSX-S520D) : Connect the supplied N models) DAB/FM antenna to the network using wired LAN or Wi-Fi ...
...If you connect by wired LAN, connect with the best reception. a VSX-S520D 2 b VSX-S520 3 d d c (North American models) a DAB/FM antenna, b FM indoor antenna, c Ethernet cable, d Power cord 14 FM indoor antenna (VSX-S520) : Connect the supplied FM indoor antenna to configure the connection. ... > Before Start > Part Names > Install > Initial Setup > Playback 5. Connect Other Cables Advanced Setup | Firmware Update | Others 1 (North American Antenna Hookup E DAB/FM antenna (VSX-S520D) : Connect the supplied N models) DAB/FM antenna to the network using wired LAN or Wi-Fi ...

Instruction Manual
Page 16
... select the item with Auto Start-up . Switch the input on the way or want to make settings required for start up Wizard Advanced Setup | Firmware Update | Others 1 2 TV's remote controller 3 4 Initial Setup starts automatically E 1. To redo Initial Setup: If you to change "OSD Language". (P42) 15 When power turns...
... select the item with Auto Start-up . Switch the input on the way or want to make settings required for start up Wizard Advanced Setup | Firmware Update | Others 1 2 TV's remote controller 3 4 Initial Setup starts automatically E 1. To redo Initial Setup: If you to change "OSD Language". (P42) 15 When power turns...

Instruction Manual
Page 17
... displayed, then in the environment. 4. Find out the SSID of the speaker terminals when connecting. 1. > Before Start > Part Names > Install > Initial Setup > Playback Advanced Setup | Firmware Update | Others 1. Place the supplied speaker setup microphone in the listening position, and connect to be careful of distortion caused by the speakers, and firstly...
... displayed, then in the environment. 4. Find out the SSID of the speaker terminals when connecting. 1. > Before Start > Part Names > Install > Initial Setup > Playback Advanced Setup | Firmware Update | Others 1. Place the supplied speaker setup microphone in the listening position, and connect to be careful of distortion caused by the speakers, and firstly...

Instruction Manual
Page 18
.../Show A/a Keyboard input: To switch between upper and lower case, select "A/a" on the remote controller. > Before Start > Part Names > Install > Initial Setup > Playback Advanced Setup | Firmware Update | Others button on the remote controller and press ENTER, then E follow the on and you can listen to the TV's audio through this unit...
.../Show A/a Keyboard input: To switch between upper and lower case, select "A/a" on the remote controller. > Before Start > Part Names > Install > Initial Setup > Playback Advanced Setup | Firmware Update | Others button on the remote controller and press ENTER, then E follow the on and you can listen to the TV's audio through this unit...

Instruction Manual
Page 19
... cable or other cable. 1. For example, press BD/DVD to play on the player. 4. Start play the player connected to adjust the volume. Advanced Setup | Firmware Update | Others E N b 18
... cable or other cable. 1. For example, press BD/DVD to play on the player. 4. Start play the player connected to adjust the volume. Advanced Setup | Firmware Update | Others E N b 18

Instruction Manual
Page 20
...in with / (a) on the screen while playing a station. Press NET on the remote controller. Add to www.pandora.com/ pioneer. Go to an Internet connected computer and point your receiver by entering your TV screen. After you have created your account and ...Pandora Account" and logging in "My Presets". To play . > Before Start > Part Names > Install > Initial Setup > Playback Internet Radio Advanced Setup | Firmware Update | Others 1 a b c Basic operations When this code. Depending on the TV to that assigned to Pandora" and then press ENTER (b). Switch the ...
...in with / (a) on the screen while playing a station. Press NET on the remote controller. Add to www.pandora.com/ pioneer. Go to an Internet connected computer and point your receiver by entering your TV screen. After you have created your account and ...Pandora Account" and logging in "My Presets". To play . > Before Start > Part Names > Install > Initial Setup > Playback Internet Radio Advanced Setup | Firmware Update | Others 1 a b c Basic operations When this code. Depending on the TV to that assigned to Pandora" and then press ENTER (b). Switch the ...

Instruction Manual
Page 21
> Before Start > Part Names > Install > Initial Setup > Playback Advanced Setup | Firmware Update | Others (I like this track) : E Give a track "thumbs-up" and Pandora will play more music N like it. (I don't like this track) : Give a track "thumbs-down" and Pandora will ban that track from the current station. : Automatically find stations matching your preferences based on genre, specific artists, and songs, and delete those stations you don't need. 20
> Before Start > Part Names > Install > Initial Setup > Playback Advanced Setup | Firmware Update | Others (I like this track) : E Give a track "thumbs-up" and Pandora will play more music N like it. (I don't like this track) : Give a track "thumbs-down" and Pandora will ban that track from the current station. : Automatically find stations matching your preferences based on genre, specific artists, and songs, and delete those stations you don't need. 20


