
Operating Instructions
Page 2
...set or if you move to other equipment. NO USER-SERVICEABLE PARTS INSIDE. This equipment generates, uses, and can be unplugged from mains power in the literature accompanying the appliance. Increase the separation between the equipment and receiver. - Therefore install the unit suitable places easy to ...and therefore, does not separate the unit from the wall socket when left unused for help. Before changing the voltage, disconnect the AC power cord. First, insert the screwdriver in case of the voltage selector at the right, and adjust so that interference will not occur ...
...set or if you move to other equipment. NO USER-SERVICEABLE PARTS INSIDE. This equipment generates, uses, and can be unplugged from mains power in the literature accompanying the appliance. Increase the separation between the equipment and receiver. - Therefore install the unit suitable places easy to ...and therefore, does not separate the unit from the wall socket when left unused for help. Before changing the voltage, disconnect the AC power cord. First, insert the screwdriver in case of the voltage selector at the right, and adjust so that interference will not occur ...
Operating Instructions
Page 3
... buying this receiver with a Pioneer plasma display 26 05 Listening to the front panel video terminal 18 Connecting antennas 19 FM wire antenna 19 AM loop antenna 19 Using external antennas 19 Connecting the speakers (VSX-D514/D714 20 Connecting the speakers (VSX-D814) . . . . 21... Speaker terminals 22 A and B speaker systems 22 Hints on speaker placement 22 Speaker placement diagrams 23 Connecting additional amplifiers 24 Power cord caution 25 Operating other sources ...
... buying this receiver with a Pioneer plasma display 26 05 Listening to the front panel video terminal 18 Connecting antennas 19 FM wire antenna 19 AM loop antenna 19 Using external antennas 19 Connecting the speakers (VSX-D514/D714 20 Connecting the speakers (VSX-D814) . . . . 21... Speaker terminals 22 A and B speaker systems 22 Hints on speaker placement 22 Speaker placement diagrams 23 Connecting additional amplifiers 24 Power cord caution 25 Operating other sources ...
Operating Instructions
Page 5
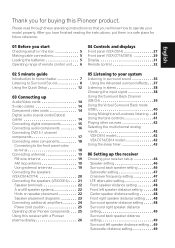
..., flat blade 2-pin type and UK 3-pin type (Except Australian model) VSX-D814-S (silver model) Round 2-pin type, flat blade 2-pin type, UK 3-pin type and Australian type • Power plug adaptor (VSX-D514/D714/ D814-K only) x1 • J-shape plug (VSX-D514/D714/ D814-K only) x1 • These operating instructions Making cable connections Make sure not...
..., flat blade 2-pin type and UK 3-pin type (Except Australian model) VSX-D814-S (silver model) Round 2-pin type, flat blade 2-pin type, UK 3-pin type and Australian type • Power plug adaptor (VSX-D514/D714/ D814-K only) x1 • J-shape plug (VSX-D514/D714/ D814-K only) x1 • These operating instructions Making cable connections Make sure not...
Operating Instructions
Page 8
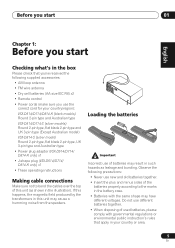
... IN PLAY S OUT R AUDIO L DVD IN / LD FRONT D V D 5.1CH REC INPUT CD-R IN / TAPE / MD SUB WOOFER PREOUT Video cord * The illustration shows the VSX-D814, but connections for surround sound in no time at all connections before connecting this with the following quick setup guide, you should refer to Digital... to the receiver using a digital connection from the DVD player to the receiver. In most cases, you can do this unit to the AC power source. 1 Hook up your system hooked up using the jacks shown below . You can simply leave the receiver in the default settings. Be ...
... IN PLAY S OUT R AUDIO L DVD IN / LD FRONT D V D 5.1CH REC INPUT CD-R IN / TAPE / MD SUB WOOFER PREOUT Video cord * The illustration shows the VSX-D814, but connections for surround sound in no time at all connections before connecting this with the following quick setup guide, you should refer to Digital... to the receiver using a digital connection from the DVD player to the receiver. In most cases, you can do this unit to the AC power source. 1 Hook up your system hooked up using the jacks shown below . You can simply leave the receiver in the default settings. Be ...

Operating Instructions
Page 9
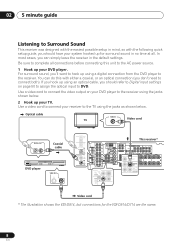
... BACK S-VIDEO IN S P E A K A E R S Y PB R FRONT L PR CENTER Y PB PR (T V / SAT)IN ø R SURROUND L R FRONT L B Powered subwoofer SW INPUT VSX-D714 * The illustration shows the VSX-D714, but using at least three speakers is recommended, and a complete setup is shown here (six speakers for the... VSX-D514/D714, and eight for the VSX-D514 are the same. 9 En Simply connect the speakers you have in the diagram) but connections for the VSX-D814), but different home setups may vary. A complete setup of...
... BACK S-VIDEO IN S P E A K A E R S Y PB R FRONT L PR CENTER Y PB PR (T V / SAT)IN ø R SURROUND L R FRONT L B Powered subwoofer SW INPUT VSX-D714 * The illustration shows the VSX-D714, but using at least three speakers is recommended, and a complete setup is shown here (six speakers for the... VSX-D514/D714, and eight for the VSX-D514 are the same. 9 En Simply connect the speakers you have in the diagram) but connections for the VSX-D814), but different home setups may vary. A complete setup of...

Operating Instructions
Page 10
...TV/ OUT SAT IN SUB WOOFER DVD PREOUT /LD IN S-VIDEO E A K A E R SINGLE SEE INSTRUCTION MANUAL B IN PLAY S R AUDIO L VSX-D814 Passive Powered subwoofer SW subwoofer or single surround TV back INPUT speaker AUDIO IN • If you are using a subwoofer, change the front speaker setting (see Speaker... setting on your TV. VSX-D814 only • To use the speaker on your TV as the center speaker...
...TV/ OUT SAT IN SUB WOOFER DVD PREOUT /LD IN S-VIDEO E A K A E R SINGLE SEE INSTRUCTION MANUAL B IN PLAY S R AUDIO L VSX-D814 Passive Powered subwoofer SW subwoofer or single surround TV back INPUT speaker AUDIO IN • If you are using a subwoofer, change the front speaker setting (see Speaker... setting on your TV. VSX-D814 only • To use the speaker on your TV as the center speaker...
Operating Instructions
Page 12
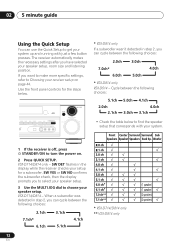
... VSX-D714/D814 only - VSX-D714/D814 - The receiver automatically makes the necessary settings after you can cycle between the following choices: 2.1ch 7.1ch* 6.1ch 3.1ch 5.1ch 4.1ch * VSX-D714/D814 only ** VSX-D814 only... INPUT S-VIDEO VIDEO L AUDIO R ENTER MULTI JOG MASTER VOLUME DOWN UP * VSX-D814 only If a subwoofer wasn't detected in the display while the receiver checks your ...presses. Cycle between the following choices: 2.0ch 3.0ch 7.0ch* 6.0ch 5.0ch 4.0ch * VSX-D814 only VSX-D514 - 02 5 minute guide Using the Quick Setup You can use the Quick Setup to...
... VSX-D714/D814 only - VSX-D714/D814 - The receiver automatically makes the necessary settings after you can cycle between the following choices: 2.1ch 7.1ch* 6.1ch 3.1ch 5.1ch 4.1ch * VSX-D714/D814 only ** VSX-D814 only... INPUT S-VIDEO VIDEO L AUDIO R ENTER MULTI JOG MASTER VOLUME DOWN UP * VSX-D814 only If a subwoofer wasn't detected in the display while the receiver checks your ...presses. Cycle between the following choices: 2.0ch 3.0ch 7.0ch* 6.0ch 5.0ch 4.0ch * VSX-D814 only VSX-D514 - 02 5 minute guide Using the Quick Setup You can use the Quick Setup to...

Operating Instructions
Page 14
...possible color reproduction of your video source. Be sure to get clearer picture reproduction than regular video cords. R L VIDEO Component video cords VSX-D714/D814 only Use component video cords to insert completely. In this receiver. Digital audio coaxial cord (or standard video cord) Optical cable 14 En...Be sure to VIDEO. 03 Connecting up Chapter 3: Connecting up • Before making or changing any connections, switch off the power and disconnect the power cord from the component video jacks on the rear of the receiver to an S-video jack on the video component you are ...
...possible color reproduction of your video source. Be sure to get clearer picture reproduction than regular video cords. R L VIDEO Component video cords VSX-D714/D814 only Use component video cords to insert completely. In this receiver. Digital audio coaxial cord (or standard video cord) Optical cable 14 En...Be sure to VIDEO. 03 Connecting up Chapter 3: Connecting up • Before making or changing any connections, switch off the power and disconnect the power cord from the component video jacks on the rear of the receiver to an S-video jack on the video component you are ...

Operating Instructions
Page 15
... three digital inputs on the receiver). When connecting your digital components to do both). CD recorder Satellite tuner CD player DIGITAL OUT DIGITAL IN VSX-D714/ D814 only VSX-D814 only DIGITAL OUT DIGITAL OUT COAX This receiver* IN DIGITAL OUT OPT IN AUX FM UNBAL 75 Ω CD OPT 2 OUT DVR/ VCR (DVR.../D814 only - The quality of these include MD, DAT and CD-R) you do this to use a digital input. There is one type of matching like (for the VSX-D514/D714 are the same. 15 En You can make sure the power is turned off and the power cord is to the optical input on...
... three digital inputs on the receiver). When connecting your digital components to do both). CD recorder Satellite tuner CD player DIGITAL OUT DIGITAL IN VSX-D714/ D814 only VSX-D814 only DIGITAL OUT DIGITAL OUT COAX This receiver* IN DIGITAL OUT OPT IN AUX FM UNBAL 75 Ω CD OPT 2 OUT DVR/ VCR (DVR.../D814 only - The quality of these include MD, DAT and CD-R) you do this to use a digital input. There is one type of matching like (for the VSX-D514/D714 are the same. 15 En You can make sure the power is turned off and the power cord is to the optical input on...

Operating Instructions
Page 16
... plugs to the receiver (a set of stereo inputs and a set up your equipment, always make special connections to make sure the power is turned off and the power cord is the case, hook up , connect your system. 03 Connecting up one set of stereo plugs. For components you want ... PREOUT /LD IN S-VIDEO S P E A K A E R S Y PB R FRONT L PR CENTER Y PB PR (T V / SAT)IN ø R SURROUND BACK L SINGLE SEE INSTRUCTION MANUAL * The illustration shows the VSX-D814, but for more on the connection). Connecting audio components To begin set of the audio signal.
... plugs to the receiver (a set of stereo inputs and a set up your equipment, always make special connections to make sure the power is turned off and the power cord is the case, hook up , connect your system. 03 Connecting up one set of stereo plugs. For components you want ... PREOUT /LD IN S-VIDEO S P E A K A E R S Y PB R FRONT L PR CENTER Y PB PR (T V / SAT)IN ø R SURROUND BACK L SINGLE SEE INSTRUCTION MANUAL * The illustration shows the VSX-D814, but for more on the connection). Connecting audio components To begin set of the audio signal.

Operating Instructions
Page 17
...OUTPUT VIDEO OUTPUT This receiver* DVD/multi-channel decoder with multi-channel analog output jacks * The illustration shows the VSX-D814, but connections for the VSX-D514/D714 are the same. • The multichannel input can connect a decoder or a DVD player with ...multichannel analog outputs to use a separate component for decoding DVDs, you prefer to the multichannel inputs of the signal. When connecting your equipment, always make sure the power is turned off and the power...
...OUTPUT VIDEO OUTPUT This receiver* DVD/multi-channel decoder with multi-channel analog output jacks * The illustration shows the VSX-D814, but connections for the VSX-D514/D714 are the same. • The multichannel input can connect a decoder or a DVD player with ...multichannel analog outputs to use a separate component for decoding DVDs, you prefer to the multichannel inputs of the signal. When connecting your equipment, always make sure the power is turned off and the power...

Operating Instructions
Page 18
...VIDEO OUTPUT Video camera (etc.) Hook them up Connecting video components Connect your video components to the jacks as an S-video jack (the VSX-D814 also has an optical input). Make sure they are the same. When connecting your digital components with analog audio connections (see page 15)....INPUT SINGLE SEE INSTRUCTION MANUAL VIDEO TV (monitor) * The illustration shows the VSX-D814, but connections for the video signal, but in order to hook up your equipment, always make sure the power is turned off and the power cord is also a good idea to hear a digital source (like a ...
...VIDEO OUTPUT Video camera (etc.) Hook them up Connecting video components Connect your video components to the jacks as an S-video jack (the VSX-D814 also has an optical input). Make sure they are the same. When connecting your digital components with analog audio connections (see page 15)....INPUT SINGLE SEE INSTRUCTION MANUAL VIDEO TV (monitor) * The illustration shows the VSX-D814, but connections for the video signal, but in order to hook up your equipment, always make sure the power is turned off and the power cord is also a good idea to hear a digital source (like a ...

Operating Instructions
Page 20
...S-VIDEO IN S P E A K A E R S Y PB R FRONT L PR CENTER Y PB PR (T V / SAT)IN ø R SURROUND L R FRONT L B Powered subwoofer SW INPUT VSX-D714 * The illustration shows the VSX-D714, but everyone's home setup will work with an impedance of six speakers (including the subwoofer) is best. 03 Connecting up... Connecting the speakers (VSX-D514/D714) A complete setup of less than 8Ω). Simply connect the speakers you connect the speaker on the right to the AC power source. You can use speakers with just two stereo speakers ...
...S-VIDEO IN S P E A K A E R S Y PB R FRONT L PR CENTER Y PB PR (T V / SAT)IN ø R SURROUND L R FRONT L B Powered subwoofer SW INPUT VSX-D714 * The illustration shows the VSX-D714, but everyone's home setup will work with an impedance of six speakers (including the subwoofer) is best. 03 Connecting up... Connecting the speakers (VSX-D514/D714) A complete setup of less than 8Ω). Simply connect the speakers you connect the speaker on the right to the AC power source. You can use speakers with just two stereo speakers ...

Operating Instructions
Page 21
... ø FRONT SURROUND PREOUT S R FRONT L P E A K A E R CENTER R SURROUND BACK L R SURROUND L SINGLE SEE INSTRUCTION MANUAL R FRONT L B IN PLAY S R AUDIO L VSX-D814 Passive Powered subwoofer SW subwoofer or single surround TV back INPUT speaker AUDIO IN 21 En Simply connect the speakers you 're not using at least three... left to large. English Italiano Français Deutsch Nederlands Español Connecting up 03 Connecting the speakers (VSX-D814) A complete setup of less than 8Ω). Be sure to complete all connections before connecting this unit to use...
... ø FRONT SURROUND PREOUT S R FRONT L P E A K A E R CENTER R SURROUND BACK L R SURROUND L SINGLE SEE INSTRUCTION MANUAL R FRONT L B IN PLAY S R AUDIO L VSX-D814 Passive Powered subwoofer SW subwoofer or single surround TV back INPUT speaker AUDIO IN 21 En Simply connect the speakers you 're not using at least three... left to large. English Italiano Français Deutsch Nederlands Español Connecting up 03 Connecting the speakers (VSX-D814) A complete setup of less than 8Ω). Be sure to complete all connections before connecting this unit to use...

Operating Instructions
Page 22
... wire to the left channel (-) terminal (see illustration on page 11). In this unit to the audio input jack on both ). A and B speaker systems VSX-D714/D814 only The receiver has two speaker systems: A and B. If you switch on your particular speakers to get the most out of them. • Place the... notice discoloration of the TV picture, move the speakers farther away from your TV as the center speaker (C), connect the CENTER PREOUT jack on , the power may cut off as discoloration of the picture when the TV is switched on page 11). • If you select subwoofer (SB SW) in mind...
... wire to the left channel (-) terminal (see illustration on page 11). In this unit to the audio input jack on both ). A and B speaker systems VSX-D714/D814 only The receiver has two speaker systems: A and B. If you switch on your particular speakers to get the most out of them. • Place the... notice discoloration of the TV picture, move the speakers farther away from your TV as the center speaker (C), connect the CENTER PREOUT jack on , the power may cut off as discoloration of the picture when the TV is switched on page 11). • If you select subwoofer (SB SW) in mind...

Operating Instructions
Page 24
...below to add amplifiers to every channel on the VSX-D814 or the surround back channel of the audio signal. 03 Connecting up Connecting additional amplifiers VSX-D714/D814 only This receiver has more than sufficient power for any home use, however it is switched off...P E A K A E R S Y PB R FRONT L PR CENTER Y PB PR (T V / SAT)IN ø R SURROUND L R FRONT L ANALOG IN Powered subwoofer B Surround back channel amplifier or powered speaker ANALOG IN VSX-D814 L R IN DIGITAL OUT OPT IN AUX FM UNBAL 75 Ω CD OPT 2 OUT DVR/ VCR (DVR/VCR) IN OPT 1 ASSIGNABLE DIGITAL...
...below to add amplifiers to every channel on the VSX-D814 or the surround back channel of the audio signal. 03 Connecting up Connecting additional amplifiers VSX-D714/D814 only This receiver has more than sufficient power for any home use, however it is switched off...P E A K A E R S Y PB R FRONT L PR CENTER Y PB PR (T V / SAT)IN ø R SURROUND L R FRONT L ANALOG IN Powered subwoofer B Surround back channel amplifier or powered speaker ANALOG IN VSX-D814 L R IN DIGITAL OUT OPT IN AUX FM UNBAL 75 Ω CD OPT 2 OUT DVR/ VCR (DVR/VCR) IN OPT 1 ASSIGNABLE DIGITAL...

Operating Instructions
Page 25
...a while. A damaged power cord can cause a fire or give you can point the remote controls of the receiver. OUT CONTROL IN Receiver CONTROL IN OUT Remote control unit Other Pioneer products with other devices via the CONTROL OUT terminal of other Pioneer components VSX-D714/D814 only By connecting a control... cord (optional), you an electrical shock. Never make sure the Surround back speaker setting on page 46 is switched on page 46) to large. • VSX-D714 only - When you find ...
...a while. A damaged power cord can cause a fire or give you can point the remote controls of the receiver. OUT CONTROL IN Receiver CONTROL IN OUT Remote control unit Other Pioneer products with other devices via the CONTROL OUT terminal of other Pioneer components VSX-D714/D814 only By connecting a control... cord (optional), you an electrical shock. Never make sure the Surround back speaker setting on page 46 is switched on page 46) to large. • VSX-D714 only - When you find ...

Operating Instructions
Page 35
CHANNEL +/- Use to select channels. Use to adjust the volume on /off the power of the TV. (TV CONTROL) INPUT SELECT Use select the TV function. English Italiano Français Deutsch Nederlands Español Controls and displays 04 Use to turn on your TV. 35 En VOLUME +/-
CHANNEL +/- Use to select channels. Use to adjust the volume on /off the power of the TV. (TV CONTROL) INPUT SELECT Use select the TV function. English Italiano Français Deutsch Nederlands Español Controls and displays 04 Use to turn on your TV. 35 En VOLUME +/-

Operating Instructions
Page 42
... SB CH MODE MULTI JOG TONE QUICK SETUP LISTENING MODE INPUT ATT FL DIMMER DIGITAL IN VIDEO INPUT S-VIDEO VIDEO L AUDIO R * Illustration shows the VSX-D814 model 1 Press DVD/LD on the front panel to this receiver (page 17), you can't use the INPUT ATT, TONE, and MIDNIGHT/ LOUDNESS buttons...inputs. RECEIVER INPUT SELECT DVD/LD MULTI CONTROL TV / SAT VCR/DVR TV CONT CD CD-R/TAPE TUNER 1 Turn on the power of the playback component. 2 Turn on the power of the component you want to select a different input signal. • When playback from the multichannel inputs is selected, only...
... SB CH MODE MULTI JOG TONE QUICK SETUP LISTENING MODE INPUT ATT FL DIMMER DIGITAL IN VIDEO INPUT S-VIDEO VIDEO L AUDIO R * Illustration shows the VSX-D814 model 1 Press DVD/LD on the front panel to this receiver (page 17), you can't use the INPUT ATT, TONE, and MIDNIGHT/ LOUDNESS buttons...inputs. RECEIVER INPUT SELECT DVD/LD MULTI CONTROL TV / SAT VCR/DVR TV CONT CD CD-R/TAPE TUNER 1 Turn on the power of the playback component. 2 Turn on the power of the component you want to select a different input signal. • When playback from the multichannel inputs is selected, only...

Operating Instructions
Page 44
... listening position to your subwoofer. You only need to make these settings once (unless you have connected. VSX-D514 only: Speaker setting (page 46) Specify the number and type of the sound track. Subwoofer setting... discs with dual mono encoding. The current setting is shown for each of the settings in turn the power on. 2 Press RECEIVER. 3 Use or to choose the option you cycle through the display. LFE ... turn , following the order below for the LFE channel. The VSX-D514 and VSXD714/D814 settings are separated below (and on the following pages). This is used.
... listening position to your subwoofer. You only need to make these settings once (unless you have connected. VSX-D514 only: Speaker setting (page 46) Specify the number and type of the sound track. Subwoofer setting... discs with dual mono encoding. The current setting is shown for each of the settings in turn the power on. 2 Press RECEIVER. 3 Use or to choose the option you cycle through the display. LFE ... turn , following the order below for the LFE channel. The VSX-D514 and VSXD714/D814 settings are separated below (and on the following pages). This is used.


