Owner's Manual
Page 2
...AND THEREFORE DOES NOT SEPARATE THE UNIT FROM MAINS POWER IN THE STANDBY POSITION. Increase the separation between FM 100 kHz/AM 10 kHz, and FM 50 kHz/AM 9 kHz. Consult the dealer or an experienced radio/TV technician for buying this Pioneer product. FM 100 kHz, AM 10 kHz: Set...alternate between the equipment and receiver. - However the method of connecting and operating the unit is intended to alertthe usertothe presence of the power plug and power outlet may sometimes differ from that may be sold. CAUTION RISK OF ELECTRIC SHOCK DO NOT OPEN CAUTION: TO PREVENT THE RISK OF ...
...AND THEREFORE DOES NOT SEPARATE THE UNIT FROM MAINS POWER IN THE STANDBY POSITION. Increase the separation between FM 100 kHz/AM 10 kHz, and FM 50 kHz/AM 9 kHz. Consult the dealer or an experienced radio/TV technician for buying this Pioneer product. FM 100 kHz, AM 10 kHz: Set...alternate between the equipment and receiver. - However the method of connecting and operating the unit is intended to alertthe usertothe presence of the power plug and power outlet may sometimes differ from that may be sold. CAUTION RISK OF ELECTRIC SHOCK DO NOT OPEN CAUTION: TO PREVENT THE RISK OF ...
Owner's Manual
Page 3
... - Never push objects of other hazards. Unauthorized substitutionsmayresult in the operating instructions should not be retained for a long period of power supply to . WALL OR CEILING MOUNTING -The product should be blocked by the operating instructions as they may fall into the household... them might be followed. Unplug this product during a lightningstorm,or whenit isleft unattended and unused for ventilation and to lightning and power-line surges. REPLACEMENT PARTS - SAFETY CHECK - HEAT -The product should not be walked on an unstable cart, stand, tripod...
... - Never push objects of other hazards. Unauthorized substitutionsmayresult in the operating instructions should not be retained for a long period of power supply to . WALL OR CEILING MOUNTING -The product should be blocked by the operating instructions as they may fall into the household... them might be followed. Unplug this product during a lightningstorm,or whenit isleft unattended and unused for ventilation and to lightning and power-line surges. REPLACEMENT PARTS - SAFETY CHECK - HEAT -The product should not be walked on an unstable cart, stand, tripod...
Owner's Manual
Page 4
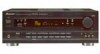
... Input By connecting components equipped with 5.1 channel analog output jacks. 5 Channels of Independent Amplification This receiver incorporates 5 independent 100 watt power amplifiers which enable high quality playback of a concert hall (MUSICAL). When the midnight listening mode is the digital sound system introduced in... components simply by simulating the environment of a movie theater (DRAMA, ACTION), or the ambience of Dolby Digital and DTS (VSX-D608 only) surround sound. Various Surround Effects (DSP) The DSP (Digital Sound Processing) surround mode allows you can enjoy Dolby...
... Input By connecting components equipped with 5.1 channel analog output jacks. 5 Channels of Independent Amplification This receiver incorporates 5 independent 100 watt power amplifiers which enable high quality playback of a concert hall (MUSICAL). When the midnight listening mode is the digital sound system introduced in... components simply by simulating the environment of a movie theater (DRAMA, ACTION), or the ambience of Dolby Digital and DTS (VSX-D608 only) surround sound. Various Surround Effects (DSP) The DSP (Digital Sound Processing) surround mode allows you can enjoy Dolby...
Owner's Manual
Page 6
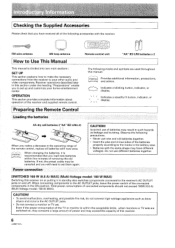
...Remote Control Loading the batteries The following accessories with new ones. When connecting components to set . Even if the power consumption of this manual: memo Provides additional information, precautions, and advice. Checking the Supplied Accessories Please check that ... or TV sets are used throughout this receiver. 6 OPERATION This section provides complete information about operation of removing the old batteries. Power connection CAUTION! Incorrect use different batteries together. [SWITCHED 100 W (0.8 A) MAX] (Multi-Voltage model: 100 W MAX) Switching...
...Remote Control Loading the batteries The following accessories with new ones. When connecting components to set . Even if the power consumption of this manual: memo Provides additional information, precautions, and advice. Checking the Supplied Accessories Please check that ... or TV sets are used throughout this receiver. 6 OPERATION This section provides complete information about operation of removing the old batteries. Power connection CAUTION! Incorrect use different batteries together. [SWITCHED 100 W (0.8 A) MAX] (Multi-Voltage model: 100 W MAX) Switching...
Owner's Manual
Page 9
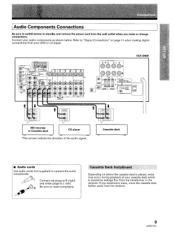
...S2' MONITOR R N DPI 22 S2 52 01 0, cL) OFT DIGITAL OUT e- TAPE 54TH JNROR✓~ LD e VCR 2 POINT SPEAXERS CD R O O L Th VSX-D608 0 CENTER PRECUT SUB WOOFER PREOUT gUERE-, - %LAMP, SCAPUATRIOEPN: RD 02;1 CAUTION: mixmurnwwxuu r :L1ETS/T7:87/ IMPEDANCE SELECTORS V ■ RC D PLAY REC MD... • Audio cords Use audio cords (not supplied) to insert completely. Audio Components Connections Be sure to switch power to standby and remove the power cord from the wall outlet when you experience noise, move the cassette deck farther away from the receiver. 9
...S2' MONITOR R N DPI 22 S2 52 01 0, cL) OFT DIGITAL OUT e- TAPE 54TH JNROR✓~ LD e VCR 2 POINT SPEAXERS CD R O O L Th VSX-D608 0 CENTER PRECUT SUB WOOFER PREOUT gUERE-, - %LAMP, SCAPUATRIOEPN: RD 02;1 CAUTION: mixmurnwwxuu r :L1ETS/T7:87/ IMPEDANCE SELECTORS V ■ RC D PLAY REC MD... • Audio cords Use audio cords (not supplied) to insert completely. Audio Components Connections Be sure to switch power to standby and remove the power cord from the wall outlet when you experience noise, move the cassette deck farther away from the receiver. 9
Owner's Manual
Page 10
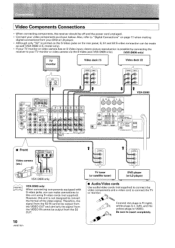
... the S-Video jacks on the rear panel, S, S1 and S2 S-video connection can be off and the power cord unpluged. • Connect your TV monitor or video camera via the S-Video jack (VSX-D608 only). (VSX-D608 only) TV monitor Le Video deck (1) Video deck (2) INPUT `V 0 SVIOE0 t "-ANTENNA DIGOITPNRATCL/MDDOT/ S FEM7anSE0rhEELAON_OTEPNNA M I HS'UTLRNRPSOLUIUBT1WN...
... the S-Video jacks on the rear panel, S, S1 and S2 S-video connection can be off and the power cord unpluged. • Connect your TV monitor or video camera via the S-Video jack (VSX-D608 only). (VSX-D608 only) TV monitor Le Video deck (1) Video deck (2) INPUT `V 0 SVIOE0 t "-ANTENNA DIGOITPNRATCL/MDDOT/ S FEM7anSE0rhEELAON_OTEPNNA M I HS'UTLRNRPSOLUIUBT1WN...
Owner's Manual
Page 13
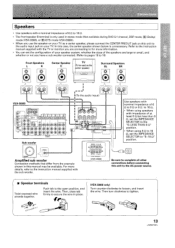
... the speakers are large or small, and whether or not you use the speaker on your TV as the center speaker) Surround Speakers SL SR O VSX-D608 °MALIN 1- '7 EEER1 th thrg: SR is unnecessary. A (75)cD)co TR L In this unit to 18) Front Speakers L R Center Speaker C... TV (To be used in stereo mode (Not available during DVD 5.1 channel, DSP mode, 1717 (Dolby) mode (VSX-D508), or DO /DTS mode (VSX-D608)). • When you have a sub woofer connected. (Refer to pages 16 to the audio input jack on your TV. r Speakers • Use...
... the speakers are large or small, and whether or not you use the speaker on your TV as the center speaker) Surround Speakers SL SR O VSX-D608 °MALIN 1- '7 EEER1 th thrg: SR is unnecessary. A (75)cD)co TR L In this unit to 18) Front Speakers L R Center Speaker C... TV (To be used in stereo mode (Not available during DVD 5.1 channel, DSP mode, 1717 (Dolby) mode (VSX-D508), or DO /DTS mode (VSX-D608)). • When you have a sub woofer connected. (Refer to pages 16 to the audio input jack on your TV. r Speakers • Use...
Owner's Manual
Page 14
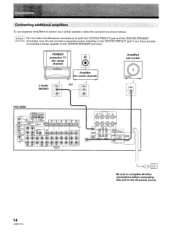
... to the CENTER PREOUT jack if you have already connected a center speaker to the AC power source. 14 ANTENNA r DIGITAL IN HEEU M ,...,ao tg, n Li r M:: /OTS S2 $2 M7 I... L @ @A %mem* M 'Er 0 TR L 7 EMILTML. Connecting additional amplifiers To use separate amplifiers to power your center speaker, make simultaneous connections to both the CENTER PREOUT jack and the CENTER SPEAKER terminals. (e.g. memo Do ... before connecting this unit to the CENTER SPEAKER terminal.) PIONEER projection TV (for center channel) O Li L-Audio IN (MONO) Amplifier (for center channel) (...
... to the CENTER PREOUT jack if you have already connected a center speaker to the AC power source. 14 ANTENNA r DIGITAL IN HEEU M ,...,ao tg, n Li r M:: /OTS S2 $2 M7 I... L @ @A %mem* M 'Er 0 TR L 7 EMILTML. Connecting additional amplifiers To use separate amplifiers to power your center speaker, make simultaneous connections to both the CENTER PREOUT jack and the CENTER SPEAKER terminals. (e.g. memo Do ... before connecting this unit to the CENTER SPEAKER terminal.) PIONEER projection TV (for center channel) O Li L-Audio IN (MONO) Amplifier (for center channel) (...

Owner's Manual
Page 15
... of the TV or monitor is within the acceptable limits, when monitors or TV sets are switched on, a large amount of power is localized at equal distances from the TV due to external shocks such as shown below. Front Left Sub Woofer Center Front Right Surround Left O 0 0 ... installed securely to prevent possible interference such as blow dryers and irons to the AC OUTLET jacks, leave the power switch of the connected components in the color of the TV screen. Power connection [SWITCHED 100 W (0.8 A) MAX] (Multi-Voltage model: 100 W MAX) Switching this rece 15 Speaker placement ...
... of the TV or monitor is within the acceptable limits, when monitors or TV sets are switched on, a large amount of power is localized at equal distances from the TV due to external shocks such as shown below. Front Left Sub Woofer Center Front Right Surround Left O 0 0 ... installed securely to prevent possible interference such as blow dryers and irons to the AC OUTLET jacks, leave the power switch of the connected components in the color of the TV screen. Power connection [SWITCHED 100 W (0.8 A) MAX] (Multi-Voltage model: 100 W MAX) Switching this rece 15 Speaker placement ...
Owner's Manual
Page 16
...digital input 1 setting (page 20) Use to specify the input to be assigned to the coaxial digital input. Optical digital input 3 setting (page 21) (VSX-D608 only) Use to specify the input to be sent to the sub woofer or "Large" speakers. CN.VVE. 0 ® 0c,„ss FULMAN SECT... FT ISMER MUSE CHECK CEOP,ISEEIES SET UP ( ) ipsonoser MOM/VW. The STANDBY indicator goes out. Press RECEIVER. Press RECEIVER to turn the power on (The STANDBY indicator goes out) before operating. Crossover frequency setting mode (page 18) Use to determine which frequencies will be assigned to the ...
...digital input 1 setting (page 20) Use to specify the input to be assigned to the coaxial digital input. Optical digital input 3 setting (page 21) (VSX-D608 only) Use to specify the input to be sent to the sub woofer or "Large" speakers. CN.VVE. 0 ® 0c,„ss FULMAN SECT... FT ISMER MUSE CHECK CEOP,ISEEIES SET UP ( ) ipsonoser MOM/VW. The STANDBY indicator goes out. Press RECEIVER. Press RECEIVER to turn the power on (The STANDBY indicator goes out) before operating. Crossover frequency setting mode (page 18) Use to determine which frequencies will be assigned to the ...
Owner's Manual
Page 23
If the component does not turn ON or OFF and there is displayed on VSX-D508) 4 $ P 0 Eibb if PAN A30 NI -EH. M PUSH LIDS- The remote control returns...the proper code. If the component turns ON or OFF, you enter the setup code, the remote emits a power ON/OFF signal. COMMANDER SET UP • All the multi-control buttons on page 56. 4 Point the remote...Press A or v repeatedly to exit the preset mode. T0SHIIIR t PI.J51-4 909 -BL. memo • When operating a PIONEER'S DVD/LD player, set the manufacturer code to "000" in the preset mode. • All codes enrolled in step 3 or...
If the component does not turn ON or OFF and there is displayed on VSX-D508) 4 $ P 0 Eibb if PAN A30 NI -EH. M PUSH LIDS- The remote control returns...the proper code. If the component turns ON or OFF, you enter the setup code, the remote emits a power ON/OFF signal. COMMANDER SET UP • All the multi-control buttons on page 56. 4 Point the remote...Press A or v repeatedly to exit the preset mode. T0SHIIIR t PI.J51-4 909 -BL. memo • When operating a PIONEER'S DVD/LD player, set the manufacturer code to "000" in the preset mode. • All codes enrolled in step 3 or...
Owner's Manual
Page 24
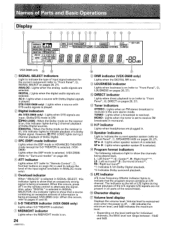
... SELECT indicators Light to indicate the type of input signal selected for 5-D THEATER) is selected. (VSXD608) Lights when the DSP mode is selected. (VSX-D508) (Refer to "Surround modes" on page 28) ATT indicator Lights when ATT (refer to "Remote Control", ©, Number buttons on page 25)...©, DIRECT on the level settings for individual channels, the MAX level can range between -10dB and 0dB. Volume level is maintained even when the power is off. ---dB indicates the minimum level, and 0dB indicates the maximum level. • Depending on pages 26, 27). 0 Tuner indicators STEREO...
... SELECT indicators Light to indicate the type of input signal selected for 5-D THEATER) is selected. (VSXD608) Lights when the DSP mode is selected. (VSX-D508) (Refer to "Surround modes" on page 28) ATT indicator Lights when ATT (refer to "Remote Control", ©, Number buttons on page 25)...©, DIRECT on the level settings for individual channels, the MAX level can range between -10dB and 0dB. Volume level is maintained even when the power is off. ---dB indicates the minimum level, and 0dB indicates the maximum level. • Depending on pages 26, 27). 0 Tuner indicators STEREO...
Owner's Manual
Page 25
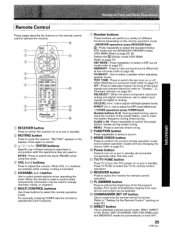
MULTI CONTROL moanI TV/SATI VCR' I rvmNnmL TUNER I vcrM' 12 00 DSP a Mga i l a TUC 6' aSgE ta cr) c:sM FUNCTION DIRECT FL DIMMER COMMANDER SETUP ) 13 14 "CWIE er RECEIVER button Press to switch the receiver on the remote control used to operate the receiver. 10 RECEIVER 0 (!) 1T 7. \ go CD i/ t" r>, F72 -= - "MUTING" appears in standby. CYO- - Remote Control These pages describe the buttons on or to put in the display. CD MUTING button Press to cancel. 0 A/v/ CHANNEL t""-if. Press again to mute the volume.
MULTI CONTROL moanI TV/SATI VCR' I rvmNnmL TUNER I vcrM' 12 00 DSP a Mga i l a TUC 6' aSgE ta cr) c:sM FUNCTION DIRECT FL DIMMER COMMANDER SETUP ) 13 14 "CWIE er RECEIVER button Press to switch the receiver on the remote control used to operate the receiver. 10 RECEIVER 0 (!) 1T 7. \ go CD i/ t" r>, F72 -= - "MUTING" appears in standby. CYO- - Remote Control These pages describe the buttons on or to put in the display. CD MUTING button Press to cancel. 0 A/v/ CHANNEL t""-if. Press again to mute the volume.
Owner's Manual
Page 26
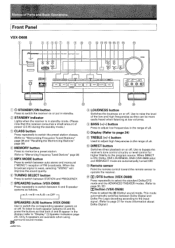
...) Press repeatedly to select the standard Dolby/DTS mode and the ADVANCED THEATER modes. (Refer to page 30, 32) MI button (VSX-D508) Press to operate the receiver. Only A speakers are automatically turned OFF. C) Display (Refer to page 24) C) TREBLE (+/-) button Used to switch ... 13. 8 9 10 VSX-D608 ligual Signal west. 12 O C- VIGGO AIM. (;) c o o) io 6 STANDBY/ON button Press to the program source. To listen to both speaker systems (A and B), press the buttons so that this receiver consumes a small amount of power (2.5 W) during the standby mode.) 0 CLASS button Press repeatedly...
...) Press repeatedly to select the standard Dolby/DTS mode and the ADVANCED THEATER modes. (Refer to page 30, 32) MI button (VSX-D508) Press to operate the receiver. Only A speakers are automatically turned OFF. C) Display (Refer to page 24) C) TREBLE (+/-) button Used to switch ... 13. 8 9 10 VSX-D608 ligual Signal west. 12 O C- VIGGO AIM. (;) c o o) io 6 STANDBY/ON button Press to the program source. To listen to both speaker systems (A and B), press the buttons so that this receiver consumes a small amount of power (2.5 W) during the standby mode.) 0 CLASS button Press repeatedly...

Owner's Manual
Page 28
... sense of motion picture audio which is enjoy! DSP modes The DSP (Digital Sound Processing) modes allow you can enjoy the power and dynamics of travelling with the soundtrack. JAZZ Simulates the acoustic environment of each channel. 28 THEATER 2 Simulates the acoustic environment... dynamic and beautiful sound characteristic of an orchestra performing in a concert hall, making it suitable for classical music. ADVANCED THEATER modes (VSX-D608 only) MUSICAL Simulates the acoustic environment of a large European concert hall and is suitable for music or musical sources marked op&#...
... sense of motion picture audio which is enjoy! DSP modes The DSP (Digital Sound Processing) modes allow you can enjoy the power and dynamics of travelling with the soundtrack. JAZZ Simulates the acoustic environment of each channel. 28 THEATER 2 Simulates the acoustic environment... dynamic and beautiful sound characteristic of an orchestra performing in a concert hall, making it suitable for classical music. ADVANCED THEATER modes (VSX-D608 only) MUSICAL Simulates the acoustic environment of a large European concert hall and is suitable for music or musical sources marked op&#...
Owner's Manual
Page 30
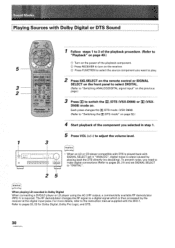
...Dolby Pro Logic, and DTS. 30 Refer to the instruction manual supplied with the RFD-1. D508) mode on the power of the playback component. To prevent noise, you want to play. 2 Press SIG.SELECT...Sound RECEIVER 5 3 2 CH, I'll, [EI 73 rTAT§III3 [vcRI MI DSE, MOW TEST • 57::' Pioneer 1 Follow steps 1 to 3 of the playback procedure. (Refer to "Playback" on page 40.) © Turn on ....digital input jacks. The RF demodulator changes the RF signal to switch the PO /DTS (VSX-D608) or DO (VSX- C) Press RECEIVER to turn on the previous page.) 3 Press DO to a digital signal...
...Dolby Pro Logic, and DTS. 30 Refer to the instruction manual supplied with the RFD-1. D508) mode on the power of the playback component. To prevent noise, you want to play. 2 Press SIG.SELECT...Sound RECEIVER 5 3 2 CH, I'll, [EI 73 rTAT§III3 [vcRI MI DSE, MOW TEST • 57::' Pioneer 1 Follow steps 1 to 3 of the playback procedure. (Refer to "Playback" on page 40.) © Turn on ....digital input jacks. The RF demodulator changes the RF signal to switch the PO /DTS (VSX-D608) or DO (VSX- C) Press RECEIVER to turn on the previous page.) 3 Press DO to a digital signal...

Owner's Manual
Page 40
...power. 2 3 40 memo • Depending on the receiver. The source you turn on the channel level setting, the MAX volume level may differ 0 to -10 dB from the level displayed. • When this receiver is displayed in the following order: VSX-D608 VSX-D508 ► TUNER MD/TAPE 1 - TV/SAT VCR DVD/LD VSX-D608 0 O O C 4 6 o o VSX-D508...panel to select the input signal corresponding to the source component. (Refer to "Switching ANALOG/DIGITAL signal input" on the power of the playback component. 2 Press RECEIVER to adjust the volume level in step 1. 6 Press VOL (+1-) to turn ...
...power. 2 3 40 memo • Depending on the receiver. The source you turn on the channel level setting, the MAX volume level may differ 0 to -10 dB from the level displayed. • When this receiver is displayed in the following order: VSX-D608 VSX-D508 ► TUNER MD/TAPE 1 - TV/SAT VCR DVD/LD VSX-D608 0 O O C 4 6 o o VSX-D508...panel to select the input signal corresponding to the source component. (Refer to "Switching ANALOG/DIGITAL signal input" on the power of the playback component. 2 Press RECEIVER to adjust the volume level in step 1. 6 Press VOL (+1-) to turn ...

Owner's Manual
Page 54
...8226; The protection circuit may lie in radio broadcasts. • Incorrect frequency. • The antenna is not properly selected. Cause • The power plug is set . AM broadcasts • The AM antenna is poorly positioned. • Weak radio waves. • Interference cause by dry air..... If you connected. • Make sure the component is something wrong with this component, check the points below , ask your nearest PIONEER authorized service center or your dealer to pages 10, 11). • Press the correct function button. Investigate the other equipment (fluorescent lamp...
...8226; The protection circuit may lie in radio broadcasts. • Incorrect frequency. • The antenna is not properly selected. Cause • The power plug is set . AM broadcasts • The AM antenna is poorly positioned. • Weak radio waves. • Interference cause by dry air..... If you connected. • Make sure the component is something wrong with this component, check the points below , ask your nearest PIONEER authorized service center or your dealer to pages 10, 11). • Press the correct function button. Investigate the other equipment (fluorescent lamp...

Owner's Manual
Page 55
... bad angle of operation. • There is an obstacle between the receiver and the remote control. • Strong light such as static electricity Disconnect the power plug from the outlet and insert again to return to normal operating conditions. 55 The sound is output intermittently when software with DTS is used...
... bad angle of operation. • There is an obstacle between the receiver and the remote control. • Strong light such as static electricity Disconnect the power plug from the outlet and insert again to return to normal operating conditions. 55 The sound is output intermittently when software with DTS is used...
Owner's Manual
Page 57
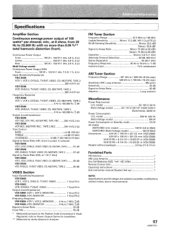
... (Multi-Voltage model) 100 W MAX Dimensions 420 (W) x 158 (H) x 401 (D) mm (VSX-D608) 420 (W) x 158 (H) x 391 (D) mm (VSX-D508) 16-9/16 (W) x 6-1/4 (H) x 15-6/8 (D) in (VSX-D608) 16-9/16 (W) x 6-1/4 (H) x 15-3/8 (D) in Standby mode 2.5 W AC Outlet SWITCHED (U.S. model 280 W, 400 VA Multi-Voltage model 320 W Power Consumption in (VSX-D508) Weight (without package) 9.8 kg (21 lb 10 oz) Furnished Parts FM...
... (Multi-Voltage model) 100 W MAX Dimensions 420 (W) x 158 (H) x 401 (D) mm (VSX-D608) 420 (W) x 158 (H) x 391 (D) mm (VSX-D508) 16-9/16 (W) x 6-1/4 (H) x 15-6/8 (D) in (VSX-D608) 16-9/16 (W) x 6-1/4 (H) x 15-3/8 (D) in Standby mode 2.5 W AC Outlet SWITCHED (U.S. model 280 W, 400 VA Multi-Voltage model 320 W Power Consumption in (VSX-D508) Weight (without package) 9.8 kg (21 lb 10 oz) Furnished Parts FM...


