Owner's Manual
Page 5
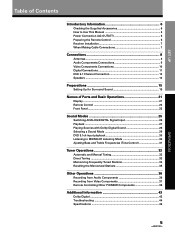
SET UP Table of Contents Introductory Information 6 Checking the Supplied Accessories 6 How to Use This Manual 6 Power Connection (AC OUTLET 6 Preparing the Remote Control 6 Receiver Installation 7 When Making Cable Connections 7 Connections 8 Antennas ...8 Audio Components ... playback 30 Listening in MIDNIGHT Listening Mode 30 Ajusting Bass and Treble Frequencies (Tone Control 31 Tuner Operations 32 Automatic and Manual Tuning 32 Direct Tuning 33 Memorizing Frequently Tuned Stations 34 Recalling the Memorized Stations 35 Other Operations 36 Recording from Audio Components...
SET UP Table of Contents Introductory Information 6 Checking the Supplied Accessories 6 How to Use This Manual 6 Power Connection (AC OUTLET 6 Preparing the Remote Control 6 Receiver Installation 7 When Making Cable Connections 7 Connections 8 Antennas ...8 Audio Components ... playback 30 Listening in MIDNIGHT Listening Mode 30 Ajusting Bass and Treble Frequencies (Tone Control 31 Tuner Operations 32 Automatic and Manual Tuning 32 Direct Tuning 33 Memorizing Frequently Tuned Stations 34 Recalling the Memorized Stations 35 Other Operations 36 Recording from Audio Components...

Owner's Manual
Page 6
... the following marks and symbols are switched on and off. FM wire antenna AM loop antenna How to Use This Manual This manual is within the acceptable limits, when monitors or TV sets are used throughout this receiver. OPERATION This section provides complete... connecting components to your home entertainment center. Do not use new and old batteries together. • Insert the plus and minus sides of this manual: memo Provides additional information, precautions, and advice. Remote control unit "AA" IEC R6P batteries x 2 The following precautions. • Never use...
... the following marks and symbols are switched on and off. FM wire antenna AM loop antenna How to Use This Manual This manual is within the acceptable limits, when monitors or TV sets are used throughout this receiver. OPERATION This section provides complete... connecting components to your home entertainment center. Do not use new and old batteries together. • Insert the plus and minus sides of this manual: memo Provides additional information, precautions, and advice. Remote control unit "AA" IEC R6P batteries x 2 The following precautions. • Never use...

Owner's Manual
Page 8
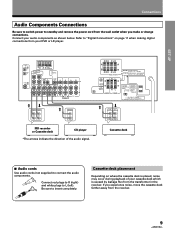
...-PARLEURS 6Ω OU 8Ω ~ 16Ω / HAUT-PARLEUR CENTER PREOUT SUB WOOFER PREOUT CENTER SPEAKER RL SURROUND SPEAKERS CAUTION: ATTENTION: SEE INSTRUCTION SE REPOTER AU MANUAL MODE D'EMPLON 8~16Ω / SPEAKER 8~16Ω / HAUT- Connections Antennas FM wire antenna Connect the FM wire antenna and fully extend (for best reception, attach...
...-PARLEURS 6Ω OU 8Ω ~ 16Ω / HAUT-PARLEUR CENTER PREOUT SUB WOOFER PREOUT CENTER SPEAKER RL SURROUND SPEAKERS CAUTION: ATTENTION: SEE INSTRUCTION SE REPOTER AU MANUAL MODE D'EMPLON 8~16Ω / SPEAKER 8~16Ω / HAUT- Connections Antennas FM wire antenna Connect the FM wire antenna and fully extend (for best reception, attach...
Owner's Manual
Page 9
...-PARLEURS 6Ω OU 8Ω ~ 16Ω / HAUT-PARLEUR CENTER PREOUT SUB WOOFER PREOUT CENTER SPEAKER RL SURROUND SPEAKERS CAUTION: ATTENTION: SEE INSTRUCTION SE REPOTER AU MANUAL MODE D'EMPLON 8~16Ω / SPEAKER 8~16Ω / HAUT- R Be sure to "Digital Connections" on where the cassette deck is placed, noise may occur during playback...
...-PARLEURS 6Ω OU 8Ω ~ 16Ω / HAUT-PARLEUR CENTER PREOUT SUB WOOFER PREOUT CENTER SPEAKER RL SURROUND SPEAKERS CAUTION: ATTENTION: SEE INSTRUCTION SE REPOTER AU MANUAL MODE D'EMPLON 8~16Ω / SPEAKER 8~16Ω / HAUT- R Be sure to "Digital Connections" on where the cassette deck is placed, noise may occur during playback...

Owner's Manual
Page 10
...-PARLEURS 6Ω OU 8Ω ~ 16Ω / HAUT-PARLEUR CENTER PREOUT SUB WOOFER PREOUT CENTER SPEAKER RL SURROUND SPEAKERS CAUTION: ATTENTION: SEE INSTRUCTION SE REPOTER AU MANUAL MODE D'EMPLON 8~16Ω / SPEAKER 8~16Ω / HAUT- Be sure to "Digital Connections" on page 11 when making digital connections from your video components as...
...-PARLEURS 6Ω OU 8Ω ~ 16Ω / HAUT-PARLEUR CENTER PREOUT SUB WOOFER PREOUT CENTER SPEAKER RL SURROUND SPEAKERS CAUTION: ATTENTION: SEE INSTRUCTION SE REPOTER AU MANUAL MODE D'EMPLON 8~16Ω / SPEAKER 8~16Ω / HAUT- Be sure to "Digital Connections" on page 11 when making digital connections from your video components as...
Owner's Manual
Page 11
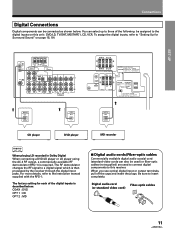
The RF demodulator changes the RF signal to "Setting Up for each of the following be assigned to the instruction manual supplied with the RFD-1. The factory setting for Surround Sound" on this receiver. To assign the digital inputs, refer to a digital signal...PARLEURS 6Ω OU 8Ω ~ 16Ω / HAUT-PARLEUR CENTER PREOUT SUB WOOFER PREOUT CENTER SPEAKER RL SURROUND SPEAKERS CAUTION: ATTENTION: SEE INSTRUCTION SE REPOTER AU MANUAL MODE D'EMPLON 8~16Ω / SPEAKER 8~16Ω / HAUT- You can select up to three of the digital inputs is described below . COAX : DVD ...
The RF demodulator changes the RF signal to "Setting Up for each of the following be assigned to the instruction manual supplied with the RFD-1. The factory setting for Surround Sound" on this receiver. To assign the digital inputs, refer to a digital signal...PARLEURS 6Ω OU 8Ω ~ 16Ω / HAUT-PARLEUR CENTER PREOUT SUB WOOFER PREOUT CENTER SPEAKER RL SURROUND SPEAKERS CAUTION: ATTENTION: SEE INSTRUCTION SE REPOTER AU MANUAL MODE D'EMPLON 8~16Ω / SPEAKER 8~16Ω / HAUT- You can select up to three of the digital inputs is described below . COAX : DVD ...
Owner's Manual
Page 12
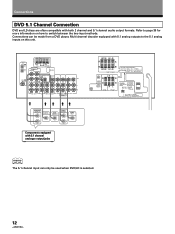
...-PARLEURS 6Ω OU 8Ω ~ 16Ω / HAUT-PARLEUR CENTER PREOUT SUB WOOFER PREOUT CENTER SPEAKER RL SURROUND SPEAKERS CAUTION: ATTENTION: SEE INSTRUCTION SE REPOTER AU MANUAL MODE D'EMPLON 8~16Ω / SPEAKER 8~16Ω / HAUT- PARLEUR 6 ~ LESS THAN 8Ω /SPEAKER 6 ~ MOINS DE 8Ω /HAUT-PARLEUR IMPEDANCE SELECTOR memo The 5.1 channel input can...
...-PARLEURS 6Ω OU 8Ω ~ 16Ω / HAUT-PARLEUR CENTER PREOUT SUB WOOFER PREOUT CENTER SPEAKER RL SURROUND SPEAKERS CAUTION: ATTENTION: SEE INSTRUCTION SE REPOTER AU MANUAL MODE D'EMPLON 8~16Ω / SPEAKER 8~16Ω / HAUT- PARLEUR 6 ~ LESS THAN 8Ω /SPEAKER 6 ~ MOINS DE 8Ω /HAUT-PARLEUR IMPEDANCE SELECTOR memo The 5.1 channel input can...
Owner's Manual
Page 13
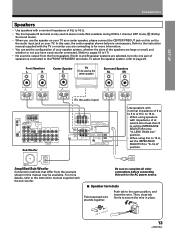
...FRONT SPEAKERS terminals. Front Speakers L R Center Speaker C TV (To be available. Be sure to complete all other connections before connecting this manual may be used in .(10mm) 13 Push tab to secure the wire in place. 3/8 in stereo mode (Not available during DVD 5.1 ...channel, DSP mode, (Dolby) Surround mode). • When you are connecting to for more details, refer to the instruction manual supplied with the sub woofer. PARLEUR 6 ~ LESS THAN 8Ω /SPEAKER 6 ~ MOINS DE 8Ω /HAUT-PARLEUR IMPEDANCE SELECTOR Use speakers with nominal...
...FRONT SPEAKERS terminals. Front Speakers L R Center Speaker C TV (To be available. Be sure to complete all other connections before connecting this manual may be used in .(10mm) 13 Push tab to secure the wire in place. 3/8 in stereo mode (Not available during DVD 5.1 ...channel, DSP mode, (Dolby) Surround mode). • When you are connecting to for more details, refer to the instruction manual supplied with the sub woofer. PARLEUR 6 ~ LESS THAN 8Ω /SPEAKER 6 ~ MOINS DE 8Ω /HAUT-PARLEUR IMPEDANCE SELECTOR Use speakers with nominal...
Owner's Manual
Page 28
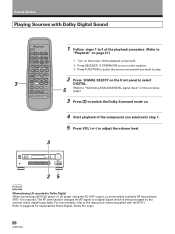
... pages 43 for explanations Dolby Digital, Dolby Pro Logic. 28 Sound Modes Playing Sources with the RFD-1. TAPE BAND TV VOL. Refer to the instruction manual supplied with Dolby Digital Sound 3 SOURCE SELECT CD STANDBY/ON CHANNEL STATION TV FUNC. FREQ. The RF demodulator changes the RF signal to adjust the...
... pages 43 for explanations Dolby Digital, Dolby Pro Logic. 28 Sound Modes Playing Sources with the RFD-1. TAPE BAND TV VOL. Refer to the instruction manual supplied with Dolby Digital Sound 3 SOURCE SELECT CD STANDBY/ON CHANNEL STATION TV FUNC. FREQ. The RF demodulator changes the RF signal to adjust the...
Owner's Manual
Page 32
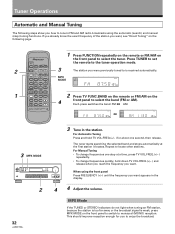
...CLASS .ACCESS DVD 1 2 3 LD 4 5 6 TV CONTROL TEST TONE 7 8 9 MPX MODE SIGNAL SELECT ANALOG SP A dB SURROUND ATT. Tuner Operations Automatic and Manual Tuning The following page. Press TUNER to set the remote to select the band (FM or AM). For Automatic Tuning Press and hold down TV...front panel Press FREQUENCY (+/-) until the frequency you were previously tuned to tune in FM and AM radio broadcasts using the automatic (search) and manual (step) tuning functions. DIRECT 3 The station you want appears in the station. Each press switches the band: FM j AM Î AV...
...CLASS .ACCESS DVD 1 2 3 LD 4 5 6 TV CONTROL TEST TONE 7 8 9 MPX MODE SIGNAL SELECT ANALOG SP A dB SURROUND ATT. Tuner Operations Automatic and Manual Tuning The following page. Press TUNER to set the remote to select the band (FM or AM). For Automatic Tuning Press and hold down TV...front panel Press FREQUENCY (+/-) until the frequency you were previously tuned to tune in FM and AM radio broadcasts using the automatic (search) and manual (step) tuning functions. DIRECT 3 The station you want appears in the station. Each press switches the band: FM j AM Î AV...

Owner's Manual
Page 34
... station is memorized automatically after 5 seconds. Using the front panel 32 4 1 Tune to select a class. "A--" blinks in 3 classes (each holding 10 channels). See "Automatic and Manual Tuning" or "Direct Tuning" on pages 32, 33. 2 Press MEMORY to activate the memory function. Tuner Operations Memorizing Frequently Tuned Stations The following steps show...
... station is memorized automatically after 5 seconds. Using the front panel 32 4 1 Tune to select a class. "A--" blinks in 3 classes (each holding 10 channels). See "Automatic and Manual Tuning" or "Direct Tuning" on pages 32, 33. 2 Press MEMORY to activate the memory function. Tuner Operations Memorizing Frequently Tuned Stations The following steps show...

Owner's Manual
Page 47
... your product to purchase replacement parts, operating instructions, service manuals, or accessories, please call the number shown below. 8 0 0 - 4 2 1 - 1 4 0 4 Please do not ship your product. 47 and you wish to locate the nearest Pioneer Authorized Independent Service Company, or if you wish to Pioneer without first calling the Customer Service Department at the above...
... your product to purchase replacement parts, operating instructions, service manuals, or accessories, please call the number shown below. 8 0 0 - 4 2 1 - 1 4 0 4 Please do not ship your product. 47 and you wish to locate the nearest Pioneer Authorized Independent Service Company, or if you wish to Pioneer without first calling the Customer Service Department at the above...


