
Owner's Manual
Page 2
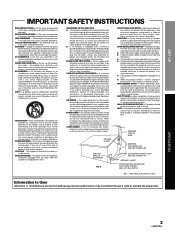
... particular installation. However the method of connecting and operating the unit is intended to alert the user to the presence of the power plug and power outlet may be determined by one or more of uninsulated "dangerous voltage" within an equilateral triangle is connected. - THE...you for future reference. WARNING: TO PREVENT FIRE OR SHOCK HAZARD, DO NOT EXPOSE THIS APPLIANCE TO RAIN OR MOISTURE. Please write this Pioneer product. Please read through these operating instructions so you have finished reading the instructions, put them away in a safe place for buying this ...
... particular installation. However the method of connecting and operating the unit is intended to alert the user to the presence of the power plug and power outlet may be determined by one or more of uninsulated "dangerous voltage" within an equilateral triangle is connected. - THE...you for future reference. WARNING: TO PREVENT FIRE OR SHOCK HAZARD, DO NOT EXPOSE THIS APPLIANCE TO RAIN OR MOISTURE. Please write this Pioneer product. Please read through these operating instructions so you have finished reading the instructions, put them away in a safe place for buying this ...
Owner's Manual
Page 3
... may cause the product and cart combination to the product. CART - A product and cart combination should be read before cleaning. POWER SOURCES - POWER-CORD PROTECTION - An outside antenna system, extreme care should still fail to fit, contact your obsolete outlet. Do not overload wall... a long period of the product should follow the manufacturer's instructions, and should be adhered to a wall or ceiling. The power cord of power source indicated on the product. GROUNDING OR POLARIZATION ¶ If this product from the type of the appliance should not be ...
... may cause the product and cart combination to the product. CART - A product and cart combination should be read before cleaning. POWER SOURCES - POWER-CORD PROTECTION - An outside antenna system, extreme care should still fail to fit, contact your obsolete outlet. Do not overload wall... a long period of the product should follow the manufacturer's instructions, and should be adhered to a wall or ceiling. The power cord of power source indicated on the product. GROUNDING OR POLARIZATION ¶ If this product from the type of the appliance should not be ...
Owner's Manual
Page 4
...Midnight Listening Mode When late night hours or other factors require that the volume be made to use minimal electricity when power is required.) Manufactured under license from even the most demanding Dolby Digital program sources. Energy-saving Design This unit is... with 5.1 channel analog output jacks. 5 Channels of Independent Amplification This receiver incorporates 5 independent 80 watt power amplifiers which enable high quality playback of the power consumption in the (Dolby) Surround mode, decoding switches automatically according to worry about program formats! Regarding the...
...Midnight Listening Mode When late night hours or other factors require that the volume be made to use minimal electricity when power is required.) Manufactured under license from even the most demanding Dolby Digital program sources. Energy-saving Design This unit is... with 5.1 channel analog output jacks. 5 Channels of Independent Amplification This receiver incorporates 5 independent 80 watt power amplifiers which enable high quality playback of the power consumption in the (Dolby) Surround mode, decoding switches automatically according to worry about program formats! Regarding the...
Owner's Manual
Page 5
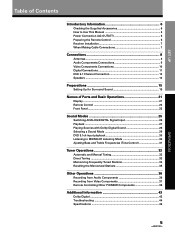
SET UP Table of Contents Introductory Information 6 Checking the Supplied Accessories 6 How to Use This Manual 6 Power Connection (AC OUTLET 6 Preparing the Remote Control 6 Receiver Installation 7 When Making Cable Connections 7 Connections 8 Antennas ...8 Audio Components Connections 9 Video Components Connections... the Memorized Stations 35 Other Operations 36 Recording from Audio Components 36 Recording from Video Components 37 Remote Controlling Other PIONEER Components 38 Additional Information 43 Dolby Digital 43 Troubleshooting 44 Specifications 46 5 OPERATION
SET UP Table of Contents Introductory Information 6 Checking the Supplied Accessories 6 How to Use This Manual 6 Power Connection (AC OUTLET 6 Preparing the Remote Control 6 Receiver Installation 7 When Making Cable Connections 7 Connections 8 Antennas ...8 Audio Components Connections 9 Video Components Connections... the Memorized Stations 35 Other Operations 36 Recording from Audio Components 36 Recording from Video Components 37 Remote Controlling Other PIONEER Components 38 Additional Information 43 Dolby Digital 43 Troubleshooting 44 Specifications 46 5 OPERATION

Owner's Manual
Page 6
... components should not exceed 100W (0.8 A). Incorrect use different batteries together. Do not use of the following accessories with new ones. 6 CAUTION! Power connection (AC OUTLET) [SWITCHED 100 W (0.8 A) MAX] Switching this manual: memo Provides additional information, precautions, and advice. Preparing the Remote... Loading the batteries AA dry cell batteries (("AA" IEC R6P)×2) \ When you to the AC OUTLET jacks, leave the power switch of the receiver and supplied remote control. Observe the following marks and symbols are switched on and off. Indicates a blinking ...
... components should not exceed 100W (0.8 A). Incorrect use different batteries together. Do not use of the following accessories with new ones. 6 CAUTION! Power connection (AC OUTLET) [SWITCHED 100 W (0.8 A) MAX] Switching this manual: memo Provides additional information, precautions, and advice. Preparing the Remote... Loading the batteries AA dry cell batteries (("AA" IEC R6P)×2) \ When you to the AC OUTLET jacks, leave the power switch of the receiver and supplied remote control. Observe the following marks and symbols are switched on and off. Indicates a blinking ...
Owner's Manual
Page 9
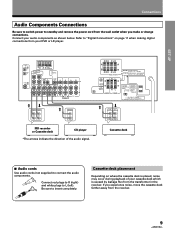
... signal. Cassette deck 7 Audio cords Use audio cords (not supplied) to connect the audio components. SET UP Connections Audio Components Connections Be sure to switch power to standby and remove the power cord from your DVD or LD player.
... signal. Cassette deck 7 Audio cords Use audio cords (not supplied) to connect the audio components. SET UP Connections Audio Components Connections Be sure to switch power to standby and remove the power cord from your DVD or LD player.
Owner's Manual
Page 13
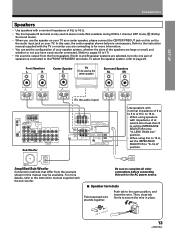
... sizes of the speakers are large or small, and whether or not you use the speaker on your TV. In this unit to the AC power source. 7 Speaker terminals Twist exposed wire strands together. Then, close tab firmly to secure the wire in place. 3/8 in stereo mode (Not available during DVD...
... sizes of the speakers are large or small, and whether or not you use the speaker on your TV. In this unit to the AC power source. 7 Speaker terminals Twist exposed wire strands together. Then, close tab firmly to secure the wire in place. 3/8 in stereo mode (Not available during DVD...
Owner's Manual
Page 15
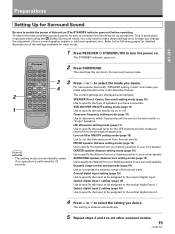
... specify the type of speakers you change the placement of the settings available for each mode. 1 Press RECEIVER STANDBY/ON to turn the power on or off. Dynamic range control setting mode (page 19) Use to compress the dynamic range of this unit on (The STANDBY indicator.... The setting is entered automatically. 5 Repeat steps 3 and 4 to set up operations. Preparations SET UP Setting Up for Surround Sound Be sure to switch the power of the sound track. TUNER MPX DIRECT CLASS .ACCESS DVD 1 2 3 LD 4 5 6 TV CONTROL TEST TONE 7 8 9 SURROUND ATT. 0 CD DISC FUNCTION ...
... specify the type of speakers you change the placement of the settings available for each mode. 1 Press RECEIVER STANDBY/ON to turn the power on or off. Dynamic range control setting mode (page 19) Use to compress the dynamic range of this unit on (The STANDBY indicator.... The setting is entered automatically. 5 Repeat steps 3 and 4 to set up operations. Preparations SET UP Setting Up for Surround Sound Be sure to switch the power of the sound track. TUNER MPX DIRECT CLASS .ACCESS DVD 1 2 3 LD 4 5 6 TV CONTROL TEST TONE 7 8 9 SURROUND ATT. 0 CD DISC FUNCTION ...
Owner's Manual
Page 21
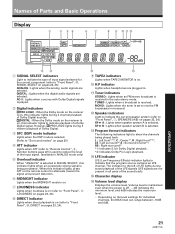
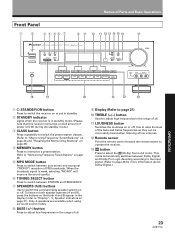
... on the level settings for the current component (refer to "Front Panel", !, SIGNAL SELECT on pages 23, 24). Volume level is maintained even when the power is selected. ~ Program format indicators The following indicators light to show the channels being processed . Names of Parts and Basic Operations Display 1 2 3 45 67 8 9 0-= SIGNAL...
... on the level settings for the current component (refer to "Front Panel", !, SIGNAL SELECT on pages 23, 24). Volume level is maintained even when the power is selected. ~ Program format indicators The following indicators light to show the channels being processed . Names of Parts and Basic Operations Display 1 2 3 45 67 8 9 0-= SIGNAL...
Owner's Manual
Page 23
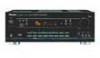
...select the (Dolby) Surround mode. Names of Parts and Basic Operations Front Panel 1 2 3 4 56 7 8 9 0 - =~ !@# $ STANDBY STANDBY/ON VSX-D498 AUDIO/VIDEO MULTI-CHANNEL RECEIVER MPX CLASS MEMORY MODE - + STATION TUNING SELECT - + FREQUENCY DSP MODE SIGNAL SELECT MIDNIGHT PHONES SPEAKERS A B BASS TREBLE - +... mode. (Please note that both speaker systems (A and B), press the buttons so that this receiver consumes a small amount of power (2.5 W) during the standby mode.) 3 CLASS button Press repeatedly to switch the preset station classes. (Refer to "Memorizing Frequency ...
...select the (Dolby) Surround mode. Names of Parts and Basic Operations Front Panel 1 2 3 4 56 7 8 9 0 - =~ !@# $ STANDBY STANDBY/ON VSX-D498 AUDIO/VIDEO MULTI-CHANNEL RECEIVER MPX CLASS MEMORY MODE - + STATION TUNING SELECT - + FREQUENCY DSP MODE SIGNAL SELECT MIDNIGHT PHONES SPEAKERS A B BASS TREBLE - +... mode. (Please note that both speaker systems (A and B), press the buttons so that this receiver consumes a small amount of power (2.5 W) during the standby mode.) 3 CLASS button Press repeatedly to switch the preset station classes. (Refer to "Memorizing Frequency ...

Owner's Manual
Page 25
... software is enjoy! A short delay on the reflected sounds emphasizes the sensation of the dance music. Less delay on the reflected sounds emulates the raw power of hearing a live band. You can identify Dolby Digital software by the or DOLBY DIGITAL AC-3 D I G I T A L marks. THEATER 2 Simulates the acoustic environment of a theater while...
... software is enjoy! A short delay on the reflected sounds emphasizes the sensation of the dance music. Less delay on the reflected sounds emulates the raw power of hearing a live band. You can identify Dolby Digital software by the or DOLBY DIGITAL AC-3 D I G I T A L marks. THEATER 2 Simulates the acoustic environment of a theater while...
Owner's Manual
Page 27
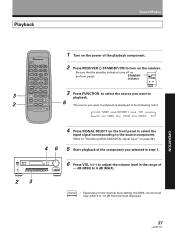
Be sure that the standby indicator turns off on the power of --- dB (MIN) to -10 dB from the level displayed. 27 FREQ. STANDBY indicator 3 6 Press FUNCTION to select the source you selected in step 1. 23 6 ...
Be sure that the standby indicator turns off on the power of --- dB (MIN) to -10 dB from the level displayed. 27 FREQ. STANDBY indicator 3 6 Press FUNCTION to select the source you selected in step 1. 23 6 ...
Owner's Manual
Page 28
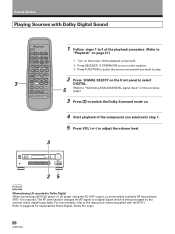
... VOLUME Î AV MULTI-CHANNEL RECEIVER REMOTE CONTROL UNIT 3 1 Follow steps 1 to 3 of the playback procedure. (Refer to "Playback" on page 27.) 1 Turn on the power of the playback component. 2 Press RECEIVER STADBY/ON to turn on the receiver. 3 Press FUNCTION to select the source component you want to play. 2 5 Press...
... VOLUME Î AV MULTI-CHANNEL RECEIVER REMOTE CONTROL UNIT 3 1 Follow steps 1 to 3 of the playback procedure. (Refer to "Playback" on page 27.) 1 Turn on the power of the playback component. 2 Press RECEIVER STADBY/ON to turn on the receiver. 3 Press FUNCTION to select the source component you want to play. 2 5 Press...
Owner's Manual
Page 44
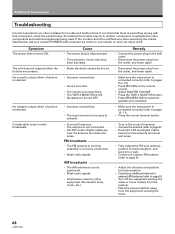
...TAPE 2 MONITOR is ON. • Speakers are turned OFF. • Improper connections. • The input source is not properly selected. • Disconnect the power plug from the equipment causing the noise. 44 The unit does not respond when the buttons are near the antenna terminals and wires. FM broadcasts... SPEAKERS (A/B) to select the speakers you think that there is something wrong with this component, check the points below , ask your nearest PIONEER authorized service center or your dealer to carry out repair work. Sometimes the trouble may have been activated.
...TAPE 2 MONITOR is ON. • Speakers are turned OFF. • Improper connections. • The input source is not properly selected. • Disconnect the power plug from the equipment causing the noise. 44 The unit does not respond when the buttons are near the antenna terminals and wires. FM broadcasts... SPEAKERS (A/B) to select the speakers you think that there is something wrong with this component, check the points below , ask your nearest PIONEER authorized service center or your dealer to carry out repair work. Sometimes the trouble may have been activated.

Owner's Manual
Page 45
... (7 m), 30° of operation. • There is an obstacle between the receiver and the remote control. • Strong light such as static electricity Disconnect the power plug from another position. • Avoid exposing the remote sensor on the front panel) returns the display to the CONTROL IN terminal on this unit...
... (7 m), 30° of operation. • There is an obstacle between the receiver and the remote control. • Strong light such as static electricity Disconnect the power plug from another position. • Avoid exposing the remote sensor on the front panel) returns the display to the CONTROL IN terminal on this unit...

Owner's Manual
Page 46
... (IHF, Loop antenna 350 µV/m Selectivity 25 dB Signal-to-Noise Ratio 50 dB Antenna Loop antenna Miscellaneous Power Requirements AC 120 V, 60 Hz Power Consumption 280 W, 400 VA Power Consumption in Standby mode 2.5 W AC Outlet SWITCHED 100 W (0.8 A) MAX Dimensions 420 (W) × 158 ... and the design are subject to possible modifications without notice, due to 20,000 Hz with no more than 0.09 %** total harmonic distortion (front). Continuous Power Output Front 80 W + 80 W (1 kHz, 0.8 %, 8 Ω) Center 80 W (1 kHz, 0.8 %, 8 Ω) Rear 80 W + 80 W (1 kHz, 0.8...
... (IHF, Loop antenna 350 µV/m Selectivity 25 dB Signal-to-Noise Ratio 50 dB Antenna Loop antenna Miscellaneous Power Requirements AC 120 V, 60 Hz Power Consumption 280 W, 400 VA Power Consumption in Standby mode 2.5 W AC Outlet SWITCHED 100 W (0.8 A) MAX Dimensions 420 (W) × 158 ... and the design are subject to possible modifications without notice, due to 20,000 Hz with no more than 0.09 %** total harmonic distortion (front). Continuous Power Output Front 80 W + 80 W (1 kHz, 0.8 %, 8 Ω) Center 80 W (1 kHz, 0.8 %, 8 Ω) Rear 80 W + 80 W (1 kHz, 0.8...
Owner's Manual
Page 48
... blaring or distortion-and, most out of your equipment by playing it damaged, ask your nearest PIONEER authorized service center or your sensitive hearing. Handle the power cord by setting your equipment at 1(800)421-1404(USA ONLY) Published by tugging the cord and...late, this unit, since these will provide a lifetime of the Deafness Research Foundation. The power cords should be stepped on. PIONEER ELECTRONIC CORPORATION 4-1, Meguro 1-Chome, Meguro-ku, Tokyo 153-8654, Japan PIONEER ELECTRONICS [USA] INC. Never make a knot in front of speakers, thunderclap 140 Gunshot ...
... blaring or distortion-and, most out of your equipment by playing it damaged, ask your nearest PIONEER authorized service center or your sensitive hearing. Handle the power cord by setting your equipment at 1(800)421-1404(USA ONLY) Published by tugging the cord and...late, this unit, since these will provide a lifetime of the Deafness Research Foundation. The power cords should be stepped on. PIONEER ELECTRONIC CORPORATION 4-1, Meguro 1-Chome, Meguro-ku, Tokyo 153-8654, Japan PIONEER ELECTRONICS [USA] INC. Never make a knot in front of speakers, thunderclap 140 Gunshot ...


