Owner's Manual
Page 4
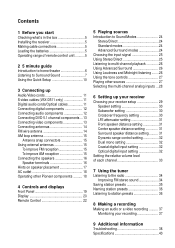
... Using the Quick Setup 10 3 Connecting up Audio/Video cords 11 S-video cables (VSX-D511 only 11 Digital audio cords/Optical cables 11 Connecting digital components 12 Connecting audio components 12 Connecting DVD 5.1 channel components ... 13 Connecting video components 13 Connecting antennas 14 FM wire antenna 14...external antennas 15 To improve FM reception 15 To improve AM reception 15 Connecting the speakers 16 Speaker terminals 16 Hints on speaker placement 17 AC outlet 18 Operating other Pioneer components .......... 18 4 Controls and displays Front Panel 19 Display 20 ...
... Using the Quick Setup 10 3 Connecting up Audio/Video cords 11 S-video cables (VSX-D511 only 11 Digital audio cords/Optical cables 11 Connecting digital components 12 Connecting audio components 12 Connecting DVD 5.1 channel components ... 13 Connecting video components 13 Connecting antennas 14 FM wire antenna 14...external antennas 15 To improve FM reception 15 To improve AM reception 15 Connecting the speakers 16 Speaker terminals 16 Hints on speaker placement 17 AC outlet 18 Operating other Pioneer components .......... 18 4 Controls and displays Front Panel 19 Display 20 ...
Owner's Manual
Page 5
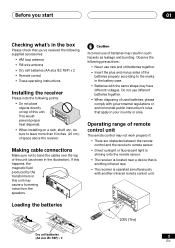
... AUDIO/VIDEO MULTI-CHANNEL MULTI JOG RECEIVER N∫m-Û.,, ENTER SINEPLUETCTOR DOWN MASTER VOLUME UP R • When installing on top of this unit. Making cable connections Make sure not to bend the cables over the top of this unit may not work properly if: • There are obstacles between the remote...
... AUDIO/VIDEO MULTI-CHANNEL MULTI JOG RECEIVER N∫m-Û.,, ENTER SINEPLUETCTOR DOWN MASTER VOLUME UP R • When installing on top of this unit. Making cable connections Make sure not to bend the cables over the top of this unit may not work properly if: • There are obstacles between the remote...
Owner's Manual
Page 7
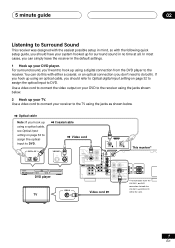
.... If you hook up using a digital connection from the DVD player to the receiver. Optical cable Note: If you 'll want to hook up using an optical cable, you can do this with the following quick setup guide, you don't need to do both the VSX-D411 and VSX-D411S will be the same. 7 En... Use a video cord to connect your receiver to the TV using the jacks shown below . You can simply leave the receiver in the default settings...
.... If you hook up using a digital connection from the DVD player to the receiver. Optical cable Note: If you 'll want to hook up using an optical cable, you can do this with the following quick setup guide, you don't need to do both the VSX-D411 and VSX-D411S will be the same. 7 En... Use a video cord to connect your receiver to the TV using the jacks shown below . You can simply leave the receiver in the default settings...
Owner's Manual
Page 8
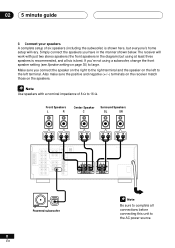
... unit to the AC power source. Use speakers with just two stereo speakers (the front speakers in the manner shown below. Simply connect the speakers you connect the speaker on the right to the right terminal and the speaker on page 30) to the left terminal. Front Speakers L R Center Speaker C Surround Speakers... setting on the left to large. Also make sure the positive and negative (+/-) terminals on the receiver match those on the speakers. 02 5 minute guide 3 Connect your speakers. A complete setup of 8 Ω to complete all six is best.
... unit to the AC power source. Use speakers with just two stereo speakers (the front speakers in the manner shown below. Simply connect the speakers you connect the speaker on the right to the right terminal and the speaker on page 30) to the left terminal. Front Speakers L R Center Speaker C Surround Speakers... setting on the left to large. Also make sure the positive and negative (+/-) terminals on the receiver match those on the speakers. 02 5 minute guide 3 Connect your speakers. A complete setup of 8 Ω to complete all six is best.
Owner's Manual
Page 11
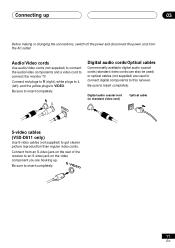
... components to this receiver. S VIDEO 11 En Connect red plugs to R (right), white plugs to L (left), and the yellow plugs to insert completely. Digital audio coaxial cord (or standard video cord) Optical cable S-video cables (VSX-D511 only) Use S-video cables (not supplied) to insert completely. R L VIDEO Digital audio cords/Optical cables...
... components to this receiver. S VIDEO 11 En Connect red plugs to R (right), white plugs to L (left), and the yellow plugs to insert completely. Digital audio coaxial cord (or standard video cord) Optical cable S-video cables (VSX-D511 only) Use S-video cables (not supplied) to insert completely. R L VIDEO Digital audio cords/Optical cables...
Owner's Manual
Page 12
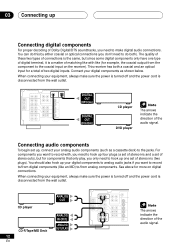
...receiver). For components you want to record to/from digital components (like (for example, the coaxial output from the wall outlet. When connecting your digital components to analog audio jacks if you need to make sure the power is turned off and the power cord is disconnected ...from the component to the coaxial input on digital connections. 03 Connecting up Connecting digital components For proper decoding of Dolby Digital/DTS soundtracks, you want to record with like an MD) to the jacks. This...
...receiver). For components you want to record to/from digital components (like (for example, the coaxial output from the wall outlet. When connecting your digital components to analog audio jacks if you need to make sure the power is turned off and the power cord is disconnected ...from the component to the coaxial input on digital connections. 03 Connecting up Connecting digital components For proper decoding of Dolby Digital/DTS soundtracks, you want to record with like an MD) to the jacks. This...
Owner's Manual
Page 13
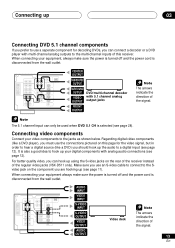
... page for decoding DVDs, you can hook up using the S-video jacks on the rear of the receiver instead of the regular video jacks (VSX-D511 only). When connecting your digital components with analog audio connections (see page 12). It is selected (see page 28). Make sure you use the... use a seperate component for the video signal, but in order to hear a digital source (like a DVD player), you must use an S-video cable to connect to the Svideo jack on the component you are hooking up (see page 11). Regarding digital video components (like a DVD) you should hook up the...
... page for decoding DVDs, you can hook up using the S-video jacks on the rear of the receiver instead of the regular video jacks (VSX-D511 only). When connecting your digital components with analog audio connections (see page 12). It is selected (see page 28). Make sure you use the... use a seperate component for the video signal, but in order to hear a digital source (like a DVD player), you must use an S-video cable to connect to the Svideo jack on the component you are hooking up (see page 11). Regarding digital video components (like a DVD) you should hook up the...
Owner's Manual
Page 14
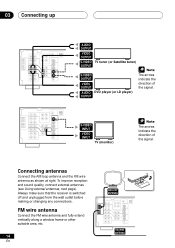
...vertically along a window frame or other suitable area, etc. 14 En AM LOOP ANTENNA FM WIRE ANTENNA Connecting antennas Connect the AM loop antenna and the FM wire antenna as shown at right. 03 Connecting up AUDIO OUTPUT VIDEO OUTPUT S-VIDEO TV tuner (or Satellite tuner) OUTPUT S-VIDEO OUTPUT VIDEO OUTPUT AUDIO... of the signal. Always make sure that the receiver is switched off and unplugged from the wall outlet before making or changing any connections. S-VIDEO INPUT VIDEO INPUT TV (monitor) The arrows indicate the direction of the signal. To improve reception and sound quality...
...vertically along a window frame or other suitable area, etc. 14 En AM LOOP ANTENNA FM WIRE ANTENNA Connecting antennas Connect the AM loop antenna and the FM wire antenna as shown at right. 03 Connecting up AUDIO OUTPUT VIDEO OUTPUT S-VIDEO TV tuner (or Satellite tuner) OUTPUT S-VIDEO OUTPUT VIDEO OUTPUT AUDIO... of the signal. Always make sure that the receiver is switched off and unplugged from the wall outlet before making or changing any connections. S-VIDEO INPUT VIDEO INPUT TV (monitor) The arrows indicate the direction of the signal. To improve reception and sound quality...
Owner's Manual
Page 15
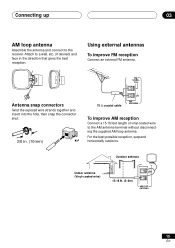
Using external antennas To improve FM reception Connect an external FM antenna. FM UNBAL 75Ω Antenna snap connectors Twist the exposed wire strands together and insert into the hole, then snap the ... desired) and face in . (10mm) 75 Ω coaxial cable FM ANTENNA To improve AM reception Connect a 15-18 feet length of vinyl-coated wire to the receiver. Connecting up 03 AM loop antenna Assemble the antenna and connect to the AM antenna terminal without disconnecting the supplied AM loop antenna. For the best...
Using external antennas To improve FM reception Connect an external FM antenna. FM UNBAL 75Ω Antenna snap connectors Twist the exposed wire strands together and insert into the hole, then snap the ... desired) and face in . (10mm) 75 Ω coaxial cable FM ANTENNA To improve AM reception Connect a 15-18 feet length of vinyl-coated wire to the receiver. Connecting up 03 AM loop antenna Assemble the antenna and connect to the AM antenna terminal without disconnecting the supplied AM loop antenna. For the best...
Owner's Manual
Page 16
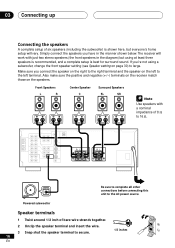
...L R Center Speaker C Surround Speakers SL SR Use speakers with just two stereo speakers (the front speakers in the manner shown below. 03 Connecting up Connecting the speakers A complete setup of six speakers (including the subwoofer) is best for surround sound. If you're not using at least three ... have in the diagram) but everyone's home setup will work with a nominal impedance of 8 Ω to 16 Ω. Simply connect the speakers you connect the speaker on the right to the right terminal and the speaker on the left to secure. 16 En The receiver will vary. Powered...
...L R Center Speaker C Surround Speakers SL SR Use speakers with just two stereo speakers (the front speakers in the manner shown below. 03 Connecting up Connecting the speakers A complete setup of six speakers (including the subwoofer) is best for surround sound. If you're not using at least three ... have in the diagram) but everyone's home setup will work with a nominal impedance of 8 Ω to 16 Ω. Simply connect the speakers you connect the speaker on the right to the right terminal and the speaker on the left to secure. 16 En The receiver will vary. Powered...
Owner's Manual
Page 17
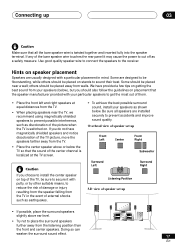
Connecting up • If possible, place the surround speakers slightly above or below the TV so that the sound of the center channel is localized at ... . Listening Position 3-D view of the picture when the TV is twisted together and inserted fully into the speaker terminal. Use good quality speaker wire to connect the speakers to sound their best. Hints on stands to the receiver. If you should be placed away from the TV in mind.
Connecting up • If possible, place the surround speakers slightly above or below the TV so that the sound of the center channel is localized at ... . Listening Position 3-D view of the picture when the TV is twisted together and inserted fully into the speaker terminal. Use good quality speaker wire to connect the speakers to sound their best. Hints on stands to the receiver. If you should be placed away from the TV in mind.
Owner's Manual
Page 18
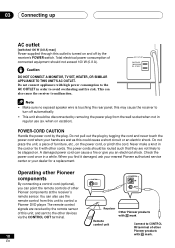
... avoid overheating and fire risk. You can cause a fire or give you find it with other Pioneer products with Î mark Remote control unit Connect to CONTROL IN terminal of other Pioneer components at the receiver's remote sensor. When you an electrical shock. Do not pull out the... plug by tugging the cord and never touch the power cord when your dealer for a replacement. Operating other Pioneer components By connecting a control cord (optional), you can also cause the receiver to malfunction. The power cords should be stepped on and off automatically. ...
... avoid overheating and fire risk. You can cause a fire or give you find it with other Pioneer products with Î mark Remote control unit Connect to CONTROL IN terminal of other Pioneer components at the receiver's remote sensor. When you an electrical shock. Do not pull out the... plug by tugging the cord and never touch the power cord when your dealer for a replacement. Operating other Pioneer components By connecting a control cord (optional), you can also cause the receiver to malfunction. The power cords should be stepped on and off automatically. ...
Owner's Manual
Page 19
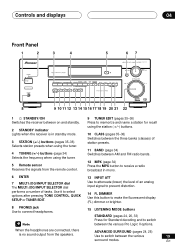
...lower) the level of tasks. En ADVANCED SURROUND (pages 24, 26) Use to switch between the various Pro Logic II options. When the headphones are connected, there is in standby mode. 3 STATION (+/-) buttons (pages 35-36) Selects station presets when using the tuner. 4 TUNING (+/-) buttons (page ... to prevent distortion. 14 FL DIMMER Use this button to make the fluorescent display (FL) dimmer or brighter. 8 PHONES jack Use to connect headphones. 15 LISTENING MODE buttons STANDARD (pages 24, 26, 33) Press for recall using the tuner. 5 Remote sensor Receives the signals from...
...lower) the level of tasks. En ADVANCED SURROUND (pages 24, 26) Use to switch between the various Pro Logic II options. When the headphones are connected, there is in standby mode. 3 STATION (+/-) buttons (pages 35-36) Selects station presets when using the tuner. 4 TUNING (+/-) buttons (page ... to prevent distortion. 14 FL DIMMER Use this button to make the fluorescent display (FL) dimmer or brighter. 8 PHONES jack Use to connect headphones. 15 LISTENING MODE buttons STANDARD (pages 24, 26, 33) Press for recall using the tuner. 5 Remote sensor Receives the signals from...
Owner's Manual
Page 21
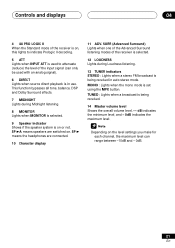
... when INPUT ATT is used with an analog signal). 6 DIRECT Lights when source direct playback is in auto stereo mode. SP 3A means speakers are connected. 10 Character display 11 ADV. dB indicates the minimum level, and - 0dB indicates the maximum level. TUNED : Lights when a broadcast is on or not. Depending...
... when INPUT ATT is used with an analog signal). 6 DIRECT Lights when source direct playback is in auto stereo mode. SP 3A means speakers are connected. 10 Character display 11 ADV. dB indicates the minimum level, and - 0dB indicates the maximum level. TUNED : Lights when a broadcast is on or not. Depending...
Owner's Manual
Page 23
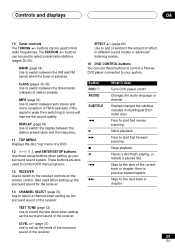
... the receiver. EFFECT +/- (page 26) Use to add or subtract the amount of a DVD. 12 } ] ' ' and ENTER/SETUP buttons Use these buttons to control a Pioneer DVD player connected to previous tracks/chapters. Changes the audio language or channel. Skips to sound the test tones when setting up your system. Starts playback. TEST...
... the receiver. EFFECT +/- (page 26) Use to add or subtract the amount of a DVD. 12 } ] ' ' and ENTER/SETUP buttons Use these buttons to control a Pioneer DVD player connected to previous tracks/chapters. Changes the audio language or channel. Skips to sound the test tones when setting up your system. Starts playback. TEST...
Owner's Manual
Page 25
... UP R • Press SIGNAL SELECT (front panel) to select the input signal corresponding to imitate a five speaker sound. To prevent noise, make the proper digital connections (page 12) and set to ANALOG. • You may get digital noise when a LD or CD player compatible with Dolby Pro Logic for a wider stereo...
... UP R • Press SIGNAL SELECT (front panel) to select the input signal corresponding to imitate a five speaker sound. To prevent noise, make the proper digital connections (page 12) and set to ANALOG. • You may get digital noise when a LD or CD player compatible with Dolby Pro Logic for a wider stereo...
Owner's Manual
Page 28
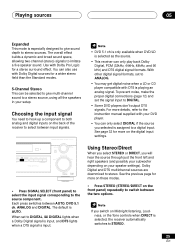
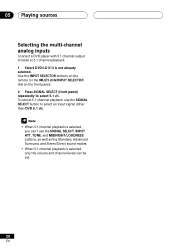
... is not already selected. To cancel 5.1 channel playback, use the SIGNAL SELECT button to select 5.1 ch. 05 Playing sources Selecting the multi-channel analog inputs Connect a DVD player with 5.1 channel output to listen to 5.1 channel playback. 1 Select DVD/LD if it is selected, only the volume and channel levels can be...
... is not already selected. To cancel 5.1 channel playback, use the SIGNAL SELECT button to select 5.1 ch. 05 Playing sources Selecting the multi-channel analog inputs Connect a DVD player with 5.1 channel output to listen to 5.1 channel playback. 1 Select DVD/LD if it is selected, only the volume and channel levels can be...
Owner's Manual
Page 29
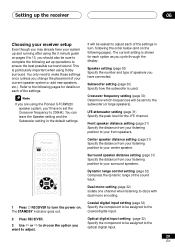
... option you change the placement of the settings. Subwoofer setting (page 30) Specify how the subwoofer is particularly important when using the Pioneer S-FCRW220 speaker system, you'll have connected. You only need to make these settings once (unless you want to set up and running after using the 5 minute guide on...
... option you change the placement of the settings. Subwoofer setting (page 30) Specify how the subwoofer is particularly important when using the Pioneer S-FCRW220 speaker system, you'll have connected. You only need to make these settings once (unless you want to set up and running after using the 5 minute guide on...
Owner's Manual
Page 30
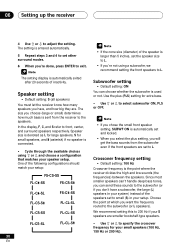
... for extra bass. • Use ' or ' to select subwoofer ON, PLS or OFF. • If you chose the small front speaker setting, SUBWF ON is connected. • Cycle through the available choices using a subwoofer, we recommend setting the front speakers to specify the crossover frequency for small speakers, and (asterisk) if...
... for extra bass. • Use ' or ' to select subwoofer ON, PLS or OFF. • If you chose the small front speaker setting, SUBWF ON is connected. • Cycle through the available choices using a subwoofer, we recommend setting the front speakers to specify the crossover frequency for small speakers, and (asterisk) if...
Owner's Manual
Page 37
... to record. Monitoring your recording You can make an audio or a video recording from the built-in tuner, or from an audio or video source connected to the receiver (such as it's being made using the MONITOR button on the front panel (a cassette deck would have to have no effect on...) the recording as a CD player or TV) through the analog jacks. Tune to the radio station, load the CD, video, DVD etc. 3 Prepare the recorder (connected to do this ). Most video recorders set the recording levels. Insert a blank tape, MD, video etc. You will need to...
... to record. Monitoring your recording You can make an audio or a video recording from the built-in tuner, or from an audio or video source connected to the receiver (such as it's being made using the MONITOR button on the front panel (a cassette deck would have to have no effect on...) the recording as a CD player or TV) through the analog jacks. Tune to the radio station, load the CD, video, DVD etc. 3 Prepare the recorder (connected to do this ). Most video recorders set the recording levels. Insert a blank tape, MD, video etc. You will need to...


