Owner's Manual
Page 4
... to home theater 6 Listening to Surround Sound 7 Using the Quick Setup 10 3 Connecting up Audio/Video cords 11 S-video cables (VSX-D511 only 11 Digital audio cords/Optical cables 11 Connecting digital components 12 Connecting audio components 12 Connecting DVD 5.1 channel components ... 13 ...Using external antennas 15 To improve FM reception 15 To improve AM reception 15 Connecting the speakers 16 Speaker terminals 16 Hints on speaker placement 17 AC outlet 18 Operating other Pioneer components .......... 18 4 Controls and displays Front Panel 19 Display 20 Remote Control 22 ...
... to home theater 6 Listening to Surround Sound 7 Using the Quick Setup 10 3 Connecting up Audio/Video cords 11 S-video cables (VSX-D511 only 11 Digital audio cords/Optical cables 11 Connecting digital components 12 Connecting audio components 12 Connecting DVD 5.1 channel components ... 13 ...Using external antennas 15 To improve FM reception 15 To improve AM reception 15 Connecting the speakers 16 Speaker terminals 16 Hints on speaker placement 17 AC outlet 18 Operating other Pioneer components .......... 18 4 Controls and displays Front Panel 19 Display 20 Remote Control 22 ...
Owner's Manual
Page 5
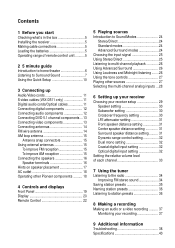
... a rack, shelf, etc., be sure to leave more than 8 inches (20 cm.) of remote control unit The remote control may cause a humming noise from the speakers.
... a rack, shelf, etc., be sure to leave more than 8 inches (20 cm.) of remote control unit The remote control may cause a humming noise from the speakers.
Owner's Manual
Page 6
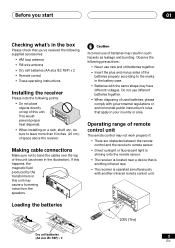
... to home theater systems that give you have set up to seven different audio tracks coming from a home theater system depends not only on the speakers you many more options (such as surround sound) when listening to soundtracks. In most cases, you won't have up in your room, but also...other possibilities (like you can have to make changes for home theater due to its size, quality, and ease of 'being sent to different speakers in your speaker setup. 02 5 minute guide Introduction to home theater You are explained in Playing sources, starting on the source and the sound settings of ...
... to home theater systems that give you have set up to seven different audio tracks coming from a home theater system depends not only on the speakers you many more options (such as surround sound) when listening to soundtracks. In most cases, you won't have up in your room, but also...other possibilities (like you can have to make changes for home theater due to its size, quality, and ease of 'being sent to different speakers in your speaker setup. 02 5 minute guide Introduction to home theater You are explained in Playing sources, starting on the source and the sound settings of ...
Owner's Manual
Page 8
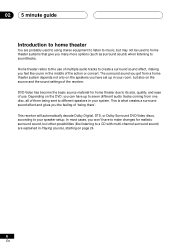
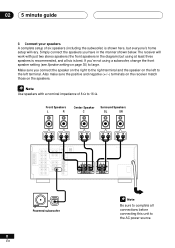
...will vary. Also make sure the positive and negative (+/-) terminals on the receiver match those on the left terminal. Front Speakers L R Center Speaker C Surround Speakers SL SR RL RL INPUT Powered subwoofer 8 En Be sure to complete all six is shown here, but everyone's home... this unit to 16 Ω. Use speakers with just two stereo speakers (the front speakers in the manner shown below. If you connect the speaker on the right to the right terminal and the speaker on the speakers. 02 5 minute guide 3 Connect your speakers. A complete setup of 8 Ω...
...will vary. Also make sure the positive and negative (+/-) terminals on the receiver match those on the left terminal. Front Speakers L R Center Speaker C Surround Speakers SL SR RL RL INPUT Powered subwoofer 8 En Be sure to complete all six is shown here, but everyone's home... this unit to 16 Ω. Use speakers with just two stereo speakers (the front speakers in the manner shown below. If you connect the speaker on the right to the right terminal and the speaker on the speakers. 02 5 minute guide 3 Connect your speakers. A complete setup of 8 Ω...
Owner's Manual
Page 9
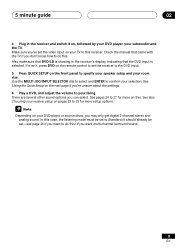
... player, your subwoofer and the TV. In this ) if you may only get digital 2 channel stereo and analog sound. See pages 24 to specify your speaker setup and your room size.
... player, your subwoofer and the TV. In this ) if you may only get digital 2 channel stereo and analog sound. See pages 24 to specify your speaker setup and your room size.
Owner's Manual
Page 10
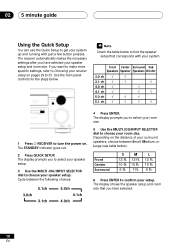
... the Quick Setup You can use the Quick Setup to get your surround speakers, choose between the following choices: 3.0ch 5.1ch 3.1ch 5.0ch 4.1ch 4.0ch Check the table below to ...and room size. The receiver automatically makes the necessary settings after you to select your speaker setup. 3 Use the MULTI JOG/INPUT SELECTOR dial to Choosing your setup. The ...Surround S 12 ft. 10 ft. 6 ft. The display shows the speaker setup and room size that corresponds with just a few button presses. If you have selected your speaker setup. Use the front panel controls for the steps below ). The ...
... the Quick Setup You can use the Quick Setup to get your surround speakers, choose between the following choices: 3.0ch 5.1ch 3.1ch 5.0ch 4.1ch 4.0ch Check the table below to ...and room size. The receiver automatically makes the necessary settings after you to select your speaker setup. 3 Use the MULTI JOG/INPUT SELECTOR dial to Choosing your setup. The ...Surround S 12 ft. 10 ft. 6 ft. The display shows the speaker setup and room size that corresponds with just a few button presses. If you have selected your speaker setup. Use the front panel controls for the steps below ). The ...
Owner's Manual
Page 16
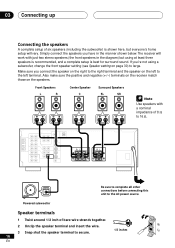
...;. 03 Connecting up Connecting the speakers A complete setup of six speakers (including the subwoofer) is best for surround sound. If you connect the speaker on the right to the right terminal and the speaker on the speakers. Simply connect the speakers you have in the diagram) ...a nominal impedance of 8 Ω to secure. 16 En The receiver will vary. Front Speakers L R Center Speaker C Surround Speakers SL SR Use speakers with just two stereo speakers (the front speakers in the manner shown below. RL RL Be sure to complete all other INPUT connections before ...
...;. 03 Connecting up Connecting the speakers A complete setup of six speakers (including the subwoofer) is best for surround sound. If you connect the speaker on the right to the right terminal and the speaker on the speakers. Simply connect the speakers you have in the diagram) ...a nominal impedance of 8 Ω to secure. 16 En The receiver will vary. Front Speakers L R Center Speaker C Surround Speakers SL SR Use speakers with just two stereo speakers (the front speakers in the manner shown below. RL RL Be sure to complete all other INPUT connections before ...
Owner's Manual
Page 17
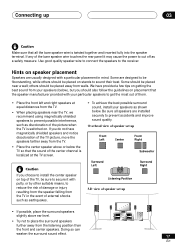
... discoloration of the picture when the TV is localized at the TV screen. • To achieve the best possible surround sound, install your speakers as shown below the TV so that the sound of external shocks such as a safety measure. Some are designed to be floorstanding, while ...power to cut off as earthquakes. others should also follow the guidelines on . We have magnetically shielded speakers and notice discoloration of them. • Place the front left and right speakers at equal distances from walls. Hints on stands to the receiver. Overhead view of damage or injury ...
... discoloration of the picture when the TV is localized at the TV screen. • To achieve the best possible surround sound, install your speakers as shown below the TV so that the sound of external shocks such as a safety measure. Some are designed to be floorstanding, while ...power to cut off as earthquakes. others should also follow the guidelines on . We have magnetically shielded speakers and notice discoloration of them. • Place the front left and right speakers at equal distances from walls. Hints on stands to the receiver. Overhead view of damage or injury ...
Owner's Manual
Page 18
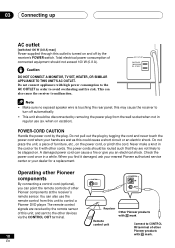
...off by the plug. AC OUTLET SWITCHED 100 W MAX 0.8 A MAX • Make sure no exposed speaker wire is turned on vacation). You can point the remote controls of other Pioneer products with high power consumption to the AC OUTLET in a while. The remote control signals are wet as...of this unit, and sent to the other devices via the CONTROL OUT terminal. 18 En CONTROL OUT CONTROL IN OUT Receiver Other Pioneer products with other Pioneer components By connecting a control cord (optional), you an electrical shock. when on and off automatically. • This unit should be...
...off by the plug. AC OUTLET SWITCHED 100 W MAX 0.8 A MAX • Make sure no exposed speaker wire is turned on vacation). You can point the remote controls of other Pioneer products with high power consumption to the AC OUTLET in a while. The remote control signals are wet as...of this unit, and sent to the other devices via the CONTROL OUT terminal. 18 En CONTROL OUT CONTROL IN OUT Receiver Other Pioneer products with other Pioneer components By connecting a control cord (optional), you an electrical shock. when on and off automatically. • This unit should be...
Owner's Manual
Page 19
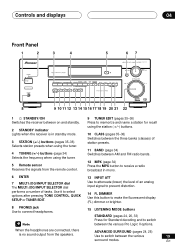
...) Selects station presets when using the tuner. 4 TUNING (+/-) buttons (page 34) Selects the frequency when using the tuner. 5 Remote sensor Receives the signals from the speakers. En Use it to select options after pressing TONE CONTROL, QUICK SETUP or TUNER EDIT. 13 INPUT ATT Use to attenuate (lower) the level of...
...) Selects station presets when using the tuner. 4 TUNING (+/-) buttons (page 34) Selects the frequency when using the tuner. 5 Remote sensor Receives the signals from the speakers. En Use it to select options after pressing TONE CONTROL, QUICK SETUP or TUNER EDIT. 13 INPUT ATT Use to attenuate (lower) the level of...
Owner's Manual
Page 21
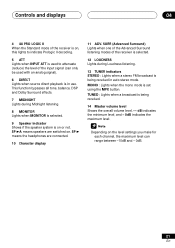
... level of the receiver is selected. 12 LOUDNESS Lights during Midnight listening. 8 MONITOR Lights when MONITOR is selected. 9 Speaker indicator Shows if the speaker system is set using the MPX button. SP 3A means speakers are connected. 10 Character display 11 ADV. SP 3 means the headphones are switched on the level settings you...
... level of the receiver is selected. 12 LOUDNESS Lights during Midnight listening. 8 MONITOR Lights when MONITOR is selected. 9 Speaker indicator Shows if the speaker system is set using the MPX button. SP 3A means speakers are connected. 10 Character display 11 ADV. SP 3 means the headphones are switched on the level settings you...
Owner's Manual
Page 24
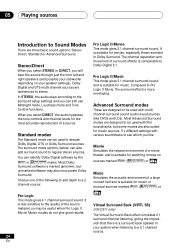
... of the source material, so may also incorporate Dolby Surround. Compared to Pro Logic II Movie, the surround effect is a surround back speaker in Dolby Surround. Try different settings with film soundtracks, but unmarked software may be used to decode Dolby Digital, DTS or Dolby Surround ...designed to be used with various soundtracks to see which you will hear the source through just the front left and right speakers (and possibly your speaker settings). Choose one of surround effects is suitable for music. 05 Playing sources Introduction to Sound Modes There are also ...
... of the source material, so may also incorporate Dolby Surround. Compared to Pro Logic II Movie, the surround effect is a surround back speaker in Dolby Surround. Try different settings with film soundtracks, but unmarked software may be used to decode Dolby Digital, DTS or Dolby Surround ...designed to be used with various soundtracks to see which you will hear the source through just the front left and right speakers (and possibly your speaker settings). Choose one of surround effects is suitable for music. 05 Playing sources Introduction to Sound Modes There are also ...
Owner's Manual
Page 25
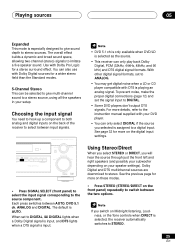
...when DVD/LD is selected as the source. • This receiver can be selected to give sound depth to imitate a five speaker sound. For more on your speaker settings). See the previous page for a wider stereo field than the Standard modes. 5-Channel Stereo This can only play back ...an analog signal. With other digital signal formats, set to stereo. If you will hear the source through just the front left and right speakers (and possibly your setup. Playing sources 05 Expanded This mode is especially designed to give multi-channel sound to a digital input. The ...
...when DVD/LD is selected as the source. • This receiver can be selected to give sound depth to imitate a five speaker sound. For more on your speaker settings). See the previous page for a wider stereo field than the Standard modes. 5-Channel Stereo This can only play back ...an analog signal. With other digital signal formats, set to stereo. If you will hear the source through just the front left and right speakers (and possibly your setup. Playing sources 05 Expanded This mode is especially designed to give multi-channel sound to a digital input. The ...
Owner's Manual
Page 29
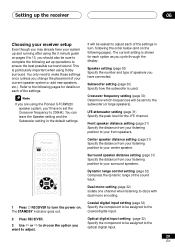
If you are using the Pioneer S-FCRW220 speaker system, you'll have to set up operations to your center speaker. LFE attenuator setting (page 31) Specify the peak level for each of the settings. Coaxial digital input setting (page 32) Specify the component to...RECEIVER position to ensure the best possible surround sound. Optical digital input setting (page 32) Specify the component to be assigned to your front speakers. Center speaker distance setting (page 31) Specify the distance from your listening position to the optical digital input. 29 En Setting up the receiver 06 ...
If you are using the Pioneer S-FCRW220 speaker system, you'll have to set up operations to your center speaker. LFE attenuator setting (page 31) Specify the peak level for each of the settings. Coaxial digital input setting (page 32) Specify the component to...RECEIVER position to ensure the best possible surround sound. Optical digital input setting (page 32) Specify the component to be assigned to your front speakers. Center speaker distance setting (page 31) Specify the distance from your listening position to the optical digital input. 29 En Setting up the receiver 06 ...
Owner's Manual
Page 30
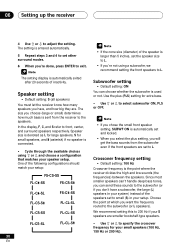
...frequency for extra bass. • Use ' or ' to select subwoofer ON, PLS or OFF. • If you 're done, press ENTER to the speakers. The size you choose (large or small) determines how much bass is larger than 5 inches, set other surround modes. 6 When you chose the small ... will get the bass sounds from the receiver to exit. • If the cone size (diameter) of inactivity. Speaker size is denoted as L for large speakers, S for small speakers, and (asterisk) if no speaker is automatically set and locked. • When you want the frequency routed to front, center, and surround...
...frequency for extra bass. • Use ' or ' to select subwoofer ON, PLS or OFF. • If you 're done, press ENTER to the speakers. The size you choose (large or small) determines how much bass is larger than 5 inches, set other surround modes. 6 When you chose the small ... will get the bass sounds from the receiver to exit. • If the cone size (diameter) of inactivity. Speaker size is denoted as L for large speakers, S for small speakers, and (asterisk) if no speaker is automatically set and locked. • When you want the frequency routed to front, center, and surround...
Owner's Manual
Page 31
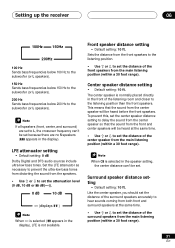
... position than the front speakers. Front speaker distance setting • Default setting: 10 ft. Surround speaker distance setting • Default setting: 10 ft. If all speakers (front, center, and surround) are no S speakers ( appears in the display). The center speaker is not available. Like the center speaker, you should set the...0 dB 10 dB ∞ (displays ) When ∞ is selected ( appears in the display), LFE is normally placed directly in the speaker setting, the center distance can't be set because there are set to L, the crossover frequency can't be set the center...
... position than the front speakers. Front speaker distance setting • Default setting: 10 ft. Surround speaker distance setting • Default setting: 10 ft. If all speakers (front, center, and surround) are no S speakers ( appears in the display). The center speaker is not available. Like the center speaker, you should set the...0 dB 10 dB ∞ (displays ) When ∞ is selected ( appears in the display), LFE is normally placed directly in the speaker setting, the center distance can't be set because there are set to L, the crossover frequency can't be set the center...
Owner's Manual
Page 32
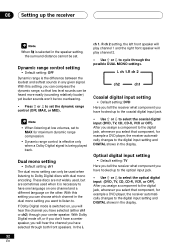
... low level sounds can choose which channel in the display. After you assign a component to the digital jack, whenever you have selected through both front speakers. With this setting you have selected (either ch1 or ch2) through the possible DUAL MONO settings. In the L ch 1. L ch 1.R ch ... (OFF, MAX, or MID). • When listening at low volumes, set . 06 Setting up the receiver When S is selected in the speaker setting, the surround distance cannot be set to MAX for maximum dynamic range compression. • Dynamic range control is effective only when a Dolby Digital...
... low level sounds can choose which channel in the display. After you assign a component to the digital jack, whenever you have selected through both front speakers. With this setting you have selected (either ch1 or ch2) through the possible DUAL MONO settings. In the L ch 1. L ch 1.R ch ... (OFF, MAX, or MID). • When listening at low volumes, set . 06 Setting up the receiver When S is selected in the speaker setting, the surround distance cannot be set to MAX for maximum dynamic range compression. • Dynamic range control is effective only when a Dolby Digital...
Owner's Manual
Page 33
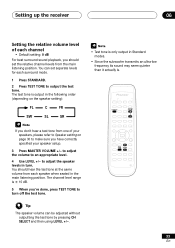
... MASTER VOLUME If you don't hear a test tone from the main listening position. to turn . Î You should set seperate levels for each speaker when seated in turn off the test tone. You can be adjusted without outputting the test tone by pressing CH SELECT and then using LEVEL... +/-. 33 En The channel level range is . The speaker volume can set the relative channel levels from one of each channel • Default setting: 0 dB For best surround sound playback, you should hear...
... MASTER VOLUME If you don't hear a test tone from the main listening position. to turn . Î You should set seperate levels for each speaker when seated in turn off the test tone. You can be adjusted without outputting the test tone by pressing CH SELECT and then using LEVEL... +/-. 33 En The channel level range is . The speaker volume can set the relative channel levels from one of each channel • Default setting: 0 dB For best surround sound playback, you should hear...
Owner's Manual
Page 38
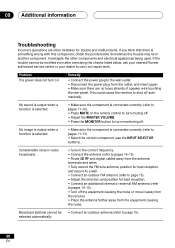
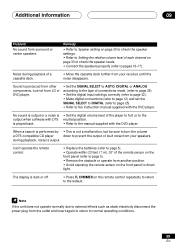
... when a function is selected. • Make sure the component is something wrong with this component, check the points below , ask your nearest Pioneer authorized service center or your dealer to page 15). If the trouble cannot be • Connect an outdoor antenna (refer to carry out repair... work. 09 Additional information Troubleshooting Incorrect operations are no loose strands of speaker wire touching the rear panel. If you think that there is connected correctly (refer to pages 11-16). • Press MUTE on the...
... when a function is selected. • Make sure the component is something wrong with this component, check the points below , ask your nearest Pioneer authorized service center or your dealer to page 15). If the trouble cannot be • Connect an outdoor antenna (refer to carry out repair... work. 09 Additional information Troubleshooting Incorrect operations are no loose strands of speaker wire touching the rear panel. If you think that there is connected correctly (refer to pages 11-16). • Press MUTE on the...
Owner's Manual
Page 39
...8226; Set the digital volume level of the remote sensor on the front panel (refer to page 5). • Remove the obstacle or operate from your speakers. Sound is output. The display is not a malfunction, but not from your receiver, until the noise disappears. Can't operate the remote control. &#...the front panel to direct light. If the unit does not operate normally due to the default. Remedy • Refer to Speaker setting on page 30 to check the speaker settings. • Refer to Setting the relative volume level of a cassette deck. • Move the cassette deck further ...
...8226; Set the digital volume level of the remote sensor on the front panel (refer to page 5). • Remove the obstacle or operate from your speakers. Sound is output. The display is not a malfunction, but not from your receiver, until the noise disappears. Can't operate the remote control. &#...the front panel to direct light. If the unit does not operate normally due to the default. Remedy • Refer to Speaker setting on page 30 to check the speaker settings. • Refer to Setting the relative volume level of a cassette deck. • Move the cassette deck further ...


