
Instruction Manual English
Page 2
Bluetooth Wakeup ( →p125) ‰ Detailed contents (Next page) 2 HDMI Standby Through ( →p123) - Network Standby ( →p125) - USB Power Out at Standby ( →p125) - HDMI CEC ( →p123) - Table of contents Speaker Layout Main Room Zone 2 Speaker Connections Firmware Update Troubleshooting Supplementary Information Reducing the Power Consumption in Standby State When the following functions are enabled, the power consumption in standby state, check each setting and set the functions to "Off". - To reduce the power consumption in standby state increases.
Bluetooth Wakeup ( →p125) ‰ Detailed contents (Next page) 2 HDMI Standby Through ( →p123) - Network Standby ( →p125) - USB Power Out at Standby ( →p125) - HDMI CEC ( →p123) - Table of contents Speaker Layout Main Room Zone 2 Speaker Connections Firmware Update Troubleshooting Supplementary Information Reducing the Power Consumption in Standby State When the following functions are enabled, the power consumption in standby state, check each setting and set the functions to "Off". - To reduce the power consumption in standby state increases.
Instruction Manual English
Page 3
... with HDMI 20 jacks Connecting an Audio Component 56 57 Connecting a TV or Integrated Amplifier in a separate 22 room (Multi-zone) 58 23 Connecting a TV (ZONE 2) 58 24 Connecting an Integrated Amplifier (ZONE 2) 59 25 Connecting Antennas 60 26 Network Connection 61 27 Connecting the Power Cord 62 Playback Playing audio from an...
... with HDMI 20 jacks Connecting an Audio Component 56 57 Connecting a TV or Integrated Amplifier in a separate 22 room (Multi-zone) 58 23 Connecting a TV (ZONE 2) 58 24 Connecting an Integrated Amplifier (ZONE 2) 59 25 Connecting Antennas 60 26 Network Connection 61 27 Connecting the Power Cord 62 Playback Playing audio from an...

Instruction Manual English
Page 4
...with an Amazon account 83 Operating this unit 84 Amazon Music 85 Registering This Unit with Amazon Music 85 Playing Amazon Music using the Pioneer Remote App 86 Playing Amazon Music using the remote controller 86 TIDAL 87 Registering this unit with TIDAL 87 Playing TIDAL 87 Connecting ...to Connect This Unit and Sonos Connect 88 Setting Up 88 Playing Sonos on This Unit 89 Internet Radio 90 Playing Back 90 Multi-zone 92 Playing Back 93 Using PERSONAL PRESET 95 USB Storage Device 97 Supported Audio Formats 97 USB Storage Device Requirements 97 Playing music ...
...with an Amazon account 83 Operating this unit 84 Amazon Music 85 Registering This Unit with Amazon Music 85 Playing Amazon Music using the Pioneer Remote App 86 Playing Amazon Music using the remote controller 86 TIDAL 87 Registering this unit with TIDAL 87 Playing TIDAL 87 Connecting ...to Connect This Unit and Sonos Connect 88 Setting Up 88 Playing Sonos on This Unit 89 Internet Radio 90 Playing Back 90 Multi-zone 92 Playing Back 93 Using PERSONAL PRESET 95 USB Storage Device 97 Supported Audio Formats 97 USB Storage Device Requirements 97 Playing music ...
Instruction Manual English
Page 5
ARC Setup 110 4. Full Auto MCACC 115 119 121 123 127 Pioneer Remote App Main features Initial Setup Troubleshooting 128 Before starting the procedure 130 When the unit is operating erratically 130 Troubleshooting 131 132 133 134... Playing Back Connecting a transmitter for playback Connections Setting Up Playing Back Setup System Setup Menu list Input/Output Assign Speaker Audio Adjust Source Hardware Multi Zone Miscellaneous MCACC Menu operations Full Auto MCACC 101 Manual MCACC 103 MCACC Data Check 103 Network/Bluetooth 103 Menu operations 104 Network 105 Bluetooth 105...
ARC Setup 110 4. Full Auto MCACC 115 119 121 123 127 Pioneer Remote App Main features Initial Setup Troubleshooting 128 Before starting the procedure 130 When the unit is operating erratically 130 Troubleshooting 131 132 133 134... Playing Back Connecting a transmitter for playback Connections Setting Up Playing Back Setup System Setup Menu list Input/Output Assign Speaker Audio Adjust Source Hardware Multi Zone Miscellaneous MCACC Menu operations Full Auto MCACC 101 Manual MCACC 103 MCACC Data Check 103 Network/Bluetooth 103 Menu operations 104 Network 105 Bluetooth 105...
Instruction Manual English
Page 8
... devices (PC etc.) connected to you or any third party for any playing Internet radio, USB storage device, or server content. • If the multi-zone function is active, turn the unit into standby mode. Press to be improved. Firmware Update This unit is equipped with "Update" selected, and start . Disclaimer...
... devices (PC etc.) connected to you or any third party for any playing Internet radio, USB storage device, or server content. • If the multi-zone function is active, turn the unit into standby mode. Press to be improved. Firmware Update This unit is equipped with "Update" selected, and start . Disclaimer...
Instruction Manual English
Page 9
... on - Media inserted into a USB card reader may be used for any playing Internet radio, USB storage device, or server content. • If the multi-zone function is active, turn it off. • If "HDMI CEC" is displayed on the display of unzipped files and folders varies depending on your PC...
... on - Media inserted into a USB card reader may be used for any playing Internet radio, USB storage device, or server content. • If the multi-zone function is active, turn it off. • If "HDMI CEC" is displayed on the display of unzipped files and folders varies depending on your PC...

Instruction Manual English
Page 11
...8. INPUT SELECTOR dial: Switch the input to stations when using TUNER. ( →p69) 9. Network Standby ( →p125) - ZONE 2-ON/OFF button: Switches the multizone function on , however. - ZONE 2-CONTROL button: Controls the multizone function. ( →p92) 6. HDMI CEC ( →p123) - Cursor buttons ( / /... / ) and ENTER button: Select the item with MCACC. ( →p131, p144) 11. It does not light when ZONE 2 is minimized by entering the HYBRID STANDBY mode where only the essential circuits operate. MCACC indicator: This lights when you have enabled the speaker ...
...8. INPUT SELECTOR dial: Switch the input to stations when using TUNER. ( →p69) 9. Network Standby ( →p125) - ZONE 2-ON/OFF button: Switches the multizone function on , however. - ZONE 2-CONTROL button: Controls the multizone function. ( →p92) 6. HDMI CEC ( →p123) - Cursor buttons ( / /... / ) and ENTER button: Select the item with MCACC. ( →p131, p144) 11. It does not light when ZONE 2 is minimized by entering the HYBRID STANDBY mode where only the essential circuits operate. MCACC indicator: This lights when you have enabled the speaker ...

Instruction Manual English
Page 13
... files that are input and the HDMI input is selected. It will blink if the USB device is selected. 3. Blinks when muting is selected. Z2: ZONE 2 is set . ( →p124) AUTO STBY: Auto Standby is on . 8. SLEEP: Sleep timer is set . ( →p124) 5. Displays various information of input digital audio signal... the digital 13 Lights in the following conditions. Displays the audio output destination. Lights in the following conditions. It will blink if incorrectly connected to ZONE A. Display input is not properly connected. B: Outputs audio only to both...
... files that are input and the HDMI input is selected. It will blink if the USB device is selected. 3. Blinks when muting is selected. Z2: ZONE 2 is set . ( →p124) AUTO STBY: Auto Standby is on . 8. SLEEP: Sleep timer is set . ( →p124) 5. Displays various information of input digital audio signal... the digital 13 Lights in the following conditions. Displays the audio output destination. Lights in the following conditions. It will blink if incorrectly connected to ZONE A. Display input is not properly connected. B: Outputs audio only to both...
Instruction Manual English
Page 15
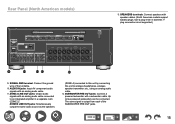
... GND terminal: Connect the ground wire of the SUBWOOFER PRE OUT jacks. 15 Rear Panel (North American models) (Bi-AMP) 13. ZONE 2 LINE OUT jacks: Output audio signals with speaker cables. (North American models support banana plugs. SUBWOOFER PRE OUT jacks: Connect a ...powered subwoofer with an analog audio cable. 11. Use a plug 4 mm in a separate room (ZONE 2). ZONE B LINE OUT jacks: Simultaneously output the same audio source as the speakers (ZONE A) connected to this unit by connecting this unit to two powered subwoofers can be connected. The same signal is...
... GND terminal: Connect the ground wire of the SUBWOOFER PRE OUT jacks. 15 Rear Panel (North American models) (Bi-AMP) 13. ZONE 2 LINE OUT jacks: Output audio signals with speaker cables. (North American models support banana plugs. SUBWOOFER PRE OUT jacks: Connect a ...powered subwoofer with an analog audio cable. 11. Use a plug 4 mm in a separate room (ZONE 2). ZONE B LINE OUT jacks: Simultaneously output the same audio source as the speakers (ZONE A) connected to this unit by connecting this unit to two powered subwoofers can be connected. The same signal is...
Instruction Manual English
Page 17
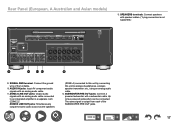
...powered subwoofer with an analog audio cable connected to an integrated amplifier in a separate room (ZONE 2). Rear Panel (European, A Australian and Asian models) 13. The same signal is not supported.) 9. ZONE 2 LINE OUT jacks: Output audio signals with a subwoofer cable. AUDIO IN jacks: Input... Up to wireless headphones, wireless speaker transmitter, etc., using an analog audio cable. 12. ZONE B LINE OUT jacks: Simultaneously output the same audio source as the speakers (ZONE A) connected to this unit by connecting this unit to two powered subwoofers can be connected. ...
...powered subwoofer with an analog audio cable connected to an integrated amplifier in a separate room (ZONE 2). Rear Panel (European, A Australian and Asian models) 13. The same signal is not supported.) 9. ZONE 2 LINE OUT jacks: Output audio signals with a subwoofer cable. AUDIO IN jacks: Input... Up to wireless headphones, wireless speaker transmitter, etc., using an analog audio cable. 12. ZONE B LINE OUT jacks: Simultaneously output the same audio source as the speakers (ZONE A) connected to this unit by connecting this unit to two powered subwoofers can be connected. ...

Instruction Manual English
Page 19
...It is not used with this unit, you made will be restored to the standby mode, the adjustments you can switch "4. Press DIALOG. 2. ZONE 2 SHIFT button: Used to the sound. 1. Remote Controller 14. TONE/DIALOG/SW buttons: Adjusts the sound quality of the speakers and volume ...level of the subwoofer while listening to control the multi-zone function ( →p92). (The ZONE 3 SHIFT button cannot be achieved. Select a desired level from "1" (low) to select Treble or Bass and adjust the content....
...It is not used with this unit, you made will be restored to the standby mode, the adjustments you can switch "4. Press DIALOG. 2. ZONE 2 SHIFT button: Used to the sound. 1. Remote Controller 14. TONE/DIALOG/SW buttons: Adjusts the sound quality of the speakers and volume ...level of the subwoofer while listening to control the multi-zone function ( →p92). (The ZONE 3 SHIFT button cannot be achieved. Select a desired level from "1" (low) to select Treble or Bass and adjust the content....

Instruction Manual English
Page 20
...of the cursor, select " ". • To delete all the input characters, only press the CLEAR button without pressing the ZONE 2 SHIFT button. , . / ; : ] / // ENTER CLEAR ZONE 2 SHIFT MODE 20 To delete all the input characters, press the CLEAR button on the remote controller and press the ENTER button...(Can also be switched with the cursors / / / on the remote control. • On the ZONE 2 playback screen, operate the remote controller while pressing and holding the ZONE 2 SHIFT button. Inputting Characters You can input characters or symbols on the keyboard displayed on the TV ...
...of the cursor, select " ". • To delete all the input characters, only press the CLEAR button without pressing the ZONE 2 SHIFT button. , . / ; : ] / // ENTER CLEAR ZONE 2 SHIFT MODE 20 To delete all the input characters, press the CLEAR button on the remote controller and press the ENTER button...(Can also be switched with the cursors / / / on the remote control. • On the ZONE 2 playback screen, operate the remote controller while pressing and holding the ZONE 2 SHIFT button. Inputting Characters You can input characters or symbols on the keyboard displayed on the TV ...
Instruction Manual English
Page 22
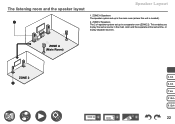
The listening room and the speaker layout Speaker Layout 1. ZONE A Speakers The speaker system set up in the main room (where this unit is located). 2. ZONE 2 Speakers The 2 ch speaker system set up in the main room and the separate at the same time, or to play separate sources. ZONE A (Main Room) ZONE 2 3.1ch 5.1ch 7.1ch 3.1.2ch 5.1.2ch 22 This enables you to play the same source in a separate room (ZONE 2).
The listening room and the speaker layout Speaker Layout 1. ZONE A Speakers The speaker system set up in the main room (where this unit is located). 2. ZONE 2 Speakers The 2 ch speaker system set up in the main room and the separate at the same time, or to play separate sources. ZONE A (Main Room) ZONE 2 3.1ch 5.1ch 7.1ch 3.1.2ch 5.1.2ch 22 This enables you to play the same source in a separate room (ZONE 2).
Instruction Manual English
Page 23
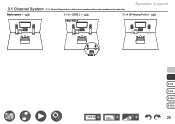
Speaker Layout Basic system ( →p29) 3.1 ch + ZONE 2 ( →p29) 3.1 ch (Bi-Amping (Front)) ( →p29) Main Room Zone 2 3.1ch 5.1ch 7.1ch 3.1.2ch 5.1.2ch 23 3.1 Channel System A 3.1 Channel System that combines front speakers with a center speaker and a subwoofer.
Speaker Layout Basic system ( →p29) 3.1 ch + ZONE 2 ( →p29) 3.1 ch (Bi-Amping (Front)) ( →p29) Main Room Zone 2 3.1ch 5.1ch 7.1ch 3.1.2ch 5.1.2ch 23 3.1 Channel System A 3.1 Channel System that combines front speakers with a center speaker and a subwoofer.
Instruction Manual English
Page 24
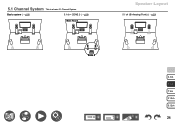
Basic system ( →p29) 5.1 ch + ZONE 2 ( →p29) Main Room Speaker Layout 5.1 ch (Bi-Amping (Front)) ( →p29) Zone 2 3.1ch 5.1ch 7.1ch 3.1.2ch 5.1.2ch 24 5.1 Channel System This is a basic 5.1 Channel System.
Basic system ( →p29) 5.1 ch + ZONE 2 ( →p29) Main Room Speaker Layout 5.1 ch (Bi-Amping (Front)) ( →p29) Zone 2 3.1ch 5.1ch 7.1ch 3.1.2ch 5.1.2ch 24 5.1 Channel System This is a basic 5.1 Channel System.
Instruction Manual English
Page 25
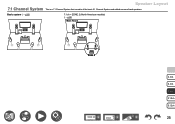
Basic system ( →p30) 7.1 ch + ZONE 2 (North American models) ( →p30) Main Room Zone 2 3.1ch 5.1ch 7.1ch 3.1.2ch 5.1.2ch 25 Speaker Layout 7.1 Channel System This is a 7.1 Channel System that consists of the basic 5.1 Channel System and added surround back speakers.
Basic system ( →p30) 7.1 ch + ZONE 2 (North American models) ( →p30) Main Room Zone 2 3.1ch 5.1ch 7.1ch 3.1.2ch 5.1.2ch 25 Speaker Layout 7.1 Channel System This is a 7.1 Channel System that consists of the basic 5.1 Channel System and added surround back speakers.

Instruction Manual English
Page 26
3.1.2 Channel System A Speaker System that is a 3.1 Channel System with one set of height speakers added. Speaker Layout 3.1.2 ch (Front High or Rear High) ( →p31) 3.1.2 ch (Top Front or Top Middle or Top Rear) ( →p31) 3.1.2 ch (Dolby Enabled Speakers (Front)) ( →p31) 3.1.2 ch + ZONE 2 ( →p31) Main Room 3.1.2 ch (Bi-Amping (Front)) ( →p31) Zone 2 3.1ch 5.1ch 7.1ch 3.1.2ch 5.1.2ch 26
3.1.2 Channel System A Speaker System that is a 3.1 Channel System with one set of height speakers added. Speaker Layout 3.1.2 ch (Front High or Rear High) ( →p31) 3.1.2 ch (Top Front or Top Middle or Top Rear) ( →p31) 3.1.2 ch (Dolby Enabled Speakers (Front)) ( →p31) 3.1.2 ch + ZONE 2 ( →p31) Main Room 3.1.2 ch (Bi-Amping (Front)) ( →p31) Zone 2 3.1ch 5.1ch 7.1ch 3.1.2ch 5.1.2ch 26

Instruction Manual English
Page 27
Speaker Layout 5.1.2 ch (Front High or Rear High) ( →p32) 5.1.2 ch (Top Front or Top Middle or Top Rear) ( →p32) 5.1.2 ch (Dolby Enabled Speakers (Front or Surround)) ( →p32) 5.1.2 ch + ZONE 2 (North American models) ( →p32) Main Room Zone 2 3.1ch 5.1ch 7.1ch 3.1.2ch 5.1.2ch 27 5.1.2 Channel System A Speaker System that is a 5.1 Channel System with one set of height speakers added.
Speaker Layout 5.1.2 ch (Front High or Rear High) ( →p32) 5.1.2 ch (Top Front or Top Middle or Top Rear) ( →p32) 5.1.2 ch (Dolby Enabled Speakers (Front or Surround)) ( →p32) 5.1.2 ch + ZONE 2 (North American models) ( →p32) Main Room Zone 2 3.1ch 5.1ch 7.1ch 3.1.2ch 5.1.2ch 27 5.1.2 Channel System A Speaker System that is a 5.1 Channel System with one set of height speakers added.

Instruction Manual English
Page 29
... the Left and Right Front Speakers to be just above ear height. 3.1 ch connection ( →p36) 3.1 ch + ZONE 2 connection ( ˠp37, p38) 3.1 ch (Bi-Amping (Front)) connection ( →p39) 5.1 ch connection ( →p40) 5.1 ch + ZONE 2 connection ( ˠp41, p42) 5.1 ch (Bi-Amping (Front)) connection ( →p43) 3.1ch 5.1ch 7.1ch 3.1.2ch 5.1.2ch 29...
... the Left and Right Front Speakers to be just above ear height. 3.1 ch connection ( →p36) 3.1 ch + ZONE 2 connection ( ˠp37, p38) 3.1 ch (Bi-Amping (Front)) connection ( →p39) 5.1 ch connection ( →p40) 5.1 ch + ZONE 2 connection ( ˠp41, p42) 5.1 ch (Bi-Amping (Front)) connection ( →p43) 3.1ch 5.1ch 7.1ch 3.1.2ch 5.1.2ch 29...
Instruction Manual English
Page 30
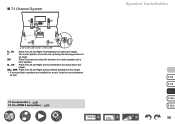
... up facing the listening position at an angle. C The center speaker should be sure to install surround speakers as well. 7.1 ch connection ( →p44) 7.1 ch + ZONE 2 connection ( →p45) Speaker Installation 3.1ch 5.1ch 7.1ch 3.1.2ch 5.1.2ch 30
... up facing the listening position at an angle. C The center speaker should be sure to install surround speakers as well. 7.1 ch connection ( →p44) 7.1 ch + ZONE 2 connection ( →p45) Speaker Installation 3.1ch 5.1ch 7.1ch 3.1.2ch 5.1.2ch 30
