
Owner's Manual
Page 4
...Channel Level 47 Speaker Distance 48 The Input Assign menu 48 The Speaker System setting 49 The Video Parameter setting 50 Video Converter 50 Resolution 50 Aspect 51 07 Using the tuner Listening to the radio 52 Improving FM ... Making cable connections 21 HDMI cables 21 About HDMI 21 Analog audio cables 22 Digital audio cables 22 Video cables 22 About the video converter 23 Connecting a TV and playback components . . . 24 Connecting using HDMI 24 Connecting your DVD ... . . . 16 Other speaker connection 17 Placing the speakers 17 Some tips for buying this Pioneer product.
...Channel Level 47 Speaker Distance 48 The Input Assign menu 48 The Speaker System setting 49 The Video Parameter setting 50 Video Converter 50 Resolution 50 Aspect 51 07 Using the tuner Listening to the radio 52 Improving FM ... Making cable connections 21 HDMI cables 21 About HDMI 21 Analog audio cables 22 Digital audio cables 22 Video cables 22 About the video converter 23 Connecting a TV and playback components . . . 24 Connecting using HDMI 24 Connecting your DVD ... . . . 16 Other speaker connection 17 Placing the speakers 17 Some tips for buying this Pioneer product.
Owner's Manual
Page 6
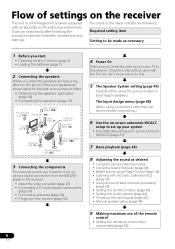
...if you 've set up your system • Automatically setting up using a digital connection from the BD/DVD player to the receiver. • About the video converter (page 23) • Connecting a TV and playback components (page 24) • Connecting antennas (page 29) • Plugging in the box (page 7)...(page 48) (When using connections other than the recommended connections.) 6 Use the on-screen automatic MCACC setup to set the video input on your speakers as shown below to make the connections and settings. The colors of functions and terminals. Flow of settings on the ...
...if you 've set up your system • Automatically setting up using a digital connection from the BD/DVD player to the receiver. • About the video converter (page 23) • Connecting a TV and playback components (page 24) • Connecting antennas (page 29) • Plugging in the box (page 7)...(page 48) (When using connections other than the recommended connections.) 6 Use the on-screen automatic MCACC setup to set the video input on your speakers as shown below to make the connections and settings. The colors of functions and terminals. Flow of settings on the ...
Owner's Manual
Page 23
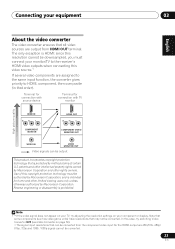
..., then composite (in that order). Note 1 • If the video signal does not appear on your TV, try switching Video Converter OFF (see Video Converter on your monitor/TV to the receiver's HDMI video outputs when connecting this video source.1 If several video components are output from the component video input for home and other rights owners. Reverse engineering...
..., then composite (in that order). Note 1 • If the video signal does not appear on your TV, try switching Video Converter OFF (see Video Converter on your monitor/TV to the receiver's HDMI video outputs when connecting this video source.1 If several video components are output from the component video input for home and other rights owners. Reverse engineering...

Owner's Manual
Page 34
... kHz / 96 kHz PCM (2 channel) audio, and if there is an MPEG audio option, set to this receiver (for example, if you connected this to convert the MPEG audio to PCM. • Depending on the remote control, INPUT SELECT, or the front panel INPUT SELECTOR dial.2 3 Press AUTO/DIRECT to select...should be set to a multichannel listening mode if you will only hear sound from the speakers connected to play. Note 1 Make sure that the TV's video input is now selected). 2 If you want multichannel surround sound. 34 En Turn down the volume of the receiver. Start by switching on the playback...
... kHz / 96 kHz PCM (2 channel) audio, and if there is an MPEG audio option, set to this receiver (for example, if you connected this to convert the MPEG audio to PCM. • Depending on the remote control, INPUT SELECT, or the front panel INPUT SELECTOR dial.2 3 Press AUTO/DIRECT to select...should be set to a multichannel listening mode if you will only hear sound from the speakers connected to play. Note 1 Make sure that the TV's video input is now selected). 2 If you want multichannel surround sound. 34 En Turn down the volume of the receiver. Start by switching on the playback...

Owner's Manual
Page 48
... Surr. The Input Assign menu You only need to adjust the channel levels. For more on this receiver's COMPONENT VIDEO OUT or HDMI OUT output (down converting component video is not possible after assigning an input). 06 The System Setup menu Tip • You can adjust the distance ...Select 'Speaker Distance' from your system, you should have your TV. System Setup 1.Auto MCACC 2.Manual SP Setup 3.Input Assign 4.Speaker System 5.Video Parameter Return 48 En BD Component 2 - Use and ENTER on your TV connected to confirm and exit the current menu. Back R Surr. DVD...
... Surr. The Input Assign menu You only need to adjust the channel levels. For more on this receiver's COMPONENT VIDEO OUT or HDMI OUT output (down converting component video is not possible after assigning an input). 06 The System Setup menu Tip • You can adjust the distance ...Select 'Speaker Distance' from your system, you should have your TV. System Setup 1.Auto MCACC 2.Manual SP Setup 3.Input Assign 4.Speaker System 5.Video Parameter Return 48 En BD Component 2 - Use and ENTER on your TV connected to confirm and exit the current menu. Back R Surr. DVD...
Owner's Manual
Page 50
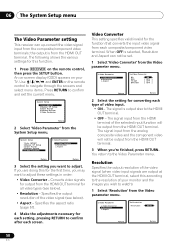
... your monitor and the images you want to adjust these settings in order: • Video Converter - The signal input from the analog composite video and the component video will be set. 1 Select 'Video Converter' from the Video parameter menu. 5.Video Parameter a.Video Converter b.Resolution c.Aspect 5a.Video Converter BD DVD T V / S AT DVR/VCR ON [ OFF ] [ OFF ] [ OFF ] Return Return 2 Select the setting...
... your monitor and the images you want to adjust these settings in order: • Video Converter - The signal input from the analog composite video and the component video will be set. 1 Select 'Video Converter' from the Video parameter menu. 5.Video Parameter a.Video Converter b.Resolution c.Aspect 5a.Video Converter BD DVD T V / S AT DVR/VCR ON [ OFF ] [ OFF ] [ OFF ] Return Return 2 Select the setting...

Owner's Manual
Page 51
... to something other than PURE and 480i/576i analog signals are input, 480p/576p signals are output from the Video parameter menu. 5.Video Parameter a.Video Converter b.Resolution c.Aspect 5c.Aspect BD DVD T V / S AT DVR/VCR VIDEO NORMAL [THROUGH] [THROUGH] [ NORMAL ] [THROUGH] Return Return 2 Select desired output aspect ratio.2 • THROUGH - Also, in some cases no...
... to something other than PURE and 480i/576i analog signals are input, 480p/576p signals are output from the Video parameter menu. 5.Video Parameter a.Video Converter b.Resolution c.Aspect 5c.Aspect BD DVD T V / S AT DVR/VCR VIDEO NORMAL [THROUGH] [THROUGH] [ NORMAL ] [THROUGH] Return Return 2 Select desired output aspect ratio.2 • THROUGH - Also, in some cases no...
Owner's Manual
Page 72
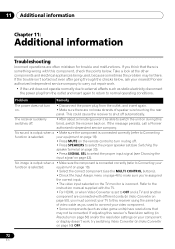
... you think that may lie there. If adjusting this component, check the points below , ask your component or display doesn't work, try switching Video Converter (in Video Converter on your nearest Pioneer authorized independent service company to carry out repair work. • If the unit does not operate normally due to external effects such as...
... you think that may lie there. If adjusting this component, check the points below , ask your component or display doesn't work, try switching Video Converter (in Video Converter on your nearest Pioneer authorized independent service company to carry out repair work. • If the unit does not operate normally due to external effects such as...


