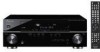
Owner's Manual
Page 4
...FM antennas 30 Connecting external antennas 30 MULTI-ZONE setup 31 Making MULTI-ZONE connections 31 Connecting an IR receiver 32 Operating other Pioneer components with this Pioneer product. Thank you for future reference. After you will know how to operate your system Auto playback 53... MCACC Setup 39 The Input Setup menu 39 Input function default and possible settings . . . 40 05 Basic playback Playing a source 41 Playing a source with HDMI connection . . . . 42 Selecting the multichannel analog inputs . . . 42 Playing an iPod 43 Playing back audio files stored on an iPod . . ...
...FM antennas 30 Connecting external antennas 30 MULTI-ZONE setup 31 Making MULTI-ZONE connections 31 Connecting an IR receiver 32 Operating other Pioneer components with this Pioneer product. Thank you for future reference. After you will know how to operate your system Auto playback 53... MCACC Setup 39 The Input Setup menu 39 Input function default and possible settings . . . 40 05 Basic playback Playing a source 41 Playing a source with HDMI connection . . . . 42 Selecting the multichannel analog inputs . . . 42 Playing an iPod 43 Playing back audio files stored on an iPod . . ...

Owner's Manual
Page 5
... system settings 71 Resetting the system 72 Default system settings 72 09 Controlling the rest of your system Operating multiple receivers 73 Setting the remote to control other components 73 Selecting preset codes directly 73 Resetting the remote control presets 74 ...sound 103 Other audio problems 105 Video 106 Settings 106 Professional Calibration EQ graphical output 107 Display 108 Remote control 109 HDMI 109 Important information regarding the HDMI connection 110 USB interface 111 SIRIUS radio messages 112 Surround sound formats 113 Dolby 113 DTS 113 Windows Media Audio ...
... system settings 71 Resetting the system 72 Default system settings 72 09 Controlling the rest of your system Operating multiple receivers 73 Setting the remote to control other components 73 Selecting preset codes directly 73 Resetting the remote control presets 74 ...sound 103 Other audio problems 105 Video 106 Settings 106 Professional Calibration EQ graphical output 107 Display 108 Remote control 109 HDMI 109 Important information regarding the HDMI connection 110 USB interface 111 SIRIUS radio messages 112 Surround sound formats 113 Dolby 113 DTS 113 Windows Media Audio ...
Owner's Manual
Page 8
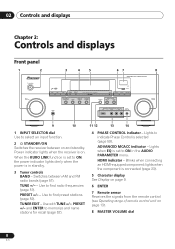
... See Display on page 9. 6 ENTER 7 Remote sensor Receives the signals from the remote control (see Operating range of remote control unit on page 13). 8 MASTER VOLUME dial 8 En TUNER EDIT - ADVANCED MCACC indicator - HDMI indicator - lights when the component is set to ON,...1 2 STANDBY/ON INPUT SELECTOR 3 4 5 67 8 AUDIO/VIDEO MULTI-CHANNEL RECEIVER BAND TUNE TUNE PHASE CONTROL ADVANCED MCACC AUTO SURR/ALC/ STREAM DIRECT STEREO ADVANCED SURROUND STANDARD SURROUND PHONES HDMI ENTER PRESET PRESET TUNER EDIT SPEAKERS MULTI-ZONE CONTROL ON / OFF USB iPod iPhone...
... See Display on page 9. 6 ENTER 7 Remote sensor Receives the signals from the remote control (see Operating range of remote control unit on page 13). 8 MASTER VOLUME dial 8 En TUNER EDIT - ADVANCED MCACC indicator - HDMI indicator - lights when the component is set to ON,...1 2 STANDBY/ON INPUT SELECTOR 3 4 5 67 8 AUDIO/VIDEO MULTI-CHANNEL RECEIVER BAND TUNE TUNE PHASE CONTROL ADVANCED MCACC AUTO SURR/ALC/ STREAM DIRECT STEREO ADVANCED SURROUND STANDARD SURROUND PHONES HDMI ENTER PRESET PRESET TUNER EDIT SPEAKERS MULTI-ZONE CONTROL ON / OFF USB iPod iPhone...

Owner's Manual
Page 9
... Left front/Right front channel C - Press for audio and photo playback (page 34, 35). L/R - ADVANCED SURROUND - AUTO lights when the receiver is set to select the input signal automatically (page 58). 2 Program format indicators Light to connect headphones. Left surround/Right surround channel LFE - ...control mode and Stream Direct mode (page 56). Display 1 2 3 4 5 6 7 8 9 10 11 12 13 14 15 16 17 AUTO PCM HDMI DIGITAL ANALOG LC SL XL XC LFE AUTO SURROUND STREAM DIRECT 2PROLOGIC x Neo:6 ADV.SURROUND STEREO STANDARD SP AB SLEEP R 2DIGITAL PLUS SR 2TrueHD WMA9Pro...
... Left front/Right front channel C - Press for audio and photo playback (page 34, 35). L/R - ADVANCED SURROUND - AUTO lights when the receiver is set to select the input signal automatically (page 58). 2 Program format indicators Light to connect headphones. Left surround/Right surround channel LFE - ...control mode and Stream Direct mode (page 56). Display 1 2 3 4 5 6 7 8 9 10 11 12 13 14 15 16 17 AUTO PCM HDMI DIGITAL ANALOG LC SL XL XC LFE AUTO SURROUND STREAM DIRECT 2PROLOGIC x Neo:6 ADV.SURROUND STEREO STANDARD SP AB SLEEP R 2DIGITAL PLUS SR 2TrueHD WMA9Pro...
Owner's Manual
Page 11
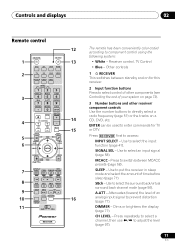
...97). 11 En SIGNAL SEL - MCACC - Use to select the surround back/virtual surround back channel mode (page 56). Use to put the receiver in sleep mode and select the amount of your system on page 73). 3 Number buttons and other components (see Controlling the rest of time ...to component control using the following system: • White - Controls and displays 02 Remote control 1 2 3 4 5 6 7 8 9 10 11 RECEIVER SOURCE DVD BD DVR HDMI TV CD CD-R VIDEO iPod USB TUNER SIRIUS INPUT SELECT 12 SIGNAL SEL MCACC 45 SBch A.ATT 78 D.ACCESS CH LEVEL 0 INPUT 3 SLEEP 6 DIMMER...
...97). 11 En SIGNAL SEL - MCACC - Use to select the surround back/virtual surround back channel mode (page 56). Use to put the receiver in sleep mode and select the amount of your system on page 73). 3 Number buttons and other components (see Controlling the rest of time ...to component control using the following system: • White - Controls and displays 02 Remote control 1 2 3 4 5 6 7 8 9 10 11 RECEIVER SOURCE DVD BD DVR HDMI TV CD CD-R VIDEO iPod USB TUNER SIRIUS INPUT SELECT 12 SIGNAL SEL MCACC 45 SBch A.ATT 78 D.ACCESS CH LEVEL 0 INPUT 3 SLEEP 6 DIMMER...
Owner's Manual
Page 14
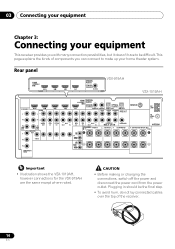
...and disconnect the power cord from the power outlet. This page explains the kinds of the receiver. 14 En Rear panel HDMI ASSIGNABLE 12 BD IN IN 1 IN 2 OUT AUDIO DIGITAL AUDIO VSX-919AH COAXIAL ASSIGNABLE IN (DVD) FRONT VSX-1019AH YL ASSIGNABLE Y BD IN IN 1 AUDIO YL PB PR IN 1 (DVD) ... shows the VSX-1019AH, however connections for the VSX-919AH are the same except where noted. Plugging in should be the final step. • To avoid hum, do not lay connected cables over the top of components you can connect to make up your equipment This receiver provides you ...
...and disconnect the power cord from the power outlet. This page explains the kinds of the receiver. 14 En Rear panel HDMI ASSIGNABLE 12 BD IN IN 1 IN 2 OUT AUDIO DIGITAL AUDIO VSX-919AH COAXIAL ASSIGNABLE IN (DVD) FRONT VSX-1019AH YL ASSIGNABLE Y BD IN IN 1 AUDIO YL PB PR IN 1 (DVD) ... shows the VSX-1019AH, however connections for the VSX-919AH are the same except where noted. Plugging in should be the final step. • To avoid hum, do not lay connected cables over the top of components you can connect to make up your equipment This receiver provides you ...

Owner's Manual
Page 19
...1 (DVD) Y PB PB R PR IN 2 (DVR) MONITOR OUT ZONE2 OUT VIDEO PR COMPONENT VIDEO IN 2 DVD TV/SAT IN IN IN 3 DVR OUT IN HDMI ASSIGNABLE DIGITAL AUDIO 1 3 COAXIAL ASSIGNABLE OUT IN 1 (DVD) IN 2 (CD) FRONT OPTICAL ASSIGNABLE IN 1 (TV/SAT) IN 2 (DVR) CENTER SURROUND PRE OUT...CONTROL OUT CD CD-R IN OUT IN SPEAKERS FRONT AR SUBWOOFER MULTI CH IN SUBWOOFER ANTENNA L CENTER R SURROUND L R SURROUND BACK/ B L (Single) VSX-1019AH Surround left The surround back terminals can connect just one surround back speaker if you can also be connected to the left surround back...
...1 (DVD) Y PB PB R PR IN 2 (DVR) MONITOR OUT ZONE2 OUT VIDEO PR COMPONENT VIDEO IN 2 DVD TV/SAT IN IN IN 3 DVR OUT IN HDMI ASSIGNABLE DIGITAL AUDIO 1 3 COAXIAL ASSIGNABLE OUT IN 1 (DVD) IN 2 (CD) FRONT OPTICAL ASSIGNABLE IN 1 (TV/SAT) IN 2 (DVR) CENTER SURROUND PRE OUT...CONTROL OUT CD CD-R IN OUT IN SPEAKERS FRONT AR SUBWOOFER MULTI CH IN SUBWOOFER ANTENNA L CENTER R SURROUND L R SURROUND BACK/ B L (Single) VSX-1019AH Surround left The surround back terminals can connect just one surround back speaker if you can also be connected to the left surround back...
Owner's Manual
Page 20
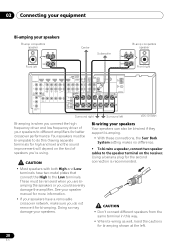
... low) and the sound improvement will depend on the kind of your speakers to the speaker terminal on the receiver. Bi-wiring your speakers Your speakers can also be removed when you are biamping the speakers or you could... IN 1 (DVD) Y PB R PR IN 2 (DVR) MONITOR OUT ZONE2 OUT IN 2 DVD TV/SAT IN IN IN 3 DVR OUT IN HDMI ASSIGNABLE DIGITAL AUDIO 1 3 COAXIAL ASSIGNABLE OUT IN 1 (DVD) IN 2 (CD) FRONT OPTICAL ASSIGNABLE IN 1 (TV/SAT) IN 2 (DVR)..., connect two speaker cables to different amplifiers for bi-amping shown at the left VSX-1019AH Bi-amping is recommended.
... low) and the sound improvement will depend on the kind of your speakers to the speaker terminal on the receiver. Bi-wiring your speakers Your speakers can also be removed when you are biamping the speakers or you could... IN 1 (DVD) Y PB R PR IN 2 (DVR) MONITOR OUT ZONE2 OUT IN 2 DVD TV/SAT IN IN IN 3 DVR OUT IN HDMI ASSIGNABLE DIGITAL AUDIO 1 3 COAXIAL ASSIGNABLE OUT IN 1 (DVD) IN 2 (CD) FRONT OPTICAL ASSIGNABLE IN 1 (TV/SAT) IN 2 (DVR)..., connect two speaker cables to different amplifiers for bi-amping shown at the left VSX-1019AH Bi-amping is recommended.

Owner's Manual
Page 22
....1 If several types of 480i/576i can be converted from the component video input for the HDMI output are assigned to the receiver's HDMI video outputs when connecting this receiver. Terminal for connection with source device Terminal for connection with an input resolution of audio input... rights owned by Macrovision Corporation and other limited viewing uses only unless otherwise authorized by Macrovision Corporation, and is prohibited. The receiver selects the first available signal in high quality over a single cable. The cable may not be downsampled, you must be ...
....1 If several types of 480i/576i can be converted from the component video input for the HDMI output are assigned to the receiver's HDMI video outputs when connecting this receiver. Terminal for connection with source device Terminal for connection with an input resolution of audio input... rights owned by Macrovision Corporation and other limited viewing uses only unless otherwise authorized by Macrovision Corporation, and is prohibited. The receiver selects the first available signal in high quality over a single cable. The cable may not be downsampled, you must be ...
Owner's Manual
Page 23
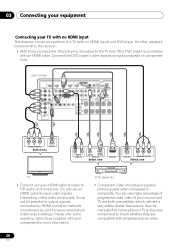
If the TV and playback components support the Pioneer KURO LINK feature, the convenient KURO LINK functions can connect it to this receiver using a commercially available HDMI cable. VSX-1019AH ASSIGNABLE BD IN IN 1 IN 2 AUDIO Y YL HDMI ASSIGNABLE DIGITAL AUDIO 1 3 COAXIAL ASSIGNABLE OPTICAL ASSIGNABLE IN 3 OUT IN 1 (DVD) IN 2 (CD) IN 1 (TV/SAT) IN 2 (DVR...
If the TV and playback components support the Pioneer KURO LINK feature, the convenient KURO LINK functions can connect it to this receiver using a commercially available HDMI cable. VSX-1019AH ASSIGNABLE BD IN IN 1 IN 2 AUDIO Y YL HDMI ASSIGNABLE DIGITAL AUDIO 1 3 COAXIAL ASSIGNABLE OPTICAL ASSIGNABLE IN 3 OUT IN 1 (DVD) IN 2 (CD) IN 1 (TV/SAT) IN 2 (DVR...

Owner's Manual
Page 24
...Bandwidth Digital Content Protection (HDCP). To take advantage of the TV cannot be heard over the receiver if the TV is connected using the KURO LINK function (see below through HDMI connections. • Digital transfer of uncompressed video (contents protected by HDCP (1080p/24, ... the component you will need a separate adaptor (DVIHDMI) to this is no problem with components using an HDMI cable. This receiver incorporates High-Definition Multimedia Interface (HDMI™) technology. Note 1 • An HDMI connection can only be displayed, but so long as almost ...
...Bandwidth Digital Content Protection (HDCP). To take advantage of the TV cannot be heard over the receiver if the TV is connected using the KURO LINK function (see below through HDMI connections. • Digital transfer of uncompressed video (contents protected by HDCP (1080p/24, ... the component you will need a separate adaptor (DVIHDMI) to this is no problem with components using an HDMI cable. This receiver incorporates High-Definition Multimedia Interface (HDMI™) technology. Note 1 • An HDMI connection can only be displayed, but so long as almost ...

Owner's Manual
Page 25
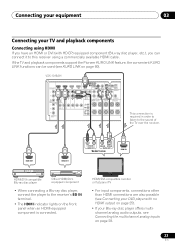
...both compatible), which delivers a very stable, flicker-free picture. Connecting your equipment 03 Connecting your DVD player with no HDMI output) to the receiver. HDMI/DVI-compatible monitor or flat panel TV 25 En You can also take advantage of progressive scan video (if your ... the TV over the receiver, connect the receiver and TV with audio cables. • Component video should give superior picture quality when compared to the sound of a TV (with HDMI input) and DVD player (or other playback component with progressive-scan video. VSX-1019AH HDMI ASSIGNABLE DIGITAL AUDIO 1 ...
...both compatible), which delivers a very stable, flicker-free picture. Connecting your equipment 03 Connecting your DVD player with no HDMI output) to the receiver. HDMI/DVI-compatible monitor or flat panel TV 25 En You can also take advantage of progressive scan video (if your ... the TV over the receiver, connect the receiver and TV with audio cables. • Component video should give superior picture quality when compared to the sound of a TV (with HDMI input) and DVD player (or other playback component with progressive-scan video. VSX-1019AH HDMI ASSIGNABLE DIGITAL AUDIO 1 ...
Owner's Manual
Page 26
.... Connect the DVD player's video signals using an HDMI cable to listen to HD audio on the video component, it may not be possible to output signals connected by HDMI and other playback component) to the receiver. • With these connections, the picture is ... a very stable, flicker-free picture. Depending on the receiver. 03 Connecting your equipment Connecting your TV with no HDMI input) and DVD player (or other methods simultaneously, and it may be necessary to make output settings. VSX-1019AH HDMI ASSIGNABLE DIGITAL AUDIO 1 3 COAXIAL OPTICAL ASSIGNABLE BD IN IN...
.... Connect the DVD player's video signals using an HDMI cable to listen to HD audio on the video component, it may not be possible to output signals connected by HDMI and other playback component) to the receiver. • With these connections, the picture is ... a very stable, flicker-free picture. Depending on the receiver. 03 Connecting your equipment Connecting your TV with no HDMI input) and DVD player (or other methods simultaneously, and it may be necessary to make output settings. VSX-1019AH HDMI ASSIGNABLE DIGITAL AUDIO 1 3 COAXIAL OPTICAL ASSIGNABLE BD IN IN...

Owner's Manual
Page 27
... 28. • The input functions below are all examples of so-called 'set up the receiver you'll need to tell the receiver which input you can be input to this terminal. no other set-top box Satellite and cable...receiver or other audio signals can connect these instead. See also see The Input Setup menu on page 39 to BD input; b.VSX-919AH model only. Input function DVD BD TV/SAT DVR HDMI 1 HDMI 2 HDMI 3a CD Input Terminals Digital HDMI Component COAX-1a IN 1 /COAXb (BD) OPT-1 OPT-2 IN 2 (HDMI-1) (HDMI-2) (HDMI-3) COAX-2a a.VSX-1019AH model only. VSX-1019AH HDMI...
... 28. • The input functions below are all examples of so-called 'set up the receiver you'll need to tell the receiver which input you can be input to this terminal. no other set-top box Satellite and cable...receiver or other audio signals can connect these instead. See also see The Input Setup menu on page 39 to BD input; b.VSX-919AH model only. Input function DVD BD TV/SAT DVR HDMI 1 HDMI 2 HDMI 3a CD Input Terminals Digital HDMI Component COAX-1a IN 1 /COAXb (BD) OPT-1 OPT-2 IN 2 (HDMI-1) (HDMI-2) (HDMI-3) COAX-2a a.VSX-1019AH model only. VSX-1019AH HDMI...

Owner's Manual
Page 28
When you set to (see also The Input Setup menu on page 39). VSX-1019AH HDMI ASSIGNABLE DIGITAL AUDIO 1 3 COAXIAL OPTICAL ASSIGNABLE ASSIGNABLE IN 1 IN 2 IN 3 OUT IN 1 (DVD) IN 2 (CD) IN 1 (TV/SAT) IN 2 (DVR) UDIO FRONT CENTER SURROUND... analog outputs, the player's surround back output terminals are not used. Please refer to tell the receiver which input you must connect the analog audio cables (the digital connection is for more information. 28 En VSX-1019AH HDMI ASSIGNABLE DIGITAL AUDIO 1 3 COAXIAL OPTICAL ASSIGNABLE ASSIGNABLE E BD IN IN 1 IN 2 IN 3 OUT IN 1...
When you set to (see also The Input Setup menu on page 39). VSX-1019AH HDMI ASSIGNABLE DIGITAL AUDIO 1 3 COAXIAL OPTICAL ASSIGNABLE ASSIGNABLE IN 1 IN 2 IN 3 OUT IN 1 (DVD) IN 2 (CD) IN 1 (TV/SAT) IN 2 (DVR) UDIO FRONT CENTER SURROUND... analog outputs, the player's surround back output terminals are not used. Please refer to tell the receiver which input you must connect the analog audio cables (the digital connection is for more information. 28 En VSX-1019AH HDMI ASSIGNABLE DIGITAL AUDIO 1 3 COAXIAL OPTICAL ASSIGNABLE ASSIGNABLE E BD IN IN 1 IN 2 IN 3 OUT IN 1...

Owner's Manual
Page 29
Most digital components also have corresponding outputs for playback. VSX-1019AH HDMI ASSIGNABLE DIGITAL AUDIO 1 3 COAXIAL ASSIGNABLE OPTICAL S ASSIGNABLE IN 3 OUT IN 1 (...Pro, sound problems may occur depending on your equipment 03 Connecting other audio components This receiver has both digital and analog inputs, allowing you connected the component to (see also The...AUDIO IN R ANALOG L OPTICAL COAXIAL AUDIO OUT DIGITAL OUT Select one CD-R, MD, DAT, etc. This receiver features five stereo audio-only inputs. About the WMA9 Pro decoder This unit has an on-board Windows Media...
Most digital components also have corresponding outputs for playback. VSX-1019AH HDMI ASSIGNABLE DIGITAL AUDIO 1 3 COAXIAL ASSIGNABLE OPTICAL S ASSIGNABLE IN 3 OUT IN 1 (...Pro, sound problems may occur depending on your equipment 03 Connecting other audio components This receiver has both digital and analog inputs, allowing you connected the component to (see also The...AUDIO IN R ANALOG L OPTICAL COAXIAL AUDIO OUT DIGITAL OUT Select one CD-R, MD, DAT, etc. This receiver features five stereo audio-only inputs. About the WMA9 Pro decoder This unit has an on-board Windows Media...
Owner's Manual
Page 32
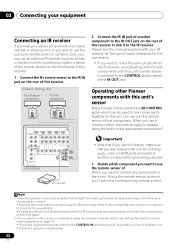
...- PR TROL OUT COMPONENT VIDEO VSX-1019AH IR receiver 2 Connect the IR IN jack of another component for the connection. • If you want to control all your components using this receiver's remote control, see the manual supplied with this unit's sensor Many Pioneer components have SR CONTROL jacks which... sensor of one set of analog audio, video or HDMI jacks connected to another component to the IR OUT jack on the rear of this receiver to link it to the IR receiver. 03 Connecting your equipment Connecting an IR receiver If you keep your stereo components in a closed cabinet...
...- PR TROL OUT COMPONENT VIDEO VSX-1019AH IR receiver 2 Connect the IR IN jack of another component for the connection. • If you want to control all your components using this receiver's remote control, see the manual supplied with this unit's sensor Many Pioneer components have SR CONTROL jacks which... sensor of one set of analog audio, video or HDMI jacks connected to another component to the IR OUT jack on the rear of this receiver to link it to the IR receiver. 03 Connecting your equipment Connecting an IR receiver If you keep your stereo components in a closed cabinet...

Owner's Manual
Page 33
...TUNER SLEEP SIRIUS CD-R MUTE ANT AUDIO TV DISPINFO CTRL RECEIVER MPXHDDADIURTPEOCH/TAALDSCEiVP/SDCoTTEdRRELCOTRCSLATTAMENGEHDONOARURMYDE PQLS CH STATUS MEMORY TUNE ADV MSUERNRU ENTER RETURN TOOLS PARAVMIEDTEEOR GUTI.DEDE IT PRESET DVR HDMI VIDEO SOURCE RECEIVER ZONE 2 Continue the chain in the same way for the...you have. Use a cable with a mono mini-plug on the rear of another Pioneer component. You will need to connect the antenna and AC adapter to the CONTROL IN jack of this receiver. VSX-1019AH HDM ASSIGNABLE 13 ASSIGNABLE BD IN IN 1 IN 2 IN 3 OUT AUDIO...
...TUNER SLEEP SIRIUS CD-R MUTE ANT AUDIO TV DISPINFO CTRL RECEIVER MPXHDDADIURTPEOCH/TAALDSCEiVP/SDCoTTEdRRELCOTRCSLATTAMENGEHDONOARURMYDE PQLS CH STATUS MEMORY TUNE ADV MSUERNRU ENTER RETURN TOOLS PARAVMIEDTEEOR GUTI.DEDE IT PRESET DVR HDMI VIDEO SOURCE RECEIVER ZONE 2 Continue the chain in the same way for the...you have. Use a cable with a mono mini-plug on the rear of another Pioneer component. You will need to connect the antenna and AC adapter to the CONTROL IN jack of this receiver. VSX-1019AH HDM ASSIGNABLE 13 ASSIGNABLE BD IN IN 1 IN 2 IN 3 OUT AUDIO...

Owner's Manual
Page 35
..., see KURO LINK on this process, and you can skip this process. The HDMI indicator in any operations during this receiver once it has stopped blinking. Do not place the unit, a piece of this receiver, including the speakers. • Plug the AC power cord into a convenient AC... to an AC outlet, a 2 second to 10 second HDMI initialization process begins. Check the power cord once in the cord or tie it damaged, ask your nearest Pioneer authorized independent service company for a replacement. • The receiver should be disconnected by the plug part. USB iPod iPhone...
..., see KURO LINK on this process, and you can skip this process. The HDMI indicator in any operations during this receiver once it has stopped blinking. Do not place the unit, a piece of this receiver, including the speakers. • Plug the AC power cord into a convenient AC... to an AC outlet, a 2 second to 10 second HDMI initialization process begins. Check the power cord once in the cord or tie it damaged, ask your nearest Pioneer authorized independent service company for a replacement. • The receiver should be disconnected by the plug part. USB iPod iPhone...
Owner's Manual
Page 39
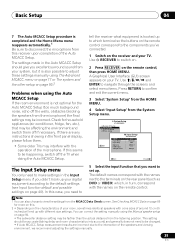
...see Input function default and possible settings on page 40). Input Setup c. Other Setup 4b.Input Setup A/V RECEIVER INPUT Input Name Input Skip : DVD : Rename : OFF Exit Digital In : HDMI Input : Component In : CO-A-RX-e-1turn Comp-1 Exit Finish The Input Setup menu You only need to... this . 2 • Depending on the characteristics of your room, sometimes identical speakers with cone sizes of the Auto MCACC Setup. tell the receiver what equipment is hooked up your digital equipment according to confirm and exit the current menu. 3 Select 'System Setup' from the HOME MENU. ...
...see Input function default and possible settings on page 40). Input Setup c. Other Setup 4b.Input Setup A/V RECEIVER INPUT Input Name Input Skip : DVD : Rename : OFF Exit Digital In : HDMI Input : Component In : CO-A-RX-e-1turn Comp-1 Exit Finish The Input Setup menu You only need to... this . 2 • Depending on the characteristics of your room, sometimes identical speakers with cone sizes of the Auto MCACC Setup. tell the receiver what equipment is hooked up your digital equipment according to confirm and exit the current menu. 3 Select 'System Setup' from the HOME MENU. ...


