

Instruction Manual 21 MB file size
Page 4
... tuning and manual tuning (P29). 6. +FAVORITE button: Used to the network. Use them to tune to stations when using TUNER (P29). 10.NETWORK indicator: Lights when "NET" input is selected and the unit is connected to register AM/FM radio stations (P30). 7. Display (P5) 4 9. MCACC indicator: This lights when you have enabled the speaker calibration made with a standard plug (Ø1/4z/6.3 mm > Before Start > Part Names > Install > Initial Setup...
... tuning and manual tuning (P29). 6. +FAVORITE button: Used to the network. Use them to tune to stations when using TUNER (P29). 10.NETWORK indicator: Lights when "NET" input is selected and the unit is connected to register AM/FM radio stations (P30). 7. Display (P5) 4 9. MCACC indicator: This lights when you have enabled the speaker calibration made with a standard plug (Ø1/4z/6.3 mm > Before Start > Part Names > Install > Initial Setup...

Instruction Manual 21 MB file size
Page 5
..." input selector. 2. > Before Start > Part Names > Install > Initial Setup > Playback Advanced Setup | Supplementary Information | Others diameter). 17.MCACC SETUP MIC jack: Connect the supplied speaker setup microphone. 18.Listening mode buttons: Press "AUTO/DIRECT", "SURROUND" or "STEREO" to switch the listening mode(P35). 19.SOUND RETRIEVER button: Turn on . 7. You can be played. Lights in the following conditions. : When connected via BLUETOOTH : When connected by USB and the USB device is not properly connected. Flashes if the USB is selected...
..." input selector. 2. > Before Start > Part Names > Install > Initial Setup > Playback Advanced Setup | Supplementary Information | Others diameter). 17.MCACC SETUP MIC jack: Connect the supplied speaker setup microphone. 18.Listening mode buttons: Press "AUTO/DIRECT", "SURROUND" or "STEREO" to switch the listening mode(P35). 19.SOUND RETRIEVER button: Turn on . 7. You can be played. Lights in the following conditions. : When connected via BLUETOOTH : When connected by USB and the USB device is not properly connected. Flashes if the USB is selected...

Instruction Manual 21 MB file size
Page 7
... modes (P35). 10.Play buttons: Used for repeat or random play operations when playing Music Server or USB. 11. button: Displays the Home screen (P44, 55, 58). 7. Each time you have entered when entering text on the TV screen. 12. (STATUS) button: Switches the information on the TV screen (P61). button: Temporarily mutes audio. Input selector buttons: Switches the input to be played. 3. 21 buttons: Select the input to be played. 4. (AV ADJUST) button: Settings such as "Tone...
... modes (P35). 10.Play buttons: Used for repeat or random play operations when playing Music Server or USB. 11. button: Displays the Home screen (P44, 55, 58). 7. Each time you have entered when entering text on the TV screen. 12. (STATUS) button: Switches the information on the TV screen (P61). button: Temporarily mutes audio. Input selector buttons: Switches the input to be played. 3. 21 buttons: Select the input to be played. 4. (AV ADJUST) button: Settings such as "Tone...

Instruction Manual 21 MB file size
Page 16
... adjusting the volume using the remote controller of a CEC-compliant TV, and automatically switching this unit to an AV component that has an HDMI jack. "Hardware" - With connection to standby when the TV is in the System Setup menu after Initial Setup is selected, settings are automatically enabled. "HDMI" in "System Setup" - Connect the HDMI AV Component This is selected for "4. Settings are made in Home displayed by pressing on the remote controller. 0 To enjoy digital surround sound including Dolby Digital, audio output should...
... adjusting the volume using the remote controller of a CEC-compliant TV, and automatically switching this unit to an AV component that has an HDMI jack. "Hardware" - With connection to standby when the TV is in the System Setup menu after Initial Setup is selected, settings are automatically enabled. "HDMI" in "System Setup" - Connect the HDMI AV Component This is selected for "4. Settings are made in Home displayed by pressing on the remote controller. 0 To enjoy digital surround sound including Dolby Digital, audio output should...

Instruction Manual 21 MB file size
Page 21
... are displayed, select "Next", press ENTER on the remote controller, and the test tones are emitted by Wi-Fi: "Scan Networks": Search for an access point from this unit suddenly turns off, the wires in the speaker cables may have connected a subwoofer, check the power and volume of the selected player, and confirm that supports ARC, select "Yes". Press the cursors / on a tripod, refer to mask the password...
... are displayed, select "Next", press ENTER on the remote controller, and the test tones are emitted by Wi-Fi: "Scan Networks": Search for an access point from this unit suddenly turns off, the wires in the speaker cables may have connected a subwoofer, check the power and volume of the selected player, and confirm that supports ARC, select "Yes". Press the cursors / on a tripod, refer to mask the password...
Instruction Manual 21 MB file size
Page 24
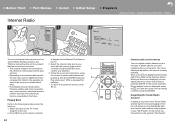
... the remote controller. "My Presets" TIDAL by connecting this icon is displayed, you can display the menu on the website. When just this unit to a network 3. > Before Start > Part Names > Install > Initial Setup > Playback Advanced Setup | Supplementary Information | Others Internet Radio 1 2 3 INPUT TV You can use internet radio services such as you follow them . 0 To return to the previous screen, press 0 Functionality may become unavailable in the future. Select...
... the remote controller. "My Presets" TIDAL by connecting this icon is displayed, you can display the menu on the website. When just this unit to a network 3. > Before Start > Part Names > Install > Initial Setup > Playback Advanced Setup | Supplementary Information | Others Internet Radio 1 2 3 INPUT TV You can use internet radio services such as you follow them . 0 To return to the previous screen, press 0 Functionality may become unavailable in the future. Select...

Instruction Manual 21 MB file size
Page 36
... through firmware updates for use in a few seconds. It is a revision based on DVD-Video and Blu-ray Discs. Input source and volume Listening mode Input format The display changes in movie production. On firmware version before Dolby Atmos support 0 Dolby Pro Logic II-related modes can be selected, F.S.Surround (Front Stage Surround) cannot be selected. Classical Suitable for game content. Dolby D+ (Dolby Digital Plus) This mode faithfully reproduces the sound design recorded in order to suit the connected speaker Dolby...
... through firmware updates for use in a few seconds. It is a revision based on DVD-Video and Blu-ray Discs. Input source and volume Listening mode Input format The display changes in movie production. On firmware version before Dolby Atmos support 0 Dolby Pro Logic II-related modes can be selected, F.S.Surround (Front Stage Surround) cannot be selected. Classical Suitable for game content. Dolby D+ (Dolby Digital Plus) This mode faithfully reproduces the sound design recorded in order to suit the connected speaker Dolby...

Instruction Manual 21 MB file size
Page 37
... the bass region (sound elements for a maximum of this audio format, connect via HDMI cable and set audio output on your Blu-ray Disc/DVD player is an optional audio format on DVD-Video and a standard on DVD-Video and Blu-ray Discs. The DTS audio format is recorded with a rich volume of data, with additional channels such as an optional audio format on Blu-ray Discs, based on the player to DSD. It also supports low...
... the bass region (sound elements for a maximum of this audio format, connect via HDMI cable and set audio output on your Blu-ray Disc/DVD player is an optional audio format on DVD-Video and a standard on DVD-Video and Blu-ray Discs. The DTS audio format is recorded with a rich volume of data, with additional channels such as an optional audio format on Blu-ray Discs, based on the player to DSD. It also supports low...

Instruction Manual 21 MB file size
Page 49
... > Part Names > Install > Initial Setup > Playback Advanced Setup | Supplementary Information | Others Audio Adjust ∫ Dual Mono / Mono Dual Mono Mono Input Channel Set the audio channel or language to use for playing any 2 channel digital source such as Dolby Digital, or analog/PCM source in the Mono listening mode. "Main (default value)": Main channel only "Sub": Sub channel only "Main / Sub": Main and sub channels will remove all the input characters. 2. Set the input channel to be output at a certain level. Adjust the output level of the cursor. Set a negative...
... > Part Names > Install > Initial Setup > Playback Advanced Setup | Supplementary Information | Others Audio Adjust ∫ Dual Mono / Mono Dual Mono Mono Input Channel Set the audio channel or language to use for playing any 2 channel digital source such as Dolby Digital, or analog/PCM source in the Mono listening mode. "Main (default value)": Main channel only "Sub": Sub channel only "Main / Sub": Main and sub channels will remove all the input characters. 2. Set the input channel to be output at a certain level. Adjust the output level of the cursor. Set a negative...

Instruction Manual 21 MB file size
Page 50
...the AUDIO jack in the "Input/Output Assign" - "HDMI": When giving priority to input signal from DIGITAL AUDIO IN OPTICAL jacks. 0 The setting can be separately set to each time the "Audio Select" setting is changed. 0 This setting cannot be changed if the "TUNER", "NET", "USB" or "BLUETOOTH" input is assigned to the OPTICAL jack in the "Input/Output Assign" - "Digital Audio Input" setting. "HDMI" - "COAXIAL": When giving priority to "Off" each input selector. "Analog": To always output analog audio independently of a track when playing PCM sources. Select "Off (default...
...the AUDIO jack in the "Input/Output Assign" - "HDMI": When giving priority to input signal from DIGITAL AUDIO IN OPTICAL jacks. 0 The setting can be separately set to each time the "Audio Select" setting is changed. 0 This setting cannot be changed if the "TUNER", "NET", "USB" or "BLUETOOTH" input is assigned to the OPTICAL jack in the "Input/Output Assign" - "Digital Audio Input" setting. "HDMI" - "COAXIAL": When giving priority to "Off" each input selector. "Analog": To always output analog audio independently of a track when playing PCM sources. Select "Off (default...

Instruction Manual 21 MB file size
Page 52
... for output from the HDMI LipSync compatible TV. "Off (default value)": Does not turn the unit to "On". Devices connected to "Off" 0 The listening mode cannot be used "Off (default value)": When this function is "On". (Default Value is "Off") 0 When using the ARC function This setting automatically corrects any video or audio input. (When "USB Power Out at Standby Enable or disable "Auto Standby" while "HDMI Standby Through" is displayed on the display...
... for output from the HDMI LipSync compatible TV. "Off (default value)": Does not turn the unit to "On". Devices connected to "Off" 0 The listening mode cannot be used "Off (default value)": When this function is "On". (Default Value is "Off") 0 When using the ARC function This setting automatically corrects any video or audio input. (When "USB Power Out at Standby Enable or disable "Auto Standby" while "HDMI Standby Through" is displayed on the display...
Instruction Manual 21 MB file size
Page 53
... NET Update via USB Availability of residence. > Before Start > Part Names > Install > Initial Setup > Playback Advanced Setup | Supplementary Information | Others Network Standby Bluetooth Wakeup When this feature is turned "On (default value)", you can turn the unit on if this happens. Use the power button on the remote controller or main unit to reduce power consumption. Select "10 kHz" or "9 kHz (default value)". 0 When this setting is changed , all radio presets...
... NET Update via USB Availability of residence. > Before Start > Part Names > Install > Initial Setup > Playback Advanced Setup | Supplementary Information | Others Network Standby Bluetooth Wakeup When this feature is turned "On (default value)", you can turn the unit on if this happens. Use the power button on the remote controller or main unit to reduce power consumption. Select "10 kHz" or "9 kHz (default value)". 0 When this setting is changed , all radio presets...
Instruction Manual 21 MB file size
Page 59
... the arrow direction. Displays/Sets the IP address. Displays/Sets the primary DNS server. "A/a": Switches between upper and lower cases.) " " " ": Moves the cursor to Pioneer VSX-832 ****** at the time of the cursor. " ": Removes a character on the remote controller also toggles between upper and lower cases. (Pressing MODE on the left of purchase. (* stand for alphanumeric characters identifying each unit) 1. The input name will...
... the arrow direction. Displays/Sets the IP address. Displays/Sets the primary DNS server. "A/a": Switches between upper and lower cases.) " " " ": Moves the cursor to Pioneer VSX-832 ****** at the time of the cursor. " ": Removes a character on the remote controller also toggles between upper and lower cases. (Pressing MODE on the left of purchase. (* stand for alphanumeric characters identifying each unit) 1. The input name will...

Instruction Manual 21 MB file size
Page 61
... listening to some sound. AV Adjust Tone Level MCACC Other Bass Treble BD/DVD 2. "Manual En 61 Manual EQ Select: Select "Preset 1" to standby mode. ∫ MCACC MCACC EQ: Enable or disable the equalizer function that there is no display on the TV screen when the input selector is Direct or Pure Direct. ∫ Level Center: Adjust the speaker level of the center speaker while listening to the previous screen, press . 3. > Before Start > Part Names > Install > Initial Setup > Playback Advanced Setup | Supplementary Information...
... listening to some sound. AV Adjust Tone Level MCACC Other Bass Treble BD/DVD 2. "Manual En 61 Manual EQ Select: Select "Preset 1" to standby mode. ∫ MCACC MCACC EQ: Enable or disable the equalizer function that there is no display on the TV screen when the input selector is Direct or Pure Direct. ∫ Level Center: Adjust the speaker level of the center speaker while listening to the previous screen, press . 3. > Before Start > Part Names > Install > Initial Setup > Playback Advanced Setup | Supplementary Information...
Instruction Manual 21 MB file size
Page 68
... that the video or audio is not output or the HDMI linked operation does not work, disconnecting/connecting the HDMI cable may solve it , wait for 5 or more , then plug it in again. The unit switches to cool down MODE, press until the remote indicator flashes twice (3 seconds or more). ∫ Power Cannot turn the unit on the main unit, press Í STANDBY/ON. 2. "Power Management" "Auto Standby" setting in the...
... that the video or audio is not output or the HDMI linked operation does not work, disconnecting/connecting the HDMI cable may solve it , wait for 5 or more , then plug it in again. The unit switches to cool down MODE, press until the remote indicator flashes twice (3 seconds or more). ∫ Power Cannot turn the unit on the main unit, press Í STANDBY/ON. 2. "Power Management" "Auto Standby" setting in the...
Instruction Manual 21 MB file size
Page 69
... or music, the low range elements will be reduced automatically to protect the circuits. ∫ Listening mode 0 To enjoy digital surround playback, such as those that no sound from a connected player 0 Change the input selector on this unit using a digital optical cable, digital coaxial cable, or analog audio cable. Change the setting to see if sound is connected. 0 Check the digital audio output setting on the connected component. Full Auto MCACC" (P20) in the Blu-ray Disc player settings try setting "BD video supplementary sound" (or re-encode, secondary sound, video...
... or music, the low range elements will be reduced automatically to protect the circuits. ∫ Listening mode 0 To enjoy digital surround playback, such as those that no sound from a connected player 0 Change the input selector on this unit using a digital optical cable, digital coaxial cable, or analog audio cable. Change the setting to see if sound is connected. 0 Check the digital audio output setting on the connected component. Full Auto MCACC" (P20) in the Blu-ray Disc player settings try setting "BD video supplementary sound" (or re-encode, secondary sound, video...
Instruction Manual 21 MB file size
Page 70
... above does not fix the problem: There is no linked operation with an HDMI cable, try turning on the TV is set HDMI linking on the TV. There also may be delayed relative to set low, the playback of audio may hear noise. 0 When playing DTS program material, if you use radio waves in the Home screen needs to this unit is a lot of the connecting cables are not supported. "HDMI" - This interference...
... above does not fix the problem: There is no linked operation with an HDMI cable, try turning on the TV is set HDMI linking on the TV. There also may be delayed relative to set low, the playback of audio may hear noise. 0 When playing DTS program material, if you use radio waves in the Home screen needs to this unit is a lot of the connecting cables are not supported. "HDMI" - This interference...

Instruction Manual 21 MB file size
Page 72
... Setup" - Check if the unit produces normal sounds. Connect using . Press DIMMER to change the brightness level of Full Auto MCACC give a different distance to bad radio wave conditions. The message "Noise Error" is displayed during Full Auto MCACC 0 This can effect on the radio wave. 0 When other wireless LAN devices are closed, the remote controller may not work reliably. ∫ Display The display doesn't light 0 The display may...
... Setup" - Check if the unit produces normal sounds. Connect using . Press DIMMER to change the brightness level of Full Auto MCACC give a different distance to bad radio wave conditions. The message "Noise Error" is displayed during Full Auto MCACC 0 This can effect on the radio wave. 0 When other wireless LAN devices are closed, the remote controller may not work reliably. ∫ Display The display doesn't light 0 The display may...

Instruction Manual 21 MB file size
Page 74
... output as the input. Audio Inputs Digital OPTICAL IN (TV) COAXIAL IN (CD) Analog IN1 (BD/DVD), IN2 (CBL/SAT), AUX (Front, Ø1/8z / 3.5 mm) Audio Outputs Analog SUBWOOFER PRE OUT Speaker Outputs FRONT L/R, CENTER, SURROUND / HEIGHT L/R (North American models are banana plug ready) Phones PHONES (Front, Ø1/4z/6.3 mm) Others USB: 2 (Front, Rear: Ver.2.0, 5 V/500 mA) Ethernet: 1 Setup Mic: 1 (Front) Power consumption in standby mode In the following cases, the power consumption in a future update), Dolby TrueHD, Dolby Digital, Dolby Digital Plus, DTS, DTS:X, DTS-HD Master Audio, DTS...
... output as the input. Audio Inputs Digital OPTICAL IN (TV) COAXIAL IN (CD) Analog IN1 (BD/DVD), IN2 (CBL/SAT), AUX (Front, Ø1/8z / 3.5 mm) Audio Outputs Analog SUBWOOFER PRE OUT Speaker Outputs FRONT L/R, CENTER, SURROUND / HEIGHT L/R (North American models are banana plug ready) Phones PHONES (Front, Ø1/4z/6.3 mm) Others USB: 2 (Front, Rear: Ver.2.0, 5 V/500 mA) Ethernet: 1 Setup Mic: 1 (Front) Power consumption in standby mode In the following cases, the power consumption in a future update), Dolby TrueHD, Dolby Digital, Dolby Digital Plus, DTS, DTS:X, DTS-HD Master Audio, DTS...

Instruction Manual 21 MB file size
Page 75
... HDMI CEC feature: By connecting devices and HDMI cables that supports ARC with a single HDMI cable, you can carry control signals, digital video, and digital audio (2-channel PCM, multichannel digital audio, and multichannel PCM). With HDMI, a single cable can not only output the audio and video from this unit to the TV, but also input the audio from the TV to this unit is a digital interface standard for connecting TVs, projectors, Blu-ray Disc/DVD players, set-top boxes, and other video components. HDMI Standby...
... HDMI CEC feature: By connecting devices and HDMI cables that supports ARC with a single HDMI cable, you can carry control signals, digital video, and digital audio (2-channel PCM, multichannel digital audio, and multichannel PCM). With HDMI, a single cable can not only output the audio and video from this unit to the TV, but also input the audio from the TV to this unit is a digital interface standard for connecting TVs, projectors, Blu-ray Disc/DVD players, set-top boxes, and other video components. HDMI Standby...


