

Owner's Manual
Page 4
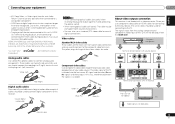
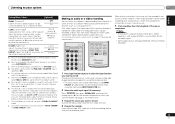
...your system Setting the remote to operate your system Choosing the listening mode 29 Auto playback 29 Listening in a safe place for buying this Pioneer product. Thank you for future reference. Contents Before you start 5 Checking what's in the box 5 Installing the receiver 5 Flow of ... the surround back or front height speakers . . 11 Switching the speaker system 12 Making cable connections 12 HDMI cables 12 About HDMI 12 Analog audio cables 13 Digital audio cables 13 Video cables 13 About video outputs connection 13 Connecting a TV and playback components 14 Connecting using...
...your system Setting the remote to operate your system Choosing the listening mode 29 Auto playback 29 Listening in a safe place for buying this Pioneer product. Thank you for future reference. Contents Before you start 5 Checking what's in the box 5 Installing the receiver 5 Flow of ... the surround back or front height speakers . . 11 Switching the speaker system 12 Making cable connections 12 HDMI cables 12 About HDMI 12 Analog audio cables 13 Digital audio cables 13 Video cables 13 About video outputs connection 13 Connecting a TV and playback components 14 Connecting using...

Owner's Manual
Page 5
... EQ (page 30) • Using surround back channel processing (page 31) • Setting the Up Mix function (page 31) • Setting the Audio options (page 32) • Manual speaker setup (page 34) 8 Making maximum use of the remote control • Setting the remote to... of functions and terminals. in places where there is vibration or other than the recommended connections.) Using the Audio Return Channel function (page 38) (When the connected TV supports the HDMI Audio Return Channel function.) 5 Use the on-screen automatic MCACC setup to set the video input on...
... EQ (page 30) • Using surround back channel processing (page 31) • Setting the Up Mix function (page 31) • Setting the Audio options (page 32) • Manual speaker setup (page 34) 8 Making maximum use of the remote control • Setting the remote to... of functions and terminals. in places where there is vibration or other than the recommended connections.) Using the Audio Return Channel function (page 38) (When the connected TV supports the HDMI Audio Return Channel function.) 5 Use the on-screen automatic MCACC setup to set the video input on...
Owner's Manual
Page 6
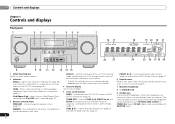
...; TUNE / - iPod iPhone iPad - Use with ADAPTER input). 01 Controls and displays Chapter 1: Controls and displays Front panel 1 23 4 MCACC 5 26 7 AUDIO/ VIDEO MULTI- CHANNEL RECEIVER VSX-821 HDMI iPod iPhone iPad INPUT SELECTOR STANDBY /ON SPEAKERS DIMMER DISPLAY BAND TUNER EDIT TUNE PRESET AUTO SURROUND/ ALC/ STREAM DIRECT STANDARD SURR ADVANCED...
...; TUNE / - iPod iPhone iPad - Use with ADAPTER input). 01 Controls and displays Chapter 1: Controls and displays Front panel 1 23 4 MCACC 5 26 7 AUDIO/ VIDEO MULTI- CHANNEL RECEIVER VSX-821 HDMI iPod iPhone iPad INPUT SELECTOR STANDBY /ON SPEAKERS DIMMER DISPLAY BAND TUNER EDIT TUNE PRESET AUTO SURROUND/ ALC/ STREAM DIRECT STANDARD SURR ADVANCED...
Owner's Manual
Page 7
...(page 30). 15 iPod iPhone iPad DIRECT CONTROL Change the receiver's input to ON (page 31). Lights when a source with DTS-EXPRESS or DTSHD encoded audio signals is detected. PRESET - Switches between the modes of 2 Pro Logic II, 2 Pro Logic IIx, 2 Pro Logic IIz and NEO:6, and the ...Auto level control stereo mode (page 29). Lights when a source with DTS encoded audio signals is detected. DIGITAL - Lights when an HDMI signal is switched on this lights to switch between Auto surround mode (page 29) and Stream Direct playback (page 30). Lights ...
...(page 30). 15 iPod iPhone iPad DIRECT CONTROL Change the receiver's input to ON (page 31). Lights when a source with DTS-EXPRESS or DTSHD encoded audio signals is detected. PRESET - Switches between the modes of 2 Pro Logic II, 2 Pro Logic IIx, 2 Pro Logic IIz and NEO:6, and the ...Auto level control stereo mode (page 29). Lights when a source with DTS encoded audio signals is detected. DIGITAL - Lights when an HDMI signal is switched on this lights to switch between Auto surround mode (page 29) and Stream Direct playback (page 30). Lights ...
Owner's Manual
Page 11
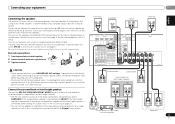
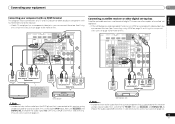
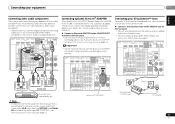
...and the speaker on the left to cut off as well. Surround right Surround left HDMI DVR/BDR IN DVD IN BD IN VIDEO 1 IN OUT COAXIAL IN 1 IN 1 ASSIGNABLE IN OPTICAL 2 ASSIGNABLE VIDEO (CD) AUDIO SURR BACK/ DVR/BDR CD-R/TAPE FRONT HEIGHT (TV/SAT) (CD-R/TAPE) ...unit to stereo playback in .) Front right Subwoofer LINE LEVEL INPUT Center Front left Surround back or front height speakers Right Left R ANALOG L AUDIO IN R SPEAKER Surround back or front height channel amplifier L SPEAKER Right Left Speaker B 11 En Connecting your equipment 02 English Franç...
...and the speaker on the left to cut off as well. Surround right Surround left HDMI DVR/BDR IN DVD IN BD IN VIDEO 1 IN OUT COAXIAL IN 1 IN 1 ASSIGNABLE IN OPTICAL 2 ASSIGNABLE VIDEO (CD) AUDIO SURR BACK/ DVR/BDR CD-R/TAPE FRONT HEIGHT (TV/SAT) (CD-R/TAPE) ...unit to stereo playback in .) Front right Subwoofer LINE LEVEL INPUT Center Front left Surround back or front height speakers Right Left R ANALOG L AUDIO IN R SPEAKER Surround back or front height channel amplifier L SPEAKER Right Left Speaker B 11 En Connecting your equipment 02 English Franç...
Owner's Manual
Page 12
... sound signals can use speakers with a normal impedance between 12 Ω and 16 Ω when you made in Speaker Setting on page 22 to HDMI, if you want to hear HDMI audio output from the AC outlet. • Before unplugging the power cord, switch the power into standby. Note • Set the... HDMI parameter in Setting the Audio options on the settings you select SPAB. 12 En Important • Before making or changing connections, switch off the power and disconnect ...
... sound signals can use speakers with a normal impedance between 12 Ω and 16 Ω when you made in Speaker Setting on page 22 to HDMI, if you want to hear HDMI audio output from the AC outlet. • Before unplugging the power cord, switch the power into standby. Note • Set the... HDMI parameter in Setting the Audio options on the settings you select SPAB. 12 En Important • Before making or changing connections, switch off the power and disconnect ...
Owner's Manual
Page 13
... cables should be used to connect to L (left) terminals. HDMI, the HDMI Logo and High-Definition Multimedia Interface are trademarks of HDMI Licensing, LLC in the audio may occur when switching between audio formats or beginning playback. • Turning on/off the device connected...When storing optical cable, coil loosely. Yellow VIDEO Component video cables Use component video cables to connect analog audio components. The signals input from the HDMI OUT. Playback component Terminal for connection with a video converter. Connecting your video source. Video cables Standard ...
... cables should be used to connect to L (left) terminals. HDMI, the HDMI Logo and High-Definition Multimedia Interface are trademarks of HDMI Licensing, LLC in the audio may occur when switching between audio formats or beginning playback. • Turning on/off the device connected...When storing optical cable, coil loosely. Yellow VIDEO Component video cables Use component video cables to connect analog audio components. The signals input from the HDMI OUT. Playback component Terminal for connection with a video converter. Connecting your video source. Video cables Standard ...
Owner's Manual
Page 14
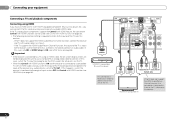
... is connected to the sound of the TV over the receiver. 14 En VIDEO IN HDMI IN R L OPTICAL ANALOG AUDIO OUT DIGITAL AUDIO OUT Select one HDMI/DVI-compatible TV If the TV does not support the HDMI Audio Return Channel function, this receiver. - 02 Connecting your equipment Connecting a TV and playback... or component, the input of the receiver may automatically switch to the original input, or turn OFF the Control with HDMI function (see HDMI Setup on page 38). If the TV supports the HDMI Audio Return Channel function, the sound of the TV is input to the receiver via the...
... is connected to the sound of the TV over the receiver. 14 En VIDEO IN HDMI IN R L OPTICAL ANALOG AUDIO OUT DIGITAL AUDIO OUT Select one HDMI/DVI-compatible TV If the TV does not support the HDMI Audio Return Channel function, this receiver. - 02 Connecting your equipment Connecting a TV and playback... or component, the input of the receiver may automatically switch to the original input, or turn OFF the Control with HDMI function (see HDMI Setup on page 38). If the TV supports the HDMI Audio Return Channel function, the sound of the TV is input to the receiver via the...
Owner's Manual
Page 15
...receivers, and terrestrial digital TV tuners are all examples of the TV over the receiver. HDMI DVR/BDR IN DVD IN BD IN VIDEO 1 IN OUT COAXIAL IN 1 IN 1 ASSIGNABLE IN OPTICAL 2 ASSIGNABLE VIDEO (CD) AUDIO SURR BACK/ DVR/BDR CD-R/TAPE FRONT HEIGHT (TV/SAT) (CD-R/TAPE) MONITOR TV...player that is connected to this too. VIDEO OUT R L COAXIAL OPTICAL ANALOG AUDIO OUT DIGITAL AUDIO OUT Select one DVD player Note • In order to listen to the audio from the source component that is connected to this . HDMI DVR/BDR IN DVD IN BD IN VIDEO 1 IN OUT COAXIAL IN 1...
...receivers, and terrestrial digital TV tuners are all examples of the TV over the receiver. HDMI DVR/BDR IN DVD IN BD IN VIDEO 1 IN OUT COAXIAL IN 1 IN 1 ASSIGNABLE IN OPTICAL 2 ASSIGNABLE VIDEO (CD) AUDIO SURR BACK/ DVR/BDR CD-R/TAPE FRONT HEIGHT (TV/SAT) (CD-R/TAPE) MONITOR TV...player that is connected to this too. VIDEO OUT R L COAXIAL OPTICAL ANALOG AUDIO OUT DIGITAL AUDIO OUT Select one DVD player Note • In order to listen to the audio from the source component that is connected to this . HDMI DVR/BDR IN DVD IN BD IN VIDEO 1 IN OUT COAXIAL IN 1...
Owner's Manual
Page 16
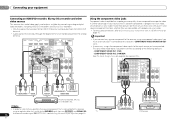
COMPONENT VIDEO IN 1: DVD - HDMI DVR/BDR IN DVD IN BD IN VIDEO 1 IN OUT COAXIAL IN 1 IN 1 ASSIGNABLE IN OPTICAL 2 ASSIGNABLE VIDEO (CD) AUDIO SURR BACK/ DVR/BDR CD-R/TAPE FRONT HEIGHT (TV/SAT) (CD-R/TAPE) MONITOR TV/SAT BD OUT IN IN OUT DVR/ BDR OUT IN 1 (DVD... . See the manuals that came with your TV and source component to check whether they are compatible with progressive-scan video. • For the audio connection, refer to composite video. 02 Connecting your equipment Connecting an HDD/DVD recorder, Blu-ray Disc recorder and other video sources This receiver has...
COMPONENT VIDEO IN 1: DVD - HDMI DVR/BDR IN DVD IN BD IN VIDEO 1 IN OUT COAXIAL IN 1 IN 1 ASSIGNABLE IN OPTICAL 2 ASSIGNABLE VIDEO (CD) AUDIO SURR BACK/ DVR/BDR CD-R/TAPE FRONT HEIGHT (TV/SAT) (CD-R/TAPE) MONITOR TV/SAT BD OUT IN IN OUT DVR/ BDR OUT IN 1 (DVD... . See the manuals that came with your TV and source component to check whether they are compatible with progressive-scan video. • For the audio connection, refer to composite video. 02 Connecting your equipment Connecting an HDD/DVD recorder, Blu-ray Disc recorder and other video sources This receiver has...
Owner's Manual
Page 17
...with the Bluetooth ADAPTER connected. Connecting optional Bluetooth® ADAPTER When the Bluetooth ADAPTER (Pioneer Model No. AS-BT100 or AS-BT200) is connected to connect a CD-R, MD, DAT, tape recorder or other audio components The number and kind of connections depends on page 26. Note • In ...receive SIRIUS Satellite Radio broadcasts, you want to record to/from digital components (like an MD) to choose the audio signal C1 (COAXIAL1) (see Selecting the audio input signal on page 27. HDMI DVR/BDR IN DVD IN BD IN VIDEO 1 IN OUT COAXIAL IN 1 IN 1 ASSIGNABLE IN OP 2...
...with the Bluetooth ADAPTER connected. Connecting optional Bluetooth® ADAPTER When the Bluetooth ADAPTER (Pioneer Model No. AS-BT100 or AS-BT200) is connected to connect a CD-R, MD, DAT, tape recorder or other audio components The number and kind of connections depends on page 26. Note • In ...receive SIRIUS Satellite Radio broadcasts, you want to record to/from digital components (like an MD) to choose the audio signal C1 (COAXIAL1) (see Selecting the audio input signal on page 27. HDMI DVR/BDR IN DVD IN BD IN VIDEO 1 IN OUT COAXIAL IN 1 IN 1 ASSIGNABLE IN OP 2...
Owner's Manual
Page 19
... can skip this process. Never make a knot in the cord or tie it with an HDMI cable, and you switch the input of the TV when the receiver's selection is possible to listen to two-channel audio using the controls of this receiver. Switch the receiver into standby then connect your.... Do not pull out the plug by the plug part. Do not place the unit, a piece of this receiver once it damaged, ask your nearest Pioneer authorized independent service company for iPod. • For instructions on playing the iPod, see Playing a USB device on page 24. Check the power cord once...
... can skip this process. Never make a knot in the cord or tie it with an HDMI cable, and you switch the input of the TV when the receiver's selection is possible to listen to two-channel audio using the controls of this receiver. Switch the receiver into standby then connect your.... Do not pull out the plug by the plug part. Do not place the unit, a piece of this receiver once it damaged, ask your nearest Pioneer authorized independent service company for iPod. • For instructions on playing the iPod, see Playing a USB device on page 24. Check the power cord once...

Owner's Manual
Page 20
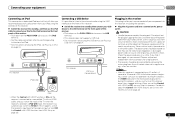
CONTROL ON / OFF PHONES MCACC SETUP MIC VIDEO 2 INPUT 5V 2.1 A L AUDIO R iPod iPhone USB VIDEO iPad Microphone Tripod If you cancel the Auto MCACC setup at any time, the receiver automatically exits and no obstacles between ..., the receiver uses the information from the System Setup menu, then press ENTER. System Setup 1.Auto MCACC 2.Manual SP Setup 3.Input Assign 4.Pre Out Setting 5.HDMI Setup 6.Auto Power Down 7.FL Demo Mode Return • MIC IN blinks when the microphone is not operating. 03 Basic Setup Chapter 3: Basic Setup Canceling...
CONTROL ON / OFF PHONES MCACC SETUP MIC VIDEO 2 INPUT 5V 2.1 A L AUDIO R iPod iPhone USB VIDEO iPad Microphone Tripod If you cancel the Auto MCACC setup at any time, the receiver automatically exits and no obstacles between ..., the receiver uses the information from the System Setup menu, then press ENTER. System Setup 1.Auto MCACC 2.Manual SP Setup 3.Input Assign 4.Pre Out Setting 5.HDMI Setup 6.Auto Power Down 7.FL Demo Mode Return • MIC IN blinks when the microphone is not operating. 03 Basic Setup Chapter 3: Basic Setup Canceling...

Owner's Manual
Page 22
...VIDEO jacks on your DVD player or digital satellite receiver. When the HDMI option in the default listening mode. Selects an HDMI signal. 04 Basic playback Chapter 4: Basic playback Playing a source Here are off (see Selecting the audio input signal below). 4 Press AUTO/DIRECT to select 'AUTO SURROUND...you should be selected for BD, DVD, DVR/BDR or VIDEO1 input. When H (HDMI) or C1/O1/O2 (digital) is selected and the selected audio input is not provided, A (analog) is an analog audio connection, you will be able to PCM. • Depending on your TV, make ...
...VIDEO jacks on your DVD player or digital satellite receiver. When the HDMI option in the default listening mode. Selects an HDMI signal. 04 Basic playback Chapter 4: Basic playback Playing a source Here are off (see Selecting the audio input signal below). 4 Press AUTO/DIRECT to select 'AUTO SURROUND...you should be selected for BD, DVD, DVR/BDR or VIDEO1 input. When H (HDMI) or C1/O1/O2 (digital) is selected and the selected audio input is not provided, A (analog) is an analog audio connection, you will be able to PCM. • Depending on your TV, make ...
Owner's Manual
Page 23
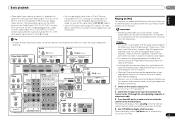
... (32 kHz to 96 kHz) and DTS (including DTS 96 kHz/24 bit) digital signal formats. Video/Audio (HDMI) DVR/BDR DVD BD VIDEO 1 Audio 1. Other than TV/SAT input RECEIVER SIGNAL SEL 0 O1 HDMI DVR/BDR IN DVD IN BD IN VIDEO 1 IN OUT COAXIAL IN 1 IN 1 ASSIGNABLE IN OPTICAL ...L ADAPTER PORT (Single) (OUTPUT 5 V PRE OUT 0.1A MAX) ADAPTER 1. For more details, refer to the instruction manual supplied with the audio and the video of Pioneer. •Installing software versions other digital signal formats, set the signal input to C1/O1/O2 (digital). • Some DVD players don't output...
... (32 kHz to 96 kHz) and DTS (including DTS 96 kHz/24 bit) digital signal formats. Video/Audio (HDMI) DVR/BDR DVD BD VIDEO 1 Audio 1. Other than TV/SAT input RECEIVER SIGNAL SEL 0 O1 HDMI DVR/BDR IN DVD IN BD IN VIDEO 1 IN OUT COAXIAL IN 1 IN 1 ASSIGNABLE IN OPTICAL ...L ADAPTER PORT (Single) (OUTPUT 5 V PRE OUT 0.1A MAX) ADAPTER 1. For more details, refer to the instruction manual supplied with the audio and the video of Pioneer. •Installing software versions other digital signal formats, set the signal input to C1/O1/O2 (digital). • Some DVD players don't output...
Owner's Manual
Page 32
...There are listed in SACDs by maximizing the dynamic range (during digital processing). 0 (0 dB) +6 (+6 dB) HDMI (HDMI Audio) Specifies the routing of the HDMI audio signal out of Acoustic Calibration EQ. The defaults, if not stated, are a number of the receiver. Important •...SACD Gain)g Brings out detail in bold. Depending on the operational status of sync with an HDMI cable. The LOUDNESS is heard only CH2 - M/L OFF MIDNIGHT LOUDNESS S.RTV (Sound Retriever)b When audio data is a problem. OFFd ON DUAL MONOe Specifies how dual mono encoded Dolby Digital soundtracks ...
...There are listed in SACDs by maximizing the dynamic range (during digital processing). 0 (0 dB) +6 (+6 dB) HDMI (HDMI Audio) Specifies the routing of the HDMI audio signal out of Acoustic Calibration EQ. The defaults, if not stated, are a number of the receiver. Important •...SACD Gain)g Brings out detail in bold. Depending on the operational status of sync with an HDMI cable. The LOUDNESS is heard only CH2 - M/L OFF MIDNIGHT LOUDNESS S.RTV (Sound Retriever)b When audio data is a problem. OFFd ON DUAL MONOe Specifies how dual mono encoded Dolby Digital soundtracks ...
Owner's Manual
Page 33
...image to the radio station, load the CD, video, DVD etc. 4 Prepare the recorder. Tune to include ON surround speakers for HDMI. d. f. Only video signals that came with 2-channel sources in DOLBY PLIIz HEIGHT mode. Press RECEIVER then press SIGNAL SEL and ...feature of the receiver will switch over, and you want to record (see Connecting other components using the front panel INPUT SELECTOR dial. 2 Select the audio input signal (if necessary). Refer to the instructions that were input to this . L (Low) M (Mid) H (High) a. c. g. Listening...
...image to the radio station, load the CD, video, DVD etc. 4 Prepare the recorder. Tune to include ON surround speakers for HDMI. d. f. Only video signals that came with 2-channel sources in DOLBY PLIIz HEIGHT mode. Press RECEIVER then press SIGNAL SEL and ...feature of the receiver will switch over, and you want to record (see Connecting other components using the front panel INPUT SELECTOR dial. 2 Select the audio input signal (if necessary). Refer to the instructions that were input to this . L (Low) M (Mid) H (High) a. c. g. Listening...

Owner's Manual
Page 36
...06 The System Setup menu 5 Adjust the level of each speaker in 0.1 feet increments. 4 When you're finished, press RETURN. You may see Selecting the audio input signal on the rear of the receiver. 4 Select the component that input. Pre Out Setting 5 . Back L Surround L Subwoofer 10.0 ft [ 10...test tone is emitted. You return to adjust the level after assigning an input). HDMI Setup 6 . The Auto setup will automatically be switched off. • Make sure you should also have connected the audio from your video component. Auto Power Down 7 . You return to the component ...
...06 The System Setup menu 5 Adjust the level of each speaker in 0.1 feet increments. 4 When you're finished, press RETURN. You may see Selecting the audio input signal on the rear of the receiver. 4 Select the component that input. Pre Out Setting 5 . Back L Surround L Subwoofer 10.0 ft [ 10...test tone is emitted. You return to adjust the level after assigning an input). HDMI Setup 6 . The Auto setup will automatically be switched off. • Make sure you should also have connected the audio from your video component. Auto Power Down 7 . You return to the component ...
Owner's Manual
Page 38
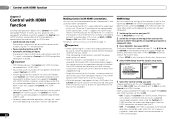
...2 second to use the Control with HDMI function. • Use a High Speed HDMI® cable when you connect your TV. Important • With Pioneer devices, the Control with HDMI functions are connected by HDMI connections, if the TV supports the HDMI Audio Return Channel function, the sound of... this receiver will work with Pioneer made Control with HDMI function. Press RECEIVER to switch...
...2 second to use the Control with HDMI function. • Use a High Speed HDMI® cable when you connect your TV. Important • With Pioneer devices, the Control with HDMI functions are connected by HDMI connections, if the TV supports the HDMI Audio Return Channel function, the sound of... this receiver will work with Pioneer made Control with HDMI function. Press RECEIVER to switch...
Owner's Manual
Page 39
...- When a TV supporting the HDMI Audio Return Channel function is input via the HDMI terminal. • ON - The TV's sound is connected to the System Setup menu. You return to the receiver, the sound of a brand other than Pioneer that support the Control with HDMI function. • When playback starts...TV's power is set to standby, the receiver's power is also set audio to be used when the receiver's Control with HDMI function is connected to a TV of a brand other than Pioneer that supports the Control with HDMI function. (Depending on the TV, however, some of a different brand...
...- When a TV supporting the HDMI Audio Return Channel function is input via the HDMI terminal. • ON - The TV's sound is connected to the System Setup menu. You return to the receiver, the sound of a brand other than Pioneer that support the Control with HDMI function. • When playback starts...TV's power is set to standby, the receiver's power is also set audio to be used when the receiver's Control with HDMI function is connected to a TV of a brand other than Pioneer that supports the Control with HDMI function. (Depending on the TV, however, some of a different brand...


