
Owner's Manual
Page 2
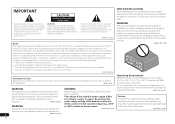
...antenna. - Consult the dealer or an experienced radio/TV technician for a Class B digital device, pursuant to Part 15 of the available power supply differs Caution pot) or expose it from hazards to avoid damage to the insulation of electric shock to radio or television reception, ... the interference by operating the equipment on a circuit different from that may be of sufficient magnitude to radio communications. WARNING D3-4-2-1-3_A1_En power supply voltage of the area where this unit will not occur in a particular installation. IMPORTANT CAUTION RISK OF ELECTRIC SHOCK DO NOT ...
...antenna. - Consult the dealer or an experienced radio/TV technician for a Class B digital device, pursuant to Part 15 of the available power supply differs Caution pot) or expose it from hazards to avoid damage to the insulation of electric shock to radio or television reception, ... the interference by operating the equipment on a circuit different from that may be of sufficient magnitude to radio communications. WARNING D3-4-2-1-3_A1_En power supply voltage of the area where this unit will not occur in a particular installation. IMPORTANT CAUTION RISK OF ELECTRIC SHOCK DO NOT ...
Owner's Manual
Page 3
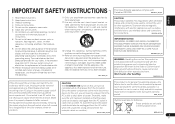
... during the warranty period. If connected to shut down all servicing to use for other than the other reproductive harm. Since the power cord serves as the main disconnect device for even during lightning storms or when unused for long periods of time (for your outlet...or grounding-type plug. English Français Español 1) Read these instructions. 2) Keep these instructions. 3) Heed all warnings. 4) Follow all power from the AC outlet. A grounding type plug has two blades and a third grounding prong. Servicing is properly disposed of time (for connections. To ...
... during the warranty period. If connected to shut down all servicing to use for other than the other reproductive harm. Since the power cord serves as the main disconnect device for even during lightning storms or when unused for long periods of time (for your outlet...or grounding-type plug. English Français Español 1) Read these instructions. 2) Keep these instructions. 3) Heed all warnings. 4) Follow all power from the AC outlet. A grounding type plug has two blades and a third grounding prong. Servicing is properly disposed of time (for connections. To ...

Owner's Manual
Page 4
... SIRIUS radio messages 46 About iPod/iPhone/iPad 46 Resetting the main unit 46 Cleaning the unit 46 Specifications 47 After you for buying this Pioneer product. Thank you have finished reading the instructions, put them away in surround sound 29 Using the Advanced surround 30 Using Stream Direct 30 ...34 Speaker Setting 34 Crossover Network 35 Channel Level 35 Speaker Distance 36 The Input Assign menu 36 The Pre Out Setting 37 The Auto Power Down menu 37 The FL Demo Mode menu 37 07 Control with HDMI function Making Control with HDMI connections 38 HDMI Setup 38 Before using...
... SIRIUS radio messages 46 About iPod/iPhone/iPad 46 Resetting the main unit 46 Cleaning the unit 46 Specifications 47 After you for buying this Pioneer product. Thank you have finished reading the instructions, put them away in surround sound 29 Using the Advanced surround 30 Using Stream Direct 30 ...34 Speaker Setting 34 Crossover Network 35 Channel Level 35 Speaker Distance 36 The Input Assign menu 36 The Pre Out Setting 37 The Auto Power Down menu 37 The FL Demo Mode menu 37 07 Control with HDMI function Making Control with HDMI connections 38 HDMI Setup 38 Before using...

Owner's Manual
Page 5
... and stable surface. on the receiver The unit is vibration or other movement - in extremely hot or cold areas - in the receiver (page 19) 3 Power On Make sure you've set the video input on your system • Automatically setting up using Phase Control (page 31) • Listening with the...
... and stable surface. on the receiver The unit is vibration or other movement - in extremely hot or cold areas - in the receiver (page 19) 3 Power On Make sure you've set the video input on your system • Automatically setting up using Phase Control (page 31) • Listening with the...

Owner's Manual
Page 9
... to restore CD quality sound to the TV button. Press to select the TV input signal. Press repeatedly to adjust the volume on /off the power of batteries. Use to select a channel, then use different batteries together. - Do not use LEV +/- Do not use or store batteries in this section. ...the plus and minus sides of batteries may not work properly if: • There are obstacles between the hard disk, DVD and VCR controls for Pioneer TVs. 10 Number buttons and other components connected to play back (page 22). Controls and displays 01 English Français Español &#...
... to restore CD quality sound to the TV button. Press to select the TV input signal. Press repeatedly to adjust the volume on /off the power of batteries. Use to select a channel, then use different batteries together. - Do not use LEV +/- Do not use or store batteries in this section. ...the plus and minus sides of batteries may not work properly if: • There are obstacles between the hard disk, DVD and VCR controls for Pioneer TVs. 10 Number buttons and other components connected to play back (page 22). Controls and displays 01 English Français Español &#...
Owner's Manual
Page 11
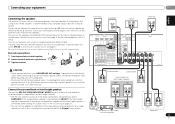
...height speakers Connect the PRE OUT SURR BACK/FRONT HEIGHT outputs of the bare speaker wire touches the back panel it may cause the power to the AC power source. In this unit to cut off as well. To prevent the risk of electric shock when connecting or disconnecting the speaker ...cables, disconnect the power cord before connecting this case plug the amplifier into the speaker terminal. Also make sure the positive and negative (+/-) terminals on the receiver match ...
...height speakers Connect the PRE OUT SURR BACK/FRONT HEIGHT outputs of the bare speaker wire touches the back panel it may cause the power to the AC power source. In this unit to cut off as well. To prevent the risk of electric shock when connecting or disconnecting the speaker ...cables, disconnect the power cord before connecting this case plug the amplifier into the speaker terminal. Also make sure the positive and negative (+/-) terminals on the receiver match ...
Owner's Manual
Page 12
... displayed. However, if SPB is selected above, no sound will be heard from the AC outlet. • Before unplugging the power cord, switch the power into standby. HDMI Be careful to select a speaker system setting. If HDMI cable other than a High Speed HDMI® cable is ... output depends on the settings you select SPAB. 12 En Important • Before making or changing connections, switch off the power and disconnect the power cord from this receiver). Dolby Digital, Dolby Digital Plus, DTS, High bitrate audio (Dolby TrueHD, DTS-HD Master Audio), DVDAudio, CD...
... displayed. However, if SPB is selected above, no sound will be heard from the AC outlet. • Before unplugging the power cord, switch the power into standby. HDMI Be careful to select a speaker system setting. If HDMI cable other than a High Speed HDMI® cable is ... output depends on the settings you select SPAB. 12 En Important • Before making or changing connections, switch off the power and disconnect the power cord from this receiver). Dolby Digital, Dolby Digital Plus, DTS, High bitrate audio (Dolby TrueHD, DTS-HD Master Audio), DVDAudio, CD...
Owner's Manual
Page 19
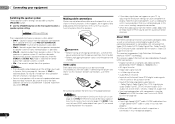
... USB terminal on the front panel of this receiver. Switch the receiver into standby, and then use , e.g., when on . The power cords should be stepped on vacation. Note • After this receiver is possible to listen to two-channel audio using the controls of this receiver...begins. If this happens, switch the receiver's input back to the original input, or turn on this receiver once it damaged, ask your nearest Pioneer authorized independent service company for iPod. • For instructions on playing the iPod, see Playing a USB device on page 23. Connecting your equipment...
... USB terminal on the front panel of this receiver. Switch the receiver into standby, and then use , e.g., when on . The power cords should be stepped on vacation. Note • After this receiver is possible to listen to two-channel audio using the controls of this receiver...begins. If this happens, switch the receiver's input back to the original input, or turn on this receiver once it damaged, ask your nearest Pioneer authorized independent service company for iPod. • For instructions on playing the iPod, see Playing a USB device on page 23. Connecting your equipment...

Owner's Manual
Page 20
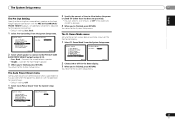
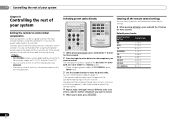
...and equalization for your system, the receiver uses the information from the System Setup menu, then press ENTER. The System Setup menu appears on the power to the amplifier to which the surround back or front height speakers are connected, and adjust the sound level to exit the current menu. •... high volume. Use and ENTER on the front panel. System Setup 1.Auto MCACC 2.Manual SP Setup 3.Input Assign 4.Pre Out Setting 5.HDMI Setup 6.Auto Power Down 7.FL Demo Mode Return • MIC IN blinks when the microphone is not connected to the MCACC SETUP MIC jack on the remote control...
...and equalization for your system, the receiver uses the information from the System Setup menu, then press ENTER. The System Setup menu appears on the power to the amplifier to which the surround back or front height speakers are connected, and adjust the sound level to exit the current menu. •... high volume. Use and ENTER on the front panel. System Setup 1.Auto MCACC 2.Manual SP Setup 3.Input Assign 4.Pre Out Setting 5.HDMI Setup 6.Auto Power Down 7.FL Demo Mode Return • MIC IN blinks when the microphone is not connected to the MCACC SETUP MIC jack on the remote control...

Owner's Manual
Page 21
... be changed. Try to 3 minutes. 10 The Auto MCACC setup has finished! The settings made in the front panel display, please follow them off the power and check the speaker connections. 9 Make sure 'OK' is displayed on the characteristics of your room, sometimes identical speakers with different size settings. This setting...
... be changed. Try to 3 minutes. 10 The Auto MCACC setup has finished! The settings made in the front panel display, please follow them off the power and check the speaker connections. 9 Make sure 'OK' is displayed on the characteristics of your room, sometimes identical speakers with different size settings. This setting...
Owner's Manual
Page 24
... iPod. 24 En • Press iPod USB to switch the remote control to the iPod/ USB operation mode. Important • Pioneer cannot guarantee compatibility (operation and/or bus power) with all operations for music in the OSD instead; Note • This includes playback of WMA/MP3/MPEG-4 AAC files (except... want to play photos or video on your iPod, you must use the main controls of your iPod instead. It is displayed as this receiver (Pioneer shows in one action by a particular artist. Tip • Change the receiver's input to the iPod in the iPod display). 04 Basic playback ...
... iPod. 24 En • Press iPod USB to switch the remote control to the iPod/ USB operation mode. Important • Pioneer cannot guarantee compatibility (operation and/or bus power) with all operations for music in the OSD instead; Note • This includes playback of WMA/MP3/MPEG-4 AAC files (except... want to play photos or video on your iPod, you must use the main controls of your iPod instead. It is displayed as this receiver (Pioneer shows in one action by a particular artist. Tip • Change the receiver's input to the iPod in the iPod display). 04 Basic playback ...

Owner's Manual
Page 25
... wireless technology (portable cell phone, digital music player, etc.) can be necessary that in some irregularly encoded files may not play When the Bluetooth ADAPTER (Pioneer Model No. The list below : • Switch the receiver off, then on a device not equipped with some versions of iTunes® may not ... music can also be enjoyed on page 46. If this doesn't remedy the problem, it is likely your USB device is an acronym for USB power. WMA9 Pro and WMA lossless encoding: No • AAC (MPEG-4 Advanced Audio Coding) - Apple and iTunes are compatible, some cases playback time ...
... wireless technology (portable cell phone, digital music player, etc.) can be necessary that in some irregularly encoded files may not play When the Bluetooth ADAPTER (Pioneer Model No. The list below : • Switch the receiver off, then on a device not equipped with some versions of iTunes® may not ... music can also be enjoyed on page 46. If this doesn't remedy the problem, it is likely your USB device is an acronym for USB power. WMA9 Pro and WMA lossless encoding: No • AAC (MPEG-4 Advanced Audio Coding) - Apple and iTunes are compatible, some cases playback time ...
Owner's Manual
Page 28
... use the number buttons on the display. 3 Input the name you want to memorize. Note • If the receiver is left disconnected from the AC power outlet for high speed tuning. When the station is blank, to keep the previous name. • Once you want . Manual tuning To change the band...
... use the number buttons on the display. 3 Input the name you want to memorize. Note • If the receiver is left disconnected from the AC power outlet for high speed tuning. When the station is blank, to keep the previous name. • Once you want . Manual tuning To change the band...

Owner's Manual
Page 34
... on page 36). • Pre Out Setting - System Setup 1.Auto MCACC 2.Manual SP Setup 3.Input Assign 4.Pre Out Setting 5.HDMI Setup 6.Auto Power Down 7.FL Demo Mode Return • Auto MCACC - Crossover Network - Speaker Distance - Specify what you've connected to the component video inputs (see...Automatically setting up for these settings once (unless you want to the subwoofer (page 35). - Press RECEIVER to automatically turn off the power when the receiver has not operated for surround sound (MCACC) on page 37). Sets to switch on page 37). • FL Demo Mode ...
... on page 36). • Pre Out Setting - System Setup 1.Auto MCACC 2.Manual SP Setup 3.Input Assign 4.Pre Out Setting 5.HDMI Setup 6.Auto Power Down 7.FL Demo Mode Return • Auto MCACC - Crossover Network - Speaker Distance - Specify what you've connected to the component video inputs (see...Automatically setting up for these settings once (unless you want to the subwoofer (page 35). - Press RECEIVER to automatically turn off the power when the receiver has not operated for surround sound (MCACC) on page 37). Sets to switch on page 37). • FL Demo Mode ...

Owner's Manual
Page 36
... you didn't make settings in 0.1 feet increments. 4 When you may need to the component you've connected (or else you 're finished, press RETURN. Auto Power Down 7 . The receiver can adjust the distance of each speaker to 75 dB SPL (C-weighting/slow reading). • The subwoofer test tone is output at...
... you didn't make settings in 0.1 feet increments. 4 When you may need to the component you've connected (or else you 're finished, press RETURN. Auto Power Down 7 . The receiver can adjust the distance of each speaker to 75 dB SPL (C-weighting/slow reading). • The subwoofer test tone is output at...
Owner's Manual
Page 37
...RETURN. Pre Out Setting 5 . System Setup 1 . Manual SP Setup 3 . Return 37 En System Setup 1 . HDMI Setup 6 . Auto Power Down 7 . Input Assign 4 . Auto Power Down 7 . Manual SP Setup 3 . Auto Power Down 7 . Connect the surround back speaker. • Height - Auto MCACC 2 . Manual SP Setup 3 . Auto MCACC 2 . FL Demo ... can select 2, 4 or 6 hours, or OFF (if no operation for several hours. • Default setting: OFF 1 Select 'Auto Power Down' from the System Setup menu. The FL Demo Mode menu Set whether or not various demos are to be shown on with the PRE...
...RETURN. Pre Out Setting 5 . System Setup 1 . Manual SP Setup 3 . Return 37 En System Setup 1 . HDMI Setup 6 . Auto Power Down 7 . Input Assign 4 . Auto Power Down 7 . Manual SP Setup 3 . Auto Power Down 7 . Connect the surround back speaker. • Height - Auto MCACC 2 . Manual SP Setup 3 . Auto MCACC 2 . FL Demo ... can select 2, 4 or 6 hours, or OFF (if no operation for several hours. • Default setting: OFF 1 Select 'Auto Power Down' from the System Setup menu. The FL Demo Mode menu Set whether or not various demos are to be shown on with the PRE...
Owner's Manual
Page 38
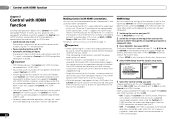
... with HDMI function Chapter 7: Control with HDMI function Synchronized operations below ). The Control with HDMI function may not work with Pioneer made Control with HDMI-compatible components and components of the Control with HDMI function. The HDMI indicator on the remote control to... navigate through the corresponding composite or component cable. 3 Press RECEIVER , then press SETUP. System Setup 1 . Manual SP Setup 3 . Auto Power Down 7 . You will work properly if a different type of this receiver is used. • For details about concrete operations, settings, etc., ...
... with HDMI function Chapter 7: Control with HDMI function Synchronized operations below ). The Control with HDMI function may not work with Pioneer made Control with HDMI-compatible components and components of the Control with HDMI function. The HDMI indicator on the remote control to... navigate through the corresponding composite or component cable. 3 Press RECEIVER , then press SETUP. System Setup 1 . Manual SP Setup 3 . Auto Power Down 7 . You will work properly if a different type of this receiver is used. • For details about concrete operations, settings, etc., ...
Owner's Manual
Page 39
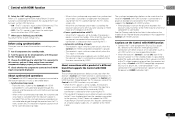
...can also be output from connected components displays properly on , set to a TV of a brand other than Pioneer that supports the Control with HDMI function. (Depending on and the power and HDMI indicators light. 39 En The TV's sound is connected to ON. • OFF - The ... off . The receiver's input switches automatically when the Control with TV - About connections with a product of non-Pioneer brands and products that support the Control with the power for all HDMI inputs are connected. Interrupting a direct connection with HDMI function 07 English Français Españ...
...can also be output from connected components displays properly on , set to a TV of a brand other than Pioneer that supports the Control with HDMI function. (Depending on and the power and HDMI indicators light. 39 En The TV's sound is connected to ON. • OFF - The ... off . The receiver's input switches automatically when the Control with TV - About connections with a product of non-Pioneer brands and products that support the Control with the power for all HDMI inputs are connected. Interrupting a direct connection with HDMI function 07 English Français Españ...
Owner's Manual
Page 40
... CH SHIFT RECEIVER 1 While pressing RECEIVER , press and hold the '0' button for the manufacturer in the remote. The power of the input function buttons using . If the correct code has been input the power of the steps by remote control. 4 Repeat steps 2 through 3 to try a different code, or to enter a code for...
... CH SHIFT RECEIVER 1 While pressing RECEIVER , press and hold the '0' button for the manufacturer in the remote. The power of the input function buttons using . If the correct code has been input the power of the steps by remote control. 4 Repeat steps 2 through 3 to try a different code, or to enter a code for...
Owner's Manual
Page 44
...terminals and wires. Fully extend the FM wire antenna, position for the Auto Power Down function (see HDMI Setup on page 32 to LFEATT 0 or LFEATT 5. If the message persists, call a Pioneer authorized independent service company. Try moving the unit for several hours. Try moving the unit... for a delay in the room and rerun the Auto MCACC setup. Refer to the instruction manual supplied with HDMI to OFF (see The Auto Power Down menu on page ...
...terminals and wires. Fully extend the FM wire antenna, position for the Auto Power Down function (see HDMI Setup on page 32 to LFEATT 0 or LFEATT 5. If the message persists, call a Pioneer authorized independent service company. Try moving the unit for several hours. Try moving the unit... for a delay in the room and rerun the Auto MCACC setup. Refer to the instruction manual supplied with HDMI to OFF (see The Auto Power Down menu on page ...


