Owner's Manual
Page 7
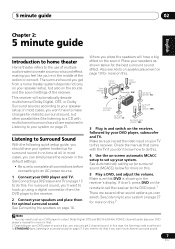
... 1 You may only get from the DVD player to your system on page 27 for optimal surround sound. Front speaker (L) Center speaker (C) Front speaker (R) Subwoofer (SW) Surround speaker (RS) Listening position Surround back speaker (SBR) Surround speaker (LS) Surround back speaker (SBL) 3 Plug in surround sound on page... to output Dolby Digital, DTS and 88.2 kHz/96 kHz PCM (2 channel) audio (see Hints on speaker placement on your DVD player, subwoofer and TV. In this case, the listening mode must be set to STANDARD (see Listening in and switch on the receiver, followed by your...
... 1 You may only get from the DVD player to your system on page 27 for optimal surround sound. Front speaker (L) Center speaker (C) Front speaker (R) Subwoofer (SW) Surround speaker (RS) Listening position Surround back speaker (SBR) Surround speaker (LS) Surround back speaker (SBL) 3 Plug in surround sound on page... to output Dolby Digital, DTS and 88.2 kHz/96 kHz PCM (2 channel) audio (see Hints on speaker placement on your DVD player, subwoofer and TV. In this case, the listening mode must be set to STANDARD (see Listening in and switch on the receiver, followed by your...

Owner's Manual
Page 9
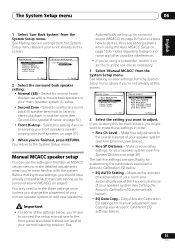
... it is also possible to adjust these settings manually using the System Setup menu (starting on page 34).1 You can correct the setting manually using a subwoofer, it is on and the volume is turned up with cone sizes of around 12 cm (5 inches) will light to show the setup is complete... 6 Follow the instructions on-screen. • Make sure the microphone is connected. • If you're using the Speaker Setting on page 40. • The subwoofer distance setting may take 3 to 8 minutes. 10 The Auto MCACC Setup has finished! The MCACC indicator on the front panel will end up . • See...
... it is also possible to adjust these settings manually using the System Setup menu (starting on page 34).1 You can correct the setting manually using a subwoofer, it is on and the volume is turned up with cone sizes of around 12 cm (5 inches) will light to show the setup is complete... 6 Follow the instructions on-screen. • Make sure the microphone is connected. • If you're using the Speaker Setting on page 40. • The subwoofer distance setting may take 3 to 8 minutes. 10 The Auto MCACC Setup has finished! The MCACC indicator on the front panel will end up . • See...
Owner's Manual
Page 10
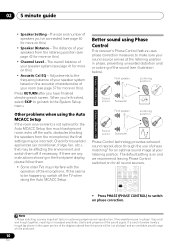
...a very important factor in achieving proper sound reproduction. P Front speaker H A S E C O N T R O L O Sound source Subwoofer N Listening position Phase Control technology provides coherent sound reproduction through the use of the microphone. P H Front speaker A S E C O N T R O L Sound O ...source Subwoofer F F Listening position ? When you have finished checking each screen. Check for household appliances (air conditioner, fridge, fan, etc.), ...
...a very important factor in achieving proper sound reproduction. P Front speaker H A S E C O N T R O L O Sound source Subwoofer N Listening position Phase Control technology provides coherent sound reproduction through the use of the microphone. P H Front speaker A S E C O N T R O L Sound O ...source Subwoofer F F Listening position ? When you have finished checking each screen. Check for household appliances (air conditioner, fridge, fan, etc.), ...

Owner's Manual
Page 18
... Ω). Use good quality speaker wire to connect the speakers to the left to the receiver. Note 1 If you're not using a subwoofer, change the front speaker setting (see Switching the speaker impedance on page 65 if you plan to LARGE. 2 If you are using at least... P E SUB WOOFER A DVD / LD A PREOUT IN S-VIDEO K E R S FRONT MONITOR OUT COMPONENT VIDEO (TV/SAT)IN 2 LR SURROUND L CENTER R SURROUND BACK L B Powered subwoofer SW INPUT AC OUTLET Caution • Make sure that all the bare speaker wire is shown here but using only one surround back speaker, connect...
... Ω). Use good quality speaker wire to connect the speakers to the left to the receiver. Note 1 If you're not using a subwoofer, change the front speaker setting (see Switching the speaker impedance on page 65 if you plan to LARGE. 2 If you are using at least... P E SUB WOOFER A DVD / LD A PREOUT IN S-VIDEO K E R S FRONT MONITOR OUT COMPONENT VIDEO (TV/SAT)IN 2 LR SURROUND L CENTER R SURROUND BACK L B Powered subwoofer SW INPUT AC OUTLET Caution • Make sure that all the bare speaker wire is shown here but using only one surround back speaker, connect...

Owner's Manual
Page 20
AC OUTLET AC 120 V 60 Hz SWITCHED 100 W MAX 0.8 A MAX Surround back left Subwoofer Surround right Listening position AC outlet Power supplied through this outlet is turned on and off by removing the power plug from the wall socket ... LS RS LS SB fig. A) shows orientation with one surround back speaker (or none) connected. This can also cause the receiver to malfunction. • Since a subwoofer or power amplifier can also refer to the AC outlet. 20 En The first diagram (fig. Front left Center Front right Surround left Surround back...
AC OUTLET AC 120 V 60 Hz SWITCHED 100 W MAX 0.8 A MAX Surround back left Subwoofer Surround right Listening position AC outlet Power supplied through this outlet is turned on and off by removing the power plug from the wall socket ... LS RS LS SB fig. A) shows orientation with one surround back speaker (or none) connected. This can also cause the receiver to malfunction. • Since a subwoofer or power amplifier can also refer to the AC outlet. 20 En The first diagram (fig. Front left Center Front right Surround left Surround back...

Owner's Manual
Page 29
... on page 8. 29 En Adjust the effect from 0 (all center channel sent to front right and left and right speakers (and possibly your subwoofer depending on this . • F.S.S. Use to provide a rich surround sound effect directed to the center of where the front left speaker Front ...right speaker Note 1 When using just the front speakers and the subwoofer. For more on this . • F.S.S.FOCUS - WIDE - WIDE - Dolby Digital and DTS multichannel sources are downmixed to a source, press STEREO...
... on page 8. 29 En Adjust the effect from 0 (all center channel sent to front right and left and right speakers (and possibly your subwoofer depending on this . • F.S.S. Use to provide a rich surround sound effect directed to the center of where the front left speaker Front ...right speaker Note 1 When using just the front speakers and the subwoofer. For more on this . • F.S.S.FOCUS - WIDE - WIDE - Dolby Digital and DTS multichannel sources are downmixed to a source, press STEREO...
Owner's Manual
Page 35
... to listen to use with the system. Make precise delay settings for notes regarding background noise and other possible interference. • If you're using a subwoofer, switch it about ear level at your normal listening position. Select to stereo playback in order. • Fine Ch Level - You return to make these...
... to listen to use with the system. Make precise delay settings for notes regarding background noise and other possible interference. • If you're using a subwoofer, switch it about ear level at your normal listening position. Select to stereo playback in order. • Fine Ch Level - You return to make these...
Owner's Manual
Page 37
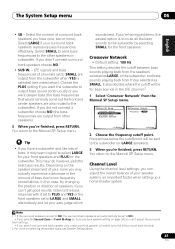
... sound as necessary. Try to match the reference speaker. You return to measure the target channel. Therefore, if you 're using a subwoofer, it is on and the volume is at the middle position. • See Other problems when using the Auto MCACC Setup on page... a channel, simply use it sounds like the delay settings are arriving simultaneously at a position slightly in terms of your speakers (excluding the subwoofer). Turn on the system. Acoustic Calibration EQ Acoustic Calibration Equalization is connected. • If you want to Setting the Acoustic Calibration EQ manually...
... sound as necessary. Try to match the reference speaker. You return to measure the target channel. Therefore, if you 're using a subwoofer, it is on and the volume is at the middle position. • See Other problems when using the Auto MCACC Setup on page... a channel, simply use it sounds like the delay settings are arriving simultaneously at a position slightly in terms of your speakers (excluding the subwoofer). Turn on the system. Acoustic Calibration EQ Acoustic Calibration Equalization is connected. • If you want to Setting the Acoustic Calibration EQ manually...

Owner's Manual
Page 40
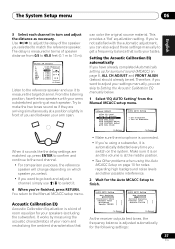
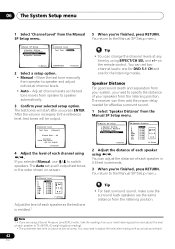
... idea to make sure that you didn't connect surround speakers choose NO (the sound of the surround channels is sent to the other speakers or subwoofer. Note 1 If you want to set then select a speaker size. Also, the center, surround, and surround back speakers can't be fixed to YES. System... the first time, you may want to adjust these settings in Automatically setting up for surround sound (MCACC) on page 8 are sent to the subwoofer. 40 En In this setting to specify your speaker configuration (size, number of your speakers from the Manual SP Setup menu. Speaker Setting Use this...
... idea to make sure that you didn't connect surround speakers choose NO (the sound of the surround channels is sent to the other speakers or subwoofer. Note 1 If you want to set then select a speaker size. Also, the center, surround, and surround back speakers can't be fixed to YES. System... the first time, you may want to adjust these settings in Automatically setting up for surround sound (MCACC) on page 8 are sent to the subwoofer. 40 En In this setting to specify your speaker configuration (size, number of your speakers from the Manual SP Setup menu. Speaker Setting Use this...
Owner's Manual
Page 41
... of your surround back speakers reproduce bass frequencies effectively. Note 1 • If the surround speakers are output from other speakers or subwoofer. Select SMALL to send bass frequencies to LARGE and SMALL alternatively and let your ears judge which sounds best. If you 're ... • Default setting: 100 Hz This setting decides the cutoff between bass sounds playing back from the speakers selected as LARGE, or the subwoofer, and bass sounds playing back from the Manual SP Setup menu. 4.Manual SP Setup a.Speaker Setting b.Crossover Network c.Channel Level d.Speaker Distance...
... of your surround back speakers reproduce bass frequencies effectively. Note 1 • If the surround speakers are output from other speakers or subwoofer. Select SMALL to send bass frequencies to LARGE and SMALL alternatively and let your ears judge which sounds best. If you 're ... • Default setting: 100 Hz This setting decides the cutoff between bass sounds playing back from the speakers selected as LARGE, or the subwoofer, and bass sounds playing back from the Manual SP Setup menu. 4.Manual SP Setup a.Speaker Setting b.Crossover Network c.Channel Level d.Speaker Distance...
Owner's Manual
Page 42
... each speaker as the test tone moves from speaker to specify the distance of each speaker to 75 dB SPL (C-weighting/slow reading). • The subwoofer test tone is emitted.1 Tip • You can set two channel levels: one for DVD 5.1 CH and one for effective surround sound. 1 Select 'Speaker Distance...
... each speaker as the test tone moves from speaker to specify the distance of each speaker to 75 dB SPL (C-weighting/slow reading). • The subwoofer test tone is emitted.1 Tip • You can set two channel levels: one for DVD 5.1 CH and one for effective surround sound. 1 Select 'Speaker Distance...

Owner's Manual
Page 57
...respectively). Hook up to 5 channels, depending on the source), the two speakers in this case, to different amplifiers (in speaker system B, and the subwoofer. See Switching the speaker system below are possible using . 1 Connect your front left speaker SR FRONT P E AA K E R S LR SURROUND ...L CENTER R SURROUND BACK L B Hi Lo Note 1 • The subwoofer output depends on the settings you made in another room. 2 Select 'Second Zone' from the surround back pre-out terminals may change. • ...
...respectively). Hook up to 5 channels, depending on the source), the two speakers in this case, to different amplifiers (in speaker system B, and the subwoofer. See Switching the speaker system below are possible using . 1 Connect your front left speaker SR FRONT P E AA K E R S LR SURROUND ...L CENTER R SURROUND BACK L B Hi Lo Note 1 • The subwoofer output depends on the settings you made in another room. 2 Select 'Second Zone' from the surround back pre-out terminals may change. • ...
Owner's Manual
Page 62
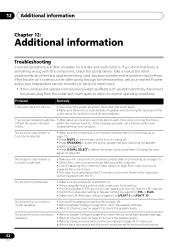
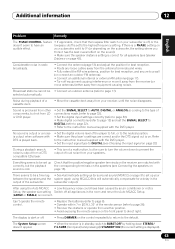
... up on page 11). • Press MUTE on . This could cause the receiver to check the speaker levels. No sound from subwoofer. • Make sure the subwoofer is connected correctly (refer to Connecting up . • The Dolby Digital or DTS source you won't be able to switch the unit... on during this component, check the points below , ask your nearest Pioneer authorized independent service company to carry out repair work. • If...
... up on page 11). • Press MUTE on . This could cause the receiver to check the speaker levels. No sound from subwoofer. • Make sure the subwoofer is connected correctly (refer to Connecting up . • The Dolby Digital or DTS source you won't be able to switch the unit... on during this component, check the points below , ask your nearest Pioneer authorized independent service company to carry out repair work. • If...
Owner's Manual
Page 63
...noise from your speakers. Refer to the instruction manual supplied with DTS is played back. • Set the digital volume level of the subwoofer. subwoofer output). The display is dark or off. • Press DIMMER on the control repeatedly to return to a wall (or connect an ...; STANDBY/ON (the current setting is displayed). 63 En Everything seems to be a time lag • See Automatically setting up your subwoofer is off all speakers (see Connecting the speakers on sound is odd. After using MCACC (this will automatically compensate for surround sound (MCACC...
...noise from your speakers. Refer to the instruction manual supplied with DTS is played back. • Set the digital volume level of the subwoofer. subwoofer output). The display is dark or off. • Press DIMMER on the control repeatedly to return to a wall (or connect an ...; STANDBY/ON (the current setting is displayed). 63 En Everything seems to be a time lag • See Automatically setting up your subwoofer is off all speakers (see Connecting the speakers on sound is odd. After using MCACC (this will automatically compensate for surround sound (MCACC...


