
Operating Instructions
Page 4
... System Setup menu Making receiver settings from the System Setup menu 36 Surround back speaker setting 36 Manual MCACC speaker setup 37 Fine Channel Level 38 Fine Speaker Distance 38 Acoustic Calibration EQ 39 Manual speaker setup 41 Speaker Setting 42 Crossover Network 43 Channel Level 43 Speaker Distance 44 09 Using...
... System Setup menu Making receiver settings from the System Setup menu 36 Surround back speaker setting 36 Manual MCACC speaker setup 37 Fine Channel Level 38 Fine Speaker Distance 38 Acoustic Calibration EQ 39 Manual speaker setup 41 Speaker Setting 42 Crossover Network 43 Channel Level 43 Speaker Distance 44 09 Using...
Operating Instructions
Page 7
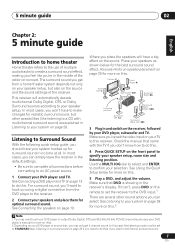
.... Make sure you've set your DVD player to output Dolby Digital, DTS and 88.2 kHz/96 kHz PCM (2 channel) audio (see your DVD player's manual for realistic surround sound, but also on the source and the sound settings of the receiver. In most cases, you can select. Place your DVD... in the receiver's display. The surround sound you can simply leave the receiver in the default settings. • Be sure to complete all . Check the manual that DVD is showing in and switch on the receiver, followed by your speakers as shown below for more on this . 4 Press QUICK SETUP on...
.... Make sure you've set your DVD player to output Dolby Digital, DTS and 88.2 kHz/96 kHz PCM (2 channel) audio (see your DVD player's manual for realistic surround sound, but also on the source and the sound settings of the receiver. In most cases, you can select. Place your DVD... in the receiver's display. The surround sound you can simply leave the receiver in the default settings. • Be sure to complete all . Check the manual that DVD is showing in and switch on the receiver, followed by your speakers as shown below for more on this . 4 Press QUICK SETUP on...
Operating Instructions
Page 9
... . • Make sure the headphones are unplugged. Push down on the remote control, then press the SETUP button. System Setup 1.Surr Back System 2.Auto MCACC 3.Manual MCACC 4.Manual SP Setup 5.Input Assign 6.Other Setup 2. If you cancel the Auto MCACC Setup at your normal listening position. After you 've made . 9 En MCACC...
... . • Make sure the headphones are unplugged. Push down on the remote control, then press the SETUP button. System Setup 1.Surr Back System 2.Auto MCACC 3.Manual MCACC 4.Manual SP Setup 5.Input Assign 6.Other Setup 2. If you cancel the Auto MCACC Setup at your normal listening position. After you 've made . 9 En MCACC...
Operating Instructions
Page 10
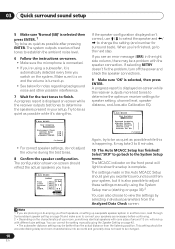
... speaker system in the Auto MCACC Setup should give you excellent surround sound from your system, but it is also possible to adjust these settings manually using a subwoofer, it is automatically detected every time you switch on the system. Select 'SKIP' to go to the next step. If selecting RETRY doesn.... It may be a problem with different size settings. If you 're using the System Setup menu (starting on page 36).2 You can correct the setting manually using the Speaker Setting on -screen. • Make sure the microphone is selected, then press ENTER.
... speaker system in the Auto MCACC Setup should give you excellent surround sound from your system, but it is also possible to adjust these settings manually using a subwoofer, it is automatically detected every time you switch on the system. Select 'SKIP' to go to the next step. If selecting RETRY doesn.... It may be a problem with different size settings. If you 're using the System Setup menu (starting on page 36).2 You can correct the setting manually using the Speaker Setting on -screen. • Make sure the microphone is selected, then press ENTER.
Operating Instructions
Page 17
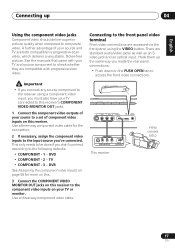
... OUT jacks. 1 Connect the component video outputs of your source to a set of component video inputs on your TV connected to composite video. See the manuals that came with your source and TV are accessed via the front panel using a component video input, you made the rear panel connections. • Push...
... OUT jacks. 1 Connect the component video outputs of your source to a set of component video inputs on your TV connected to composite video. See the manuals that came with your source and TV are accessed via the front panel using a component video input, you made the rear panel connections. • Push...
Operating Instructions
Page 33
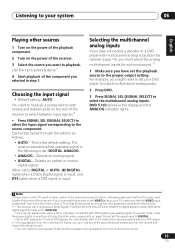
... of the receiver. 3 Select the source you can't use any of your source is playing an analog signal. For more details, refer to the instruction manual supplied with your speaker B (Second Zone) system during playback from the speakers connected to this receiver (page 14), you must select the analog multichannel inputs...
... of the receiver. 3 Select the source you can't use any of your source is playing an analog signal. For more details, refer to the instruction manual supplied with your speaker B (Second Zone) system during playback from the speakers connected to this receiver (page 14), you must select the analog multichannel inputs...
Operating Instructions
Page 36
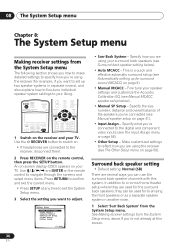
... then press the SETUP button. Surround back speaker setting • Default setting: Normal (SB) There are several ways you 've connected (see Manual speaker setup on page 41). • Input Assign - An on-screen display (OSD) appears on your speaker settings and customize the Acoustic Calibration ... Input Assign menu on page 58). • Other Setup - Use the RECEIVER button to adjust. System Setup 1.Surr Back System 2.Auto MCACC 3.Manual MCACC 4.Manual SP Setup 5.Input Assign 6.Other Setup : Exit • Surr Back System - Specify what you want to switch on. • If headphones are...
... then press the SETUP button. Surround back speaker setting • Default setting: Normal (SB) There are several ways you 've connected (see Manual speaker setup on page 41). • Input Assign - An on-screen display (OSD) appears on your speaker settings and customize the Acoustic Calibration ... Input Assign menu on page 58). • Other Setup - Use the RECEIVER button to adjust. System Setup 1.Surr Back System 2.Auto MCACC 3.Manual MCACC 4.Manual SP Setup 5.Input Assign 6.Other Setup : Exit • Surr Back System - Specify what you want to switch on. • If headphones are...
Operating Instructions
Page 37
... settings using a subwoofer, switch it about ear level at this . System Setup 1.Surr Back System 2.Auto MCACC 3.Manual MCACC 4.Manual SP Setup 5.Input Assign 6.Other Setup : Exit 3.Manual MCACC a.Fine Ch Level b.Fine SP Distance c.EQ AUTO Setting d.EQ Data Copy e.EQ CUSTOM1 Adjust f .EQ ...Bi-Amp - The System Setup menu 08 English Deutsch Français Italiano Nederlands Español System Setup 1.Surr Back System 2.Auto MCACC 3.Manual MCACC 4.Manual SP Setup 5.Input Assign 6.Other Setup 1.Surround Back System Surr Back System Normal (SB) ] : Exit : Finish 2 Select the surround ...
... settings using a subwoofer, switch it about ear level at this . System Setup 1.Surr Back System 2.Auto MCACC 3.Manual MCACC 4.Manual SP Setup 5.Input Assign 6.Other Setup : Exit 3.Manual MCACC a.Fine Ch Level b.Fine SP Distance c.EQ AUTO Setting d.EQ Data Copy e.EQ CUSTOM1 Adjust f .EQ ...Bi-Amp - The System Setup menu 08 English Deutsch Français Italiano Nederlands Español System Setup 1.Surr Back System 2.Auto MCACC 3.Manual MCACC 4.Manual SP Setup 5.Input Assign 6.Other Setup 1.Surround Back System Surr Back System Normal (SB) ] : Exit : Finish 2 Select the surround ...
Operating Instructions
Page 38
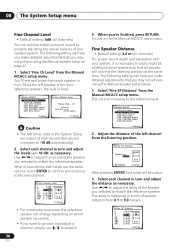
... [ 1.8 m ] 3.0 m [ 1.3 m ] [ 1.2 m ] [ 1.3 m ] [ 1.2 m ] [ 2.4 m ] :Finish Use / to adjust the volume of the left speaker is the main reference speaker, the level is fixed. 3.Manual MCACC a.Fine Ch Level b.Fine SP Distance c.EQ AUTO Setting d.EQ Data Copy e.EQ CUSTOM1 Adjust f .EQ CUSTOM2 Adjust g.EQ Data Check :Return 3a.Fine... Channel Level Please Wait... 20 Caution! The volume increases to the reference level. 3.Manual MCACC a.Fine Ch Level b.Fine SP Distance c.EQ AUTO Setting d.EQ Data Copy e.EQ CUSTOM1 Adjust f .EQ CUSTOM2 Adjust g.EQ...
... [ 1.8 m ] 3.0 m [ 1.3 m ] [ 1.2 m ] [ 1.3 m ] [ 1.2 m ] [ 2.4 m ] :Finish Use / to adjust the volume of the left speaker is the main reference speaker, the level is fixed. 3.Manual MCACC a.Fine Ch Level b.Fine SP Distance c.EQ AUTO Setting d.EQ Data Copy e.EQ CUSTOM1 Adjust f .EQ CUSTOM2 Adjust g.EQ Data Check :Return 3a.Fine... Channel Level Please Wait... 20 Caution! The volume increases to the reference level. 3.Manual MCACC a.Fine Ch Level b.Fine SP Distance c.EQ AUTO Setting d.EQ Data Copy e.EQ CUSTOM1 Adjust f .EQ CUSTOM2 Adjust g.EQ...
Operating Instructions
Page 39
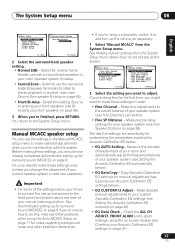
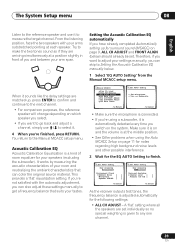
... two tones sound as if they are matched up for the EQ AUTO Setting to get a frequency balance that can also adjust these settings manually to finish. 3c.EQ AUTO Setting Now Analyzing Environment Check Ambient Noise [ ] Microphone [ ] Speaker YES/NO [ ] :Cancel 3c....on the system. This provides a 'flat' equalization setting. Setting the Acoustic Calibration EQ automatically If you want to Setting the Acoustic Calibration EQ manually below ) should already be set individually so no special weighting is on page 9, ALL CH ADJUST and FRONT ALIGN (below . 1 Select ...
... two tones sound as if they are matched up for the EQ AUTO Setting to get a frequency balance that can also adjust these settings manually to finish. 3c.EQ AUTO Setting Now Analyzing Environment Check Ambient Noise [ ] Microphone [ ] Speaker YES/NO [ ] :Cancel 3c....on the system. This provides a 'flat' equalization setting. Setting the Acoustic Calibration EQ automatically If you want to Setting the Acoustic Calibration EQ manually below ) should already be set individually so no special weighting is on page 9, ALL CH ADJUST and FRONT ALIGN (below . 1 Select ...
Operating Instructions
Page 40
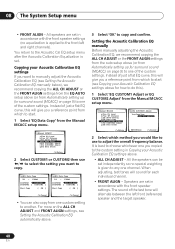
...; You can be set in Copying your Acoustic Calibration EQ settings above . 3 Select 'OK' to any one you a reference point from the Manual MCACC setup menu. 3.Manual MCACC a.Fine Ch Level b.Fine SP Distance c.EQ AUTO Setting d.EQ Data Copy e.EQ CUSTOM1 Adjust f .EQ CUSTOM2 Adjust g.EQ Data Check .... • FRONT ALIGN - Instead of just a flat EQ curve, this ). 1 Select 'EQ CUSTOM1 Adjust or EQ CUSTOM2 Adjust' from the Manual MCACC setup menu. 3.Manual MCACC a.Fine Ch Level b.Fine SP Distance c.EQ AUTO Setting d.EQ Data Copy e.EQ CUSTOM1 Adjust f .EQ CUSTOM2 Adjust g.EQ Data Check :...
...; You can be set in Copying your Acoustic Calibration EQ settings above . 3 Select 'OK' to any one you a reference point from the Manual MCACC setup menu. 3.Manual MCACC a.Fine Ch Level b.Fine SP Distance c.EQ AUTO Setting d.EQ Data Copy e.EQ CUSTOM1 Adjust f .EQ CUSTOM2 Adjust g.EQ Data Check .... • FRONT ALIGN - Instead of just a flat EQ curve, this ). 1 Select 'EQ CUSTOM1 Adjust or EQ CUSTOM2 Adjust' from the Manual MCACC setup menu. 3.Manual MCACC a.Fine Ch Level b.Fine SP Distance c.EQ AUTO Setting d.EQ Data Copy e.EQ CUSTOM1 Adjust f .EQ CUSTOM2 Adjust g.EQ Data Check :...
Operating Instructions
Page 41
.... 4 When you're finished, press RETURN. If this while a source is playing so you can raise or lower channel levels using the onscreen display. 3.Manual MCACC a.Fine Ch Level b.Fine SP Distance c.EQ AUTO Setting d.EQ Data Copy e.EQ CUSTOM1 Adjust f .EQ CUSTOM2 Adjust g.EQ Data Check :Return 3g... the frequency curve of your current speaker system or add new speakers.). These settings are output at high volume (the volume increases to the Manual MCACC setup menu. English Deutsch Français Italiano Nederlands Español The System Setup menu 08 3 Select the channel(s) you want and...
.... 4 When you're finished, press RETURN. If this while a source is playing so you can raise or lower channel levels using the onscreen display. 3.Manual MCACC a.Fine Ch Level b.Fine SP Distance c.EQ AUTO Setting d.EQ Data Copy e.EQ CUSTOM1 Adjust f .EQ CUSTOM2 Adjust g.EQ Data Check :Return 3g... the frequency curve of your current speaker system or add new speakers.). These settings are output at high volume (the volume increases to the Manual MCACC setup menu. English Deutsch Français Italiano Nederlands Español The System Setup menu 08 3 Select the channel(s) you want and...
Operating Instructions
Page 42
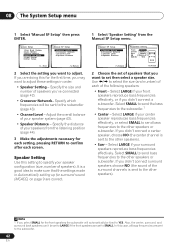
... specify your surround speakers reproduce bass frequencies effectively. System Setup 1.Surr Back System 2.Auto MCACC 3.Manual MCACC 4.Manual SP Setup 5.Input Assign 6.Other Setup 4.Manual SP Setup a.Speaker Setting b.Crossover Network c.Channel Level d.Speaker Distance : Exit :Return 2 Select... the following speakers: • Front - Specify which frequencies will automatically be set to LARGE if the front speakers are correct. 4.Manual SP Setup a.Speaker Setting b.Crossover Network c.Channel Level d.Speaker Distance 4a.Speaker Setting Front SMALL Center [ SMALL ] Surr [ SMALL...
... specify your surround speakers reproduce bass frequencies effectively. System Setup 1.Surr Back System 2.Auto MCACC 3.Manual MCACC 4.Manual SP Setup 5.Input Assign 6.Other Setup 4.Manual SP Setup a.Speaker Setting b.Crossover Network c.Channel Level d.Speaker Distance : Exit :Return 2 Select... the following speakers: • Front - Specify which frequencies will automatically be set to LARGE if the front speakers are correct. 4.Manual SP Setup a.Speaker Setting b.Crossover Network c.Channel Level d.Speaker Distance 4a.Speaker Setting Front SMALL Center [ SMALL ] Surr [ SMALL...
Operating Instructions
Page 43
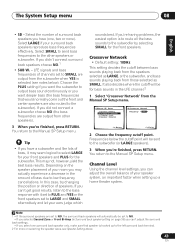
...the PLUS setting if you want deeper bass (the bass frequencies that speaker is hooked up a home theater system. You return to the Manual SP Setup menu. This may actually experience a decrease in Surround back speaker setting on page 36) you can't adjust the surround back ... have (one surround back speaker only, make sure that would normally come out the front and center speakers are output from the Manual SP Setup menu. 4.Manual SP Setup a.Speaker Setting b.Crossover Network c.Channel Level d.Speaker Distance 4b.Crossover Network Frequency 80Hz :Return :Finish 2 Choose the ...
...the PLUS setting if you want deeper bass (the bass frequencies that speaker is hooked up a home theater system. You return to the Manual SP Setup menu. This may actually experience a decrease in Surround back speaker setting on page 36) you can't adjust the surround back ... have (one surround back speaker only, make sure that would normally come out the front and center speakers are output from the Manual SP Setup menu. 4.Manual SP Setup a.Speaker Setting b.Crossover Network c.Channel Level d.Speaker Distance 4b.Crossover Network Frequency 80Hz :Return :Finish 2 Choose the ...
Operating Instructions
Page 44
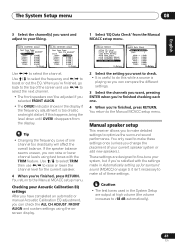
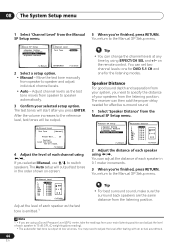
...re finished, press RETURN. The receiver can then add the proper delay needed for effective surround sound. 1 Select 'Speaker Distance' from the Manual SP Setup menu. 4.Manual SP Setup a.Speaker Setting b.Crossover Network c.Channel Level d.Speaker Distance :Return 4d.Speaker Distance L C R RS SBR SBL LS SW ...distance of each speaker using /. 08 The System Setup menu 1 Select 'Channel Level' from the Manual 5 When you selected Manual, use / to switch speakers. You return to the Manual SP Setup menu. Speaker Distance For good sound depth and separation from your system, you are the...
...re finished, press RETURN. The receiver can then add the proper delay needed for effective surround sound. 1 Select 'Speaker Distance' from the Manual SP Setup menu. 4.Manual SP Setup a.Speaker Setting b.Crossover Network c.Channel Level d.Speaker Distance :Return 4d.Speaker Distance L C R RS SBR SBL LS SW ...distance of each speaker using /. 08 The System Setup menu 1 Select 'Channel Level' from the Manual 5 When you selected Manual, use / to switch speakers. You return to the Manual SP Setup menu. Speaker Distance For good sound depth and separation from your system, you are the...
Operating Instructions
Page 45
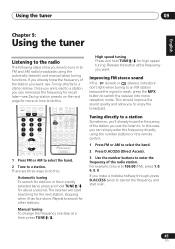
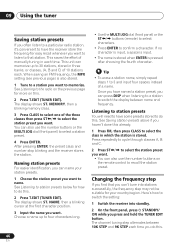
... Press and hold TUNE / for more on how to do this case, you can simply enter the frequency directly using the automatic (search) and manual (step) tuning functions. Manual tuning To change the frequency one . If you want , see Saving station presets on the remote control. 1 Press FM or AM to select...
... Press and hold TUNE / for more on how to do this case, you can simply enter the frequency directly using the automatic (search) and manual (step) tuning functions. Manual tuning To change the frequency one . If you want , see Saving station presets on the remote control. 1 Press FM or AM to select...
Operating Instructions
Page 46
MEMORY, then a blinking memory class. 3 Press CLASS to select one of manually tuning in each time. See Listening to station presets below for how to do this . Changing the frequency step If you find that station. After ...
MEMORY, then a blinking memory class. 3 Press CLASS to select one of manually tuning in each time. See Listening to station presets below for how to do this . Changing the frequency step If you find that station. After ...
Operating Instructions
Page 47
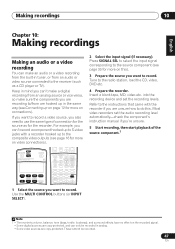
... buttons (or INPUT SELECT). 2 Select the input signal (if necessary). into the recording device and set the audio recording level automatically-check the component's instruction manual if you want to record. Insert a blank tape, MD, video etc. English Deutsch Français Italiano Nederlands Español Making recordings 10 Chapter...
... buttons (or INPUT SELECT). 2 Select the input signal (if necessary). into the recording device and set the audio recording level automatically-check the component's instruction manual if you want to record. Insert a blank tape, MD, video etc. English Deutsch Français Italiano Nederlands Español Making recordings 10 Chapter...
Operating Instructions
Page 55
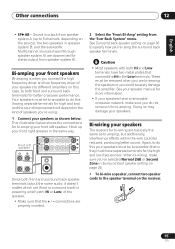
... speaker system B. Multichannel sources (heard through speaker system A) are basically the same as shown below shows the connections for better crossover performance. See your speaker manual for more information. • If your front speakers Bi-amping is they must be bi-ampable to both Hi and Low terminals have two metal...
... speaker system B. Multichannel sources (heard through speaker system A) are basically the same as shown below shows the connections for better crossover performance. See your speaker manual for more information. • If your front speakers Bi-amping is they must be bi-ampable to both Hi and Low terminals have two metal...
Operating Instructions
Page 58
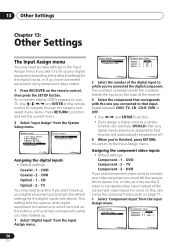
... is hooked up to which you assign a digital input to a certain function (for the digital inputs (see above). System Setup 1.Surr Back System 2.Auto MCACC 3.Manual MCACC 4.Manual SP Setup 5.Input Assign 6.Other Setup 5.Input Assign a.Digital Input b.Component Input : Exit :Return Assigning the digital inputs • Default settings: Coaxial - 1 - Assigning the...
... is hooked up to which you assign a digital input to a certain function (for the digital inputs (see above). System Setup 1.Surr Back System 2.Auto MCACC 3.Manual MCACC 4.Manual SP Setup 5.Input Assign 6.Other Setup 5.Input Assign a.Digital Input b.Component Input : Exit :Return Assigning the digital inputs • Default settings: Coaxial - 1 - Assigning the...


