
Operating Instructions
Page 4
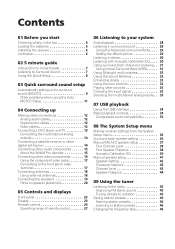
... System Setup menu Making receiver settings from the System Setup menu 36 Surround back speaker setting 36 Manual MCACC speaker setup 37 Fine Channel Level 38 Fine Speaker Distance 38 Acoustic Calibration EQ 39 Manual speaker setup 41 Speaker Setting 42 Crossover Network 43 Channel Level 43 Speaker Distance 44 09 Using...
... System Setup menu Making receiver settings from the System Setup menu 36 Surround back speaker setting 36 Manual MCACC speaker setup 37 Fine Channel Level 38 Fine Speaker Distance 38 Acoustic Calibration EQ 39 Manual speaker setup 41 Speaker Setting 42 Crossover Network 43 Channel Level 43 Speaker Distance 44 09 Using...
Operating Instructions
Page 7
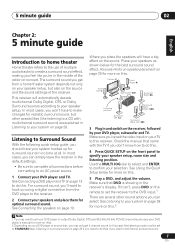
... Connecting a DVD player and TV on page 13 to STANDARD (see Hints on speaker placement on page 20 for more on page 19. Check the manual that DVD is showing in Listening to your system on page 28. 5 minute guide 02 English Deutsch Français Italiano Nederlands Español... listening mode must be set your DVD player to output Dolby Digital, DTS and 88.2 kHz/96 kHz PCM (2 channel) audio (see your DVD player's manual for more on this. 5 Play a DVD, and adjust the volume.
... Connecting a DVD player and TV on page 13 to STANDARD (see Hints on speaker placement on page 20 for more on page 19. Check the manual that DVD is showing in Listening to your system on page 28. 5 minute guide 02 English Deutsch Français Italiano Nederlands Español... listening mode must be set your DVD player to output Dolby Digital, DTS and 88.2 kHz/96 kHz PCM (2 channel) audio (see your DVD player's manual for more on this. 5 Play a DVD, and adjust the volume.
Operating Instructions
Page 9
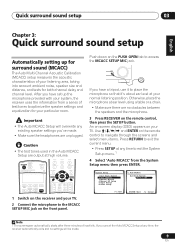
... the PUSH OPEN tab to place the microphone so that it to access the MCACC SETUP MIC jack. System Setup 1.Surr Back System 2.Auto MCACC 3.Manual MCACC 4.Manual SP Setup 5.Input Assign 6.Other Setup 2. If you cancel the Auto MCACC Setup at high volume. Caution • The test tones used in the...
... the PUSH OPEN tab to place the microphone so that it to access the MCACC SETUP MIC jack. System Setup 1.Surr Back System 2.Auto MCACC 3.Manual MCACC 4.Manual SP Setup 5.Input Assign 6.Other Setup 2. If you cancel the Auto MCACC Setup at high volume. Caution • The test tones used in the...
Operating Instructions
Page 10
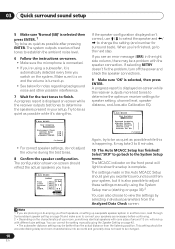
... the System Setup menu (starting on page 36).2 You can correct the setting manually using a subwoofer, it 's doing this is selected then press ENTER. 1 Try to establish the ambient noise level. 6 Follow the instructions on-screen. • Make sure ...
... the System Setup menu (starting on page 36).2 You can correct the setting manually using a subwoofer, it 's doing this is selected then press ENTER. 1 Try to establish the ambient noise level. 6 Follow the instructions on-screen. • Make sure ...
Operating Instructions
Page 17
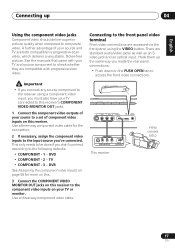
... both compatible) is progressive-scan video, which delivers a very stable, flicker-free picture. This only needs to be done if you 've connected. See the manuals that came with your TV and source component to check whether they are standard audio/video jacks as well as an Svideo jack and an...
... both compatible) is progressive-scan video, which delivers a very stable, flicker-free picture. This only needs to be done if you 've connected. See the manuals that came with your TV and source component to check whether they are standard audio/video jacks as well as an Svideo jack and an...
Operating Instructions
Page 33
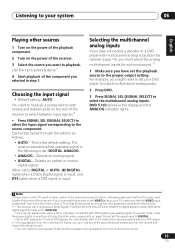
.... • Some DVD players don't output DTS signals. Note 1 If your source is the TV's built-in step 1. For more details, refer to the instruction manual supplied with your DVD player. 3 • During playback from the speakers connected to this receiver (page 14), you must select the analog multichannel inputs for...
.... • Some DVD players don't output DTS signals. Note 1 If your source is the TV's built-in step 1. For more details, refer to the instruction manual supplied with your DVD player. 3 • During playback from the speakers connected to this receiver (page 14), you must select the analog multichannel inputs for...
Operating Instructions
Page 36
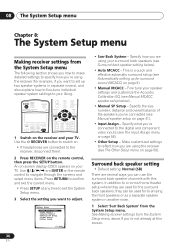
...your TV. Specify how you are using your speaker settings and customize the Acoustic Calibration EQ (see Surround back speaker setting below ). • Manual SP Setup - In addition to a normal home theater setup where they can use the surround back speaker channels with this screen. 36 En Use...control, then press the SETUP button. This is a quick and effective automatic surround setup (see The Input Assign menu on page 9). • Manual MCACC - Make customized settings to reflect how you are several ways you can be used for the surround back speakers, they are connected to ...
...your TV. Specify how you are using your speaker settings and customize the Acoustic Calibration EQ (see Surround back speaker setting below ). • Manual SP Setup - In addition to a normal home theater setup where they can use the surround back speaker channels with this screen. 36 En Use...control, then press the SETUP button. This is a quick and effective automatic surround setup (see The Input Assign menu on page 9). • Manual MCACC - Make customized settings to reflect how you are several ways you can be used for the surround back speakers, they are connected to ...
Operating Instructions
Page 37
...up for the first time, you 're finished, press RETURN. System Setup 1.Surr Back System 2.Auto MCACC 3.Manual MCACC 4.Manual SP Setup 5.Input Assign 6.Other Setup : Exit 3.Manual MCACC a.Fine Ch Level b.Fine SP Distance c.EQ AUTO Setting d.EQ Data Copy e.EQ CUSTOM1 Adjust f .EQ... Adjust - The System Setup menu 08 English Deutsch Français Italiano Nederlands Español System Setup 1.Surr Back System 2.Auto MCACC 3.Manual MCACC 4.Manual SP Setup 5.Input Assign 6.Other Setup 1.Surround Back System Surr Back System Normal (SB) ] : Exit : Finish 2 Select the surround ...
...up for the first time, you 're finished, press RETURN. System Setup 1.Surr Back System 2.Auto MCACC 3.Manual MCACC 4.Manual SP Setup 5.Input Assign 6.Other Setup : Exit 3.Manual MCACC a.Fine Ch Level b.Fine SP Distance c.EQ AUTO Setting d.EQ Data Copy e.EQ CUSTOM1 Adjust f .EQ... Adjust - The System Setup menu 08 English Deutsch Français Italiano Nederlands Español System Setup 1.Surr Back System 2.Auto MCACC 3.Manual MCACC 4.Manual SP Setup 5.Input Assign 6.Other Setup 1.Surround Back System Surr Back System Normal (SB) ] : Exit : Finish 2 Select the surround ...
Operating Instructions
Page 38
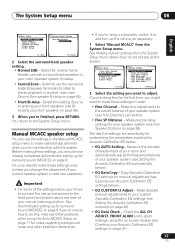
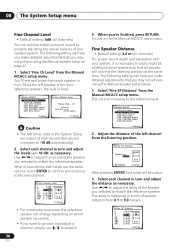
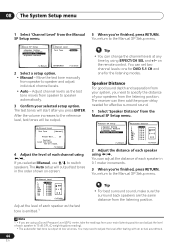
... Distance • Default setting: 3.0 m (all channels) For proper sound depth and separation with your speaker system. You return to the Manual MCACC setup menu. The following setting can help you make detailed adjustments that you 're finished, press RETURN. The volume increases to the reference...) 3.0 m ENTER:Next :Cancel After pressing ENTER, test tones will change depending on page 41. 1 Select 'Fine Ch Level' from the Manual MCACC setup menu. Use / to adjust the volume of the speaker you selected to match the reference speaker. The following setting can help you ...
... Distance • Default setting: 3.0 m (all channels) For proper sound depth and separation with your speaker system. You return to the Manual MCACC setup menu. The following setting can help you make detailed adjustments that you 're finished, press RETURN. The volume increases to the reference...) 3.0 m ENTER:Next :Cancel After pressing ENTER, test tones will change depending on page 41. 1 Select 'Fine Ch Level' from the Manual MCACC setup menu. Use / to adjust the volume of the speaker you selected to match the reference speaker. The following setting can help you ...
Operating Instructions
Page 39
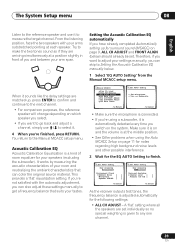
...the delay settings are set . It works by measuring the acoustic characteristics of your room and neutralizing the ambient characteristics that suits your settings manually, you can color the original source material. This provides a 'flat' equalization setting. You return to make the two tones sound as... detected every time you switch on page 9, ALL CH ADJUST and FRONT ALIGN (below . 1 Select 'EQ AUTO Setting' from the Manual MCACC setup menu. Acoustic Calibration EQ Acoustic Calibration Equalization is adjusted automatically for your arm span. Make sure it is on page 11 for...
...the delay settings are set . It works by measuring the acoustic characteristics of your room and neutralizing the ambient characteristics that suits your settings manually, you can color the original source material. This provides a 'flat' equalization setting. You return to make the two tones sound as... detected every time you switch on page 9, ALL CH ADJUST and FRONT ALIGN (below . 1 Select 'EQ AUTO Setting' from the Manual MCACC setup menu. Acoustic Calibration EQ Acoustic Calibration Equalization is adjusted automatically for your arm span. Make sure it is on page 11 for...
Operating Instructions
Page 40
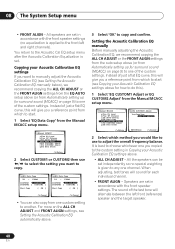
...Instead of just a flat EQ curve, this will give you a reference point from which to start . 1 Select 'EQ Data Copy' from the Manual MCACC setup menu. 3.Manual MCACC a.Fine Ch Level b.Fine SP Distance c.EQ AUTO Setting d.EQ Data Copy e.EQ CUSTOM1 Adjust f .EQ CUSTOM2 Adjust g.EQ Data Check :...copy and confirm. 08 The System Setup menu • FRONT ALIGN - The sound of the custom settings. Setting the Acoustic Calibration EQ manually Before manually adjusting the Acoustic Calibration EQ, we recommend copying the ALL CH ADJUST or the FRONT ALIGN settings from the auto setup above (or ...
...Instead of just a flat EQ curve, this will give you a reference point from which to start . 1 Select 'EQ Data Copy' from the Manual MCACC setup menu. 3.Manual MCACC a.Fine Ch Level b.Fine SP Distance c.EQ AUTO Setting d.EQ Data Copy e.EQ CUSTOM1 Adjust f .EQ CUSTOM2 Adjust g.EQ Data Check :...copy and confirm. 08 The System Setup menu • FRONT ALIGN - The sound of the custom settings. Setting the Acoustic Calibration EQ manually Before manually adjusting the Acoustic Calibration EQ, we recommend copying the ALL CH ADJUST or the FRONT ALIGN settings from the auto setup above (or ...
Operating Instructions
Page 41
... level for surround sound (MCACC) on page 9, it isn't necessary to fine-tune your liking. 1 Select 'EQ Data Check' from the display. disappears from the Manual MCACC setup menu. 3e.EQ CUSTOM1 Adjust Test Tone Type: "ALL CH ADJUST" Left 40Hz : [+ 1.0dB ] 125Hz : [ 0.0dB ] 250Hz : [ 0.0dB ] 4kHz : [ 0.0dB ]... select TRIM then use / to select the next channel. • The front speakers can raise or lower channel levels using the onscreen display. 3.Manual MCACC a.Fine Ch Level b.Fine SP Distance c.EQ AUTO Setting d.EQ Data Copy e.EQ CUSTOM1 Adjust f .EQ CUSTOM2 Adjust g.EQ Data Check ...
... level for surround sound (MCACC) on page 9, it isn't necessary to fine-tune your liking. 1 Select 'EQ Data Check' from the display. disappears from the Manual MCACC setup menu. 3e.EQ CUSTOM1 Adjust Test Tone Type: "ALL CH ADJUST" Left 40Hz : [+ 1.0dB ] 125Hz : [ 0.0dB ] 250Hz : [ 0.0dB ] 4kHz : [ 0.0dB ]... select TRIM then use / to select the next channel. • The front speakers can raise or lower channel levels using the onscreen display. 3.Manual MCACC a.Fine Ch Level b.Fine SP Distance c.EQ AUTO Setting d.EQ Data Copy e.EQ CUSTOM1 Adjust f .EQ CUSTOM2 Adjust g.EQ Data Check ...
Operating Instructions
Page 42
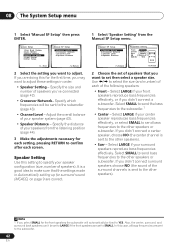
...surround, and surround back speakers can't be set then select a speaker size. Speaker Setting Use this case, all bass frequencies are correct. 4.Manual SP Setup a.Speaker Setting b.Crossover Network c.Channel Level d.Speaker Distance 4a.Speaker Setting Front SMALL Center [ SMALL ] Surr [ SMALL ] ... frequencies to the other speakers). • Surr - System Setup 1.Surr Back System 2.Auto MCACC 3.Manual MCACC 4.Manual SP Setup 5.Input Assign 6.Other Setup 4.Manual SP Setup a.Speaker Setting b.Crossover Network c.Channel Level d.Speaker Distance : Exit :Return 2 Select the...
...surround, and surround back speakers can't be set then select a speaker size. Speaker Setting Use this case, all bass frequencies are correct. 4.Manual SP Setup a.Speaker Setting b.Crossover Network c.Channel Level d.Speaker Distance 4a.Speaker Setting Front SMALL Center [ SMALL ] Surr [ SMALL ] ... frequencies to the other speakers). • Surr - System Setup 1.Surr Back System 2.Auto MCACC 3.Manual MCACC 4.Manual SP Setup 5.Input Assign 6.Other Setup 4.Manual SP Setup a.Speaker Setting b.Crossover Network c.Channel Level d.Speaker Distance : Exit :Return 2 Select the...
Operating Instructions
Page 43
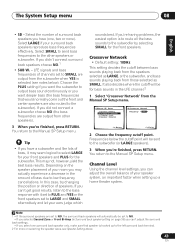
... Network' from other speakers or subwoofer. Depending on selecting the speaker sizes, see notes below the cutoff point will be sent to the Manual SP Setup menu. If you 're finished, press RETURN. You return to the subwoofer). Choose the PLUS setting if you want the .... Channel Level Using the channel level settings, you can adjust the overall balance of channels set to SMALL are output from the Manual SP Setup menu. 4.Manual SP Setup a.Speaker Setting b.Crossover Network c.Channel Level d.Speaker Distance 4b.Crossover Network Frequency 80Hz :Return :Finish 2 Choose the ...
... Network' from other speakers or subwoofer. Depending on selecting the speaker sizes, see notes below the cutoff point will be sent to the Manual SP Setup menu. If you 're finished, press RETURN. You return to the subwoofer). Choose the PLUS setting if you want the .... Channel Level Using the channel level settings, you can adjust the overall balance of channels set to SMALL are output from the Manual SP Setup menu. 4.Manual SP Setup a.Speaker Setting b.Crossover Network c.Channel Level d.Speaker Distance 4b.Crossover Network Frequency 80Hz :Return :Finish 2 Choose the ...
Operating Instructions
Page 44
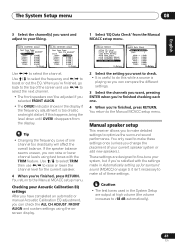
...Level (SPL) meter, take the readings from your speakers from the listening position. Move the test tone manually from the Manual 5 When you need to switch speakers. Loud test tones will output test tones in 0.1 meter increments... surround sound, make sure the surround back speakers are using EFFECT/CH SEL and +/- Speaker Distance For good sound depth and separation from the Manual SP Setup menu. 4.Manual SP Setup a.Speaker Setting b.Crossover Network c.Channel Level d.Speaker Distance :Return 4d.Speaker Distance L C R RS SBR SBL LS SW 3.0 m [ 3.0 m ] [ 3.0 m ] [ 3.0 m ] [ 3.0 ...
...Level (SPL) meter, take the readings from your speakers from the listening position. Move the test tone manually from the Manual 5 When you need to switch speakers. Loud test tones will output test tones in 0.1 meter increments... surround sound, make sure the surround back speakers are using EFFECT/CH SEL and +/- Speaker Distance For good sound depth and separation from the Manual SP Setup menu. 4.Manual SP Setup a.Speaker Setting b.Crossover Network c.Channel Level d.Speaker Distance :Return 4d.Speaker Distance L C R RS SBR SBL LS SW 3.0 m [ 3.0 m ] [ 3.0 m ] [ 3.0 m ] [ 3.0 ...
Operating Instructions
Page 45
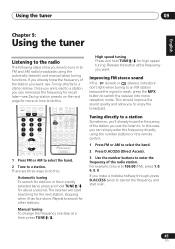
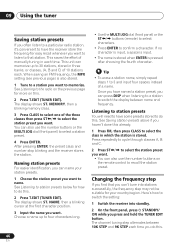
... one step at the frequency you can simply enter the frequency directly using the automatic (search) and manual (step) tuning functions. Once you are three ways to . The receiver will start over. 45 En Manual tuning To change the frequency one . This should improve the sound quality and allow you how to...
... one step at the frequency you can simply enter the frequency directly using the automatic (search) and manual (step) tuning functions. Once you are three ways to . The receiver will start over. 45 En Manual tuning To change the frequency one . This should improve the sound quality and allow you how to...
Operating Instructions
Page 46
... press ST / to select the station preset you want. Tip • To erase a station name, simply repeat steps 1 to 3 and input four spaces instead of manually tuning in which the station is pressed after choosing the fourth character. The display shows ST. NAME, then a blinking cursor at the first character position...
... press ST / to select the station preset you want. Tip • To erase a station name, simply repeat steps 1 to 3 and input four spaces instead of manually tuning in which the station is pressed after choosing the fourth character. The display shows ST. NAME, then a blinking cursor at the first character position...
Operating Instructions
Page 47
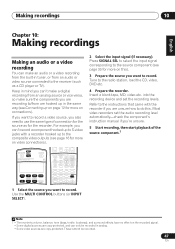
into the recording device and set the audio recording level automatically-check the component's instruction manual if you're unsure. 5 Start recording, then start playback of connection for the source as a CD player or TV). Most video recorders set the recording ...
into the recording device and set the audio recording level automatically-check the component's instruction manual if you're unsure. 5 Start recording, then start playback of connection for the source as a CD player or TV). Most video recorders set the recording ...
Operating Instructions
Page 55
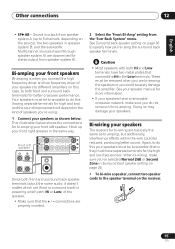
... separate terminals for high and low) and the sound improvement will depend on the source), the two speakers in the same way. See your speaker manual for bi-amping. These must be removed when you are downmixed for stereo output from speaker system A (up your speakers to the Low terminals. English...
... separate terminals for high and low) and the sound improvement will depend on the source), the two speakers in the same way. See your speaker manual for bi-amping. These must be removed when you are downmixed for stereo output from speaker system A (up your speakers to the Low terminals. English...
Operating Instructions
Page 58
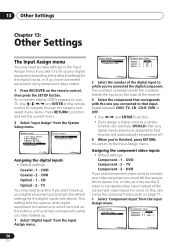
... need to do this , see Using the component video jacks on the back of the component video signal. System Setup 1.Surr Back System 2.Auto MCACC 3.Manual MCACC 4.Manual SP Setup 5.Input Assign 6.Other Setup 5.Input Assign a.Digital Input b.Component Input : Exit :Return Assigning the digital inputs • Default settings: Coaxial...
... need to do this , see Using the component video jacks on the back of the component video signal. System Setup 1.Surr Back System 2.Auto MCACC 3.Manual MCACC 4.Manual SP Setup 5.Input Assign 6.Other Setup 5.Input Assign a.Digital Input b.Component Input : Exit :Return Assigning the digital inputs • Default settings: Coaxial...


