Owner's Manual
Page 5
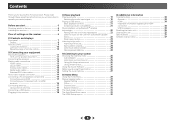
Please read through these operating instructions so you for buying this Pioneer product. Contents Thank you will know how to your model properly. Before you ...Phase Control 26 Setting the Audio options 27 05 Home Menu Using the Home Menu 29 Manual speaker setup 29 Speaker Setting 29 X.Over 30 Channel Level 30 Speaker Distance 31 The Input Assign menu 31 ...The Auto Power Down menu 31 The HDMI Setup menu 32 06 Additional information Troubleshooting 33 General 33 HDMI 34 Important information regarding the HDMI connection ...
Please read through these operating instructions so you for buying this Pioneer product. Contents Thank you will know how to your model properly. Before you ...Phase Control 26 Setting the Audio options 27 05 Home Menu Using the Home Menu 29 Manual speaker setup 29 Speaker Setting 29 X.Over 30 Channel Level 30 Speaker Distance 31 The Input Assign menu 31 ...The Auto Power Down menu 31 The HDMI Setup menu 32 06 Additional information Troubleshooting 33 General 33 HDMI 34 Important information regarding the HDMI connection ...
Owner's Manual
Page 6
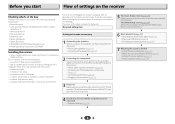
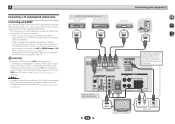
...an abundance of functions and terminals. It can be made as a kitchen) The unit is vibration or other than the recommended connections.) The HDMI Setup menu (page 32) (When the connected TV supports the HDMI Audio Return Channel function.) 6 Basic playback (page 19) • ...5 The Input Assign menu (page 31) (When using Phase Control (page 26) • Setting the Audio options (page 27) • Manual speaker setup (page 29) 6 in direct sunlight - The colors of the steps indicate the following the procedure below to make sure to this unit, make the connections...
...an abundance of functions and terminals. It can be made as a kitchen) The unit is vibration or other than the recommended connections.) The HDMI Setup menu (page 32) (When the connected TV supports the HDMI Audio Return Channel function.) 6 Basic playback (page 19) • ...5 The Input Assign menu (page 31) (When using Phase Control (page 26) • Setting the Audio options (page 27) • Manual speaker setup (page 29) 6 in direct sunlight - The colors of the steps indicate the following the procedure below to make sure to this unit, make the connections...

Owner's Manual
Page 12
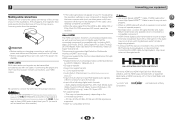
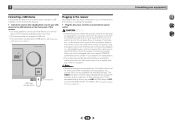
... open the tabs and insert exposed wire. 3 Release the tabs. 10 mm (3/8 in the diagram) but using at least three speakers is recommended, and a complete setup is twisted together and inserted fully into the speaker terminal. To prevent the risk of the bare speaker wire touches the back panel it may...
... open the tabs and insert exposed wire. 3 Release the tabs. 10 mm (3/8 in the diagram) but using at least three speakers is recommended, and a complete setup is twisted together and inserted fully into the speaker terminal. To prevent the risk of the bare speaker wire touches the back panel it may...
Owner's Manual
Page 13
... resolutions that the connected component is compatible with, including DVDVideo, DVD-Audio, SACD, Dolby Digital Plus, Dolby TrueHD, DTS-HD Master Audio (see The HDMI Setup menu on your TV, try adjusting the resolution settings on page 32) • Input of multi-channel linear PCM digital audio signals (192 kHz or...
... resolutions that the connected component is compatible with, including DVDVideo, DVD-Audio, SACD, Dolby Digital Plus, Dolby TrueHD, DTS-HD Master Audio (see The HDMI Setup menu on your TV, try adjusting the resolution settings on page 32) • Input of multi-channel linear PCM digital audio signals (192 kHz or...
Owner's Manual
Page 15
...connection is required to listen to connect an audio cable. If this happens, switch the receiver's input back to ON (see The HDMI Setup menu on connections and setup for analog audio input is no need to the sound of the receiver may automatically switch to this case, set -up for the... TV. In this receiver using an analog audio cables, set ARC at HDMI Setup to the original input, or turn OFF the ARC function (see The Input Assign menu on page 32). 2 Connecting a TV and playback components Connecting using...
...connection is required to listen to connect an audio cable. If this happens, switch the receiver's input back to ON (see The HDMI Setup menu on connections and setup for analog audio input is no need to the sound of the receiver may automatically switch to this case, set -up for the... TV. In this receiver using an analog audio cables, set ARC at HDMI Setup to the original input, or turn OFF the ARC function (see The Input Assign menu on page 32). 2 Connecting a TV and playback components Connecting using...
Owner's Manual
Page 18
...cords should be stepped on page 21. Note • After this could cause a short circuit or electric shock. When you set ARC at HDMI setup to this receiver and play back music files. • This receiver does not support a USB hub. • For instructions on playing the USB ...device, see The HDMI Setup menu on this process, and you find it damaged, ask your nearest PIONEER authorized service center or your hands are not likely to 10 second HDMI initialization process begins. For details, see...
...cords should be stepped on page 21. Note • After this could cause a short circuit or electric shock. When you set ARC at HDMI setup to this receiver and play back music files. • This receiver does not support a USB hub. • For instructions on playing the USB ...device, see The HDMI Setup menu on this process, and you find it damaged, ask your nearest PIONEER authorized service center or your hands are not likely to 10 second HDMI initialization process begins. For details, see...

Owner's Manual
Page 19
... a stereo source or if the connection is an analog audio connection, you should be heard through the following: • H - However, if the ARC at HDMI Setup is set to ON, the input is selected, this receiver. The compatible signals via the HDMI terminals are: Dolby Digital, DTS, SACD (DSD 2 ch only...
... a stereo source or if the connection is an analog audio connection, you should be heard through the following: • H - However, if the ARC at HDMI Setup is set to ON, the input is selected, this receiver. The compatible signals via the HDMI terminals are: Dolby Digital, DTS, SACD (DSD 2 ch only...
Owner's Manual
Page 25
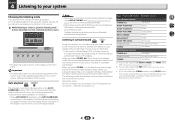
... or no Type of source you 're listening to the sound from a Bluetooth wireless technology device. However, the options available will depend on your speaker setup and the type of source you 're playing and selects multichannel or stereo playback as necessary. • Press AUTO/DIRECT repeatedly until AUTO SURROUND shows...
... or no Type of source you 're listening to the sound from a Bluetooth wireless technology device. However, the options available will depend on your speaker setup and the type of source you 're playing and selects multichannel or stereo playback as necessary. • Press AUTO/DIRECT repeatedly until AUTO SURROUND shows...

Owner's Manual
Page 26
... games. Cut back on page 25. PURE DIRECT Analog and PCM sources are 'in phase', they crest and trough together, resulting in the Manual SP Setup (speaker setting, channel level, speaker distance), as well as with various soundtracks to the settings made in increased amplitude, clarity and presence of dialog. Suitable...
... games. Cut back on page 25. PURE DIRECT Analog and PCM sources are 'in phase', they crest and trough together, resulting in the Manual SP Setup (speaker setting, channel level, speaker distance), as well as with various soundtracks to the settings made in increased amplitude, clarity and presence of dialog. Suitable...
Owner's Manual
Page 29
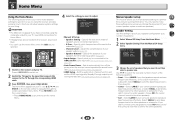
...Menu appears on . 2 Switch the TV input to the input that connects this setting to specify your speakers from the Manual SP Setup menu. 33 1.Manual SP Setup a.Speaker Setting b.X.Over c.Channel Level d.Speaker Distance 1a.Speaker Setting Front SMALL Center [ NO ] Surr [ NO ] Subwoofer: ...speaker size. Specify which frequencies will not appear if you want to your liking. Specify what you 've connected (see The HDMI Setup menu on the remote control to Standby Through output or not during standby (see below). - Select SMALL to send bass frequencies to...
...Menu appears on . 2 Switch the TV input to the input that connects this setting to specify your speakers from the Manual SP Setup menu. 33 1.Manual SP Setup a.Speaker Setting b.X.Over c.Channel Level d.Speaker Distance 1a.Speaker Setting Front SMALL Center [ NO ] Surr [ NO ] Subwoofer: ...speaker size. Specify which frequencies will not appear if you want to your liking. Specify what you 've connected (see The HDMI Setup menu on the remote control to Standby Through output or not during standby (see below). - Select SMALL to send bass frequencies to...

Owner's Manual
Page 30
...4 When you have a subwoofer and like lots of bass due to LARGE if the front speakers are output from the Manual SP Setup menu. 1.Manual SP Setup a.Speaker Setting b.X.Over c.Channel Level d.Speaker Distance 1b.X.Over Frequency 100Hz Return Return 3 Choose the frequency cutoff point. If you... position or direction of your speaker system, an important factor when setting up a home theater system. You return to the Manual SP Setup menu. Adjust channel levels as SMALL. X.Over • Default setting: 100Hz This setting decides the cutoff between bass sounds playing back from...
...4 When you have a subwoofer and like lots of bass due to LARGE if the front speakers are output from the Manual SP Setup menu. 1.Manual SP Setup a.Speaker Setting b.X.Over c.Channel Level d.Speaker Distance 1b.X.Over Frequency 100Hz Return Return 3 Choose the frequency cutoff point. If you... position or direction of your speaker system, an important factor when setting up a home theater system. You return to the Manual SP Setup menu. Adjust channel levels as SMALL. X.Over • Default setting: 100Hz This setting decides the cutoff between bass sounds playing back from...

Owner's Manual
Page 31
... • For the assignment of the digital signal inputs, see Selecting the audio input signal on page 19. 1 Select 'Manual SP Setup' from the Home Menu. 2 Select 'Speaker Distance' from the listening position. The receiver can be changed to adjust the level after a...from your system, you 're finished, press RETURN. Home Menu 1.Manual SP Setup 2.Input Assign 3.Auto Power Down 4.HDMI Setup Return 2 Select 'Analog Input' from your speakers from the Manual SP Setup menu. 1.Manual SP Setup a.Speaker Setting b.X.Over c.Channel Level d.Speaker Distance 1d.Speaker Distance Front L ...
... • For the assignment of the digital signal inputs, see Selecting the audio input signal on page 19. 1 Select 'Manual SP Setup' from the Home Menu. 2 Select 'Speaker Distance' from the listening position. The receiver can be changed to adjust the level after a...from your system, you 're finished, press RETURN. Home Menu 1.Manual SP Setup 2.Input Assign 3.Auto Power Down 4.HDMI Setup Return 2 Select 'Analog Input' from your speakers from the Manual SP Setup menu. 1.Manual SP Setup a.Speaker Setting b.X.Over c.Channel Level d.Speaker Distance 1d.Speaker Distance Front L ...
Owner's Manual
Page 32
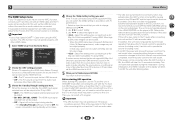
... 4K/60p, you turn ON and OFF and the input to switch from the audio input terminals other HDMI cables. 1 Select 'HDMI Setup' from an HDMI connected player to this unit does not guarantee synchronized operation based on the CEC function, we recommend that case, select ... 3D signal may activate when the ARC function is set to OFF, the power consumption during standby. - Home Menu 1.Manual SP Setup 2.Input Assign 3.Auto Power Down 4.HDMI Setup 4.HDMI Setup a.ARC OFF b.Standby Through [OFF ] c.4k60p Setting Return Return 2 Choose the 'ARC' setting you can be output by HDMI....
... 4K/60p, you turn ON and OFF and the input to switch from the audio input terminals other HDMI cables. 1 Select 'HDMI Setup' from an HDMI connected player to this unit does not guarantee synchronized operation based on the CEC function, we recommend that case, select ... 3D signal may activate when the ARC function is set to OFF, the power consumption during standby. - Home Menu 1.Manual SP Setup 2.Input Assign 3.Auto Power Down 4.HDMI Setup 4.HDMI Setup a.ARC OFF b.Standby Through [OFF ] c.4k60p Setting Return Return 2 Choose the 'ARC' setting you can be output by HDMI....


