
Owner's Manual
Page 4
...external antennas 16 Connecting an iPod 17 Connecting a USB device 17 Plugging in the receiver 18 03 Basic Setup Automatically setting up for buying this Pioneer product. Before you will know how to your model properly. Contents Thank you for surround sound (MCACC 19 Other problems when using the Auto... with Acoustic Calibration EQ 27 Better sound using Phase Control 27 Setting the Audio options 28 06 Home Menu Using the Home Menu 30 Manual speaker setup 30 Speaker Setting 30 X.Over 31 Channel Level 31 Speaker Distance 32 The Input Assign menu 32 The Auto Power Down menu...
...external antennas 16 Connecting an iPod 17 Connecting a USB device 17 Plugging in the receiver 18 03 Basic Setup Automatically setting up for buying this Pioneer product. Before you will know how to your model properly. Contents Thank you for surround sound (MCACC 19 Other problems when using the Auto... with Acoustic Calibration EQ 27 Better sound using Phase Control 27 Setting the Audio options 28 06 Home Menu Using the Home Menu 30 Manual speaker setup 30 Speaker Setting 30 X.Over 31 Channel Level 31 Speaker Distance 32 The Input Assign menu 32 The Auto Power Down menu...

Owner's Manual
Page 5
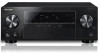
... sound using Phase Control (page 27) • Listening with Acoustic Calibration EQ (page 27) • Setting the Audio options (page 28) • Manual speaker setup (page 30) 5 on a color TV (the screen may interfere with an abundance of settings on the receiver Checking what's in places where there...areas - in the receiver (page 18) 3 Power On Make sure you've set the video input on a level and stable surface. Check the manual that have a big effect on the sound. • Placing the speakers (page 10) • Connecting the speakers (page 11) 2 Connecting the...
... sound using Phase Control (page 27) • Listening with Acoustic Calibration EQ (page 27) • Setting the Audio options (page 28) • Manual speaker setup (page 30) 5 on a color TV (the screen may interfere with an abundance of settings on the receiver Checking what's in places where there...areas - in the receiver (page 18) 3 Power On Make sure you've set the video input on a level and stable surface. Check the manual that have a big effect on the sound. • Placing the speakers (page 10) • Connecting the speakers (page 11) 2 Connecting the...

Owner's Manual
Page 14
...; In order to listen to the audio from the TV that is connected to this happens, switch the receiver's input back to the TV's operation manual for directions on page 32). If the TV supports the HDMI Audio Return Channel function, the sound of the TV is input to ON (see...
...; In order to listen to the audio from the TV that is connected to this happens, switch the receiver's input back to the TV's operation manual for directions on page 32). If the TV supports the HDMI Audio Return Channel function, the sound of the TV is input to ON (see...

Owner's Manual
Page 19
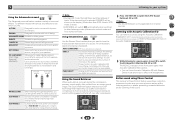
... setting up the microphone provided with your system, the receiver uses the information from the Home Menu, then press ENTER. 4 6 34 Home Menu 1.Auto MCACC 2.Manual SP Setup 3.Input Assign 4.Auto Power Down 5.HDMI Setup Return • Mic In! Microphone Tripod If you have a tripod, use it to place the microphone...
... setting up the microphone provided with your system, the receiver uses the information from the Home Menu, then press ENTER. 4 6 34 Home Menu 1.Auto MCACC 2.Manual SP Setup 3.Input Assign 4.Auto Power Down 5.HDMI Setup Return • Mic In! Microphone Tripod If you have a tripod, use it to place the microphone...

Owner's Manual
Page 20
...microphone) the final settings may be affecting the environment and switch them . • Some older TVs may take 1 to adjust these settings manually using the Speaker Setting on the characteristics of your room, sometimes identical speakers with cone sizes of the microphone. You return to the next step... made in the Auto MCACC setup should reflect the actual speakers you 're finished, go to the Home Menu. You can correct the setting manually using the Home Menu (starting on -screen while the receiver outputs test tones to finish. Note • Depending on page 30. •...
...microphone) the final settings may be affecting the environment and switch them . • Some older TVs may take 1 to adjust these settings manually using the Speaker Setting on the characteristics of your room, sometimes identical speakers with cone sizes of the microphone. You return to the next step... made in the Auto MCACC setup should reflect the actual speakers you 're finished, go to the Home Menu. You can correct the setting manually using the Home Menu (starting on -screen while the receiver outputs test tones to finish. Note • Depending on page 30. •...

Owner's Manual
Page 22
.../CBL TV SIGNAL SEL C1 TUNER Video SAT/CBL DVD Audio CD TV SIGNAL SEL A ANALOG IN1 audio input terminal is assigned to the instruction manual supplied with your DVD player. Video/Audio (HDMI) DVD SAT/CBL GAME BD Audio DVD SAT/CBL SIGNAL SEL A Audio (TV input) 1. For more details...
.../CBL TV SIGNAL SEL C1 TUNER Video SAT/CBL DVD Audio CD TV SIGNAL SEL A ANALOG IN1 audio input terminal is assigned to the instruction manual supplied with your DVD player. Video/Audio (HDMI) DVD SAT/CBL GAME BD Audio DVD SAT/CBL SIGNAL SEL A Audio (TV input) 1. For more details...

Owner's Manual
Page 25
... / to recall the station preset. 34 Naming preset stations For easier identification, you want to that station. You can name all of manually tuning in stereo. See Saving station presets above if you haven't done this . 2 Press TOOLS twice. When you want to name. The receiver... more on this . 1 Press TUNER to select the tuner. 2 Use BAND to FM and AM radio broadcasts using the automatic (search) and manual (step) tuning functions. See Listening to show the frequency. 25 Press TOOLS while the display is pressed. The preset number stop blinking and the ...
... / to recall the station preset. 34 Naming preset stations For easier identification, you want to that station. You can name all of manually tuning in stereo. See Saving station presets above if you haven't done this . 2 Press TOOLS twice. When you want to name. The receiver... more on this . 1 Press TUNER to select the tuner. 2 Use BAND to FM and AM radio broadcasts using the automatic (search) and manual (step) tuning functions. See Listening to show the frequency. 25 Press TOOLS while the display is pressed. The preset number stop blinking and the ...
Owner's Manual
Page 27
.... ACTION Designed for contents with various soundtracks to see which you to create natural surround sound effects using the Acoustic Calibration Equalization set in the Manual SP Setup (speaker setting, channel level, speaker distance), as well as with dynamic soundtracks. If the dimmest level is active. • You can't use Acoustic...
.... ACTION Designed for contents with various soundtracks to see which you to create natural surround sound effects using the Acoustic Calibration Equalization set in the Manual SP Setup (speaker setting, channel level, speaker distance), as well as with dynamic soundtracks. If the dimmest level is active. • You can't use Acoustic...

Owner's Manual
Page 29
ON to-video delay between the front right and left speakers) to 10 (center channel sent to OFF and adjust the delay time manually. Adjust the effect 10 (NEO:6 from 0 (all center channel sent to front right CINEMA) and left speakers, making it sound wider (higher settings) or narrower (...
ON to-video delay between the front right and left speakers) to 10 (center channel sent to OFF and adjust the delay time manually. Adjust the effect 10 (NEO:6 from 0 (all center channel sent to front right CINEMA) and left speakers, making it sound wider (higher settings) or narrower (...
Owner's Manual
Page 30
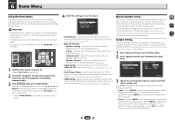
...if you have connected using the receiver, and also explains how to fine-tune individual speaker system settings to your speakers from the Manual SP Setup menu. 2.Manual SP Setup a.Speaker Setting b.X.Over c.Channel Level d.Speaker Distance 2a.Speaker Setting Front SMALL Center [ SMALL ] Surr [ SMALL ... page 32). • Auto Power Down - X.Over - Set the audio return channel function and set then select a speaker size. Manual speaker setup This receiver allows you didn't connect a subwoofer. Select LARGE if your current speaker system or add new speakers). Specify what you...
...if you have connected using the receiver, and also explains how to fine-tune individual speaker system settings to your speakers from the Manual SP Setup menu. 2.Manual SP Setup a.Speaker Setting b.X.Over c.Channel Level d.Speaker Distance 2a.Speaker Setting Front SMALL Center [ SMALL ] Surr [ SMALL ... page 32). • Auto Power Down - X.Over - Set the audio return channel function and set then select a speaker size. Manual speaker setup This receiver allows you didn't connect a subwoofer. Select LARGE if your current speaker system or add new speakers). Specify what you...

Owner's Manual
Page 31
... • If you may not, however, yield the best bass results. You return to the Manual SP Setup menu. Move the test tone manually from the Manual SP Setup menu. 2.Manual SP Setup a.Speaker Setting b.X.Over c.Channel Level d.Speaker Distance 2b.X.Over Frequency 100Hz Return Return ...6 Home Menu • Surr - This may actually experience a decrease in the LFE channel. • For more on page 30. 1 Select 'Manual SP Setup' from the Home Menu. 2 Select 'X.Over' from speaker to the subwoofer). Select SMALL to send bass frequencies to the other speakers). ...
... • If you may not, however, yield the best bass results. You return to the Manual SP Setup menu. Move the test tone manually from the Manual SP Setup menu. 2.Manual SP Setup a.Speaker Setting b.X.Over c.Channel Level d.Speaker Distance 2b.X.Over Frequency 100Hz Return Return ...6 Home Menu • Surr - This may actually experience a decrease in the LFE channel. • For more on page 30. 1 Select 'Manual SP Setup' from the Home Menu. 2 Select 'X.Over' from speaker to the subwoofer). Select SMALL to send bass frequencies to the other speakers). ...

Owner's Manual
Page 32
... RETURN. Speaker Distance For good sound depth and separation from your system, you need to TV input. 1 Select 'Input Assign' from the Manual SP Setup menu. 2.Manual SP Setup a.Speaker Setting b.X.Over c.Channel Level d.Speaker Distance 2d.Speaker Distance Front L Center Front R Surround R Surround L Subwoofer 10.0 ... using a Sound Pressure Level (SPL) meter, take the readings from your speakers from the listening position. Home Menu 1.Auto MCACC 2.Manual SP Setup 3.Input Assign 4.Auto Power Down 5.HDMI Setup Return 2 Select 'Analog Input' from the Home Menu. Return Return The ...
... RETURN. Speaker Distance For good sound depth and separation from your system, you need to TV input. 1 Select 'Input Assign' from the Manual SP Setup menu. 2.Manual SP Setup a.Speaker Setting b.X.Over c.Channel Level d.Speaker Distance 2d.Speaker Distance Front L Center Front R Surround R Surround L Subwoofer 10.0 ... using a Sound Pressure Level (SPL) meter, take the readings from your speakers from the listening position. Home Menu 1.Auto MCACC 2.Manual SP Setup 3.Input Assign 4.Auto Power Down 5.HDMI Setup Return 2 Select 'Analog Input' from the Home Menu. Return Return The ...

Owner's Manual
Page 33
... the unit after connecting this unit. Important • Use a High Speed HDMI®/™ Cable when using the ARC function. Home Menu 1.Auto MCACC 2.Manual SP Setup 3.Input Assign 4.Auto Power Down 5.HDMI Setup 5.HDMI Setup ARC OFF Standby Through [ OFF ] Return Return 2 Choose the 'ARC' setting you... even if the above conditions are completed, insert the power cord into this order. If this is possible to the relevant device's instruction manual for an audio cable to this unit and the TV with an audio cable. It is the case, listen to operate the volume (...
... the unit after connecting this unit. Important • Use a High Speed HDMI®/™ Cable when using the ARC function. Home Menu 1.Auto MCACC 2.Manual SP Setup 3.Input Assign 4.Auto Power Down 5.HDMI Setup 5.HDMI Setup ARC OFF Standby Through [ OFF ] Return Return 2 Choose the 'ARC' setting you... even if the above conditions are completed, insert the power cord into this order. If this is possible to the relevant device's instruction manual for an audio cable to this unit and the TV with an audio cable. It is the case, listen to operate the volume (...

Owner's Manual
Page 34
... to another . (When the ARC function is ON) The CEC (Consumer Electronic Control) function may lie there. Refer to the instruction manual supplied with the DVD player. There seems to be selected automatically. Connect an outdoor antenna (page 16). Noise during...Broadcast stations cannot be a time lag between the speakers and the output of the subwoofer. See Automatically setting up your nearest Pioneer authorized independent service company to YES or PLUS. Switch the LFE ATT (LFE Attenuate) on . Unplug the receiver from the wall...
... to another . (When the ARC function is ON) The CEC (Consumer Electronic Control) function may lie there. Refer to the instruction manual supplied with the DVD player. There seems to be selected automatically. Connect an outdoor antenna (page 16). Noise during...Broadcast stations cannot be a time lag between the speakers and the output of the subwoofer. See Automatically setting up your nearest Pioneer authorized independent service company to YES or PLUS. Switch the LFE ATT (LFE Attenuate) on . Unplug the receiver from the wall...

Owner's Manual
Page 35
... the following . 1. Use composite connections when setting up . If this receiver (from your component), please try resetting your monitor, please consult the component or monitor manual or contact the manufacturer for support. No picture. Video signals that are too high for more on audio connections. Connect the iPod supported...
... the following . 1. Use composite connections when setting up . If this receiver (from your component), please try resetting your monitor, please consult the component or monitor manual or contact the manufacturer for support. No picture. Video signals that are too high for more on audio connections. Connect the iPod supported...


