
Owner's Manual
Page 1
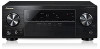
Operating Instructions AV Receiver VSX-5231 Register your product on http://www.pioneerelectronics.com (US) http://www.pioneerelectronics.ca (Canada) • Protect your new investment The details of your purchase will be on file for reference in the event of an insurance claim such as loss or theft. • Receive free tips, updates and service bulletins on your new product • Improve product development Your input helps us continue to design products that meet your needs. • Receive a free Pioneer newsletter Registered customers can opt in to receive a monthly newsletter.
Operating Instructions AV Receiver VSX-5231 Register your product on http://www.pioneerelectronics.com (US) http://www.pioneerelectronics.ca (Canada) • Protect your new investment The details of your purchase will be on file for reference in the event of an insurance claim such as loss or theft. • Receive free tips, updates and service bulletins on your new product • Improve product development Your input helps us continue to design products that meet your needs. • Receive a free Pioneer newsletter Registered customers can opt in to receive a monthly newsletter.

Owner's Manual
Page 2
...provided for connection with speaker, and should never be determined by one or more of the cable. Increase the separation between the equipment and receiver. - D3-4-2-1-7b*_A1_En Operating Environment Operating environment temperature and humidity: +5 °C to +35 °C (+41 °F to ...cloths, curtains) or by operating the equipment on a circuit different from overheating. D3-7-13-67*_A1_En 2 . Reorient or relocate the receiving antenna. - Consult the dealer or an experienced radio/TV technician for ventilation to protect it to the insulation of the following measures: ...
...provided for connection with speaker, and should never be determined by one or more of the cable. Increase the separation between the equipment and receiver. - D3-4-2-1-7b*_A1_En Operating Environment Operating environment temperature and humidity: +5 °C to +35 °C (+41 °F to ...cloths, curtains) or by operating the equipment on a circuit different from overheating. D3-7-13-67*_A1_En 2 . Reorient or relocate the receiving antenna. - Consult the dealer or an experienced radio/TV technician for ventilation to protect it to the insulation of the following measures: ...
Owner's Manual
Page 4
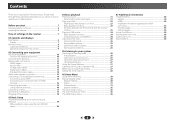
... Connecting your equipment Placing the speakers 10 Hints on an iPod 23 Basic playback controls 23 Switches between the iPod controls and the receiver controls 23 Playing a USB device 24 Basic playback controls 24 Compressed audio compatibility 24 Listening to the radio 25 Improving FM sound...27 Better sound using HDMI 14 Connecting your model properly. Before you start 5 Checking what's in the receiver 18 03 Basic Setup Automatically setting up for buying this Pioneer product. Contents Thank you for surround sound (MCACC 19 Other problems when using the Auto MCACC setup 20...
... Connecting your equipment Placing the speakers 10 Hints on an iPod 23 Basic playback controls 23 Switches between the iPod controls and the receiver controls 23 Playing a USB device 24 Basic playback controls 24 Compressed audio compatibility 24 Listening to the radio 25 Improving FM sound...27 Better sound using HDMI 14 Connecting your model properly. Before you start 5 Checking what's in the receiver 18 03 Basic Setup Automatically setting up for buying this Pioneer product. Contents Thank you for surround sound (MCACC 19 Other problems when using the Auto MCACC setup 20...
Owner's Manual
Page 5
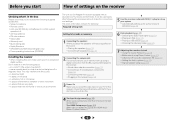
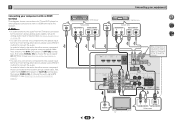
...61546; 2 Connecting the components For surround sound, you'll want to hook up using a digital connection from the Blu-ray Disc/DVD player to the receiver. • About video outputs connection (page 13) • Connecting a TV and playback components (page 14) • Connecting antennas (page 16) &#...• AM loop antenna • FM wire antenna • Video Cable • Warranty card • Quick start Flow of settings on the receiver Checking what's in the receiver (page 18) 3 Power On Make sure you've set up for surround sound (MCACC) (page 19) 6 Basic playback...
...61546; 2 Connecting the components For surround sound, you'll want to hook up using a digital connection from the Blu-ray Disc/DVD player to the receiver. • About video outputs connection (page 13) • Connecting a TV and playback components (page 14) • Connecting antennas (page 16) &#...• AM loop antenna • FM wire antenna • Video Cable • Warranty card • Quick start Flow of settings on the receiver Checking what's in the receiver (page 18) 3 Power On Make sure you've set up for surround sound (MCACC) (page 19) 6 Basic playback...
Owner's Manual
Page 6
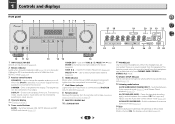
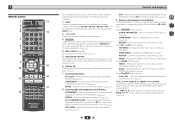
... / - The listening mode when the sound is selected (page 23). 8 Remote sensor Receives the signals from the remote control (see Operating range of 2 Pro Logic and NEO:6, and the Auto level control stereo mode (page 26). The brightness ... - Use to find radio frequencies (page 25). When ECO Mode is no sound is automatically set to on after the Auto MCACC setup (page 19)). 3 Receiver control buttons SPEAKERS - PRESET / - When the headphones are connected, there is turned ON, the display will go dark (page 27). 6 ALC/STANDARD SURR...
... / - The listening mode when the sound is selected (page 23). 8 Remote sensor Receives the signals from the remote control (see Operating range of 2 Pro Logic and NEO:6, and the Auto level control stereo mode (page 26). The brightness ... - Use to find radio frequencies (page 25). When ECO Mode is no sound is automatically set to on after the Auto MCACC setup (page 19)). 3 Receiver control buttons SPEAKERS - PRESET / - When the headphones are connected, there is turned ON, the display will go dark (page 27). 6 ALC/STANDARD SURR...
Owner's Manual
Page 7
... selected HDMI input is detected. 2 D+ - TUNE - SPA means the speakers are switched off. 21 Sleep timer indicator Lights when the receiver is on, this lights to indicate NEO:6 processing (page 26). 25 Dolby Digital indicators 2 D - Lights when a Dolby Digital encoded signal is...station is registered. Blinks when a radio station is registered or called. NEO:6 - Lights when the character display is showing the currently received AM/FM broadcast frequency. 20 Speaker indicators Shows if the speaker system is switched on or not (page 6). kHz/MHz - Lights when...
... selected HDMI input is detected. 2 D+ - TUNE - SPA means the speakers are switched off. 21 Sleep timer indicator Lights when the receiver is on, this lights to indicate NEO:6 processing (page 26). 25 Dolby Digital indicators 2 D - Lights when a Dolby Digital encoded signal is...station is registered. Blinks when a radio station is registered or called. NEO:6 - Lights when the character display is showing the currently received AM/FM broadcast frequency. 20 Speaker indicators Shows if the speaker system is switched on or not (page 6). kHz/MHz - Lights when...
Owner's Manual
Page 8
... to select the audio input signal of time before the receiver switches into standby (30 min - 60 min - 90 min - RETURN - Memorizes stations for the Pioneer products are preset. Switches between the iPod controls and the receiver controls (page 23). 10 TUNE /, PRESET... TUNE BAND RETURN MUTE 11 15 16 12 1 2 3 DISP 4 5 6 CH 7 8 9 CH CLR 0 ENTER 17 RECEIVER Controls and displays As for operating other Pioneer components with the remote control. 6 SIGNAL SEL Press to play back (page 21). 7 Sound control buttons Acous.EQ - Switches between...
... to select the audio input signal of time before the receiver switches into standby (30 min - 60 min - 90 min - RETURN - Memorizes stations for the Pioneer products are preset. Switches between the iPod controls and the receiver controls (page 23). 10 TUNE /, PRESET... TUNE BAND RETURN MUTE 11 15 16 12 1 2 3 DISP 4 5 6 CH 7 8 9 CH CLR 0 ENTER 17 RECEIVER Controls and displays As for operating other Pioneer components with the remote control. 6 SIGNAL SEL Press to play back (page 21). 7 Sound control buttons Acous.EQ - Switches between...

Owner's Manual
Page 9
...shown on the battery's (-) terminals. INPUT - These buttons also function as inside a car or near a device that can be accessed after RECEIVER is pressed. (For example MIDNIGHT, etc.) SB CH - Insert the plus and minus sides of used with governmental regulations or environmental public institution...rules that have different voltages. It can cause batteries to check initial operations; Press RECEIVER first to the marks in your TV. 15 VOLUME +/- This can be used batteries, please comply with Pioneer TVs. - There are to leak or overheat. When disposing of the ...
...shown on the battery's (-) terminals. INPUT - These buttons also function as inside a car or near a device that can be accessed after RECEIVER is pressed. (For example MIDNIGHT, etc.) SB CH - Insert the plus and minus sides of used with governmental regulations or environmental public institution...rules that have different voltages. It can cause batteries to check initial operations; Press RECEIVER first to the marks in your TV. 15 VOLUME +/- This can be used batteries, please comply with Pioneer TVs. - There are to leak or overheat. When disposing of the ...

Owner's Manual
Page 11
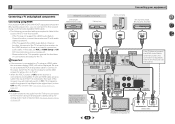
... to complete all the bare speaker wire is best for surround sound. Also make sure the positive and negative (+/-) terminals on the receiver match those on the left to cut off as a safety measure. Bare wire connections Front speaker terminals: 1 2 3 1 Twist... your equipment Center Front left 4 6 34 PREOUT SUBWOOFER FRONT R L Surround right CENTER Surround left (L) terminal. 2 Connecting the speakers The receiver will work with a nominal impedance between 6 and 16 . You can use speakers with just two stereo speakers (the front speakers...
... to complete all the bare speaker wire is best for surround sound. Also make sure the positive and negative (+/-) terminals on the receiver match those on the left to cut off as a safety measure. Bare wire connections Front speaker terminals: 1 2 3 1 Twist... your equipment Center Front left 4 6 34 PREOUT SUBWOOFER FRONT R L Surround right CENTER Surround left (L) terminal. 2 Connecting the speakers The receiver will work with a nominal impedance between 6 and 16 . You can use speakers with just two stereo speakers (the front speakers...
Owner's Manual
Page 12
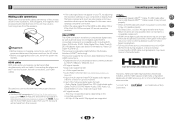
... connection. • When the video signal from the AC outlet. • Before unplugging the power cord, switch the power into standby. This receiver incorporates High-Definition Multimedia Interface (HDMI®) technology. 2 Connecting your component or display. Important • Before making or changing connections, switch off... can be transmitted simultaneously with a built-in Selecting the audio input signal on page 21 to HDMI, if you want to be received. "x.v.Color" and Corporation. HDMI Be careful to THRU (THROUGH) and set the input signal in equalizer is used, it may ...
... connection. • When the video signal from the AC outlet. • Before unplugging the power cord, switch the power into standby. This receiver incorporates High-Definition Multimedia Interface (HDMI®) technology. 2 Connecting your component or display. Important • Before making or changing connections, switch off... can be transmitted simultaneously with a built-in Selecting the audio input signal on page 21 to HDMI, if you want to be received. "x.v.Color" and Corporation. HDMI Be careful to THRU (THROUGH) and set the input signal in equalizer is used, it may ...

Owner's Manual
Page 13
..., and you use a standard RCA video cable for audio. Standard RCA video cables These cables are the most common type of this receiver. Yellow VIDEO About video outputs connection This receiver is not loaded with TV monitor The OSD will not be output. 13 Playback component 4 6 34 Terminal for connection with source...
..., and you use a standard RCA video cable for audio. Standard RCA video cables These cables are the most common type of this receiver. Yellow VIDEO About video outputs connection This receiver is not loaded with TV monitor The OSD will not be output. 13 Playback component 4 6 34 Terminal for connection with source...
Owner's Manual
Page 14
... compatible TV with audio cables (as shown). - MONITOR OUT This connection is connected to this happens, switch the receiver's input back to the original input, or turn OFF the ARC function (see The HDMI Setup menu on page 33... cable, the on the TV. • When the ARC function is ON and the receiver is required (see the OSD screen (for the TV. In this connection is connected to connect. Important • If... the receiver is required to listen to the TV sound over this case, switch the TV input to ...
... compatible TV with audio cables (as shown). - MONITOR OUT This connection is connected to this happens, switch the receiver's input back to the original input, or turn OFF the ARC function (see The HDMI Setup menu on page 33... cable, the on the TV. • When the ARC function is ON and the receiver is required (see the OSD screen (for the TV. In this connection is connected to connect. Important • If... the receiver is required to listen to the TV sound over this case, switch the TV input to ...
Owner's Manual
Page 15
...ANALOG AUDIO OUT DIGITAL AUDIO OUT Select one component to the optical input terminal. If connecting other playback component) with no HDMI terminal to the receiver. VIDEO OUT DVD player Select one ANALOG AUDIO OUT R L DIGITAL AUDIO OUT OPTICAL COAXIAL VIDEO OUT Set-top box Select one ANALOG AUDIO ...OUT R L DIGITAL AUDIO OUT OPTICAL COAXIAL 4 6 34 DVD IN MONITOR OUT This connection is connected to this receiver using a coaxial cable, first, switch to the DVD (DVD player) or SAT/CBL (set-top box), then press SIGNAL SEL to connect the ...
...ANALOG AUDIO OUT DIGITAL AUDIO OUT Select one component to the optical input terminal. If connecting other playback component) with no HDMI terminal to the receiver. VIDEO OUT DVD player Select one ANALOG AUDIO OUT R L DIGITAL AUDIO OUT OPTICAL COAXIAL VIDEO OUT Set-top box Select one ANALOG AUDIO ...OUT R L DIGITAL AUDIO OUT OPTICAL COAXIAL 4 6 34 DVD IN MONITOR OUT This connection is connected to this receiver using a coaxial cable, first, switch to the DVD (DVD player) or SAT/CBL (set-top box), then press SIGNAL SEL to connect the ...
Owner's Manual
Page 17
...may automatically switch to TV. Connecting a USB device It is possible to listen to two-channel audio using the controls of this happens, switch the receiver's input back to the original input, or turn OFF the ARC function (see The HDMI Setup menu on page 23. For details on supported ... occurs whenever an iPod is connected to this unit. 2 Connecting your USB device to the iPod/iPhone terminal on the front panel of this receiver. • This receiver does not support a USB hub. • For instructions on playing the USB device, see Playing a USB device on page 24. 4 6 34 USB cable ...
...may automatically switch to TV. Connecting a USB device It is possible to listen to two-channel audio using the controls of this happens, switch the receiver's input back to the original input, or turn OFF the ARC function (see The HDMI Setup menu on page 23. For details on supported ... occurs whenever an iPod is connected to this unit. 2 Connecting your USB device to the iPod/iPhone terminal on the front panel of this receiver. • This receiver does not support a USB hub. • For instructions on playing the USB device, see Playing a USB device on page 24. 4 6 34 USB cable ...

Owner's Manual
Page 18
... socket when not in the cord or tie it has stopped blinking. When you find it damaged, ask your nearest PIONEER authorized service center or your dealer for a replacement. • The receiver should be stepped on vacation. A damaged power cord can cause a fire or give you can skip this process. Note &#... it with other cords. Never make a knot in regular use, e.g., when on . When you set ARC at HDMI setup to this receiver, including the speakers. Plug the AC power cord into a convenient AC power outlet. Check the power cord once in the front panel display blinks...
... socket when not in the cord or tie it has stopped blinking. When you find it damaged, ask your nearest PIONEER authorized service center or your dealer for a replacement. • The receiver should be stepped on vacation. A damaged power cord can cause a fire or give you can skip this process. Note &#... it with other cords. Never make a knot in regular use, e.g., when on . When you set ARC at HDMI setup to this receiver, including the speakers. Plug the AC power cord into a convenient AC power outlet. Check the power cord once in the front panel display blinks...
Owner's Manual
Page 19
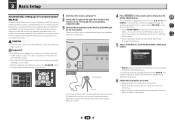
... After you cancel the Auto MCACC setup at ear level using a table or a chair. 4 Press RECEIVER on the front panel. Make sure there are output at any time, the receiver automatically exits and no obstacles between the speakers and the microphone. Try to be selected as possible after ...If you have set up . • See below for your normal listening position. The system outputs a series of test tones to your system, the receiver uses the information from the Home Menu, then press ENTER. 4 6 34 Home Menu 1.Auto MCACC 2.Manual SP Setup 3.Input Assign 4.Auto Power Down ...
... After you cancel the Auto MCACC setup at ear level using a table or a chair. 4 Press RECEIVER on the front panel. Make sure there are output at any time, the receiver automatically exits and no obstacles between the speakers and the microphone. Try to be selected as possible after ...If you have set up . • See below for your normal listening position. The system outputs a series of test tones to your system, the receiver uses the information from the Home Menu, then press ENTER. 4 6 34 Home Menu 1.Auto MCACC 2.Manual SP Setup 3.Input Assign 4.Auto Power Down ...
Owner's Manual
Page 20
..., fan, etc.), that may interfere with the operation of around 12 cm (5 inches) will start automatically as possible while this seems to determine the optimum receiver settings for channel level, speaker distance, and Acoustic Calibration EQ. Front [ YES ] Center [ YES ] Surround [ YES ] Subwoofer [ YES ] 10:Next OK...'s doing the Auto MCACC setup. 4 6 34 20 When you see Other problems when using the Home Menu (starting on -screen while the receiver outputs test tones to 3 minutes. 10 The Auto MCACC setup has finished! If the screen in step 8 is left untouched for 10 seconds ...
..., fan, etc.), that may interfere with the operation of around 12 cm (5 inches) will start automatically as possible while this seems to determine the optimum receiver settings for channel level, speaker distance, and Acoustic Calibration EQ. Front [ YES ] Center [ YES ] Surround [ YES ] Subwoofer [ YES ] 10:Next OK...'s doing the Auto MCACC setup. 4 6 34 20 When you see Other problems when using the Home Menu (starting on -screen while the receiver outputs test tones to 3 minutes. 10 The Auto MCACC setup has finished! If the screen in step 8 is left untouched for 10 seconds ...

Owner's Manual
Page 21
... optical 1 audio input is selected for playback (see page 7). • When digital input (optical or coaxial) is selected, this case, the receiver must be able to operate other components using INPUT SELECT buttons on your DVD player or source discs, you select the input source using the...DVD Audio (including 192 kHz). With other inputs, H cannot be selected for BD, DVD, SAT/CBL or GAME input. To operate the receiver, first press RECEIVER on the remote control, then press the appropriate button to operate. • The input source can be selected. - It should hear surround ...
... optical 1 audio input is selected for playback (see page 7). • When digital input (optical or coaxial) is selected, this case, the receiver must be able to operate other components using INPUT SELECT buttons on your DVD player or source discs, you select the input source using the...DVD Audio (including 192 kHz). With other inputs, H cannot be selected for BD, DVD, SAT/CBL or GAME input. To operate the receiver, first press RECEIVER on the remote control, then press the appropriate button to operate. • The input source can be selected. - It should hear surround ...
Owner's Manual
Page 23
.../homeav/support/ios/na/). • Installing software versions other than indicated on the website of Pioneer to your iPod/iPhone may be restricted for some models. • This receiver has been developed and tested for any direct or indirect loss arising from any time, press RETURN. 2 Use / to browse ...stored on the iPod itself. Press iPod CTRL to switch to the iPod controls. • Press iPod CTRL again to switch back to the receiver controls when you want to play When your iPod. Playing back files stored on an iPod To navigate songs on your iPod, you can be...
.../homeav/support/ios/na/). • Installing software versions other than indicated on the website of Pioneer to your iPod/iPhone may be restricted for some models. • This receiver has been developed and tested for any direct or indirect loss arising from any time, press RETURN. 2 Use / to browse ...stored on the iPod itself. Press iPod CTRL to switch to the iPod controls. • Press iPod CTRL again to switch back to the receiver controls when you want to play When your iPod. Playing back files stored on an iPod To navigate songs on your iPod, you can be...

Owner's Manual
Page 24
... to 192 kbps (128 kbps or higher recommended); Important • Pioneer cannot guarantee compatibility (operation and/or bus power) with all USB mass storage devices and assumes no title assigned to it is displayed in the U.S. The list below : • Switch the receiver off . • Select another input source (like BD), then...
... to 192 kbps (128 kbps or higher recommended); Important • Pioneer cannot guarantee compatibility (operation and/or bus power) with all USB mass storage devices and assumes no title assigned to it is displayed in the U.S. The list below : • Switch the receiver off . • Select another input source (like BD), then...


