

Owner's Manual
Page 4
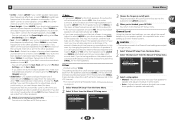
...Audio options 28 06 Home Menu Using the Home Menu 30 Manual speaker setup 30 Speaker Setting 30 X.Over 31 Channel Level 31 Speaker Distance 32 ...Auto Power Down menu 33 The FL Demo Mode menu 33 The HDMI Setup menu 33 07 Additional information Troubleshooting 35 General 35 HDMI 36 Important information...Thank you for surround sound (MCACC) . . . 18 Other problems when using the Auto MCACC setup . . . . 19 04 Basic playback Playing a source 20 Selecting the audio input signal 20...the receiver 17 03 Basic Setup Canceling the demo display 18 Automatically setting up for buying this...
...Audio options 28 06 Home Menu Using the Home Menu 30 Manual speaker setup 30 Speaker Setting 30 X.Over 31 Channel Level 31 Speaker Distance 32 ...Auto Power Down menu 33 The FL Demo Mode menu 33 The HDMI Setup menu 33 07 Additional information Troubleshooting 35 General 35 HDMI 36 Important information...Thank you for surround sound (MCACC) . . . 18 Other problems when using the Auto MCACC setup . . . . 19 04 Basic playback Playing a source 20 Selecting the audio input signal 20...the receiver 17 03 Basic Setup Canceling the demo display 18 Automatically setting up for buying this...

Owner's Manual
Page 5
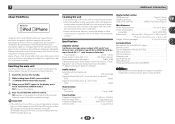
...surround back channel processing (page 27) • Setting the Up Mix function (page 27) • Setting the Audio options (page 28) • Manual speaker setup (page 30) 5 in places that gives off a magnetic field). This may distort) - near a cassette deck (or close to a device that are very ...you start Flow of settings on the receiver Checking what's in the box Please check that you've received the following supplied accessories: • Setup microphone • Remote control • AAA size IEC R03 dry cell batteries (to confirm system operation) x2 • AM loop antenna &#...
...surround back channel processing (page 27) • Setting the Up Mix function (page 27) • Setting the Audio options (page 28) • Manual speaker setup (page 30) 5 in places that gives off a magnetic field). This may distort) - near a cassette deck (or close to a device that are very ...you start Flow of settings on the receiver Checking what's in the box Please check that you've received the following supplied accessories: • Setup microphone • Remote control • AAA size IEC R03 dry cell batteries (to confirm system operation) x2 • AM loop antenna &#...
Owner's Manual
Page 6
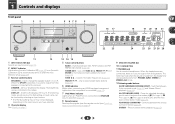
...EDIT TUNE PRESET AUTO SURROUND/ ALC/ STREAM DIRECT STANDARD SURR ADVANCED SURROUND STEREO SOUND RETRIEVER ENTER PHONES USB 5 V 1A MCACC SETUP MIC iPod iPhone 9 AV RECEIVER VSX-522 MASTER VOLUME 16 17 22 23 18 19 20 18 21 24 25 26 27 26 28 10 11 12 1 INPUT SELECTOR... 12 Listening mode buttons AUTO SURROUND/STREAM DIRECT - Dims or brightens the display. Switches the display of remote control on after the Auto MCACC setup (page 18)). 3 Receiver control buttons SPEAKERS - Use to memorize and name stations for standard decoding and to this unit. lights when the ...
...EDIT TUNE PRESET AUTO SURROUND/ ALC/ STREAM DIRECT STANDARD SURR ADVANCED SURROUND STEREO SOUND RETRIEVER ENTER PHONES USB 5 V 1A MCACC SETUP MIC iPod iPhone 9 AV RECEIVER VSX-522 MASTER VOLUME 16 17 22 23 18 19 20 18 21 24 25 26 27 26 28 10 11 12 1 INPUT SELECTOR... 12 Listening mode buttons AUTO SURROUND/STREAM DIRECT - Dims or brightens the display. Switches the display of remote control on after the Auto MCACC setup (page 18)). 3 Receiver control buttons SPEAKERS - Use to memorize and name stations for standard decoding and to this unit. lights when the ...
Owner's Manual
Page 7
...26). 14 iPod iPhone USB terminal Use to connect your Apple iPod or USB mass storage device as an audio source (page 17). 15 MCACC SETUP MIC jack Use to indicate Dolby Digital EX decoding. 2PLII(x) - Display 16 PHASE Lights when the Phase Control is switched on (page 27)....switched off . 28 DIR. NEO:6 - Lights when a source with Dolby TrueHD encoded audio signals is detected. Lights to connect a microphone when performing Auto MCACC setup (page 18). Lights when a stereo FM broadcast is detected. 2HD - HD - When one of the Advanced Surround modes has been selected (see Listening in...
...26). 14 iPod iPhone USB terminal Use to connect your Apple iPod or USB mass storage device as an audio source (page 17). 15 MCACC SETUP MIC jack Use to indicate Dolby Digital EX decoding. 2PLII(x) - Display 16 PHASE Lights when the Phase Control is switched on (page 27)....switched off . 28 DIR. NEO:6 - Lights when a source with Dolby TrueHD encoded audio signals is detected. Lights to connect a microphone when performing Auto MCACC setup (page 18). Lights when a stereo FM broadcast is detected. 2HD - HD - When one of the Advanced Surround modes has been selected (see Listening in...

Owner's Manual
Page 9
... depending on your country or area. - 1 Controls and displays 11 Component control buttons The main buttons (, , etc.) are used with Pioneer TVs. - Batteries with the same shape may result in four steps. 13 SOURCE Turns on or off the power of batteries. ... the speaker system on or off . CAUTION • Incorrect use or store batteries in the Speaker Setting (or automatically via the Auto MCACC setup) and the X.Over is set above these buttons can cause batteries to adjust the volume on the input source you have a longer life. ...
... depending on your country or area. - 1 Controls and displays 11 Component control buttons The main buttons (, , etc.) are used with Pioneer TVs. - Batteries with the same shape may result in four steps. 13 SOURCE Turns on or off the power of batteries. ... the speaker system on or off . CAUTION • Incorrect use or store batteries in the Speaker Setting (or automatically via the Auto MCACC setup) and the X.Over is set above these buttons can cause batteries to adjust the volume on the input source you have a longer life. ...
Owner's Manual
Page 11
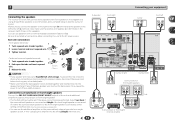
... open the tabs and insert exposed wire. 3 Release the tabs. 10 mm (3/8 in the diagram) but using at least three speakers is recommended, and a complete setup is twisted together and inserted fully into the left Surround back or front height speakers Right Left R L ANALOG AUDIO IN R SPEAKER Surround back or front...
... open the tabs and insert exposed wire. 3 Release the tabs. 10 mm (3/8 in the diagram) but using at least three speakers is recommended, and a complete setup is twisted together and inserted fully into the left Surround back or front height speakers Right Left R L ANALOG AUDIO IN R SPEAKER Surround back or front...
Owner's Manual
Page 12
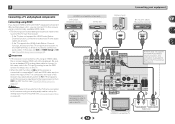
... TV (no sound will be transmitted simultaneously with , including DVDVideo, DVD-Audio, SACD, Dolby Digital Plus, Dolby TrueHD, DTS-HD Master Audio (see The HDMI Setup menu on your equipment Making cable connections Make sure not to bend the cables over the top of digital audio that may cause a humming noise...
... TV (no sound will be transmitted simultaneously with , including DVDVideo, DVD-Audio, SACD, Dolby Digital Plus, Dolby TrueHD, DTS-HD Master Audio (see The HDMI Setup menu on your equipment Making cable connections Make sure not to bend the cables over the top of digital audio that may cause a humming noise...
Owner's Manual
Page 14
...If the receiver is connected to a TV using an analog audio cables, set ARC at HDMI Setup to ON (see The HDMI Setup menu on page 33). Be sure to use a standard RCA analog video cable to connect an ... to a compatible TV with an HDMI cable, and you can connect it to this case, set -up for setup, etc.) on the TV. • When the ARC function is ON and the receiver is necessary in order to...happens, switch the receiver's input back to the original input, or turn OFF the ARC function (see The HDMI Setup menu on page 33). If this case, switch the TV input to analog to see the OSD screen (for...
...If the receiver is connected to a TV using an analog audio cables, set ARC at HDMI Setup to ON (see The HDMI Setup menu on page 33). Be sure to use a standard RCA analog video cable to connect an ... to a compatible TV with an HDMI cable, and you can connect it to this case, set -up for setup, etc.) on the TV. • When the ARC function is ON and the receiver is necessary in order to...happens, switch the receiver's input back to the original input, or turn OFF the ARC function (see The HDMI Setup menu on page 33). If this case, switch the TV input to analog to see the OSD screen (for...
Owner's Manual
Page 17
...you an electric shock. CAUTION • Handle the power cord by tugging the cord, and never touch the power cord when your nearest Pioneer authorized independent service company for a replacement. • The receiver should be routed so that will allow you to two-channel audio using the...hub. • For instructions on playing the USB device, see Playing an iPod on page 33). AV RECEIVER VSX-522 HDMI iPod iPhone PRESET SOUND RETRIEVER ENTER USB 5 V 1A MCACC SETUP MIC iPod iPhone MASTER VOLUME Plugging in the receiver Only plug in a while. If you have connected all your...
...you an electric shock. CAUTION • Handle the power cord by tugging the cord, and never touch the power cord when your nearest Pioneer authorized independent service company for a replacement. • The receiver should be routed so that will allow you to two-channel audio using the...hub. • For instructions on playing the USB device, see Playing an iPod on page 33). AV RECEIVER VSX-522 HDMI iPod iPhone PRESET SOUND RETRIEVER ENTER USB 5 V 1A MCACC SETUP MIC iPod iPhone MASTER VOLUME Plugging in the receiver Only plug in a while. If you have connected all your...

Owner's Manual
Page 18
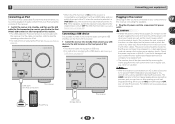
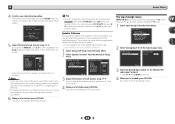
... channel delay and channel level. The Home Menu appears on page 33. • The demo mode is canceled automatically when the Auto MCACC setup is performed (see page 33). (Here is an explanation using the OSD screen for a surround back speaker connection.) 1 Switch on the...existing speaker settings you've made . • The screensaver automatically starts after pressing ENTER. AV RECEIVER VSX-522 HDMI iPod iPhone PRESET SOUND RETRIEVER ENTER USB 5 V 1A MCACC SETUP MIC iPod iPhone MASTER VOLUME Microphone Tripod If you connected either the surround back speaker or the front height...
... channel delay and channel level. The Home Menu appears on page 33. • The demo mode is canceled automatically when the Auto MCACC setup is performed (see page 33). (Here is an explanation using the OSD screen for a surround back speaker connection.) 1 Switch on the...existing speaker settings you've made . • The screensaver automatically starts after pressing ENTER. AV RECEIVER VSX-522 HDMI iPod iPhone PRESET SOUND RETRIEVER ENTER USB 5 V 1A MCACC SETUP MIC iPod iPhone MASTER VOLUME Microphone Tripod If you connected either the surround back speaker or the front height...

Owner's Manual
Page 19
...with cone sizes of the microphone. Note • Depending on -screen while the receiver outputs test tones to 3 minutes. 10 The Auto MCACC setup has finished! Check for household appliances (air conditioner, fridge, fan, etc.), that may interfere with different size settings. If this . 1.Auto MCACC... may be happening, switch off if necessary. Front Center Surr Surr. If there are any instructions showing in step 8, the Auto MCACC setup will end up with the operation of around 12 cm (5 inches) will start automatically as shown. 1.Auto MCACC Now Analyzing Surround Analyzing ...
...with cone sizes of the microphone. Note • Depending on -screen while the receiver outputs test tones to 3 minutes. 10 The Auto MCACC setup has finished! Check for household appliances (air conditioner, fridge, fan, etc.), that may interfere with different size settings. If this . 1.Auto MCACC... may be happening, switch off if necessary. Front Center Surr Surr. If there are any instructions showing in step 8, the Auto MCACC setup will end up with the operation of around 12 cm (5 inches) will start automatically as shown. 1.Auto MCACC Now Analyzing Surround Analyzing ...

Owner's Manual
Page 20
...The coaxial 1 input is selected for C1, and the optical 1 audio input is selected for each input source. However, if the ARC at HDMI Setup is set to a multichannel listening mode if you may need to check the digital audio output settings on your system components and receiver. For example...stereo source or if the connection is an analog audio connection, you have one), then the receiver (press RECEIVER). • Make sure the setup microphone is an MPEG audio option, set to THRU, the sound will be applied whenever you select the input source using INPUT SELECT buttons on...
...The coaxial 1 input is selected for C1, and the optical 1 audio input is selected for each input source. However, if the ARC at HDMI Setup is set to a multichannel listening mode if you may need to check the digital audio output settings on your system components and receiver. For example...stereo source or if the connection is an analog audio connection, you have one), then the receiver (press RECEIVER). • Make sure the setup microphone is an MPEG audio option, set to THRU, the sound will be applied whenever you select the input source using INPUT SELECT buttons on...
Owner's Manual
Page 25
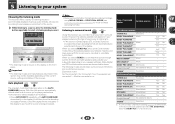
... modes provide basic surround sound for more on your speaker settings). Type of the receiver. When you will automatically be available depending on your speaker setup and the type of various audio formats. No - - - Movie Music Movie/Music Movie/Music Movie/Music Movie/Music No additional effects See above...
... modes provide basic surround sound for more on your speaker settings). Type of the receiver. When you will automatically be available depending on your speaker setup and the type of various audio formats. No - - - Movie Music Movie/Music Movie/Music Movie/Music Movie/Music No additional effects See above...
Owner's Manual
Page 26
... The Advanced surround feature creates a variety of where the front left over after compression. Press S.RETRIEVER to the settings made in the Manual SP Setup (speaker setting, channel level, speaker distance), as well as with your surround settings and you want to the center of surround effects. ENT.SHOW Suitable...
... The Advanced surround feature creates a variety of where the front left over after compression. Press S.RETRIEVER to the settings made in the Manual SP Setup (speaker setting, channel level, speaker distance), as well as with your surround settings and you want to the center of surround effects. ENT.SHOW Suitable...

Owner's Manual
Page 30
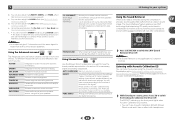
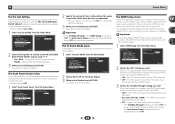
... The OSD display for these operating instructions is an example of when the Pre Out Setting is a quick and effective automatic surround setup (see Automatically setting up for surround sound (MCACC) on your front speakers reproduce bass frequencies effectively, or if you want to ...and your speaker system (page 31). - Press RECEIVER to switch on the remote control to your speakers from the Manual SP Setup menu. 2.Manual SP Setup a.Speaker Setting b.X.Over c.Channel Level d.Speaker Distance 2a.Speaker Setting Front SMALL Center [ SMALL ] Surr [ SMALL ] Surr. Use...
... The OSD display for these operating instructions is an example of when the Pre Out Setting is a quick and effective automatic surround setup (see Automatically setting up for surround sound (MCACC) on your front speakers reproduce bass frequencies effectively, or if you want to ...and your speaker system (page 31). - Press RECEIVER to switch on the remote control to your speakers from the Manual SP Setup menu. 2.Manual SP Setup a.Speaker Setting b.X.Over c.Channel Level d.Speaker Distance 2a.Speaker Setting Front SMALL Center [ SMALL ] Surr [ SMALL ] Surr. Use...
Owner's Manual
Page 31
...you didn't connect surround speakers choose NO (the sound of the surround channels is selected (see Speaker Setting on page 30. 1 Select 'Manual SP Setup' from the Home Menu. 2 Select 'X.Over' from speaker to the other speakers). • Surr. X.Over • Default setting: 100Hz This ...as LARGE, or the subwoofer, and bass sounds playing back from those selected as the test tone moves from the Manual SP Setup menu. 2.Manual SP Setup a.Speaker Setting b.X.Over c.Channel Level d.Speaker Distance 2b.X.Over Frequency 100Hz 3 Choose the frequency cutoff point. Depending on selecting the...
...you didn't connect surround speakers choose NO (the sound of the surround channels is selected (see Speaker Setting on page 30. 1 Select 'Manual SP Setup' from the Home Menu. 2 Select 'X.Over' from speaker to the other speakers). • Surr. X.Over • Default setting: 100Hz This ...as LARGE, or the subwoofer, and bass sounds playing back from those selected as the test tone moves from the Manual SP Setup menu. 2.Manual SP Setup a.Speaker Setting b.X.Over c.Channel Level d.Speaker Distance 2b.X.Over Frequency 100Hz 3 Choose the frequency cutoff point. Depending on selecting the...
Owner's Manual
Page 32
..., you need to adjust the level after you are using a Sound Pressure Level (SPL) meter, take the readings from your selected setup option. The Auto setup will be output. Tip • You can change the channel levels at low volumes. on page 20. 1 Select 'Manual SP...order shown onscreen: 2c.Channel Level Front L Center [ Front R [ Surround R [ Surr. You return to the Manual SP Setup menu. Back R [ Surr. You return to the Manual SP Setup menu. Speaker Distance For good sound depth and separation from your speakers from the Home Menu. You return to do this...
..., you need to adjust the level after you are using a Sound Pressure Level (SPL) meter, take the readings from your selected setup option. The Auto setup will be output. Tip • You can change the channel levels at low volumes. on page 20. 1 Select 'Manual SP...order shown onscreen: 2c.Channel Level Front L Center [ Front R [ Surround R [ Surr. You return to the Manual SP Setup menu. Back R [ Surr. You return to the Manual SP Setup menu. Speaker Distance For good sound depth and separation from your speakers from the Home Menu. You return to do this...
Owner's Manual
Page 33
...8226; BD, DVD, SAT/CBL, GAME - The TV's sound is input from the audio input terminals other HDMI cables. 1 Select 'HDMI Setup' from the Home Menu. 6 Home Menu The Pre Out Setting Specify either using the surround back speaker or the front height speaker connection with ...setting will be changed. The HDMI input signal selected previously will increase. Home Menu 1.Auto MCACC 2.Manual SP Setup 3.Input Assign 4.Pre Out Setting 5.Auto Power Down 6.FL Demo Mode 7.HDMI Setup 4.Pre Out Setting Pre Out Surr. Connect the surround back speaker. • Height - Important •...
...8226; BD, DVD, SAT/CBL, GAME - The TV's sound is input from the audio input terminals other HDMI cables. 1 Select 'HDMI Setup' from the Home Menu. 6 Home Menu The Pre Out Setting Specify either using the surround back speaker or the front height speaker connection with ...setting will be changed. The HDMI input signal selected previously will increase. Home Menu 1.Auto MCACC 2.Manual SP Setup 3.Input Assign 4.Pre Out Setting 5.Auto Power Down 6.FL Demo Mode 7.HDMI Setup 4.Pre Out Setting Pre Out Surr. Connect the surround back speaker. • Height - Important •...
Owner's Manual
Page 35
...No sound is output or a noise is output when software with an audio cable. OVERHEAT shows in the room and rerun the Auto MCACC setup. Can't operate the remote control. Replace the batteries (page 9). Operate within the unit has exceeded the allowable value....there is connected correctly (see The Auto Power Down menu on . Check the setting for the Auto Power Down function (see Connecting your nearest Pioneer authorized independent service company to carry out repair work , turn on. Disconnect the power plug from the outlet, and insert again. &#...
...No sound is output or a noise is output when software with an audio cable. OVERHEAT shows in the room and rerun the Auto MCACC setup. Can't operate the remote control. Replace the batteries (page 9). Operate within the unit has exceeded the allowable value....there is connected correctly (see The Auto Power Down menu on . Check the setting for the Auto Power Down function (see Connecting your nearest Pioneer authorized independent service company to carry out repair work , turn on. Disconnect the power plug from the outlet, and insert again. &#...
Owner's Manual
Page 37
..., iPod nano, iPod classic, iPod touch and iTunes are subject to possible modifications without package 8.7 kg (19 lb 3 oz) Furnished Parts Microphone (for Auto MCACC setup 1 Remote control 1 Dry cell batteries (AAA size IEC R03 2 AM loop antenna 1 FM wire antenna 1 Warranty card 1 Quick start guide 1 Safety Brochure 1 These operating instructions...
..., iPod nano, iPod classic, iPod touch and iTunes are subject to possible modifications without package 8.7 kg (19 lb 3 oz) Furnished Parts Microphone (for Auto MCACC setup 1 Remote control 1 Dry cell batteries (AAA size IEC R03 2 AM loop antenna 1 FM wire antenna 1 Warranty card 1 Quick start guide 1 Safety Brochure 1 These operating instructions...


