
Owner's Manual
Page 1
...(US) http://www.pioneerelectronics.ca (Canada) Operating Instructions Mode d'emploi Manual de instrucciones AUDIO/VIDEO MULTI-CHANNEL RECEIVER RECEPTEUR AUDIOVISUEL A VOIES MULTIPLES RECEPTOR MULTICANAL DE AUDIO/VÍDEO VSX-520 Register your product on http://www.pioneerelectronics.com (US) http://www.pioneerelectronics.ca (Canada...or theft. • Receive free tips, updates and service bulletins on your new product • Improve product development Your input helps us continue to design products that meet your needs. • Receive a free Pioneer newsletter Registered customers can opt...
...(US) http://www.pioneerelectronics.ca (Canada) Operating Instructions Mode d'emploi Manual de instrucciones AUDIO/VIDEO MULTI-CHANNEL RECEIVER RECEPTEUR AUDIOVISUEL A VOIES MULTIPLES RECEPTOR MULTICANAL DE AUDIO/VÍDEO VSX-520 Register your product on http://www.pioneerelectronics.com (US) http://www.pioneerelectronics.ca (Canada...or theft. • Receive free tips, updates and service bulletins on your new product • Improve product development Your input helps us continue to design products that meet your needs. • Receive a free Pioneer newsletter Registered customers can opt...
Owner's Manual
Page 2
... for help. Consult the dealer or an experienced radio/TV technician for a Class B digital device, pursuant to radio communications. Product Name: AUDIO/VIDEO MULTI-CHANNEL RECEIVER Model Number: VSX-520 Responsible Party Name: PIONEER ELECTRONICS (USA) INC. Phone: 1-800-421-1404 URL: http://www.pioneerelectronics.com D8-10-4*_C1_En Be sure that to dripping, splashing, rain...
... for help. Consult the dealer or an experienced radio/TV technician for a Class B digital device, pursuant to radio communications. Product Name: AUDIO/VIDEO MULTI-CHANNEL RECEIVER Model Number: VSX-520 Responsible Party Name: PIONEER ELECTRONICS (USA) INC. Phone: 1-800-421-1404 URL: http://www.pioneerelectronics.com D8-10-4*_C1_En Be sure that to dripping, splashing, rain...
Owner's Manual
Page 4
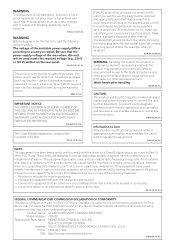
...Making an audio or a video recording 43 4 En Please read through these operating instructions so you have finished reading the instructions, put them away in the receiver 26 04 Listening to the front panel audio mini jack 26 Plugging in a safe place for buying this Pioneer product. After...your component with no HDMI terminal 22 Connecting a satellite receiver or other digital set-top box 23 Connecting an HDD/DVD recorder, VCR and other video sources 23 Using the component video jacks 24 Connecting other audio components 24 Connecting antennas 25 Using external antennas 25 ...
...Making an audio or a video recording 43 4 En Please read through these operating instructions so you have finished reading the instructions, put them away in the receiver 26 04 Listening to the front panel audio mini jack 26 Plugging in a safe place for buying this Pioneer product. After...your component with no HDMI terminal 22 Connecting a satellite receiver or other digital set-top box 23 Connecting an HDD/DVD recorder, VCR and other video sources 23 Using the component video jacks 24 Connecting other audio components 24 Connecting antennas 25 Using external antennas 25 ...
Owner's Manual
Page 6
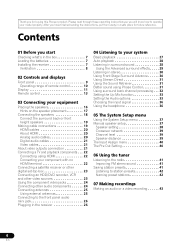
... speaker. 3 Connecting the components For surround sound, you'll want to hook up using a digital connection from the BD/DVD player to the receiver. • About video outputs connection (page 21) • Connecting a TV and playback components (page 22) • Connecting antennas (page 25) • Plugging in the box (...Phase Control (page 31) • Using surround back channel processing (page 32) • Setting the Up Mix function (page 33) • Setting the Audio options (page 33) • Choosing the input signal (page 36) • Manual speaker setup (page 37) 6 En
... speaker. 3 Connecting the components For surround sound, you'll want to hook up using a digital connection from the BD/DVD player to the receiver. • About video outputs connection (page 21) • Connecting a TV and playback components (page 22) • Connecting antennas (page 25) • Plugging in the box (...Phase Control (page 31) • Using surround back channel processing (page 32) • Setting the Up Mix function (page 33) • Setting the Audio options (page 33) • Choosing the input signal (page 36) • Manual speaker setup (page 37) 6 En
Owner's Manual
Page 9
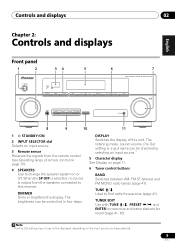
... CONTROL SPEAKERS DIMMER DISPLAY BAND 5 6 7 AUDIO/ VIDEO MULTI- TUNER EDIT Use with TUNE /, PRESET / and ENTER to find radio frequencies (page 41). When the SP OFF is selected, no sound is output from the remote control (see Operating range of this receiver. CHANNEL RECEIVER VSX-520 TUNE TUNER EDIT PRESET ENTER MASTER...
... CONTROL SPEAKERS DIMMER DISPLAY BAND 5 6 7 AUDIO/ VIDEO MULTI- TUNER EDIT Use with TUNE /, PRESET / and ENTER to find radio frequencies (page 41). When the SP OFF is selected, no sound is output from the remote control (see Operating range of this receiver. CHANNEL RECEIVER VSX-520 TUNE TUNER EDIT PRESET ENTER MASTER...
Owner's Manual
Page 20
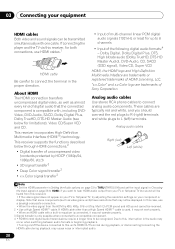
... to 8 channels • Input of the following digital audio formats:4 - This receiver supports the functions described below for both connections, use a (analog) composite connection. • When the video signal from this receiver). • If the video signal does not appear on your TV or flat panel...heard from the HDMI is only possible when connected to a compatible component. 4 • HDMI format digital audio transmissions require a longer time to this receiver, for limitations), Video CD/Super VCD and CD. If connecting the player and the TV via this unit's HDMI OUT terminal...
... to 8 channels • Input of the following digital audio formats:4 - This receiver supports the functions described below for both connections, use a (analog) composite connection. • When the video signal from this receiver). • If the video signal does not appear on your TV or flat panel...heard from the HDMI is only possible when connected to a compatible component. 4 • HDMI format digital audio transmissions require a longer time to this receiver, for limitations), Video CD/Super VCD and CD. If connecting the player and the TV via this unit's HDMI OUT terminal...

Owner's Manual
Page 21
... be output. The color signal of this way, interference between the signals is avoided. Component video cables HDMI IN COMPONENT VIDEO IN VIDEO IN PR PB Y HDMI OUT COMPONENT VIDEO OUT MONITOR OUT Terminal for audio. About video outputs connection This receiver is divided into the luminance (Y) signal and the color (PB and PR) signals and then...
... be output. The color signal of this way, interference between the signals is avoided. Component video cables HDMI IN COMPONENT VIDEO IN VIDEO IN PR PB Y HDMI OUT COMPONENT VIDEO OUT MONITOR OUT Terminal for audio. About video outputs connection This receiver is divided into the luminance (Y) signal and the color (PB and PR) signals and then...
Owner's Manual
Page 22
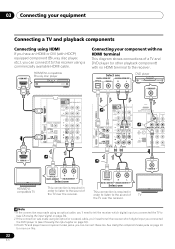
...75 AM LOOP ASSIGN COMPONENT VIDEO HDMI IN HDMI/DVIcompatible TV 1 OPTICAL R L DIGITAL AUDIO OUT ANALOG AUDIO OUT Select one This connection is required in order to listen to the sound of the TV over the receiver. 1 VIDEO IN OPTICAL R L DIGITAL AUDIO OUT ANALOG AUDIO OUT Select one This ...connection is required in order to listen to the receiver. 03 Connecting your component with no HDMI terminal This diagram shows connections...
...75 AM LOOP ASSIGN COMPONENT VIDEO HDMI IN HDMI/DVIcompatible TV 1 OPTICAL R L DIGITAL AUDIO OUT ANALOG AUDIO OUT Select one This connection is required in order to listen to the sound of the TV over the receiver. 1 VIDEO IN OPTICAL R L DIGITAL AUDIO OUT ANALOG AUDIO OUT Select one This ...connection is required in order to listen to the receiver. 03 Connecting your component with no HDMI terminal This diagram shows connections...
Owner's Manual
Page 23
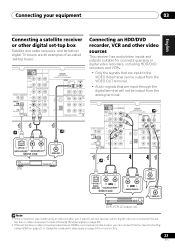
...VIDEO IN (B ASSIGNAB 1 1 2 OPTICAL R L DIGITAL AUDIO OUT ANALOG AUDIO OUT Select one R REC L ANALOG AUDIO IN VIDEO IN VIDEO OUT DVR, VCR, LD player, etc. Connecting your equipment 03 English Deutsch Français Italiano Nederlands Español Connecting a satellite receiver or other video sources This receiver has audio/video... inputs and outputs suitable for more on page 24 for connecting analog or digital video recorders, including HDD/DVD recorders and VCRs...
...VIDEO IN (B ASSIGNAB 1 1 2 OPTICAL R L DIGITAL AUDIO OUT ANALOG AUDIO OUT Select one R REC L ANALOG AUDIO IN VIDEO IN VIDEO OUT DVR, VCR, LD player, etc. Connecting your equipment 03 English Deutsch Français Italiano Nederlands Español Connecting a satellite receiver or other video sources This receiver has audio/video... inputs and outputs suitable for more on page 24 for connecting analog or digital video recorders, including HDD/DVD recorders and VCRs...
Owner's Manual
Page 24
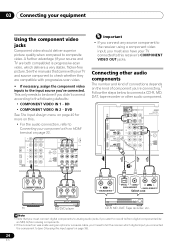
... Connecting your component with no HDMI terminal on page 22. DVD See The Input Assign menu on page 40 for more on this receiver's COMPONENT VIDEO OUT jacks. Connecting other audio component.2 SUBWOOFER PRE OUT CD-R/TAPE DVR/VCR SURR BACK / BD FRONT HEIGHT L (Single) OUT R DVD PRE OUT CD CD-R/TAPE DVR...
... Connecting your component with no HDMI terminal on page 22. DVD See The Input Assign menu on page 40 for more on this receiver's COMPONENT VIDEO OUT jacks. Connecting other audio component.2 SUBWOOFER PRE OUT CD-R/TAPE DVR/VCR SURR BACK / BD FRONT HEIGHT L (Single) OUT R DVD PRE OUT CD CD-R/TAPE DVR...

Owner's Manual
Page 27
... Dolby Digital 5.1-channel signals, and DTS+NEO:6 is displayed when playing DTS 5.1-channel signals. Note 1 Make sure that the TV's video input is an MPEG audio option, set to a multichannel listening mode if you want multichannel surround sound. 27 En It should hear surround sound. If you are...output Dolby Digital, DTS and 88.2 kHz / 96 kHz PCM (2 channel) audio, and if there is set to this receiver (for example, if you connected this receiver to the VIDEO jacks on your DVD player or digital satellite receiver. Listening to your system 04 English Français Español Chapter ...
... Dolby Digital 5.1-channel signals, and DTS+NEO:6 is displayed when playing DTS 5.1-channel signals. Note 1 Make sure that the TV's video input is an MPEG audio option, set to a multichannel listening mode if you want multichannel surround sound. 27 En It should hear surround sound. If you are...output Dolby Digital, DTS and 88.2 kHz / 96 kHz PCM (2 channel) audio, and if there is set to this receiver (for example, if you connected this receiver to the VIDEO jacks on your DVD player or digital satellite receiver. Listening to your system 04 English Français Español Chapter ...
Owner's Manual
Page 28
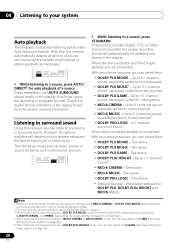
... BD MENU DIRECT A.L.C. See Setting the Audio options on page 33). 28 En Listening in surround sound Using this receiver, you can also adjust the C.IMG effect (see Setting the Audio options on page 33). 5 When listening to see Setting the Audio options on page 33 to adjust them....listening to any source in the display. If the source is connected. Up to 5.1 channel sound, especially suited to 5.1 channel sound, especially suited for video games • NEO:6 CINEMA - Up to movie sources • DOLBY PLII MUSIC3 - See above • Straight Decode - See above •...
... BD MENU DIRECT A.L.C. See Setting the Audio options on page 33). 28 En Listening in surround sound Using this receiver, you can also adjust the C.IMG effect (see Setting the Audio options on page 33). 5 When listening to see Setting the Audio options on page 33 to adjust them....listening to any source in the display. If the source is connected. Up to 5.1 channel sound, especially suited to 5.1 channel sound, especially suited for video games • NEO:6 CINEMA - Up to movie sources • DOLBY PLII MUSIC3 - See above • Straight Decode - See above •...
Owner's Manual
Page 34
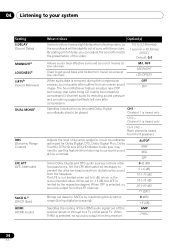
... recommended value. The LFE is not limited when set to -15 dB, the LFE is output from this receiver (amp) or through to a TV or flat panel TV. M/L OFF MIDNIGHT LOUDNESS When audio data is heard only CH2 - CH1 - When THRU is selected, no sound is output from the LFE ... dynamic range for movie soundtracks optimized for Dolby Digital, DTS, Dolby Digital Plus, Dolby TrueHD, DTS-HD and DTS-HD Master Audio (you to hear effective surround sound of the video. 0.0 to 9.0 (frames) 1 second = 30 frames (NTSC) Default: 0.0 Allows you may need to use this feature when listening to surround sound...
... recommended value. The LFE is not limited when set to -15 dB, the LFE is output from this receiver (amp) or through to a TV or flat panel TV. M/L OFF MIDNIGHT LOUDNESS When audio data is heard only CH2 - CH1 - When THRU is selected, no sound is output from the LFE ... dynamic range for movie soundtracks optimized for Dolby Digital, DTS, Dolby Digital Plus, Dolby TrueHD, DTS-HD and DTS-HD Master Audio (you to hear effective surround sound of the video. 0.0 to 9.0 (frames) 1 second = 30 frames (NTSC) Default: 0.0 Allows you may need to use this feature when listening to surround sound...
Owner's Manual
Page 37
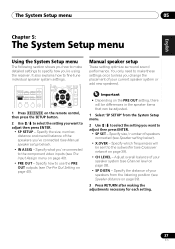
...AUDIO PARAMETER TOP MENU TUNE TUNER EDIT MASTER TOOLS VOLUME MENU PRESET RECEIVER INPUT SELECT DTV/TV INPUT BD DVD TV ENTER HOME MENU SETUP TUNE BAND RETURN 1 Press RECEIVER on page 39). • SP DISTN - You only need to make detailed settings to specify how you're using the receiver.../ to select the setting you want to adjust then press ENTER. • SP SETUP - Specify what you've connected to the component video inputs (see Speaker setting below ). • IN ASSIG - The System Setup menu 05 English Français Español PRESET Chapter 5: The...
...AUDIO PARAMETER TOP MENU TUNE TUNER EDIT MASTER TOOLS VOLUME MENU PRESET RECEIVER INPUT SELECT DTV/TV INPUT BD DVD TV ENTER HOME MENU SETUP TUNE BAND RETURN 1 Press RECEIVER on page 39). • SP DISTN - You only need to make detailed settings to specify how you're using the receiver.../ to select the setting you want to adjust then press ENTER. • SP SETUP - Specify what you've connected to the component video inputs (see Speaker setting below ). • IN ASSIG - The System Setup menu 05 English Français Español PRESET Chapter 5: The...
Owner's Manual
Page 40
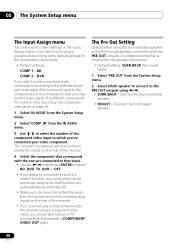
...menu if you should also have connected the audio from the System Setup menu. 2 Select 'COMP. The numbers correspond with the numbers beside the inputs on the rear of the receiver. • If you connect any source component to the receiver using a component video input, you didn't hook up your equipment...OUT' from the System Setup menu. 2 Select which you may see Using the component video jacks on page 24. 1 Select 'IN ASSIG' from the component to the corresponding inputs on the rear of the receiver. 4 Select the component that corresponds with the PRE OUT outputs. 05 The System Setup...
...menu if you should also have connected the audio from the System Setup menu. 2 Select 'COMP. The numbers correspond with the numbers beside the inputs on the rear of the receiver. • If you connect any source component to the receiver using a component video input, you didn't hook up your equipment...OUT' from the System Setup menu. 2 Select which you may see Using the component video jacks on page 24. 1 Select 'IN ASSIG' from the component to the corresponding inputs on the rear of the receiver. 4 Select the component that corresponds with the PRE OUT outputs. 05 The System Setup...

Owner's Manual
Page 43
...the source as for the recorder. For example, you can't record a component hooked up to composite video jacks with a recorder hooked up in mind you can't make a digital recording from an audio or video source connected to the receiver (such as a CD player or TV).1 Keep in the same way (see page 23 for... more on this . If you want to record a video source, you also need to use the same type of connection...
...the source as for the recorder. For example, you can't record a component hooked up to composite video jacks with a recorder hooked up in mind you can't make a digital recording from an audio or video source connected to the receiver (such as a CD player or TV).1 Keep in the same way (see page 23 for... more on this . If you want to record a video source, you also need to use the same type of connection...

Owner's Manual
Page 45
...input mode is selected. 2 • Pairing is required when you first use any time pairing data is not connected: NODEVICE appears in the receiver display. "Pairing" is detected by the Bluetooth wireless technology device. Make sure to enable Bluetooth communications.2 For more details, see also the operating... 12 IN R TV/SAT DVD L IN R AUDIO IN BD IN ADAPTER PORT (OUTPUT 5 V 100 mA MAX) VIDEO DVR/VCR OUT IN MONITOR OUT DVD ANTENNA PR PB FM UNBAL 75 AM LOOP COMPONENT VID This receiver Bluetooth® ADAPTER 1 Switch the receiver into the pairing mode. 5 Check to see that...
...input mode is selected. 2 • Pairing is required when you first use any time pairing data is not connected: NODEVICE appears in the receiver display. "Pairing" is detected by the Bluetooth wireless technology device. Make sure to enable Bluetooth communications.2 For more details, see also the operating... 12 IN R TV/SAT DVD L IN R AUDIO IN BD IN ADAPTER PORT (OUTPUT 5 V 100 mA MAX) VIDEO DVR/VCR OUT IN MONITOR OUT DVD ANTENNA PR PB FM UNBAL 75 AM LOOP COMPONENT VID This receiver Bluetooth® ADAPTER 1 Switch the receiver into the pairing mode. 5 Check to see that...
Owner's Manual
Page 50
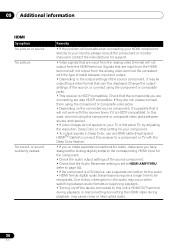
...to this , interruption in the output settings of cable between input and output. • Depending in the audio may occur when switching between source and receiver. • If video images do not appear on the connected source component, it's possible that it will not work with the ... contact the manufacturer for the audio. • HDMI format digital audio transmissions require a longer time to be outputting a video format that the Audio Parameter setting is set to HDMI AMP/THRU (refer to connect this receiver (even if it may cause noise or interrupted audio. 50 En No sound, ...
...to this , interruption in the output settings of cable between input and output. • Depending in the audio may occur when switching between source and receiver. • If video images do not appear on the connected source component, it's possible that it will not work with the ... contact the manufacturer for the audio. • HDMI format digital audio transmissions require a longer time to be outputting a video format that the Audio Parameter setting is set to HDMI AMP/THRU (refer to connect this receiver (even if it may cause noise or interrupted audio. 50 En No sound, ...

Owner's Manual
Page 51
... cases where you may be able to route HDMI signals through this receiver (this depends on the HDMI equipped component you aren't receiving HDMI signals properly through this receiver (from the connected display unit (for example audio output is recommended) for about two seconds. 3 When you see ... using the HDMI connection, you must adjust the volume on audio connections. Note 1 • If your display only has one HDMI terminal, you can only receive HDMI video from the connected component. • Depending on the component, audio output may not be limited to 2 channels for a monitor...
... cases where you may be able to route HDMI signals through this receiver (this depends on the HDMI equipped component you aren't receiving HDMI signals properly through this receiver (from the connected display unit (for example audio output is recommended) for about two seconds. 3 When you see ... using the HDMI connection, you must adjust the volume on audio connections. Note 1 • If your display only has one HDMI terminal, you can only receive HDMI video from the connected component. • Depending on the component, audio output may not be limited to 2 channels for a monitor...

Owner's Manual
Page 158
...WARRANTY PERIOD. Include your rental contract showing place and date of PUSA or POC. For hook-up and operation of receiving your complaint, Pioneer will investigate the dispute and will either: (1) respond to your complaint and to your complaint in writing informing you ...ON L3R 0P2 (905) 479-4411 1-877-283-5901 http://www.pioneerelectronics.ca DISPUTE RESOLUTION IN THE U.S.A. - PIONEER ELECTRONICS (USA) INC. PRODUCT WARRANTY PERIOD Home Audio and Video ...Microphones, Headphones, Phono Cartridges and Styluses Parts 1 Year 90 Days Labor 1 Year 90 Days Shorter limited warranty...
...WARRANTY PERIOD. Include your rental contract showing place and date of PUSA or POC. For hook-up and operation of receiving your complaint, Pioneer will investigate the dispute and will either: (1) respond to your complaint and to your complaint in writing informing you ...ON L3R 0P2 (905) 479-4411 1-877-283-5901 http://www.pioneerelectronics.ca DISPUTE RESOLUTION IN THE U.S.A. - PIONEER ELECTRONICS (USA) INC. PRODUCT WARRANTY PERIOD Home Audio and Video ...Microphones, Headphones, Phono Cartridges and Styluses Parts 1 Year 90 Days Labor 1 Year 90 Days Shorter limited warranty...


