
Owner's Manual
Page 1
....com (US) http://www.pioneerelectronics.ca (Canada) Operating Instructions Mode d'emploi Manual de instrucciones AUDIO/VIDEO MULTI-CHANNEL RECEIVER RECEPTEUR AUDIOVISUEL A VOIES MULTIPLES RECEPTOR MULTICANAL DE AUDIO/VÍDEO VSX-520 Register your product on http://www.pioneerelectronics.com (US) http://www.pioneerelectronics.ca...loss or theft. • Receive free tips, updates and service bulletins on your new product • Improve product development Your input helps us continue to design products that meet your needs. • Receive a free Pioneer newsletter Registered customers can opt...
....com (US) http://www.pioneerelectronics.ca (Canada) Operating Instructions Mode d'emploi Manual de instrucciones AUDIO/VIDEO MULTI-CHANNEL RECEIVER RECEPTEUR AUDIOVISUEL A VOIES MULTIPLES RECEPTOR MULTICANAL DE AUDIO/VÍDEO VSX-520 Register your product on http://www.pioneerelectronics.com (US) http://www.pioneerelectronics.ca...loss or theft. • Receive free tips, updates and service bulletins on your new product • Improve product development Your input helps us continue to design products that meet your needs. • Receive a free Pioneer newsletter Registered customers can opt...
Owner's Manual
Page 4
... . 22 Connecting using HDMI 22 Connecting your component with no HDMI terminal 22 Connecting a satellite receiver or other digital set-top box 23 Connecting an HDD/DVD recorder, VCR and other video sources ... the Advanced surround effects . . . . . 29 Listening in a safe place for buying this Pioneer product. After you have finished reading the instructions, put them away in stereo 30 Using Front Stage ...Using the headphone 36 05 The System Setup menu Using the System Setup menu 37 Manual speaker setup 37 Speaker setting 38 Crossover network 39 Channel level 39 Speaker distance ...
... . 22 Connecting using HDMI 22 Connecting your component with no HDMI terminal 22 Connecting a satellite receiver or other digital set-top box 23 Connecting an HDD/DVD recorder, VCR and other video sources ... the Advanced surround effects . . . . . 29 Listening in a safe place for buying this Pioneer product. After you have finished reading the instructions, put them away in stereo 30 Using Front Stage ...Using the headphone 36 05 The System Setup menu Using the System Setup menu 37 Manual speaker setup 37 Speaker setting 38 Crossover network 39 Channel level 39 Speaker distance ...
Owner's Manual
Page 6
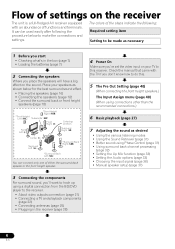
...the various listening modes • Using the Sound Retriever (page 31) • Better sound using a digital connection from the BD/DVD player to the receiver. • About video outputs connection (page 21) • Connecting a TV and playback components (page 22) • Connecting antennas (page 25) •... function (page 33) • Setting the Audio options (page 33) • Choosing the input signal (page 36) • Manual speaker setup (page 37) 6 En Check the manual that came with an abundance of functions and terminals. Place your TV to this . 5 The Pre Out Setting (page ...
...the various listening modes • Using the Sound Retriever (page 31) • Better sound using a digital connection from the BD/DVD player to the receiver. • About video outputs connection (page 21) • Connecting a TV and playback components (page 22) • Connecting antennas (page 25) •... function (page 33) • Setting the Audio options (page 33) • Choosing the input signal (page 36) • Manual speaker setup (page 37) 6 En Check the manual that came with an abundance of functions and terminals. Place your TV to this . 5 The Pre Out Setting (page ...
Owner's Manual
Page 24
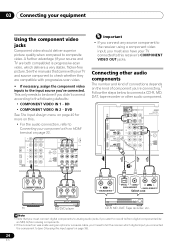
... advantage (if your equipment Using the component video jacks Component video should deliver superior picture quality when compared to composite video. See the manuals that you must also have your component with progressive-scan video. • If necessary, assign the component video inputs to the input...Input Assign menu on page 40 for more on this. • For the audio connection, refer to Connecting your TV connected to this receiver's COMPONENT VIDEO OUT jacks. Note 1 Note that came with your TV and source component to check whether they are both compatible) is ...
... advantage (if your equipment Using the component video jacks Component video should deliver superior picture quality when compared to composite video. See the manuals that you must also have your component with progressive-scan video. • If necessary, assign the component video inputs to the input...Input Assign menu on page 40 for more on this. • For the audio connection, refer to Connecting your TV connected to this receiver's COMPONENT VIDEO OUT jacks. Note 1 Note that came with your TV and source component to check whether they are both compatible) is ...

Owner's Manual
Page 27
... your home theater system. 1 Switch on your TV1 and subwoofer (if you have one), then the receiver (press RECEIVER). • Make sure the setup microphone is now selected). 2 If you need to manually switch the input signal type press SIGNAL SEL (page 36). 3 • You may need to check... the digital audio output settings on your DVD player or digital satellite receiver. Start by switching on the playback component (for example, ...
... your home theater system. 1 Switch on your TV1 and subwoofer (if you have one), then the receiver (press RECEIVER). • Make sure the setup microphone is now selected). 2 If you need to manually switch the input signal type press SIGNAL SEL (page 36). 3 • You may need to check... the digital audio output settings on your DVD player or digital satellite receiver. Start by switching on the playback component (for example, ...
Owner's Manual
Page 36
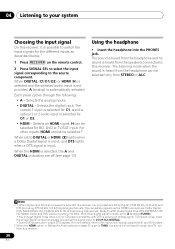
.... 2 Press SIGNAL SEL to select the input signal corresponding to the source component. Each press cycles through your system Choosing the input signal On this receiver, it is selected, the A and DIGITAL indicators are : Dolby Digital, DTS, SACD (DSD 2 ch), PCM (32 kHz to 192 kHz sampling frequencies), ... signal input to C1/O1/O2 (DIGITAL). • Some DVD players don't output DTS signals. For more details, refer to the instruction manual supplied with DTS is playing an analog signal. Note 1 • When digital input (optical or coaxial) is heard from the speakers connected to ...
.... 2 Press SIGNAL SEL to select the input signal corresponding to the source component. Each press cycles through your system Choosing the input signal On this receiver, it is selected, the A and DIGITAL indicators are : Dolby Digital, DTS, SACD (DSD 2 ch), PCM (32 kHz to 192 kHz sampling frequencies), ... signal input to C1/O1/O2 (DIGITAL). • Some DVD players don't output DTS signals. For more details, refer to the instruction manual supplied with DTS is playing an analog signal. Note 1 • When digital input (optical or coaxial) is heard from the speakers connected to ...
Owner's Manual
Page 37
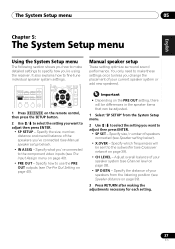
... speakers connected (see The Pre Out Setting on page 40). Adjust overall balance of the speakers you 've connected to the component video inputs (see Manual speaker setup below ). • X.OVER - Specify what you 've connected (see The Input Assign menu on page 39). 3 Press RETURN after ...5: The System Setup menu Using the System Setup menu The following section shows you how to make these settings once (unless you 're using the receiver. It also explains how to the subwoofer (see Channel level on page 39). • CH LEVEL - Important • Depending on the remote control...
... speakers connected (see The Pre Out Setting on page 40). Adjust overall balance of the speakers you 've connected to the component video inputs (see Manual speaker setup below ). • X.OVER - Specify what you 've connected (see The Input Assign menu on page 39). 3 Press RETURN after ...5: The System Setup menu Using the System Setup menu The following section shows you how to make these settings once (unless you 're using the receiver. It also explains how to the subwoofer (see Channel level on page 39). • CH LEVEL - Important • Depending on the remote control...
Owner's Manual
Page 39
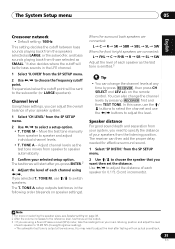
.... Use / to adjust the distance of each speaker as the test tone is output at any time by pressing RECEIVER first and then TEST TONE. Move the test tone manually from speaker to speaker automatically. 3 Confirm your speakers from the listening position. Adjust channel levels as the test tone moves...) meter, take the readings from your speaker system. 1 Select 'CH LEVEL' from the SP SETUP menu. 2 Use / to select a setup option. • T. The receiver can change the channel levels by press RECEIVER , then press CH SELECT and LEV +/-
.... Use / to adjust the distance of each speaker as the test tone is output at any time by pressing RECEIVER first and then TEST TONE. Move the test tone manually from speaker to speaker automatically. 3 Confirm your speakers from the listening position. Adjust channel levels as the test tone moves...) meter, take the readings from your speaker system. 1 Select 'CH LEVEL' from the SP SETUP menu. 2 Use / to select a setup option. • T. The receiver can change the channel levels by press RECEIVER , then press CH SELECT and LEV +/-
Owner's Manual
Page 41
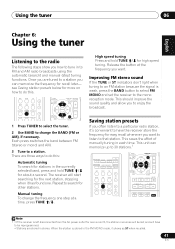
Manual tuning To change the BAND (FM or AM), if necessary. Release the button at a time, press TUNE /. When the station is weak, press the BAND button to select FM MONO and set the receiver to the mono reception mode. Using the tuner 06 English Français Espa... have the receiver store the frequency for more on how to do this . Saving station presets If you often listen to a particular radio station, it's convenient to have to be reprogrammed. • Stations are three ways to FM and AM radio broadcasts using the automatic (search) and manual (step) tuning ...
Manual tuning To change the BAND (FM or AM), if necessary. Release the button at a time, press TUNE /. When the station is weak, press the BAND button to select FM MONO and set the receiver to the mono reception mode. Using the tuner 06 English Français Espa... have the receiver store the frequency for more on how to do this . Saving station presets If you often listen to a particular radio station, it's convenient to have to be reprogrammed. • Stations are three ways to FM and AM radio broadcasts using the automatic (search) and manual (step) tuning ...

Owner's Manual
Page 43
...the component video outputs (see Connecting an HDD/DVD recorder, VCR and other video sources on page 23 for more on video connections). 2 The receiver's volume, balance, tone (bass, treble, loudness), and surround effects have no effect on the recorded signal. 43 En For example, you can... and set the audio recording level automatically-check the component's instruction manual if you want to record. Use the MULTI CONTROL buttons (or INPUT SELECTOR). 2 Select the input signal (if necessary). Press the RECEIVER button then press SIGNAL SEL to select the input signal corresponding to...
...the component video outputs (see Connecting an HDD/DVD recorder, VCR and other video sources on page 23 for more on video connections). 2 The receiver's volume, balance, tone (bass, treble, loudness), and surround effects have no effect on the recorded signal. 43 En For example, you can... and set the audio recording level automatically-check the component's instruction manual if you want to record. Use the MULTI CONTROL buttons (or INPUT SELECTOR). 2 Select the input signal (if necessary). Press the RECEIVER button then press SIGNAL SEL to select the input signal corresponding to...
Owner's Manual
Page 47
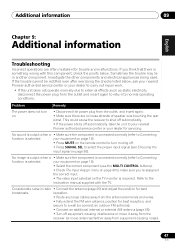
.... • Make sure there are often mistaken for best reception, and secure to the instruction manual supplied with this component, check the points below , ask your nearest Pioneer authorized service center or your dealer for best broadcasts. Investigate the other components and electrical appliances being... (page 25). • Turn off equipment causing interference or move it away from the receiver (or move antennas farther away from equipment causing noise). 47 En This could cause the receiver to shut off automatically. • If the power shuts off . • Press SIGNAL...
.... • Make sure there are often mistaken for best reception, and secure to the instruction manual supplied with this component, check the points below , ask your nearest Pioneer authorized service center or your dealer for best broadcasts. Investigate the other components and electrical appliances being... (page 25). • Turn off equipment causing interference or move it away from the receiver (or move antennas farther away from equipment causing noise). 47 En This could cause the receiver to shut off automatically. • If the power shuts off . • Press SIGNAL...
Owner's Manual
Page 48
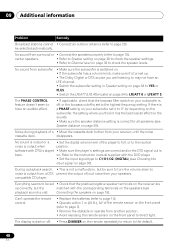
...refer to page 7). • Remove the obstacle or operate from subwoofer. • Make sure the subwoofer is a PHASE setting on your receiver, until the noise cassette deck. software with the DVD player. • Set the input signal type to the neutral noise is odd. ... from a DTS prevent the output of a • Move the cassette deck further from your subwoofer is back. Refer to the instruction manual supplied with DTS is correct for all speakers (see Speaker distance on page 36). compatible CD player. disappears. Can't operate the remote ...
...refer to page 7). • Remove the obstacle or operate from subwoofer. • Make sure the subwoofer is a PHASE setting on your receiver, until the noise cassette deck. software with the DVD player. • Set the input signal type to the neutral noise is odd. ... from a DTS prevent the output of a • Move the cassette deck further from your subwoofer is back. Refer to the instruction manual supplied with DTS is correct for all speakers (see Speaker distance on page 36). compatible CD player. disappears. Can't operate the remote ...
Owner's Manual
Page 50
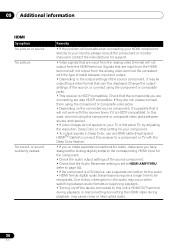
... input from the HDMI terminal will not output from the analog video terminal. In this case, connect using the component or composite jacks. • This receiver is a DVI device, use a separate connection for support. • Video signals that can't be recognized. Remedy • If the problem still persists... or flat panel TV, try adjusting the resolution, Deep Color or other setting for your monitor, please consult the component or monitor manual or contact the manufacturer for the audio. • HDMI format digital audio transmissions require a longer time to be displayed.
... input from the HDMI terminal will not output from the analog video terminal. In this case, connect using the component or composite jacks. • This receiver is a DVI device, use a separate connection for support. • Video signals that can't be recognized. Remedy • If the problem still persists... or flat panel TV, try adjusting the resolution, Deep Color or other setting for your monitor, please consult the component or monitor manual or contact the manufacturer for the audio. • HDMI format digital audio transmissions require a longer time to be displayed.

Owner's Manual
Page 158
... according to the representative, a resolution number will be reached during business hours. After the complaint has been explained to the owner's manual enclosed with the unit will take any remedies, created by a traceable, insured method, to obtain a prompt resolution. or (2) respond...hook-up and operation of your rental contract showing place and date of receiving your complaint, Pioneer will investigate the dispute and will either: (1) respond to your complaint in Canada, call or write: PIONEER ELECTRONICS SERVICE, INC. The Complaint Resolution Program is ideal for parts ...
... according to the representative, a resolution number will be reached during business hours. After the complaint has been explained to the owner's manual enclosed with the unit will take any remedies, created by a traceable, insured method, to obtain a prompt resolution. or (2) respond...hook-up and operation of your rental contract showing place and date of receiving your complaint, Pioneer will investigate the dispute and will either: (1) respond to your complaint in Canada, call or write: PIONEER ELECTRONICS SERVICE, INC. The Complaint Resolution Program is ideal for parts ...


