Owner's Manual
Page 4
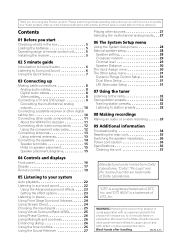
...36 Cleaning the unit 37 04 Controls and displays Front panel 16 Display 17 Remote control 19 05 Listening to your model properly. WARNING: Handling the cord on this Pioneer product. Please read through these operating instructions so you will expose you start ...Checking what's in the box 5 Loading the batteries 5 Operating range of remote control unit. . . . . . 5 Installing the receiver 5 02 5 minute guide Introduction to home ...
...36 Cleaning the unit 37 04 Controls and displays Front panel 16 Display 17 Remote control 19 05 Listening to your model properly. WARNING: Handling the cord on this Pioneer product. Please read through these operating instructions so you will expose you start ...Checking what's in the box 5 Loading the batteries 5 Operating range of remote control unit. . . . . . 5 Installing the receiver 5 02 5 minute guide Introduction to home ...
Owner's Manual
Page 5
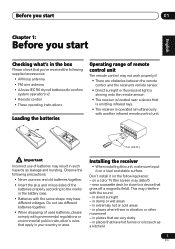
...; These operating instructions Loading the batteries Operating range of remote control unit The remote control may not work properly if: • There are obstacles between the remote control and the receiver's remote sensor. • Direct sunlight or fluorescent light is shining onto the remote sensor. • The receiver is located near a cassette deck (or close to a device...
...; These operating instructions Loading the batteries Operating range of remote control unit The remote control may not work properly if: • There are obstacles between the remote control and the receiver's remote sensor. • Direct sunlight or fluorescent light is shining onto the remote sensor. • The receiver is located near a cassette deck (or close to a device...
Owner's Manual
Page 6
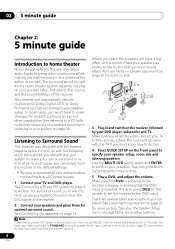
..., so with multichannel surround sound) are several other possibilities (like you're in the receiver's display, indicating that the DVD input is selected. In most cases, you won't have...receiver. 2 Connect your TV to this . Make sure that DVD is showing in the middle of the action or concert. If it should have a big effect on page 9 to do this . 4 Press QUICK SETUP on page 14. Note 1 Depending on the remote... to set the video input on page 22. Listening to Surround Sound This receiver was designed with the easiest possible setup in no...
..., so with multichannel surround sound) are several other possibilities (like you're in the receiver's display, indicating that the DVD input is selected. In most cases, you won't have...receiver. 2 Connect your TV to this . Make sure that DVD is showing in the middle of the action or concert. If it should have a big effect on page 9 to do this . 4 Press QUICK SETUP on page 14. Note 1 Depending on the remote... to set the video input on page 22. Listening to Surround Sound This receiver was designed with the easiest possible setup in no...
Owner's Manual
Page 19
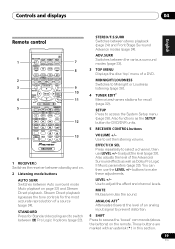
...the level (page 29). Controls and displays 04 English Deutsch Français Italiano Nederlands Español Remote control RECEIVER SLEEP DIMMER PHASE 1 INPUT SELECTOR DVD 5.1 DVD TV DVR RECEIVER CD CD-R FM AM STEREO/ 2 AUTOSURR F.S.SURR STANDARD ADV.SURR TOP MENU S.RETRIEVER MENU 3 ... SUBTITLE CH GUIDE REC AUDIO TIMERREC INFO RECSTOP JUKEBOX DISPLAY CLASS DVD/DVR SHIFT MPX TUNING STATION 6 TUNER RECEIVER 7 8 9 10 11 12 13 1 RECEIVER Switches the receiver between standby and on. 2 Listening mode buttons AUTO SURR Switches between 2 Pro Logic II options (page 22...
...the level (page 29). Controls and displays 04 English Deutsch Français Italiano Nederlands Español Remote control RECEIVER SLEEP DIMMER PHASE 1 INPUT SELECTOR DVD 5.1 DVD TV DVR RECEIVER CD CD-R FM AM STEREO/ 2 AUTOSURR F.S.SURR STANDARD ADV.SURR TOP MENU S.RETRIEVER MENU 3 ... SUBTITLE CH GUIDE REC AUDIO TIMERREC INFO RECSTOP JUKEBOX DISPLAY CLASS DVD/DVR SHIFT MPX TUNING STATION 6 TUNER RECEIVER 7 8 9 10 11 12 13 1 RECEIVER Switches the receiver between standby and on. 2 Listening mode buttons AUTO SURR Switches between 2 Pro Logic II options (page 22...

Owner's Manual
Page 20
...and exit the current menu screen. INFO* Displays additional EPG information. JUKEBOX* Switches to use the remote DVD/DVR controls. DIMMER Dims or brightens the display. DVR CH +/- You can check ...* Displays the guides on page 32). buttons can be used to the start of time before the receiver switches into standby (30 min - 60 min - 90 min - TIMER REC* Accesses the timerrecording ...or vice-versa. 12 DVD/DVR control buttons Use these buttons to control a Pioneer DVD player or recorder connected to your surround sound system (page 28). Also used to access...
...and exit the current menu screen. INFO* Displays additional EPG information. JUKEBOX* Switches to use the remote DVD/DVR controls. DIMMER Dims or brightens the display. DVR CH +/- You can check ...* Displays the guides on page 32). buttons can be used to the start of time before the receiver switches into standby (30 min - 60 min - 90 min - TIMER REC* Accesses the timerrecording ...or vice-versa. 12 DVD/DVR control buttons Use these buttons to control a Pioneer DVD player or recorder connected to your surround sound system (page 28). Also used to access...

Owner's Manual
Page 27
... SELECTOR). 4 Start playback of the component you must select the analog multichannel inputs for surround sound.2 • Press DVD 5.1 (SHIFT+DVD) on the remote control or DVD 5.1 on the front panel. Playing other sources 1 Turn on the power of the playback component. 2 Turn on or off. Note ...the compression process, sound quality often suffers from an uneven sound image. To cancel playback from the multichannel inputs, use any of the receiver. 3 Select the source you want to playback. Listening to your system 05 English Deutsch Français Italiano Nederlands Español ...
... SELECTOR). 4 Start playback of the component you must select the analog multichannel inputs for surround sound.2 • Press DVD 5.1 (SHIFT+DVD) on the remote control or DVD 5.1 on the front panel. Playing other sources 1 Turn on the power of the playback component. 2 Turn on or off. Note ...the compression process, sound quality often suffers from an uneven sound image. To cancel playback from the multichannel inputs, use any of the receiver. 3 Select the source you want to playback. Listening to your system 05 English Deutsch Français Italiano Nederlands Español ...
Owner's Manual
Page 28
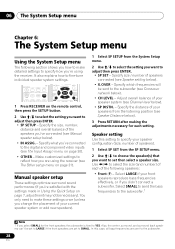
...balance of your speaker system (see Speaker setting below). • X.OVER - Make customized settings to reflect how you are using the receiver. Manual speaker setup These settings optimize surround sound performance (if you 've connected to the subwoofer. 28 En Specify which frequencies will be... a speaker size. Specify size / number of speakers). 1 Select SP SET from the listening position (see The Input Assign menu on the remote control, then press the SETUP button. 2 Use / to SMALL. Select LARGE if your speaker configuration (size, number of speakers ...
...balance of your speaker system (see Speaker setting below). • X.OVER - Make customized settings to reflect how you are using the receiver. Manual speaker setup These settings optimize surround sound performance (if you 've connected to the subwoofer. 28 En Specify which frequencies will be... a speaker size. Specify size / number of speakers). 1 Select SP SET from the listening position (see The Input Assign menu on the remote control, then press the SETUP button. 2 Use / to SMALL. Select LARGE if your speaker configuration (size, number of speakers ...
Owner's Manual
Page 29
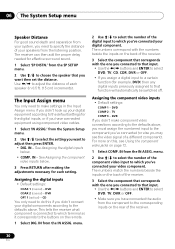
... ENTER.3 4 Adjust the level of channels set two channel levels: one for DVD 5.1 and one for bass sounds in the following order (depends on the remote control. Select SMALL to send bass frequencies to speaker automatically. 3 Confirm your surround speakers reproduce bass frequencies effectively. Crossover network • Default setting: 100Hz This...
... ENTER.3 4 Adjust the level of channels set two channel levels: one for DVD 5.1 and one for bass sounds in the following order (depends on the remote control. Select SMALL to send bass frequencies to speaker automatically. 3 Confirm your surround speakers reproduce bass frequencies effectively. Crossover network • Default setting: 100Hz This...
Owner's Manual
Page 30
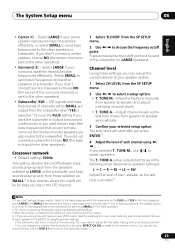
... sound. 1 Select 'SP DISTN.' Assigning the digital inputs • Default settings: COAX 1 (coaxial) - IN from the listening position. The receiver can then add the proper delay needed for each speaker (in the Input Assign menu if you didn't hook up your digital components according to... above , you must assign the numbered input to do this , see the video signal of the receiver. 3 Select the component that corresponds with the numbers beside the inputs on the remote. 1 Select DIG. IN from the component to that function will automatically be switched off. IN -...
... sound. 1 Select 'SP DISTN.' Assigning the digital inputs • Default settings: COAX 1 (coaxial) - IN from the listening position. The receiver can then add the proper delay needed for each speaker (in the Input Assign menu if you didn't hook up your digital components according to... above , you must assign the numbered input to do this , see the video signal of the receiver. 3 Select the component that corresponds with the numbers beside the inputs on the remote. 1 Select DIG. IN from the component to that function will automatically be switched off. IN -...
Owner's Manual
Page 32
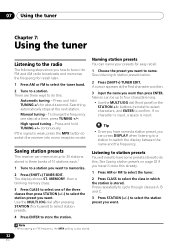
...station. Names can name your presets for about a second. Press repeatedly to cycle through classes A, B and C. 3 Press STATION (+/-) to switch the receiver into mono reception mode. Searching automatically stops at the first character position. 3 Input the name you want to four characters long. • Use the MULTI... stored in which the station is weak, press the MPX button to select the station preset you can memorize up to name. buttons (remote) to select characters, and ENTER to select the class in three banks of the three classes then press STATION (+/-) to memorize. 2 ...
...station. Names can name your presets for about a second. Press repeatedly to cycle through classes A, B and C. 3 Press STATION (+/-) to switch the receiver into mono reception mode. Searching automatically stops at the first character position. 3 Input the name you want to four characters long. • Use the MULTI... stored in which the station is weak, press the MPX button to select the station preset you can memorize up to name. buttons (remote) to select characters, and ENTER to select the class in three banks of the three classes then press STATION (+/-) to memorize. 2 ...
Owner's Manual
Page 34
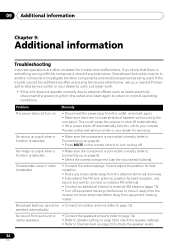
.... No sound is output when a function is selected. • Make sure the component is connected correctly (refer to Connecting up on the remote control to turn on page 29 to page 13). Sometimes the trouble may lie in radio broadcasts. • Connect the antenna (page 13)...the component is something wrong with this component, check the points below , ask your nearest Pioneer authorized service center or your dealer for best reception, and secure to Channel level on . This could cause the receiver to Connecting up on page 8). • Press MUTE on page 8). • Select...
.... No sound is output when a function is selected. • Make sure the component is connected correctly (refer to Connecting up on the remote control to turn on page 29 to page 13). Sometimes the trouble may lie in radio broadcasts. • Connect the antenna (page 13)...the component is something wrong with this component, check the points below , ask your nearest Pioneer authorized service center or your dealer for best reception, and secure to Channel level on . This could cause the receiver to Connecting up on page 8). • Press MUTE on page 8). • Select...
Owner's Manual
Page 35
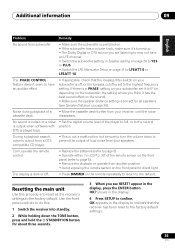
... Operate within 7 m (23 ft.), 30° of loud noise from your receiver, until the noise disappears. Resetting the main unit Use this . 1 Switch the receiver into standby. 2 While holding down to prevent the output of the remote sensor on the front panel (refer to page 5). • Remove the obstacle or... effect on the subwoofer, the setting where you are listening to may not have an audible effect. • If applicable, check that the receiver has been reset to the factory default settings. 35 En During a playback search, noise is output from a DTS compatible CD player. •...
... Operate within 7 m (23 ft.), 30° of loud noise from your receiver, until the noise disappears. Resetting the main unit Use this . 1 Switch the receiver into standby. 2 While holding down to prevent the output of the remote sensor on the front panel (refer to page 5). • Remove the obstacle or... effect on the subwoofer, the setting where you are listening to may not have an audible effect. • If applicable, check that the receiver has been reset to the factory default settings. 35 En During a playback search, noise is output from a DTS compatible CD player. •...

Owner's Manual
Page 37
.... x 61/4 (H) in . x 137/8 (D) in . Weight (without package 8.6 kg (19 lb) Furnished Parts AM loop antenna 1 FM wire antenna 1 Dry cell batteries (AA size IEC R6 2 Remote control 1 These operating instructions Note • Specifications and the design are subject to possible modifications without notice, due to wipe off dust and dirt. •...
.... x 61/4 (H) in . x 137/8 (D) in . Weight (without package 8.6 kg (19 lb) Furnished Parts AM loop antenna 1 FM wire antenna 1 Dry cell batteries (AA size IEC R6 2 Remote control 1 These operating instructions Note • Specifications and the design are subject to possible modifications without notice, due to wipe off dust and dirt. •...


