Owner's Manual
Page 4
...components on and off using synchronization 45 About synchronized operations 45 Setting the PQLS function 45 Cautions on the Control with this Pioneer product. Please read through LAN interface 21 Connecting optional Bluetooth ADAPTER 21 Connecting an iPod 22 Connecting a USB device 22...an audio or a video recording......... 51 Reducing the level of an analog signal....... 51 Using the sleep timer 51 Dimming the display 51 Checking your system settings 51 Resetting the system 51 10 Controlling the rest of your system About the Remote Setup menu 53 Operating multiple receivers 53...
...components on and off using synchronization 45 About synchronized operations 45 Setting the PQLS function 45 Cautions on the Control with this Pioneer product. Please read through LAN interface 21 Connecting optional Bluetooth ADAPTER 21 Connecting an iPod 22 Connecting a USB device 22...an audio or a video recording......... 51 Reducing the level of an analog signal....... 51 Using the sleep timer 51 Dimming the display 51 Checking your system settings 51 Resetting the system 51 10 Controlling the rest of your system About the Remote Setup menu 53 Operating multiple receivers 53...
Owner's Manual
Page 5
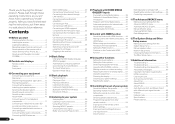
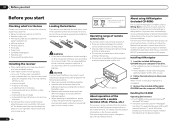
...4 Connecting the components ! Control with the receiver. About the audio connection on page 20 ! Connecting AM/FM antennas on page 15 ! The System Setup and Other Setup menus (page 65) j 12 Making maximum use of functions and terminals. Flow of settings on page 6 j 2 Determining the speakers' application (page...HDMI function (page 44) ! Automatically conducting optimum sound tuning (Full Auto MCACC) on page 25 j 8 The Input Setup menu (page 26) (When using Wiring Navi on page 15 ! Using the various listening modes (page 36) !
...4 Connecting the components ! Control with the receiver. About the audio connection on page 20 ! Connecting AM/FM antennas on page 15 ! The System Setup and Other Setup menus (page 65) j 12 Making maximum use of functions and terminals. Flow of settings on page 6 j 2 Determining the speakers' application (page...HDMI function (page 44) ! Automatically conducting optimum sound tuning (Full Auto MCACC) on page 25 j 8 The Input Setup menu (page 26) (When using Wiring Navi on page 15 ! Using the various listening modes (page 36) !
Owner's Manual
Page 6
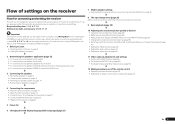
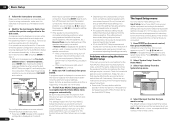
...box Please check that you to easily make the receiver's connections and initial settings in dialog fashion. CD-ROM (AVNavigator) ! on the Pioneer website. in damp or wet areas - they may have different voltages. The installation screen is Microsoft Internet Explorer 6, 7 and 8. ... Warranty card ! WARNING ! When disposing of used for batteries) These symbols are very dusty - About using alkaline batteries that gives off . Setup microphone (cable: 5 m (16.4 ft.)) ! near a heater. in association with Microsoft® Windows® XP/Vista/7. ! Direct sunlight or ...
...box Please check that you to easily make the receiver's connections and initial settings in dialog fashion. CD-ROM (AVNavigator) ! on the Pioneer website. in damp or wet areas - they may have different voltages. The installation screen is Microsoft Internet Explorer 6, 7 and 8. ... Warranty card ! WARNING ! When disposing of used for batteries) These symbols are very dusty - About using alkaline batteries that gives off . Setup microphone (cable: 5 m (16.4 ft.)) ! near a heater. in association with Microsoft® Windows® XP/Vista/7. ! Direct sunlight or ...
Owner's Manual
Page 8
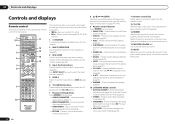
...operations in sleep mode and select the amount of time before sleep (page 51). ! SLEEP - CH LEVEL - Press repeatedly to select a channel, then use this button to perform multi operations (page 55). 3 RCU SETUP Use to input the preset code when making remote control settings and to confirm... Remote control This section explains how to operate the remote control for the receiver. 1 2,3 4 5 6 7 8 9 10 RECEIVER MULTI OPERATION SOURCE RCU SETUP BDR BD DVD DVR HDMI SAT TV CD HMG ADPT USB iPod TV CTRL TUNER SIRIUS INPUT SELECT ZONE 2 RECEIVER INPUT MASTER VOLUME TV CONTROL...
...operations in sleep mode and select the amount of time before sleep (page 51). ! SLEEP - CH LEVEL - Press repeatedly to select a channel, then use this button to perform multi operations (page 55). 3 RCU SETUP Use to input the preset code when making remote control settings and to confirm... Remote control This section explains how to operate the remote control for the receiver. 1 2,3 4 5 6 7 8 9 10 RECEIVER MULTI OPERATION SOURCE RCU SETUP BDR BD DVD DVR HDMI SAT TV CD HMG ADPT USB iPod TV CTRL TUNER SIRIUS INPUT SELECT ZONE 2 RECEIVER INPUT MASTER VOLUME TV CONTROL...
Owner's Manual
Page 10
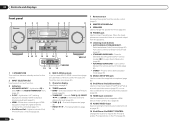
... iPod iPhone iPad DIRECT CONTROL ENTER PHONES MCACC SETUP MIC 5V 2.1 A iPod iPhone iPad USB HDMI 2 INPUT 8 VSX-51 MASTER VOLUME 9 10 11 12 13 14 MCACC SETUP MIC VIDEO 2 INPUT 5V 2.1 A L AUDIO R iPod iPhone USB VIDEO iPad 12 15 13 16 VSX-50 VSX-51 1 u STANDBY/ON This switches between the... Direct mode (page 37). ! STANDARD SURROUND - ADVANCED MCACC - ADVANCED SURROUND - Press to select stereo playback mode (page 36). 12 MCACC SETUP MIC jack Use to connect the supplied microphone (page 25). 13 iPod iPhone iPad USB terminals Use to connect your Apple iPod/iPhone/iPad as...
... iPod iPhone iPad DIRECT CONTROL ENTER PHONES MCACC SETUP MIC 5V 2.1 A iPod iPhone iPad USB HDMI 2 INPUT 8 VSX-51 MASTER VOLUME 9 10 11 12 13 14 MCACC SETUP MIC VIDEO 2 INPUT 5V 2.1 A L AUDIO R iPod iPhone USB VIDEO iPad 12 15 13 16 VSX-50 VSX-51 1 u STANDBY/ON This switches between the... Direct mode (page 37). ! STANDARD SURROUND - ADVANCED MCACC - ADVANCED SURROUND - Press to select stereo playback mode (page 36). 12 MCACC SETUP MIC jack Use to connect the supplied microphone (page 25). 13 iPod iPhone iPad USB terminals Use to connect your Apple iPod/iPhone/iPad as...
Owner's Manual
Page 11
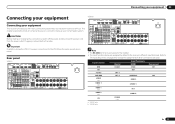
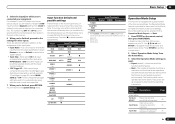
... off the power and disconnect the power cord from the power outlet. Input function DVD BD TV/SAT DVR/BDR VIDEO VIDEO 1 HDMI 1 HDMI 2 CD a VSX-51 only b VSX-50 only Digital COAX-1 OPT-1 OPT-2 COAX-2 Input Terminals HDMI (DVD) (BD) Component IN 1 (DVR/BDR) IN 2 (VIDEO) (VIDEO 1) IN 1 (...This receiver provides you with many connection possibilities, but it doesn't have to the receiver's different input terminals. Refer to The Input Setup menu on page 26 to change the assignments if other connections are assigned by default to be the final step. The input functions below...
... off the power and disconnect the power cord from the power outlet. Input function DVD BD TV/SAT DVR/BDR VIDEO VIDEO 1 HDMI 1 HDMI 2 CD a VSX-51 only b VSX-50 only Digital COAX-1 OPT-1 OPT-2 COAX-2 Input Terminals HDMI (DVD) (BD) Component IN 1 (DVR/BDR) IN 2 (VIDEO) (VIDEO 1) IN 1 (...This receiver provides you with many connection possibilities, but it doesn't have to the receiver's different input terminals. Refer to The Input Setup menu on page 26 to change the assignments if other connections are assigned by default to be the final step. The input functions below...
Owner's Manual
Page 15
... main zone with 5.1-channel surround sound. 1 Connect bi-amp compatible speakers to the front and surround back speaker terminals. Front height setup *Default setting 1 Connect a pair of speakers to the front height speaker terminals. See Standard surround connection on page 14 . 2...signal priority Digital (Coaxial) Conventional digital audio Digital (Optical) RCA (Analog) (White/Red) Conventional analog audio ! ZONE 2 setup With these connections, the Speaker System setting makes no difference. About the video converter The video converter ensures that order). With these...
... main zone with 5.1-channel surround sound. 1 Connect bi-amp compatible speakers to the front and surround back speaker terminals. Front height setup *Default setting 1 Connect a pair of speakers to the front height speaker terminals. See Standard surround connection on page 14 . 2...signal priority Digital (Coaxial) Conventional digital audio Digital (Optical) RCA (Analog) (White/Red) Conventional analog audio ! ZONE 2 setup With these connections, the Speaker System setting makes no difference. About the video converter The video converter ensures that order). With these...
Owner's Manual
Page 17
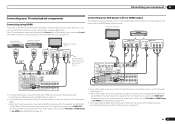
... Y HDMI OUT HDMI OUT HDMI IN Select one DIGITAL OUT AUDIO OUT COAXIAL OPTICAL R ANALOG L VSX-51 only This connection is no need to tell the receiver which digital input you can be used (see The Input Setup menu on page 26 ). HDMI IN 1 ASSIGNABLE 1 VIDEO IN BD IN DVD IN DVR/BDR... and TV with audio cables. - SPEAKERS SELECTA Class 2Wiring SELECTA ! If you want to listen to via HDMI (see HDMI Setup on page 44 ). In this case, set TV Audio at HDMI Setup to the sound of the TV over the receiver, connect the receiver and TV with audio cables (page 17). -
... Y HDMI OUT HDMI OUT HDMI IN Select one DIGITAL OUT AUDIO OUT COAXIAL OPTICAL R ANALOG L VSX-51 only This connection is no need to tell the receiver which digital input you can be used (see The Input Setup menu on page 26 ). HDMI IN 1 ASSIGNABLE 1 VIDEO IN BD IN DVD IN DVR/BDR... and TV with audio cables. - SPEAKERS SELECTA Class 2Wiring SELECTA ! If you want to listen to via HDMI (see HDMI Setup on page 44 ). In this case, set TV Audio at HDMI Setup to the sound of the TV over the receiver, connect the receiver and TV with audio cables (page 17). -
Owner's Manual
Page 18
... to tell the receiver which digital input you connected the recorder to (see also The Input Setup menu on the video component, it may be possible to output signals connected by HDMI (see The Input Setup menu on page 26 ). 18 En HDMI IN 1 ASSIGNABLE 1 VIDEO IN BD IN DVD IN DVR..., you want to listen to the sound of the TV over the receiver, connect the receiver and TV with your component for playback only) (page 51). ! Please refer to the operating instructions supplied with audio cables (page 17). ! When doing so, also connect the receiver and TV by HDMI and other...
... to tell the receiver which digital input you connected the recorder to (see also The Input Setup menu on the video component, it may be possible to output signals connected by HDMI (see The Input Setup menu on page 26 ). 18 En HDMI IN 1 ASSIGNABLE 1 VIDEO IN BD IN DVD IN DVR..., you want to listen to the sound of the TV over the receiver, connect the receiver and TV with your component for playback only) (page 51). ! Please refer to the operating instructions supplied with audio cables (page 17). ! When doing so, also connect the receiver and TV by HDMI and other...
Owner's Manual
Page 19
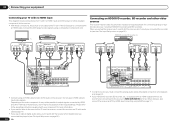
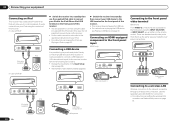
... 03 Connecting a satellite/cable receiver or other audio components This receiver has both digital and analog inputs, allowing you to (see The Input Setup menu on page 26 ). When you connected the component to (see Connecting using HDMI on page 26 ). STB Connecting other set-top box... SPEAKER IMPEDANCE ENCEINTE D'IMPEDANCE DE 6 -16 . 6 -16 . When doing so, also connect the receiver and TV by HDMI (see also The Input Setup menu on page 17 ). En 19 If your set -top box to connect audio components for WIRELESS LAN LAN (10/100) COAXIAL ASSIGNABLE IN 1 IN...
... 03 Connecting a satellite/cable receiver or other audio components This receiver has both digital and analog inputs, allowing you to (see The Input Setup menu on page 26 ). When you connected the component to (see Connecting using HDMI on page 26 ). STB Connecting other set-top box... SPEAKER IMPEDANCE ENCEINTE D'IMPEDANCE DE 6 -16 . 6 -16 . When doing so, also connect the receiver and TV by HDMI (see also The Input Setup menu on page 17 ). En 19 If your set -top box to connect audio components for WIRELESS LAN LAN (10/100) COAXIAL ASSIGNABLE IN 1 IN...
Owner's Manual
Page 20
... to two independent systems in the direction indicated by the remote or front panel controls. Different sources can be output to ZONE 2: In case of VSX-51 Sub Zone Input functions available ZONE 2 DVD, TV/SAT, DVR/BDR, VIDEO, HOME MEDIA GALLERY, iPod/ USB, CD, CD-R/TAPE, TUNER, ADAPTER PORT, ...these connections if you plan to mount the AM antenna to the attached stand. a) then clip the loop onto the stand (fig. Basic MULTI-ZONE setup (ZONE 2) 1 Connect a separate amplifier to the AUDIO ZONE 2 OUT jacks on your equipment Connecting AM/FM antennas Connect the AM loop antenna and...
... to two independent systems in the direction indicated by the remote or front panel controls. Different sources can be output to ZONE 2: In case of VSX-51 Sub Zone Input functions available ZONE 2 DVD, TV/SAT, DVR/BDR, VIDEO, HOME MEDIA GALLERY, iPod/ USB, CD, CD-R/TAPE, TUNER, ADAPTER PORT, ...these connections if you plan to mount the AM antenna to the attached stand. a) then clip the loop onto the stand (fig. Basic MULTI-ZONE setup (ZONE 2) 1 Connect a separate amplifier to the AUDIO ZONE 2 OUT jacks on your equipment Connecting AM/FM antennas Connect the AM loop antenna and...
Owner's Manual
Page 21
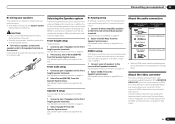
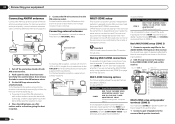
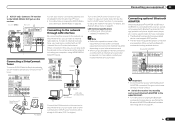
... used to listen to set up the network manually. For instructions on playing the SIRIUS Radio, see Network Setup menu on page 67 . LAN terminal : Ethernet jack (10BASE-T/100BASE-TX) Note ! En 21 When... -16 . 6 -16 . SPEAKERS SELECT Class 2 Wiring SELECT Important ! For more details, contact your router. Pioneer does not guarantee proper connection and operation of the equipment you have the built-in this way, you will also need ...terminal on this receiver to the LAN terminal on your equipment 03 2 VSX-51 only: Connect a TV monitor to the ADAPTER PORT. !
... used to listen to set up the network manually. For instructions on playing the SIRIUS Radio, see Network Setup menu on page 67 . LAN terminal : Ethernet jack (10BASE-T/100BASE-TX) Note ! En 21 When... -16 . 6 -16 . SPEAKERS SELECT Class 2 Wiring SELECT Important ! For more details, contact your router. Pioneer does not guarantee proper connection and operation of the equipment you have the built-in this way, you will also need ...terminal on this receiver to the LAN terminal on your equipment 03 2 VSX-51 only: Connect a TV monitor to the ADAPTER PORT. !
Owner's Manual
Page 22
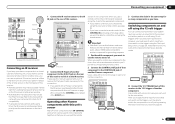
...text in the following GUI screens. ! In case of VSX-51 CONTROL ON / OFF MCACC SETUP MIC 5V 2.1 A iPod iPhone iPad USB HDMI 2 INPUT iPod cable (supplied) In case of VSX-50 iPod MENU CONTROL ON / OFF MCACC SETUP MIC VIDEO 2 INPUT 5V 2.1 A L AUDIO R...the remote control. Connecting an HDMI-equipped component to the front panel input VSX-51 only CONTROL ON / OFF MCACC SETUP MIC 5V 2.1 A iPod iPhone iPad USB HDMI 2 INPUT Connecting to the front panel video terminal VSX-50 only Front VIDEO 2 connections are standard audio/video jacks. USB ...
...text in the following GUI screens. ! In case of VSX-51 CONTROL ON / OFF MCACC SETUP MIC 5V 2.1 A iPod iPhone iPad USB HDMI 2 INPUT iPod cable (supplied) In case of VSX-50 iPod MENU CONTROL ON / OFF MCACC SETUP MIC VIDEO 2 INPUT 5V 2.1 A L AUDIO R...the remote control. Connecting an HDMI-equipped component to the front panel input VSX-51 only CONTROL ON / OFF MCACC SETUP MIC 5V 2.1 A iPod iPhone iPad USB HDMI 2 INPUT Connecting to the front panel video terminal VSX-50 only Front VIDEO 2 connections are standard audio/video jacks. USB ...
Owner's Manual
Page 23
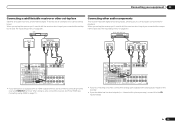
... the IR IN jack on page 26. If using a mini-plug cable), you have a standby mode. Switching components on and off using the The Input Setup menu on the IR receiver remote sensor window. ! Remote operation may not use just the remote sensor of one set on the rear of another... on the front panel. 1 Connect the IR receiver sensor to this receiver so that this feature, make sure that have . Closet or shelving unit Pioneer component Non-Pioneer component CONTROL IR IN OUT IN HDMI IN 1 ASSIGNABLE 1 VIDEO IN BD IN DVD IN DVR/BDR IN OUT DC OUTPUT for the connection...
... the IR IN jack on page 26. If using a mini-plug cable), you have a standby mode. Switching components on and off using the The Input Setup menu on the IR receiver remote sensor window. ! Remote operation may not use just the remote sensor of one set on the rear of another... on the front panel. 1 Connect the IR receiver sensor to this receiver so that this feature, make sure that have . Closet or shelving unit Pioneer component Non-Pioneer component CONTROL IR IN OUT IN HDMI IN 1 ASSIGNABLE 1 VIDEO IN BD IN DVD IN DVR/BDR IN OUT DC OUTPUT for the connection...
Owner's Manual
Page 25
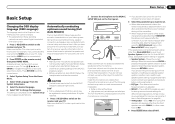
... - Make sure that it's about ear level at your TV. Automatically conducting optimum sound tuning (Full Auto MCACC) The Full Auto MCACC Setup measures the acoustic characteristics of the following surfaces may be disconnected. All rights reserved. 1 Press u RECEIVER to the VIDEO jacks on your... than the front speakers are used for storing surround sound settings for the GUI screen. 1 Press u RECEIVER to SMALL). Basic Setup 04 Basic Setup Changing the OSD display language (OSD Language) The language used on the Graphical User Interface screen can rename it later in Data ...
... - Make sure that it's about ear level at your TV. Automatically conducting optimum sound tuning (Full Auto MCACC) The Full Auto MCACC Setup measures the acoustic characteristics of the following surfaces may be disconnected. All rights reserved. 1 Press u RECEIVER to the VIDEO jacks on your... than the front speakers are used for storing surround sound settings for the GUI screen. 1 Press u RECEIVER to SMALL). Basic Setup 04 Basic Setup Changing the OSD display language (OSD Language) The language used on the Graphical User Interface screen can rename it later in Data ...
Owner's Manual
Page 26
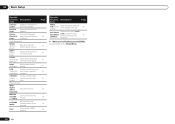
.... - A progress report is displayed on the rear panel (such as possible while it is hooked up with the speaker connection. Other Setup 4b.Input Setup A/V RECEIVER Input Input Name Input Skip : DVD : Rename : OFF Exit Digital In : HDMI Input : Component In : 12V Trigger1...settings made in the GUI screen. If the connections were wrong, turn , correspond with the operation of the Full Auto MCACC Setup. 04 Basic Setup 5 Follow the instructions on your TV. or Check microphone.), select RETRY after checking for household appliances (air conditioner, fridge,...
.... - A progress report is displayed on the rear panel (such as possible while it is hooked up with the speaker connection. Other Setup 4b.Input Setup A/V RECEIVER Input Input Name Input Skip : DVD : Rename : OFF Exit Digital In : HDMI Input : Component In : 12V Trigger1...settings made in the GUI screen. If the connections were wrong, turn , correspond with the operation of the Full Auto MCACC Setup. 04 Basic Setup 5 Follow the instructions on your TV. or Check microphone.), select RETRY after checking for household appliances (air conditioner, fridge,...
Owner's Manual
Page 27
... see Control with the input function buttons.) ! 12V Trigger1/2 - Select Rename to do so, or Default to return to achieve the Pioneer-recommended sound and picture quality. After connecting a component to the assignment of the receiver. 6 When you 're finished, press RETURN. ...to ON, assignments cannot be selected directly with HDMI function on the remote control, then press HOME MENU. b VSX-51 only c VSX-50 only Operation Mode Setup This receiver is restricted, and functions whose operations are restricted are skipped (not displayed). A Graphical User Interface (...
... see Control with the input function buttons.) ! 12V Trigger1/2 - Select Rename to do so, or Default to return to achieve the Pioneer-recommended sound and picture quality. After connecting a component to the assignment of the receiver. 6 When you 're finished, press RETURN. ...to ON, assignments cannot be selected directly with HDMI function on the remote control, then press HOME MENU. b VSX-51 only c VSX-50 only Operation Mode Setup This receiver is restricted, and functions whose operations are restricted are skipped (not displayed). A Graphical User Interface (...
Owner's Manual
Page 28
... from the iPod. Switches the input to set the listening volume. You will return to the Home Menu. 28 En Pairing Bluetooth Setup Pairs with high sound quality. DUAL Dual monaural audio (Dual Mono) setting. V.SB (Virtual Surround Back) Creates a virtual surround back... you're finished, press RETURN. Other functions INPUT SELECT (INPUT SELECTOR) Switches the input. LISTENING MODE Only Pioneer-recommended modes can be selected. 04 Basic Setup Operable functions/ Descriptions items Software Update Updates to the latest version of the overall sound. Page 34 47 47...
... from the iPod. Switches the input to set the listening volume. You will return to the Home Menu. 28 En Pairing Bluetooth Setup Pairs with high sound quality. DUAL Dual monaural audio (Dual Mono) setting. V.SB (Virtual Surround Back) Creates a virtual surround back... you're finished, press RETURN. Other functions INPUT SELECT (INPUT SELECTOR) Switches the input. LISTENING MODE Only Pioneer-recommended modes can be selected. 04 Basic Setup Operable functions/ Descriptions items Software Update Updates to the latest version of the overall sound. Page 34 47 47...
Owner's Manual
Page 30
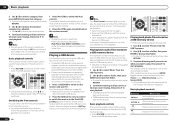
...a folder, then press ENTER to browse that you can switch over the iPod controls between play files using the USB interface on the Slideshow Setup is left in standby when disconnecting the USB device. 2 Press iPod USB on page 22 . ! During Audiobook playback, press i/j to...device connected. Playing back audio files stored on an iPod. ! After a slideshow launches, pressing ENTER toggles between the iPod and the receiver. ! Pioneer cannot guarantee compatibility (operation and/or bus power) with the device) for any time, press RETURN. 3 Use i/j to switch the iPod controls....
...a folder, then press ENTER to browse that you can switch over the iPod controls between play files using the USB interface on the Slideshow Setup is left in standby when disconnecting the USB device. 2 Press iPod USB on page 22 . ! During Audiobook playback, press i/j to...device connected. Playing back audio files stored on an iPod. ! After a slideshow launches, pressing ENTER toggles between the iPod and the receiver. ! Pioneer cannot guarantee compatibility (operation and/or bus power) with the device) for any time, press RETURN. 3 Use i/j to switch the iPod controls....
Owner's Manual
Page 31
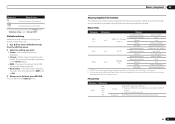
...Music Select - b Files encoded using Windows Media Codec 9 may not be played when BGM is set to Normal (OFF). ported; Slideshow Setup Make the various settings for playing slideshows of the specification are not available for switching the photos. You will return to the slideshow. !... playable but some file formats are not sup- Play music files stored on the Slideshow Setup is set to ON. 3 When you want. ! Select the folder containing the music files to select 'Slideshow Setup' from Fraunhofer IIS and Thomson multimedia." Y:Cb:Cr - 4:4:4, 4:2:2 or 4:2:0 30 ...
...Music Select - b Files encoded using Windows Media Codec 9 may not be played when BGM is set to Normal (OFF). ported; Slideshow Setup Make the various settings for playing slideshows of the specification are not available for switching the photos. You will return to the slideshow. !... playable but some file formats are not sup- Play music files stored on the Slideshow Setup is set to ON. 3 When you want. ! Select the folder containing the music files to select 'Slideshow Setup' from Fraunhofer IIS and Thomson multimedia." Y:Cb:Cr - 4:4:4, 4:2:2 or 4:2:0 30 ...


