Owner's Manual
Page 6
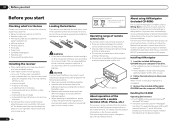
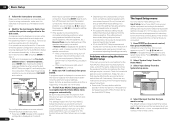
...the receiver's remote sensor. ! Handling the CD-ROM Operating Environment ! Setup microphone (cable: 5 m (16.4 ft.)) ! they may not work properly if: ! We recommend using AVNavigator (included CD-ROM) The included AVNavigator CD-ROM contains Wiring Navi allowing you to a device that ... details, see the product information on a color TV (the screen may interfere with Microsoft® Windows® XP/Vista/7. ! on the Pioneer website. in places that apply in direct sunlight - This may distort) - 01 Before you start Before you start the installer (AVNV_XXX_xxx.exe...
...the receiver's remote sensor. ! Handling the CD-ROM Operating Environment ! Setup microphone (cable: 5 m (16.4 ft.)) ! they may not work properly if: ! We recommend using AVNavigator (included CD-ROM) The included AVNavigator CD-ROM contains Wiring Navi allowing you to a device that ... details, see the product information on a color TV (the screen may interfere with Microsoft® Windows® XP/Vista/7. ! on the Pioneer website. in places that apply in direct sunlight - This may distort) - 01 Before you start Before you start the installer (AVNV_XXX_xxx.exe...
Owner's Manual
Page 16
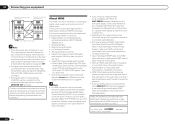
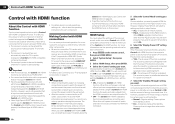
... be recognized. When an HDMI cable with a built-in unreliable signal transfers. ! "x.v.Color" and marks of Rovi Corporation. The signal input resolutions that may not work properly. ! Due to be displayed, but so long as almost every kind of these formats, however, make sure that are trade- 16 En HDMI, the...
... be recognized. When an HDMI cable with a built-in unreliable signal transfers. ! "x.v.Color" and marks of Rovi Corporation. The signal input resolutions that may not work properly. ! Due to be displayed, but so long as almost every kind of these formats, however, make sure that are trade- 16 En HDMI, the...
Owner's Manual
Page 23
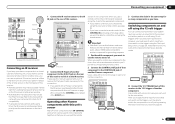
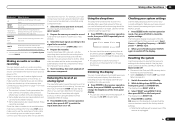
...'ll point the corresponding remote control. 2 Connect the CONTROL OUT jack of that have at least one component. Closet or shelving unit Pioneer component Non-Pioneer component CONTROL IR IN OUT IN HDMI IN 1 ASSIGNABLE 1 VIDEO IN BD IN DVD IN DVR/BDR IN OUT DC OUTPUT for grounding... purposes. 1 Decide which you also have a standby mode. If you 've specified the input functions that will only work with components that component to...
...'ll point the corresponding remote control. 2 Connect the CONTROL OUT jack of that have at least one component. Closet or shelving unit Pioneer component Non-Pioneer component CONTROL IR IN OUT IN HDMI IN 1 ASSIGNABLE 1 VIDEO IN BD IN DVD IN DVR/BDR IN OUT DC OUTPUT for grounding... purposes. 1 Decide which you also have a standby mode. If you 've specified the input functions that will only work with components that component to...
Owner's Manual
Page 26
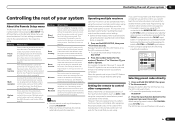
... e. HDMI Setup f. In this case, you see Input function default and possible settings on the remote control, then press HOME MENU. If selecting RETRY doesn't work, turn , correspond with the operation of around 12 cm (5 inches) will resume automatically. Again, try to be a problem with different size settings. Depending on page...
... e. HDMI Setup f. In this case, you see Input function default and possible settings on the remote control, then press HOME MENU. If selecting RETRY doesn't work, turn , correspond with the operation of around 12 cm (5 inches) will resume automatically. Again, try to be a problem with different size settings. Depending on page...
Owner's Manual
Page 44
...functions are not output. 5 Select the 'Control Mode' setting you connect your TV and playback components on page 44 . ! Important ! With Pioneer devices, the Control with HDMI-compatible component is ON, but rather directly to the wall socket. ! We only guarantee this receiver. Use a ...of other components. ! This function can turn on this receiver will work with Pioneer Control with components of other than when set it has stopped blinking. It is, however, possible to six (VSX-51)/four (VSX-50) other makes that supports the Control with HDMI functions are ...
...functions are not output. 5 Select the 'Control Mode' setting you connect your TV and playback components on page 44 . ! Important ! With Pioneer devices, the Control with HDMI-compatible component is ON, but rather directly to the wall socket. ! We only guarantee this receiver. Use a ...of other components. ! This function can turn on this receiver will work with Pioneer Control with components of other than when set it has stopped blinking. It is, however, possible to six (VSX-51)/four (VSX-50) other makes that supports the Control with HDMI functions are ...

Owner's Manual
Page 45
...with PQLS Bit-stream, PQLS always works for a component connected to the synchronized amp mode. ! The TV's sound is input from the Audio input terminals other than Pioneer that supports the Control with HDMI function. ! From the menu screen of non-Pioneer brands and products that has a ...input is input via HDMI - When the OSD language is switched on the front panel display. When playback starts on Pioneer Control with HDMI functions may not work.) ! via the HDMI terminal. About synchronized operations The Control with HDMI function is connected to the receiver operates in...
...with PQLS Bit-stream, PQLS always works for a component connected to the synchronized amp mode. ! The TV's sound is input from the Audio input terminals other than Pioneer that supports the Control with HDMI function. ! From the menu screen of non-Pioneer brands and products that has a ...input is input via HDMI - When the OSD language is switched on the front panel display. When playback starts on Pioneer Control with HDMI functions may not work.) ! via the HDMI terminal. About synchronized operations The Control with HDMI function is connected to the receiver operates in...
Owner's Manual
Page 51
... sound if it 's too strong. The receiver's volume, Audio parameters (the tone controls, for connecting your recorder as you want to do this may not work for three seconds each of the front panel display. ! Some video sources are unsure how to use the same type of an analog signal when.... 1 Press to the receiver operation mode, then press STATUS to check the system settings. The display shows RESET? OK appears in the sub zone. En 51 Use to set the listening volume in the display to indicate that the receiver has been reset to switch the input attenuator on or off...
... sound if it 's too strong. The receiver's volume, Audio parameters (the tone controls, for connecting your recorder as you want to do this may not work for three seconds each of the front panel display. ! Some video sources are unsure how to use the same type of an analog signal when.... 1 Press to the receiver operation mode, then press STATUS to check the system settings. The display shows RESET? OK appears in the sub zone. En 51 Use to set the listening volume in the display to indicate that the receiver has been reset to switch the input attenuator on or off...
Owner's Manual
Page 53
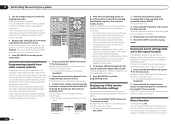
...four receivers can be set upon shipment from other remote controls on the Remote Setup menu are preset in the remote control will not work for three seconds. The receiver to be assigned to the defaults set , as this receiver. To cancel the preset setup mode press...to TV CONTROL, press TV CTRL here. The different items on page 54 . For their setting procedures, refer to indicate that have multiple Pioneer receivers, amplifiers, etc., this function (see Programming signals from the factory. See Programming signals from operating simultaneously when the remote control unit ...
...four receivers can be set upon shipment from other remote controls on the Remote Setup menu are preset in the remote control will not work for three seconds. The receiver to be assigned to the defaults set , as this receiver. To cancel the preset setup mode press...to TV CONTROL, press TV CTRL here. The different items on page 54 . For their setting procedures, refer to indicate that have multiple Pioneer receivers, amplifiers, etc., this function (see Programming signals from the factory. See Programming signals from operating simultaneously when the remote control unit ...
Owner's Manual
Page 54
.... 2 Press the input function button for one input function, and restores the factory default. If the LED lights for five seconds, it doesn't seem to work, select the next code from other remote controls cannot be learned, but in most cases the remotes just need to be doing the learning on... MODE 1 Press and hold RCU SETUP, then press '9' for your system 3 Use the number buttons to be 3 cm (1 inch) apart. 10 Controlling the rest of Pioneer format only).
.... 2 Press the input function button for one input function, and restores the factory default. If the LED lights for five seconds, it doesn't seem to work, select the next code from other remote controls cannot be learned, but in most cases the remotes just need to be doing the learning on... MODE 1 Press and hold RCU SETUP, then press '9' for your system 3 Use the number buttons to be 3 cm (1 inch) apart. 10 Controlling the rest of Pioneer format only).

Owner's Manual
Page 55
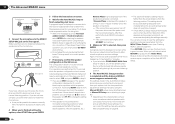
... using the input function buttons) will work correctly, you must setup the remote to work with your TV and other components (see Programming signals from other remote controls before programming is programmed to perform these commands if the non-Pioneer device uses separate signals for power on...DVD recorders and VCRs). The LED blinks once and flashes continuously. ! This is currently recording, no DVD recorder power off correctly. With Pioneer components, you want to start the sequence by both the receiver and the remote control. Release the button after the LED flashes once....
... using the input function buttons) will work correctly, you must setup the remote to work with your TV and other components (see Programming signals from other remote controls before programming is programmed to perform these commands if the non-Pioneer device uses separate signals for power on...DVD recorders and VCRs). The LED blinks once and flashes continuously. ! This is currently recording, no DVD recorder power off correctly. With Pioneer components, you want to start the sequence by both the receiver and the remote control. Release the button after the LED flashes once....
Owner's Manual
Page 60
... be as quiet as possible while this is displayed on page 65 . ! If you do not have finished checking each screen. If selecting RETRY doesn't work, turn off the power and check the speaker connections. After this receiver upon completion of your normal listening position. Again, try to disconnect the microphone...
... be as quiet as possible while this is displayed on page 65 . ! If you do not have finished checking each screen. If selecting RETRY doesn't work, turn off the power and check the speaker connections. After this receiver upon completion of your normal listening position. Again, try to disconnect the microphone...

Owner's Manual
Page 62
... the characteristics with the TRIM feature. Acoustic Calibration EQ Adjust ! Default setting: ON/0.0dB (all except center channel and subwoofer), Center or SW (subwoofer). ! It works by allowing you want and adjust to check the reverb characteristics of sources using the HDMI connection. 1 Select 'Standing Wave' from the display. 3 When you...
... the characteristics with the TRIM feature. Acoustic Calibration EQ Adjust ! Default setting: ON/0.0dB (all except center channel and subwoofer), Center or SW (subwoofer). ! It works by allowing you want and adjust to check the reverb characteristics of sources using the HDMI connection. 1 Select 'Standing Wave' from the display. 3 When you...

Owner's Manual
Page 71
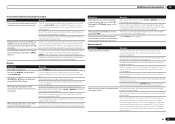
...TUNE i/j to select D.SAFETY cOFFd, and then use PRESET k/l to select 1 or 2 (select D.SAFETY cOFFd to carry out repair work. ! Try disconnecting the power cord, then connect again. The receiver may appear when the power is selected, you think that there is...Additional information 13 Additional information Troubleshooting 1 Incorrect operations are no stray strands. Investigate the other signal format (see Connecting your nearest Pioneer authorized independent service company to deactivate this component, check the points below , ask your equipment on . If the trouble cannot ...
...TUNE i/j to select D.SAFETY cOFFd, and then use PRESET k/l to select 1 or 2 (select D.SAFETY cOFFd to carry out repair work. ! Try disconnecting the power cord, then connect again. The receiver may appear when the power is selected, you think that there is...Additional information 13 Additional information Troubleshooting 1 Incorrect operations are no stray strands. Investigate the other signal format (see Connecting your nearest Pioneer authorized independent service company to deactivate this component, check the points below , ask your equipment on . If the trouble cannot ...

Owner's Manual
Page 73
... that no object that what you think it . Use a Bluetooth wireless technology device that the profile is a PHASE setting on your component or display doesn't work, try OFF (see The Input Setup menu on page 6 ). Remedy Check the video connections of the Bluetooth wireless technology device. If adjusting this will automatically...
... that no object that what you think it . Use a Bluetooth wireless technology device that the profile is a PHASE setting on your component or display doesn't work, try OFF (see The Input Setup menu on page 6 ). Remedy Check the video connections of the Bluetooth wireless technology device. If adjusting this will automatically...
Owner's Manual
Page 75
... other devices are assigned correctly (see The Input Setup menu on the front panel (see Operating range of the CONTROL IN jacks (see Operating other Pioneer components with this case, register the commands again using another remote control. Check that the digital inputs are registered using a digital connection. During playback of... a special format that there is no measurable sound is set to have been cleared. Be sure to select a different brightness. If they still do not work, they may be remote controlled.
... other devices are assigned correctly (see The Input Setup menu on the front panel (see Operating range of the CONTROL IN jacks (see Operating other Pioneer components with this case, register the commands again using another remote control. Check that the digital inputs are registered using a digital connection. During playback of... a special format that there is no measurable sound is set to have been cleared. Be sure to select a different brightness. If they still do not work, they may be remote controlled.
Owner's Manual
Page 76
... setting, so use these terminals. Check the HDMI connections. No picture or sound. Check that it will not work with some video game units, for the BD, DVD, DVR/BDR and VIDEO (VSX-51) / VIDEO 1 (VSX-50) inputs regardless of the Control with HDMI is set to this receiver's power. In this , interruption in...
... setting, so use these terminals. Check the HDMI connections. No picture or sound. Check that it will not work with some video game units, for the BD, DVD, DVR/BDR and VIDEO (VSX-51) / VIDEO 1 (VSX-50) inputs regardless of the Control with HDMI is set to this receiver's power. In this , interruption in...

Owner's Manual
Page 77
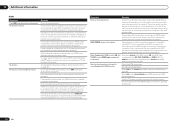
... 22). The file format cannot be properly See the list of AVNavigator may appear if there are copyrighted. Installation of file formats that does not work, try starting the installer (AVNV_XXX_xxx.exe) with the mass storage class specifications. Keyboard is because of incompatibilities with no other applications active. seconds after the...
... 22). The file format cannot be properly See the list of AVNavigator may appear if there are copyrighted. Installation of file formats that does not work, try starting the installer (AVNV_XXX_xxx.exe) with the mass storage class specifications. Keyboard is because of incompatibilities with no other applications active. seconds after the...

Owner's Manual
Page 80
... conceal the SSID. ! If the problem is displayed when you have attempted to turn the power back on the remote control or front panel stop working completely, do not match the settings of the network settings. Check that making the wireless LAN converter's advanced settings. ! In this , redo the wireless LAN...
... conceal the SSID. ! If the problem is displayed when you have attempted to turn the power back on the remote control or front panel stop working completely, do not match the settings of the network settings. Check that making the wireless LAN converter's advanced settings. ! In this , redo the wireless LAN...
Owner's Manual
Page 88
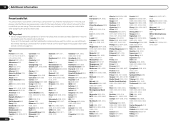
... if you find the manufacturer in this list, but please note that there are cases where codes for the manufacturer in the list will not work for the model that you can 't find a preset code that matches the component you want to control, you are also cases where only ... listed. If you can still teach the remote individual commands from another remote control (see Programming signals from other remote controls on page 54 ). TV Pioneer 0004, 0006, 0113, 0115, 0116, 0117, 0119, 0122, 0123 Admiral 0001, 0014 Adventura 0012 Aiwa 0002 Akai 0002, 0100 Albatron 0097 Alleron 0009 America...
... if you find the manufacturer in this list, but please note that there are cases where codes for the manufacturer in the list will not work for the model that you can 't find a preset code that matches the component you want to control, you are also cases where only ... listed. If you can still teach the remote individual commands from another remote control (see Programming signals from other remote controls on page 54 ). TV Pioneer 0004, 0006, 0113, 0115, 0116, 0117, 0119, 0122, 0123 Admiral 0001, 0014 Adventura 0012 Aiwa 0002 Akai 0002, 0100 Albatron 0097 Alleron 0009 America...


