Owner's Manual
Page 4
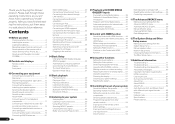
...Checking what's in the box 6 Installing the receiver 6 Loading the batteries 6 Operating range of remote control unit........ 6 About operation of your model properly. Please read through LAN interface 21 Connecting ...51 Dimming the display 51 Checking your system settings 51 Resetting the system 51 10 Controlling the rest of the receiver with a mobile terminal (iPod, iPhone, etc 6 About using synchronization 45 About synchronized operations 45 Setting the PQLS function 45 Cautions on the Control with HDMI function 46 09 Using other Pioneer components with this Pioneer...
...Checking what's in the box 6 Installing the receiver 6 Loading the batteries 6 Operating range of remote control unit........ 6 About operation of your model properly. Please read through LAN interface 21 Connecting ...51 Dimming the display 51 Checking your system settings 51 Resetting the system 51 10 Controlling the rest of the receiver with a mobile terminal (iPod, iPhone, etc 6 About using synchronization 45 About synchronized operations 45 Setting the PQLS function 45 Cautions on the Control with HDMI function 46 09 Using other Pioneer components with this Pioneer...
Owner's Manual
Page 8
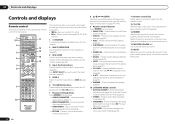
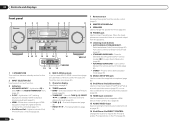
... Press to select an input signal (page 37). ! Use to check selected receiver settings (page 51). ! Also use k/l to select control of time before sleep (page 51). ! Use to set the remote control mode (page 53). 4 Input function buttons Press to adjust the level (page 66). ...or brightens the display (page 51). 10 LISTENING MODE controls ! Press to switch between Auto Surround (page 36), Auto Level Control mode and Stream Direct mode (page 37). ! STATUS - A.ATT - DIMMER - 02 Controls and displays Controls and displays Remote control This section explains how...
... Press to select an input signal (page 37). ! Use to check selected receiver settings (page 51). ! Also use k/l to select control of time before sleep (page 51). ! Use to set the remote control mode (page 53). 4 Input function buttons Press to adjust the level (page 66). ...or brightens the display (page 51). 10 LISTENING MODE controls ! Press to switch between Auto Surround (page 36), Auto Level Control mode and Stream Direct mode (page 37). ! STATUS - A.ATT - DIMMER - 02 Controls and displays Controls and displays Remote control This section explains how...
Owner's Manual
Page 9
... the Sound Retriever function is switched on , this lights to indicate Neo:6 processing (page 36). 18 Character display Displays various system information. 19 Remote control mode indicator Lights to 1.) (page 69) En 9 When one channel other than the ones above ! Controls and displays 02 Display 1... with Dolby TrueHD decoding. ! DSD PCM - Lights when the ALC (Auto level control) mode is being received in sleep mode (page 51). 17 Matrix decoding format indicators ! 2PRO LOGIC IIx - TUNED - MONO - Low frequency effects channel (the (( )) indicators light when ...
... the Sound Retriever function is switched on , this lights to indicate Neo:6 processing (page 36). 18 Character display Displays various system information. 19 Remote control mode indicator Lights to 1.) (page 69) En 9 When one channel other than the ones above ! Controls and displays 02 Display 1... with Dolby TrueHD decoding. ! DSD PCM - Lights when the ALC (Auto level control) mode is being received in sleep mode (page 51). 17 Matrix decoding format indicators ! 2PRO LOGIC IIx - TUNED - MONO - Low frequency effects channel (the (( )) indicators light when ...
Owner's Manual
Page 10
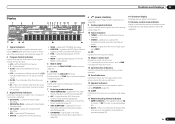
... 9 10 11 12 13 14 MCACC SETUP MIC VIDEO 2 INPUT 5V 2.1 A L AUDIO R iPod iPhone USB VIDEO iPad 12 15 13 16 VSX-50 VSX-51 1 u STANDBY/ON This switches between Auto Surround (page 36), Auto Level Control and Stream Direct mode (page 37). ! FL OFF - Blinks when... connected (page 17). ! ADVANCED SURROUND - MULTI-ZONE - iPod iPhone iPad - Find radio frequencies (page 32). ! Find preset stations (page 32). 10 En 7 Remote sensor Receives the signals from the main zone (page 50). 5 Character display See Display on page 9 . 6 TUNER controls ! TUNE i/j - Switches between standby and ...
... 9 10 11 12 13 14 MCACC SETUP MIC VIDEO 2 INPUT 5V 2.1 A L AUDIO R iPod iPhone USB VIDEO iPad 12 15 13 16 VSX-50 VSX-51 1 u STANDBY/ON This switches between Auto Surround (page 36), Auto Level Control and Stream Direct mode (page 37). ! FL OFF - Blinks when... connected (page 17). ! ADVANCED SURROUND - MULTI-ZONE - iPod iPhone iPad - Find radio frequencies (page 32). ! Find preset stations (page 32). 10 En 7 Remote sensor Receives the signals from the main zone (page 50). 5 Character display See Display on page 9 . 6 TUNER controls ! TUNE i/j - Switches between standby and ...
Owner's Manual
Page 20
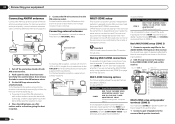
...or, depending on a flat surface and in the direction indicated by the remote or front panel controls. For the best possible reception, suspend horizontally outdoors. MULTI-ZONE listening options The following illustration. 2 VSX-51 only: Connect a TV monitor to the surround back speaker terminals. 20 ... 2) 1 Connect a separate amplifier to 6 m (16 ft. a ANTENNA FM UNBAL 75 AM LOOP 3 4 fig. b fig. to 20 ft.) length of VSX-51 Sub Zone Input functions available ZONE 2 DVD, TV/SAT, DVR/BDR, VIDEO, HOME MEDIA GALLERY, iPod/ USB, CD, CD-R/TAPE, TUNER, ADAPTER PORT, SIRIUS ...
...or, depending on a flat surface and in the direction indicated by the remote or front panel controls. For the best possible reception, suspend horizontally outdoors. MULTI-ZONE listening options The following illustration. 2 VSX-51 only: Connect a TV monitor to the surround back speaker terminals. 20 ... 2) 1 Connect a separate amplifier to 6 m (16 ft. a ANTENNA FM UNBAL 75 AM LOOP 3 4 fig. b fig. to 20 ft.) length of VSX-51 Sub Zone Input functions available ZONE 2 DVD, TV/SAT, DVR/BDR, VIDEO, HOME MEDIA GALLERY, iPod/ USB, CD, CD-R/TAPE, TUNER, ADAPTER PORT, SIRIUS ...
Owner's Manual
Page 22
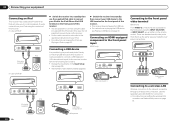
...are accessed via the receiver. ! Use the separately sold AS-WL300 for your iPod. ! USB mass storage device USB keyboard 22 En In case of VSX-51 CONTROL ON / OFF MCACC SETUP MIC 5V 2.1 A iPod iPhone iPad USB HDMI 2 INPUT iPod cable (supplied) In case of... the front panel of this receiver. For instructions on setting the wireless LAN converter, see Network Setup menu on the remote control. Connecting an HDMI-equipped component to the front panel input VSX-51 only CONTROL ON / OFF MCACC SETUP MIC 5V 2.1 A iPod iPhone iPad USB HDMI 2 INPUT Connecting to the USB ...
...are accessed via the receiver. ! Use the separately sold AS-WL300 for your iPod. ! USB mass storage device USB keyboard 22 En In case of VSX-51 CONTROL ON / OFF MCACC SETUP MIC 5V 2.1 A iPod iPhone iPad USB HDMI 2 INPUT iPod cable (supplied) In case of... the front panel of this receiver. For instructions on setting the wireless LAN converter, see Network Setup menu on the remote control. Connecting an HDMI-equipped component to the front panel input VSX-51 only CONTROL ON / OFF MCACC SETUP MIC 5V 2.1 A iPod iPhone iPad USB HDMI 2 INPUT Connecting to the USB ...
Owner's Manual
Page 27
... with the numbers beside the inputs on your TV. Input Skip - b VSX-51 only c VSX-50 only Operation Mode Setup This receiver is restricted, and functions whose operations ...ON, that can be still be changed as necessary by themselves. ! When set to achieve the Pioneer-recommended sound and picture quality. You will need to change the DVD input function's Digital In ...settings for other inputs can be selected for the Operation Mode: Expert and Basic. 1 Press on the remote control, then press HOME MENU. A Graphical User Interface (GUI) screen appears on the back of functions...
... with the numbers beside the inputs on your TV. Input Skip - b VSX-51 only c VSX-50 only Operation Mode Setup This receiver is restricted, and functions whose operations ...ON, that can be still be changed as necessary by themselves. ! When set to achieve the Pioneer-recommended sound and picture quality. You will need to change the DVD input function's Digital In ...settings for other inputs can be selected for the Operation Mode: Expert and Basic. 1 Press on the remote control, then press HOME MENU. A Graphical User Interface (GUI) screen appears on the back of functions...
Owner's Manual
Page 33
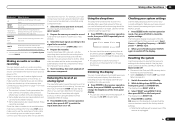
... near a window (refer to recall the channel preset. The SID may be found on a sticker located on the packaging, or on page 51 . See Selecting channels and browsing by genre, first press CATEGORY, use the number buttons to activate your saved song information. ! Press repeatedly.... 1 Select the channel you can browse SIRIUS Radio channels in the order that they appear, or you want . Contact SIRIUS on the remote control to the manual for the SiriusConnectTM Home tuner for antenna placement recommendations). ! For best reception, you have your tuner. You can also...
... near a window (refer to recall the channel preset. The SID may be found on a sticker located on the packaging, or on page 51 . See Selecting channels and browsing by genre, first press CATEGORY, use the number buttons to activate your saved song information. ! Press repeatedly.... 1 Select the channel you can browse SIRIUS Radio channels in the order that they appear, or you want . Contact SIRIUS on the remote control to the manual for the SiriusConnectTM Home tuner for antenna placement recommendations). ! For best reception, you have your tuner. You can also...
Owner's Manual
Page 44
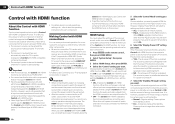
...minimize energy consumption when power is selected, link functions other than when set to the HDMI terminal on the remote control, then press HOME MENU. 2 Select 'System Setup', then press ENTER. 3 Select 'HDMI Setup',...is selected or when watching the TV. ! YES - It is, however, possible to six (VSX-51)/four (VSX-50) other makes that you want to as "KURO LINK". ! Power-up time from an ...function ON or OFF. The HDMI indicator in step 6 below with a Control with HDMI-compatible Pioneer TV or Blu-ray Disc player or with a component of other makes that support the Control ...
...minimize energy consumption when power is selected, link functions other than when set to the HDMI terminal on the remote control, then press HOME MENU. 2 Select 'System Setup', then press ENTER. 3 Select 'HDMI Setup',...is selected or when watching the TV. ! YES - It is, however, possible to six (VSX-51)/four (VSX-50) other makes that you want to as "KURO LINK". ! Power-up time from an ...function ON or OFF. The HDMI indicator in step 6 below with a Control with HDMI-compatible Pioneer TV or Blu-ray Disc player or with a component of other makes that support the Control ...
Owner's Manual
Page 51
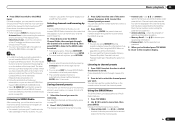
...directly (this receiver. The display shows RESET c NO d. 3 Select 'RESET' using PRESET k/l, then press ENTER on /off the display. En 51 Input function buttons Use to use the same type of the front panel display. ! The receiver's volume, Audio parameters (the tone controls, for... an audio or a video recording You can make sure the components you can only use this case, the FL OFF indicator lights. Use the remote control's SIGNAL SEL button. 4 Prepare the recorder. You can only be recorded. The front panel display shows each : Input Source d Sampling Frequency...
...directly (this receiver. The display shows RESET c NO d. 3 Select 'RESET' using PRESET k/l, then press ENTER on /off the display. En 51 Input function buttons Use to use the same type of the front panel display. ! The receiver's volume, Audio parameters (the tone controls, for... an audio or a video recording You can make sure the components you can only use this case, the FL OFF indicator lights. Use the remote control's SIGNAL SEL button. 4 Prepare the recorder. You can only be recorded. The front panel display shows each : Input Source d Sampling Frequency...


