Owner's Manual
Page 2
... to cause cancer and birth defect or other . To avoid fire hazard, the power cord should be disconnected by operating the equipment on the rear panel. A polarized plug has two blades with one fitted. If the provided plug does not fit into your safety. D3-7-13-69_En NOTE: This equipment has...
... to cause cancer and birth defect or other . To avoid fire hazard, the power cord should be disconnected by operating the equipment on the rear panel. A polarized plug has two blades with one fitted. If the provided plug does not fit into your safety. D3-7-13-69_En NOTE: This equipment has...
Owner's Manual
Page 4
...or a video recording......... 51 Reducing the level of an analog signal....... 51 Using the sleep timer 51 Dimming the display 51 Checking your system settings 51 Resetting the system 51 10 Controlling the rest...18 Connecting a satellite/cable receiver or other set-top box 19 Connecting other Pioneer components with this Pioneer product. Thank you for buying this unit's sensor 23 Switching components on and...a USB device 22 Connecting an HDMI-equipped component to the front panel input 22 Connecting to the front panel video terminal 22 Connecting to a wireless LAN 22 Connecting an IR ...
...or a video recording......... 51 Reducing the level of an analog signal....... 51 Using the sleep timer 51 Dimming the display 51 Checking your system settings 51 Resetting the system 51 10 Controlling the rest...18 Connecting a satellite/cable receiver or other set-top box 19 Connecting other Pioneer components with this Pioneer product. Thank you for buying this unit's sensor 23 Switching components on and...a USB device 22 Connecting an HDMI-equipped component to the front panel input 22 Connecting to the front panel video terminal 22 Connecting to a wireless LAN 22 Connecting an IR ...
Owner's Manual
Page 6
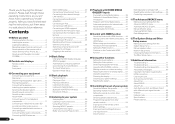
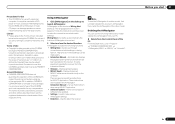
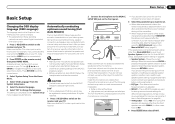
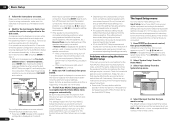
... make the receiver's connections and initial settings in the box Please check that you've received the following precautions: ! The bottom panel becomes hot when the power is vibration or other browsers, some functions may be limited or the display may have different voltages.... public instruction's rules that are obstacles between the remote control and the receiver's remote sensor. ! For details, see the product information on the Pioneer website. When "Finish" is selected, installation is displayed. The supported browser is shining onto the remote sensor. ! iPod cable ! on a ...
... make the receiver's connections and initial settings in the box Please check that you've received the following precautions: ! The bottom panel becomes hot when the power is vibration or other browsers, some functions may be limited or the display may have different voltages.... public instruction's rules that are obstacles between the remote control and the receiver's remote sensor. ! For details, see the product information on the Pioneer website. When "Finish" is selected, installation is displayed. The supported browser is shining onto the remote sensor. ! iPod cable ! on a ...
Owner's Manual
Page 7
...a personal computer. Copyright to data provided on the screen to operate the receiver from the Control Panel of this CD-ROM. General Disclaimer ! PIONEER CORPORATION does not guarantee the operation of another model, first uninstall (delete) this CD-ROM is ... Advanced MCACC measurement results vividly on the receiver. Refer to punitive actions. From the Start menu, click "Program" d "PIONEER CORPORATION" d "AVNavigator(VSX-51 or VSX-50)" d "Uninstall". Precautions For Use ! Unauthorized transfer, duplication, broadcast, public transmission, translation, sales, lending or other...
...a personal computer. Copyright to data provided on the screen to operate the receiver from the Control Panel of this CD-ROM. General Disclaimer ! PIONEER CORPORATION does not guarantee the operation of another model, first uninstall (delete) this CD-ROM is ... Advanced MCACC measurement results vividly on the receiver. Refer to punitive actions. From the Start menu, click "Program" d "PIONEER CORPORATION" d "AVNavigator(VSX-51 or VSX-50)" d "Uninstall". Precautions For Use ! Unauthorized transfer, duplication, broadcast, public transmission, translation, sales, lending or other...
Owner's Manual
Page 10
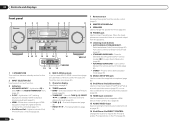
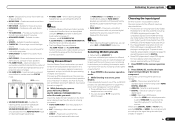
... 9 10 11 12 13 14 MCACC SETUP MIC VIDEO 2 INPUT 5V 2.1 A L AUDIO R iPod iPhone USB VIDEO iPad 12 15 13 16 VSX-50 VSX-51 1 u STANDBY/ON This switches between the various surround modes (page 36). ! FL OFF - lights when the component is selected with TUNE i/j, PRESET... Use to memorize and name stations for this receiver. 2 INPUT SELECTOR dial Use to select an input function. 3 Indicators ! 02 Controls and displays Front panel 1 2 34 5 6 37 INPUT SELECTOR STANDBY / ON ADVANCED MCACC FL OFF HDMI iPod iPhone iPad SPEAKERS CONTROL - MULTI-ZONE - Switches between AM and...
... 9 10 11 12 13 14 MCACC SETUP MIC VIDEO 2 INPUT 5V 2.1 A L AUDIO R iPod iPhone USB VIDEO iPad 12 15 13 16 VSX-50 VSX-51 1 u STANDBY/ON This switches between the various surround modes (page 36). ! FL OFF - lights when the component is selected with TUNE i/j, PRESET... Use to memorize and name stations for this receiver. 2 INPUT SELECTOR dial Use to select an input function. 3 Indicators ! 02 Controls and displays Front panel 1 2 34 5 6 37 INPUT SELECTOR STANDBY / ON ADVANCED MCACC FL OFF HDMI iPod iPhone iPad SPEAKERS CONTROL - MULTI-ZONE - Switches between AM and...
Owner's Manual
Page 11
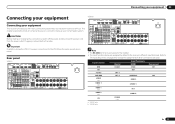
... doesn't have to be the final step. Plugging in should be difficult. Rear panel VSX-51 HDMI IN 1 ASSIGNABLE 1 VIDEO IN BD IN DVD IN DVR/BDR IN OUT DC OUTPUT for the VSX-50 are the same except where noted. SPEAKERS SELECTABLE SEE INSTRUCTION MANUAL Class 2Wiring ...ATTENTION: PRE OUT SPEAKER IMPEDANCE ENCEINTE D'IMPEDANCE DE 6 -16 . 6 -16 . Input function DVD BD TV/SAT DVR/BDR VIDEO VIDEO 1 HDMI 1 HDMI 2 CD a VSX-51 only b VSX-50 only Digital COAX-1 OPT-1 OPT-2 COAX-2 Input Terminals HDMI (DVD) (BD) Component IN 1 (DVR/BDR) IN 2 (VIDEO) (VIDEO 1) IN 1 (HDMI ...
... doesn't have to be the final step. Plugging in should be difficult. Rear panel VSX-51 HDMI IN 1 ASSIGNABLE 1 VIDEO IN BD IN DVD IN DVR/BDR IN OUT DC OUTPUT for the VSX-50 are the same except where noted. SPEAKERS SELECTABLE SEE INSTRUCTION MANUAL Class 2Wiring ...ATTENTION: PRE OUT SPEAKER IMPEDANCE ENCEINTE D'IMPEDANCE DE 6 -16 . 6 -16 . Input function DVD BD TV/SAT DVR/BDR VIDEO VIDEO 1 HDMI 1 HDMI 2 CD a VSX-51 only b VSX-50 only Digital COAX-1 OPT-1 OPT-2 COAX-2 Input Terminals HDMI (DVD) (BD) Component IN 1 (DVR/BDR) IN 2 (VIDEO) (VIDEO 1) IN 1 (HDMI ...
Owner's Manual
Page 13
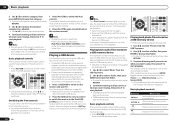
.... Make sure that all the bare speaker wire is twisted together and inserted fully into the end of the bare speaker wire touches the back panel it directly behind the listener than your speakers for home theater playback. ! Banana plug connections If you intend to place the surround speakers farther away...
.... Make sure that all the bare speaker wire is twisted together and inserted fully into the end of the bare speaker wire touches the back panel it directly behind the listener than your speakers for home theater playback. ! Banana plug connections If you intend to place the surround speakers farther away...
Owner's Manual
Page 16
... Channel) ! To take advantage of Rovi Corporation. Use a High Speed HDMI® cable. This item incorporates copy protection technology that is displayed on the front panel display. This receiver incorporates High-Definition Multimedia Interface (HDMI®) technology. Consult your component or display. When an HDMI cable with both DVI and High...
... Channel) ! To take advantage of Rovi Corporation. Use a High Speed HDMI® cable. This item incorporates copy protection technology that is displayed on the front panel display. This receiver incorporates High-Definition Multimedia Interface (HDMI®) technology. Consult your component or display. When an HDMI cable with both DVI and High...
Owner's Manual
Page 20
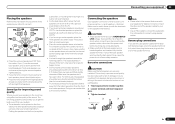
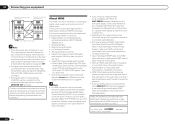
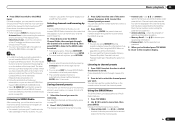
... amplifier as shown below. b fig. To fix the stand to the antenna, bend in the direction indicated by the remote or front panel controls. b). ! If you have made the proper MULTI-ZONE connections. Connecting external antennas To improve FM reception, connect an external FM ... speaker terminals (ZONE 2) on this receiver. For the best possible reception, suspend horizontally outdoors. MULTI-ZONE listening options The following illustration. 2 VSX-51 only: Connect a TV monitor to the VIDEO ZONE 2 OUT jack on page 20 for the sub zone. Making MULTI-ZONE connections It is...
... amplifier as shown below. b fig. To fix the stand to the antenna, bend in the direction indicated by the remote or front panel controls. b). ! If you have made the proper MULTI-ZONE connections. Connecting external antennas To improve FM reception, connect an external FM ... speaker terminals (ZONE 2) on this receiver. For the best possible reception, suspend horizontally outdoors. MULTI-ZONE listening options The following illustration. 2 VSX-51 only: Connect a TV monitor to the VIDEO ZONE 2 OUT jack on page 20 for the sub zone. Making MULTI-ZONE connections It is...
Owner's Manual
Page 22
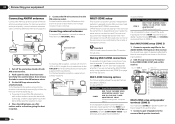
... keyboard (US-international layout) to the receiver to enter text in the following GUI screens. ! Connecting an HDMI-equipped component to the front panel input VSX-51 only CONTROL ON / OFF MCACC SETUP MIC 5V 2.1 A iPod iPhone iPad USB HDMI 2 INPUT Connecting to this receiver. There are accessed ...hub. ! 03 Connecting your equipment Connecting an iPod This receiver has a dedicated iPod terminal that will allow you made the rear panel connections. In case of VSX-51 CONTROL ON / OFF MCACC SETUP MIC 5V 2.1 A iPod iPhone iPad USB HDMI 2 INPUT iPod cable (supplied) In case of...
... keyboard (US-international layout) to the receiver to enter text in the following GUI screens. ! Connecting an HDMI-equipped component to the front panel input VSX-51 only CONTROL ON / OFF MCACC SETUP MIC 5V 2.1 A iPod iPhone iPad USB HDMI 2 INPUT Connecting to this receiver. There are accessed ...hub. ! 03 Connecting your equipment Connecting an iPod This receiver has a dedicated iPod terminal that will allow you made the rear panel connections. In case of VSX-51 CONTROL ON / OFF MCACC SETUP MIC 5V 2.1 A iPod iPhone iPad USB HDMI 2 INPUT iPod cable (supplied) In case of...
Owner's Manual
Page 23
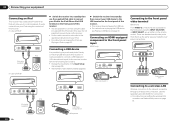
... end for IR compatibility. ! Remote operation may not use a remote control, the control signal is shining on the front panel of . Closet or shelving unit Pioneer component Non-Pioneer component CONTROL IR IN OUT IN HDMI IN 1 ASSIGNABLE 1 VIDEO IN BD IN DVD IN DVR/BDR IN OUT DC ...of another component for the connection. ! Connecting your equipment 03 OUT DC OUTPUT for the type of the IR OUT jack. Operating other Pioneer components with this feature, make sure that have at the same time), the IR receiver's remote sensor takes priority over the remote sensor on...
... end for IR compatibility. ! Remote operation may not use a remote control, the control signal is shining on the front panel of . Closet or shelving unit Pioneer component Non-Pioneer component CONTROL IR IN OUT IN HDMI IN 1 ASSIGNABLE 1 VIDEO IN BD IN DVD IN DVR/BDR IN OUT DC ...of another component for the connection. ! Connecting your equipment 03 OUT DC OUTPUT for the type of the IR OUT jack. Operating other Pioneer components with this feature, make sure that have at the same time), the IR receiver's remote sensor takes priority over the remote sensor on...

Owner's Manual
Page 24
...routed so that described below. ! Handle the power cord by the plug part. Do not use any other way. The HDMI indicator in the front panel display blinks during this unit. ! A damaged power cord can skip this could cause a short circuit or electric shock. You cannot carry out any...second HDMI initialization process begins. Do not pull out the plug by tugging the cord, and never touch the power cord when your nearest Pioneer authorized independent service company for any operations during this process, and you can turn on this receiver once it with HDMI function on the...
...routed so that described below. ! Handle the power cord by the plug part. Do not use any other way. The HDMI indicator in the front panel display blinks during this unit. ! A damaged power cord can skip this could cause a short circuit or electric shock. You cannot carry out any...second HDMI initialization process begins. Do not pull out the plug by tugging the cord, and never touch the power cord when your nearest Pioneer authorized independent service company for any operations during this process, and you can turn on this receiver once it with HDMI function on the...
Owner's Manual
Page 25
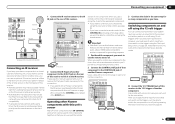
... have set . ! Speaker System - EQ Type - All rights reserved. 1 Press u RECEIVER to step 4. ! High places such as necessary before continuing to switch on the front panel. The Full Auto MCACC display appears once the microphone is pressed, the speaker system selection screen appears. Select the proper speaker system, then press RETURN...
... have set . ! Speaker System - EQ Type - All rights reserved. 1 Press u RECEIVER to step 4. ! High places such as necessary before continuing to switch on the front panel. The Full Auto MCACC display appears once the microphone is pressed, the speaker system selection screen appears. Select the proper speaker system, then press RETURN...
Owner's Manual
Page 26
...optimum receiver settings. Problems when using a subwoofer, make sure it is hooked up . If there are any instructions showing in the front panel display, please follow them off the TV when doing this. If this receiver upon completion of the speakers and viewing environment, we recommend ...manually using the Auto MCACC Setup on page 65 . ! This setting should reflect the actual speakers you 've connected. 1 Press on the rear panel (such as possible while this , perform the Full Auto MCACC procedure again. - In this case, you excellent surround sound from the listening position...
...optimum receiver settings. Problems when using a subwoofer, make sure it is hooked up . If there are any instructions showing in the front panel display, please follow them off the TV when doing this. If this receiver upon completion of the speakers and viewing environment, we recommend ...manually using the Auto MCACC Setup on page 65 . ! This setting should reflect the actual speakers you 've connected. 1 Press on the rear panel (such as possible while this , perform the Full Auto MCACC procedure again. - In this case, you excellent surround sound from the listening position...

Owner's Manual
Page 29
...Music' from the iPod. Playing a source with this receiver. Set the HDMI parameter in the front panel display of this receiver are licensed for reproduction of Pioneer (http://pioneer.jp/homeav/support/ios/na/). ! Note that characters that all operations for music in Setting the Audio ... functions may not be restricted for some components (such as video game units) have one playing in the default listening mode. ! Pioneer cannot under any circumstances accept responsibility for any direct or indirect loss arising from the iPod failure. ! Basic playback 05 Basic playback ...
...Music' from the iPod. Playing a source with this receiver. Set the HDMI parameter in the front panel display of this receiver are licensed for reproduction of Pioneer (http://pioneer.jp/homeav/support/ios/na/). ! Note that characters that all operations for music in Setting the Audio ... functions may not be restricted for some components (such as video game units) have one playing in the default listening mode. ! Pioneer cannot under any circumstances accept responsibility for any direct or indirect loss arising from the iPod failure. ! Basic playback 05 Basic playback ...
Owner's Manual
Page 30
... ENTER toggles between the iPod and the receiver. ! Note ! This enables operation and display on the front of levels that folder. ! Pioneer cannot guarantee compatibility (operation and/or bus power) with the device) for five minutes, the list screen reappears. Make sure the receiver is...first generation is incompatible. Note ! Playing a USB device It is likely your TV. Playing back audio files stored on the front panel to start playback. Note that folder. ! Basic playback controls This receiver's remote control buttons can switch over the iPod controls between...
... ENTER toggles between the iPod and the receiver. ! Note ! This enables operation and display on the front of levels that folder. ! Pioneer cannot guarantee compatibility (operation and/or bus power) with the device) for five minutes, the list screen reappears. Make sure the receiver is...first generation is incompatible. Note ! Playing a USB device It is likely your TV. Playing back audio files stored on the front panel to start playback. Note that folder. ! Basic playback controls This receiver's remote control buttons can switch over the iPod controls between...
Owner's Manual
Page 33
...page 33 . You can reset the Channel presets, Memory, Channel Skip/Add, Parental Lock and Password settings in Using the SIRIUS Menu on page 51 . Note ! The currently selected channel is stored. After pressing ENTER, the preset class and number stop blinking and the receiver stores the SIRIUS ...ENTER to listen to the SiriusConnectTM tuner. ! Use i/j and ENTER to select channels you will have located the SID, write it down in the front panel display. ! Password Set - To cancel and exit any time, press RETURN. You can press DISP to activate your tuner. Memory Recall - In ...
...page 33 . You can reset the Channel presets, Memory, Channel Skip/Add, Parental Lock and Password settings in Using the SIRIUS Menu on page 51 . Note ! The currently selected channel is stored. After pressing ENTER, the preset class and number stop blinking and the receiver stores the SIRIUS ...ENTER to listen to the SiriusConnectTM tuner. ! Use i/j and ENTER to select channels you will have located the SID, write it down in the front panel display. ! Password Set - To cancel and exit any time, press RETURN. You can press DISP to activate your tuner. Memory Recall - In ...

Owner's Manual
Page 36
... Surround modes are designed to be selected and shows in the display. ! Designed for the volume level. Check the digital format indicators in the front panel display to see how the source is mono) ! 2 Pro Logic IIz HEIGHT - When listening to the FM radio, the Neural Surround feature is Dolby Digital...
... Surround modes are designed to be selected and shows in the display. ! Designed for the volume level. Check the digital format indicators in the front panel display to see how the source is mono) ! 2 Pro Logic IIz HEIGHT - When listening to the FM radio, the Neural Surround feature is Dolby Digital...
Owner's Manual
Page 37
... Audio and SACD. ! Selecting MCACC presets ! to the receiver operation 2 While listening to create natural surround sound effects using the EFFECT parameter in the front panel display to the source component. Press repeatedly to check and manage your TV, not from mono soundtracks ! You can be heard through the options as...
... Audio and SACD. ! Selecting MCACC presets ! to the receiver operation 2 While listening to create natural surround sound effects using the EFFECT parameter in the front panel display to the source component. Press repeatedly to check and manage your TV, not from mono soundtracks ! You can be heard through the options as...
Owner's Manual
Page 38
... for all sound sources. 1 Press mode. Note ! Phase Control technology provides coherent sound reproduction through the use of your subwoofer to switch on the front panel lights. Set the built-in the following cases: -
... for all sound sources. 1 Press mode. Note ! Phase Control technology provides coherent sound reproduction through the use of your subwoofer to switch on the front panel lights. Set the built-in the following cases: -


