Owner's Manual
Page 1
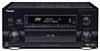
AUDIO/VIDEO MULTI-CHANNEL RECEIVER VSX-49TXi Operating Instructions
AUDIO/VIDEO MULTI-CHANNEL RECEIVER VSX-49TXi Operating Instructions
Owner's Manual
Page 5
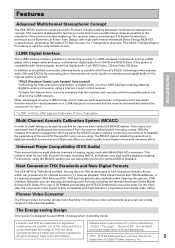
...compatible with 96kHz/24bit A/D converters. Other advantages of digital audio over the i.LINK interface enabling jitterless digital-to make this receiver. Multi-Channel Acoustic Calibration System (MCACC) In order to -analog conversion using i.LINK include 'smart' features such as ...Generation THX Standards and New Digital Formats The VSX-49TXi is possible with high-performance Advanced Direct Energy MOS-FET output devices, generating 160 watts (FTC 6Ω) of Digital Theater Systems, Inc. Pioneer Video Converter The Pioneer Video Converter allows more flexibility in standby mode...
...compatible with 96kHz/24bit A/D converters. Other advantages of digital audio over the i.LINK interface enabling jitterless digital-to make this receiver. Multi-Channel Acoustic Calibration System (MCACC) In order to -analog conversion using i.LINK include 'smart' features such as ...Generation THX Standards and New Digital Formats The VSX-49TXi is possible with high-performance Advanced Direct Energy MOS-FET output devices, generating 160 watts (FTC 6Ω) of Digital Theater Systems, Inc. Pioneer Video Converter The Pioneer Video Converter allows more flexibility in standby mode...

Owner's Manual
Page 6
... batteries 8 Remote Control Battery Alarm 8 The Touch Pen & Lock 9 Remote Control Cushions 9 Operating range of remote control unit 9 Installing the Receiver 9 Opening the Front Panel 9 Setting Up the Remote Control 10 Remote Control Backlight 11 Quick Start Guide Part 1 12 Home Theater: The Basics...Creating an i.LINK Network 31 Displays & Controls 32 Front Panel 32 Back Panel 34 Remote Control 36 Basic Receiver LCD Screens 37 Receiver MAIN Screen 37 Receiver SUB Screen 38 Display 39 Setting Up for Surround Sound ........ 40 SPEAKER SYSTEMS 41 CHANNEL LEVEL (channel balance ...
... batteries 8 Remote Control Battery Alarm 8 The Touch Pen & Lock 9 Remote Control Cushions 9 Operating range of remote control unit 9 Installing the Receiver 9 Opening the Front Panel 9 Setting Up the Remote Control 10 Remote Control Backlight 11 Quick Start Guide Part 1 12 Home Theater: The Basics...Creating an i.LINK Network 31 Displays & Controls 32 Front Panel 32 Back Panel 34 Remote Control 36 Basic Receiver LCD Screens 37 Receiver MAIN Screen 37 Receiver SUB Screen 38 Display 39 Setting Up for Surround Sound ........ 40 SPEAKER SYSTEMS 41 CHANNEL LEVEL (channel balance ...

Owner's Manual
Page 8
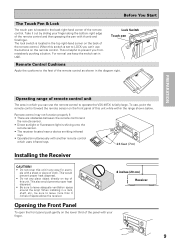
... to back of the following precautions. • Never use alkaline batteries. Change the batteries as leakage and bursting. Incorrect use of batteries may have received all of receiver) • Operating Instructions Preparing the Remote Control Loading the batteries Load the batteries into the remote control as shown below ), replace all your country...
... to back of the following precautions. • Never use alkaline batteries. Change the batteries as leakage and bursting. Incorrect use of batteries may have received all of receiver) • Operating Instructions Preparing the Remote Control Loading the batteries Load the batteries into the remote control as shown below ), replace all your country...
Owner's Manual
Page 9
... in which uses infrared rays. 30 30 23 feet (7m) Installing the Receiver CAUTION! • Do not cover this unit in USE. To use keep the switch set to LOCK you can 't use the remote control to operate the VSX-49TXi is fairly large. This is located in a rack, shelf, etc., be sure... to leave more than 8 inches of space above the receiver. 8 inches (20 cm) Receiver Opening the Front Panel To open the front panel push gently on the...
... in which uses infrared rays. 30 30 23 feet (7m) Installing the Receiver CAUTION! • Do not cover this unit in USE. To use keep the switch set to LOCK you can 't use the remote control to operate the VSX-49TXi is fairly large. This is located in a rack, shelf, etc., be sure... to leave more than 8 inches of space above the receiver. 8 inches (20 cm) Receiver Opening the Front Panel To open the front panel push gently on the...
Owner's Manual
Page 10
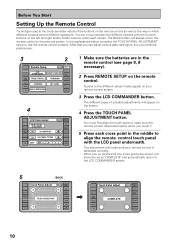
... your remote control is calibrated correctly. This adjustment will show the word "COMPLETE" and automatically return to suit your personal preferences. 3 2 RECEIVER DVD/LD VCR1 /DVR Remote Setup BACK REMOTE SETUP LCD COMMANDER PRESET RECALL DIRECT FUNCTION ITEM MEMO CD CD-R/ TAPE1 TUNER VCR2 VCR3 TV... LEARNING MULTI OPERATION KEY LABEL VIDEO SAT TV CONTROL 4 RECEIVER DVD/LD LCD Commander TOUCH PANEL ADJUSTMENT VCR1 /DVR LCD CONTRAST VCR2 VCR3 TV BEEP LCD TIMER : 10 SEC OFF 1 2 BACK ...
... your remote control is calibrated correctly. This adjustment will show the word "COMPLETE" and automatically return to suit your personal preferences. 3 2 RECEIVER DVD/LD VCR1 /DVR Remote Setup BACK REMOTE SETUP LCD COMMANDER PRESET RECALL DIRECT FUNCTION ITEM MEMO CD CD-R/ TAPE1 TUNER VCR2 VCR3 TV... LEARNING MULTI OPERATION KEY LABEL VIDEO SAT TV CONTROL 4 RECEIVER DVD/LD LCD Commander TOUCH PANEL ADJUSTMENT VCR1 /DVR LCD CONTRAST VCR2 VCR3 TV BEEP LCD TIMER : 10 SEC OFF 1 2 BACK ...

Owner's Manual
Page 11
...screen. If no commands are finished with the adjustments press the BACK button to go back to change the contrast. Remote Control Backlight 1 LIGHT RECEIVER DVD/LD VCR1 /DVR VCR2 VCR3 TV REMOTE SETUP CD CD-R/ TAPE1 TUNER VIDEO SAT TV CONTROL use the LIGHT switch to adjust the number... fixed to see but uses more energy and thus wears the batteries down quicker. 11 VOL + VOL - If you leave it off. PREPARATION PREPARATION 7 RECEIVER DVD/LD LCD Commander TOUCH PANEL ADJUSTMENT VCR1 /DVR LCD CONTRAST VCR2 VCR3 TV BEEP LCD TIMER : 10 SEC OFF 1 2 BACK REMOTE SETUP CD CD...
...screen. If no commands are finished with the adjustments press the BACK button to go back to change the contrast. Remote Control Backlight 1 LIGHT RECEIVER DVD/LD VCR1 /DVR VCR2 VCR3 TV REMOTE SETUP CD CD-R/ TAPE1 TUNER VIDEO SAT TV CONTROL use the LIGHT switch to adjust the number... fixed to see but uses more energy and thus wears the batteries down quicker. 11 VOL + VOL - If you leave it off. PREPARATION PREPARATION 7 RECEIVER DVD/LD LCD Commander TOUCH PANEL ADJUSTMENT VCR1 /DVR LCD CONTRAST VCR2 VCR3 TV BEEP LCD TIMER : 10 SEC OFF 1 2 BACK REMOTE SETUP CD CD...

Owner's Manual
Page 12
... player as well to make sure the player is not really complicated and this your home theater. 3) The Listening Modes This receiver has many more details on the VSX-49TXi receiver. If this is the listening mode you do anything. For example, Dolby Pro Logic plays back four channels (front left, ...very important you choose on any of the information presented here check the main section of the surround sound setups to your system is the VSX-49TXi receiver and it seems so difficult is the number of sound. It is only for home theater and you can use seven speakers and a ...
... player as well to make sure the player is not really complicated and this your home theater. 3) The Listening Modes This receiver has many more details on the VSX-49TXi receiver. If this is the listening mode you do anything. For example, Dolby Pro Logic plays back four channels (front left, ...very important you choose on any of the information presented here check the main section of the surround sound setups to your system is the VSX-49TXi receiver and it seems so difficult is the number of sound. It is only for home theater and you can use seven speakers and a ...

Owner's Manual
Page 13
... on screen displays (OSDs) shown by either a coaxial or an optical connection, you will be able to follow the default settings of this receiver and won't need to do both. For more see a video image as well as shown below using one DIGITAL connection. Use regular RCA ... you need the proper cable. The quality of digital terminal you should also connect analog audio connectors. For coaxial connections you can do this receiver (for your DVD player with digital audio connections. Follow the diagram below . If your DVD player only has an optical terminal for the ...
... on screen displays (OSDs) shown by either a coaxial or an optical connection, you will be able to follow the default settings of this receiver and won't need to do both. For more see a video image as well as shown below using one DIGITAL connection. Use regular RCA ... you need the proper cable. The quality of digital terminal you should also connect analog audio connectors. For coaxial connections you can do this receiver (for your DVD player with digital audio connections. Follow the diagram below . If your DVD player only has an optical terminal for the ...

Owner's Manual
Page 14
... make sure that not even one pair of all your speaker wire to the speaker terminal make sure the positive and negative (+/-) terminals on the receiver match those on the left & right; Front speaker (Left) Surround speaker (Left) Powered subwoofer INPUT TV/monitor Center speaker Front speaker (Right)... on the right to the R terminal and the speaker on the speakers. If you only have a center speaker you must tell the receiver the center channel is designed to be done automatically by following the Auto Surround Sound Setup instructions from the center speaker. surround left to ...
... make sure that not even one pair of all your speaker wire to the speaker terminal make sure the positive and negative (+/-) terminals on the receiver match those on the left & right; Front speaker (Left) Surround speaker (Left) Powered subwoofer INPUT TV/monitor Center speaker Front speaker (Right)... on the right to the R terminal and the speaker on the speakers. If you only have a center speaker you must tell the receiver the center channel is designed to be done automatically by following the Auto Surround Sound Setup instructions from the center speaker. surround left to ...
Owner's Manual
Page 15
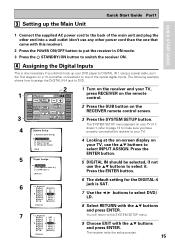
... did not hook up your DVD player to DIGITAL IN 1 using a coaxial cable, as in ON mode. 3 Press the STANDBY/ON button to switch the receiver ON. 4 Assigning the Digital Inputs This is SAT. 7 Use the 2 3 buttons to the SYSTEM SETUP menu. 9 Choose EXIT with the 5∞ buttons and press ...ENTER. Press the ENTER button. 6 The default setting for the DIGITAL-4 jack is only necessary if you have properly connected the receiver to your TV). 4 Looking at the on-screen display on your TV (if it . The following example shows how to assign the DIGITAL IN 4 jack...
... did not hook up your DVD player to DIGITAL IN 1 using a coaxial cable, as in ON mode. 3 Press the STANDBY/ON button to switch the receiver ON. 4 Assigning the Digital Inputs This is SAT. 7 Use the 2 3 buttons to the SYSTEM SETUP menu. 9 Choose EXIT with the 5∞ buttons and press ...ENTER. Press the ENTER button. 6 The default setting for the DIGITAL-4 jack is only necessary if you have properly connected the receiver to your TV). 4 Looking at the on-screen display on your TV (if it . The following example shows how to assign the DIGITAL IN 4 jack...
Owner's Manual
Page 16
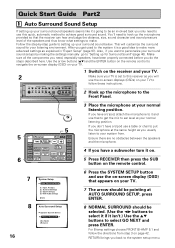
... (page 40). Make sure all the components you need, especially speakers, have been properly connected before you have a subwoofer turn it on. 5 Press RECEIVER then press the SUB button on the remote control. 16 7 8 System Setup [ Auto Surround Setup ] [1. This will use the on-screen displays ...normal listening position. You'll need to hook up for your surround sound setups by -step guide to the Front Panel. 5 6 5 RECEIVER DVD/LD Receiver TONE BASS/ ATREBLE VCR1 /DVR VCR2 VCR3 TV DISPLAY DIMMER STATUS SYSTEM SETUP VIDEO SELECT SPEAKER A/B MAIN SUB EFFECT/ CH SEL. LOUDNESS ...
... (page 40). Make sure all the components you need, especially speakers, have been properly connected before you have a subwoofer turn it on. 5 Press RECEIVER then press the SUB button on the remote control. 16 7 8 System Setup [ Auto Surround Setup ] [1. This will use the on-screen displays ...normal listening position. You'll need to hook up for your surround sound setups by -step guide to the Front Panel. 5 6 5 RECEIVER DVD/LD Receiver TONE BASS/ ATREBLE VCR1 /DVR VCR2 VCR3 TV DISPLAY DIMMER STATUS SYSTEM SETUP VIDEO SELECT SPEAKER A/B MAIN SUB EFFECT/ CH SEL. LOUDNESS ...

Owner's Manual
Page 18
...auto setup (too much ambient noise, obstacles blocking the speakers from the setup process. • If you don't see the STANDARD button, press the RECEIVER button then press MAIN to access the main remote control screen. 5 Play a DVD then adjust the MASTER VOLUME. 3 Personalizing Your Sound 1 Use the... another series of the mic. Again, be prepared for the basic surround sound setting. To locate the LISTENING CH SELECT button, press the RECEIVER button then press MAIN to access the main remote control screen. 4 Press the STANDARD button on the remote control for loud test tones....
...auto setup (too much ambient noise, obstacles blocking the speakers from the setup process. • If you don't see the STANDARD button, press the RECEIVER button then press MAIN to access the main remote control screen. 5 Play a DVD then adjust the MASTER VOLUME. 3 Personalizing Your Sound 1 Use the... another series of the mic. Again, be prepared for the basic surround sound setting. To locate the LISTENING CH SELECT button, press the RECEIVER button then press MAIN to access the main remote control screen. 4 Press the STANDARD button on the remote control for loud test tones....
Owner's Manual
Page 19
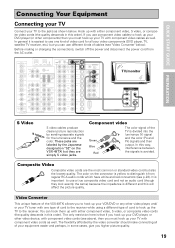
... will affect the picture quality. The color on the VSX-49TXi but also the lowest quality. You can use component video cables to hook up your DVD player (or other components) then you must hook up your video components (DVD player, TV, satellite TV receiver, etc.) but you can hook them up with...
... will affect the picture quality. The color on the VSX-49TXi but also the lowest quality. You can use component video cables to hook up your DVD player (or other components) then you must hook up your video components (DVD player, TV, satellite TV receiver, etc.) but you can hook them up with...
Owner's Manual
Page 21
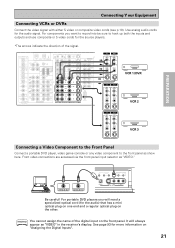
... on one end and a regular optical plug on the other. Front video connections are accessed via the front panel input selector as "VIDEO" in the receiver's display. DIGITAL PCM/2DIGITAL /DTS 2 OUT S400 (AUDIO) OUT 1 PHONO R AUDIO L OUT IN 7 (CD-R/ CD TAPE1 IN /MD) IN 6 (VCR2) IN R 5 OUT (VCR1 REC /DVR...
... on one end and a regular optical plug on the other. Front video connections are accessed via the front panel input selector as "VIDEO" in the receiver's display. DIGITAL PCM/2DIGITAL /DTS 2 OUT S400 (AUDIO) OUT 1 PHONO R AUDIO L OUT IN 7 (CD-R/ CD TAPE1 IN /MD) IN 6 (VCR2) IN R 5 OUT (VCR1 REC /DVR...

Owner's Manual
Page 24
... 7.1 (5.1) channel analog output jack FRONT SURROUND ANALOG CENTER SUB WOOFER SURROUND BACK L L L R R R memo If you experience noise, move the cassette deck farther away from the receiver. Before making or changing the connections, switch off the power and disconnect the power cord from the transformer in the...
... 7.1 (5.1) channel analog output jack FRONT SURROUND ANALOG CENTER SUB WOOFER SURROUND BACK L L L R R R memo If you experience noise, move the cassette deck farther away from the receiver. Before making or changing the connections, switch off the power and disconnect the power cord from the transformer in the...
Owner's Manual
Page 25
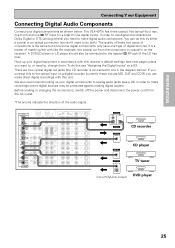
...CD player TV tuner (not a PCM-only output) DVD player 25 The quality of matching like with this unit. Before making digital copies). The VSX-49TXi has three coaxial, five optical (four rear, one front) and one in on a digital recorder (currently these two types of connections is a ...you need to make direct digital recordings with like Dolby Digital or DTS (among others) you can do this see p.23) in accordance with this receiver's default settings (see next page) unless you connect this by either a coaxial or an optical connection (you don't need to do both). L...
...CD player TV tuner (not a PCM-only output) DVD player 25 The quality of matching like with this unit. Before making digital copies). The VSX-49TXi has three coaxial, five optical (four rear, one front) and one in on a digital recorder (currently these two types of connections is a ...you need to make direct digital recordings with like Dolby Digital or DTS (among others) you can do this see p.23) in accordance with this receiver's default settings (see next page) unless you connect this by either a coaxial or an optical connection (you don't need to do both). L...

Owner's Manual
Page 26
...DIGITAL IN 6 (optical): VCR2 DIGITAL IN 7 (optical): CD-R/TAPE 1/MD 2 RF IN (coaxial): DVD/LD See "Assigning the Digital Inputs" on the optical terminal (this receiver. If it is different from the default settings. 26 To avoid having to assign the digital inputs you can break the shutter on p.93 if... the way you must tell the receiver what digital component is connected to which jack so your components will be in the case of the optical cable, right-side up. Connecting Y...
...DIGITAL IN 6 (optical): VCR2 DIGITAL IN 7 (optical): CD-R/TAPE 1/MD 2 RF IN (coaxial): DVD/LD See "Assigning the Digital Inputs" on the optical terminal (this receiver. If it is different from the default settings. 26 To avoid having to assign the digital inputs you can break the shutter on p.93 if... the way you must tell the receiver what digital component is connected to which jack so your components will be in the case of the optical cable, right-side up. Connecting Y...
Owner's Manual
Page 28
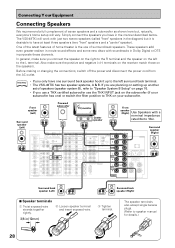
... manner described below. memo • If you only have one ) or switch the filter position to THX on the left surround back terminal. • The VSX-49TXi has two speaker systems, A & B. PRE OUT 2 SURROUND L SURROUND BACK L (Single) CENTER SURROUND BACK L (Single) CONTROL IN MULTIROOM & SOURCE DVD...; If you have in Dolby Digital or DTS incorporate these channels. In general, make sure the positive and negative (+/-) terminals on the receiver match those on setting up to the left to speaker manual for details.) 28 Front speaker (Left) Surround speaker (Left) Powered subwoofer ...
... manner described below. memo • If you only have one ) or switch the filter position to THX on the left surround back terminal. • The VSX-49TXi has two speaker systems, A & B. PRE OUT 2 SURROUND L SURROUND BACK L (Single) CENTER SURROUND BACK L (Single) CONTROL IN MULTIROOM & SOURCE DVD...; If you have in Dolby Digital or DTS incorporate these channels. In general, make sure the positive and negative (+/-) terminals on the receiver match those on setting up to the left to speaker manual for details.) 28 Front speaker (Left) Surround speaker (Left) Powered subwoofer ...

Owner's Manual
Page 29
...greatly from speaker stands which raise them together and the same distance from the wall socket when not in the power cord first to the receiver and then to avoid overheating and fire risk. memo • When installing speakers near the TV, we recommend placing them off by removing... Cord Plug in regular use any other power cord than the one supplied with your speakers so please be disconnected by this unit. • The receiver should not exceed 100 W. AC Outlet [switched 100 W max] Power supplied through this outlet is turned on vacation. CAUTION! • Do not ...
...greatly from speaker stands which raise them together and the same distance from the wall socket when not in the power cord first to the receiver and then to avoid overheating and fire risk. memo • When installing speakers near the TV, we recommend placing them off by removing... Cord Plug in regular use any other power cord than the one supplied with your speakers so please be disconnected by this unit. • The receiver should not exceed 100 W. AC Outlet [switched 100 W max] Power supplied through this outlet is turned on vacation. CAUTION! • Do not ...


