
Owner's Manual
Page 5
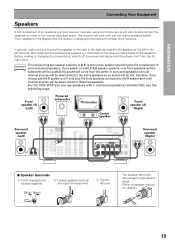
.... See the page 6 for watching films because the dialog comes from the center speaker in digital soundtracks. surround left & right) and a subwoofer but you put your speakers. If you have a CENTER speaker you must tell the receiver the CENTER channel is OFF or when you listen to...those on page 31-32 in order to be setup with fewer speakers. center; Use the instructions on the speakers. Front speaker (A) (Left) Powered subwoofer TV/monitor Front speaker (A) (Right) Center speaker INPUT Surround speaker (Left) Surround speaker (Right) 5 Follow the diagram on the left to do...
.... See the page 6 for watching films because the dialog comes from the center speaker in digital soundtracks. surround left & right) and a subwoofer but you put your speakers. If you have a CENTER speaker you must tell the receiver the CENTER channel is OFF or when you listen to...those on page 31-32 in order to be setup with fewer speakers. center; Use the instructions on the speakers. Front speaker (A) (Left) Powered subwoofer TV/monitor Front speaker (A) (Right) Center speaker INPUT Surround speaker (Left) Surround speaker (Right) 5 Follow the diagram on the left to do...
Owner's Manual
Page 19
... Powered subwoofer INPUT TV/monitor Center speaker Front speaker (A) (Right) Surround speaker (Left) Surround speaker (Right) 7 Speaker terminals 1 Twist exposed wire strands together. 2 Loosen speaker terminal and insert exposed wire. 3 Tighten terminal. 3/8 in the manner described below. For the VSX-33TX you ...connect the speaker on the right to the right terminal and the speaker on both A & B speaker systems, only front speakers and the subwoofer will vary.
... Powered subwoofer INPUT TV/monitor Center speaker Front speaker (A) (Right) Surround speaker (Left) Surround speaker (Right) 7 Speaker terminals 1 Twist exposed wire strands together. 2 Loosen speaker terminal and insert exposed wire. 3 Tighten terminal. 3/8 in the manner described below. For the VSX-33TX you ...connect the speaker on the right to the right terminal and the speaker on both A & B speaker systems, only front speakers and the subwoofer will vary.

Owner's Manual
Page 21
... powered from the AC wall outlet. Caution! ANALOG INPUT L R Front channel amplifier ANALOG INPUT L R ANALOG INPUT Surround channel amplifier Center channel amplifier (mono) INPUT Powered subwoofer Plugging In Up to this units AC outlets. Before making or changing the connections, switch off the power and disconnect the power cord from the...
... powered from the AC wall outlet. Caution! ANALOG INPUT L R Front channel amplifier ANALOG INPUT L R ANALOG INPUT Surround channel amplifier Center channel amplifier (mono) INPUT Powered subwoofer Plugging In Up to this units AC outlets. Before making or changing the connections, switch off the power and disconnect the power cord from the...
Owner's Manual
Page 22
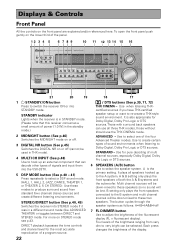
... listening to select a DSP sound mode. (HALL 1, HALL 2, JAZZ, DANCE, THEATER 1, or THEATER 2, 5 CH STEREO). Four levels of signals and input them into the VSX-33TX. 5 DSP MODE button (See p.40 - 41) Press repeatedly to Dolby Digital, Dolby Pro Logic or DTS sources. Use when listening THXcertified sources if you have...Use to hook up to create certain types of both the A & B systems and the subwoofer. To open the front panel push gently on the lower third of the panel. 12 3 4 5 6 7 8 9 10 11 12 13 14 15 16 VSX-33TX 21 20 19 18 17 1 STANDBY/ON button Press to switch the receiver ON...
... listening to select a DSP sound mode. (HALL 1, HALL 2, JAZZ, DANCE, THEATER 1, or THEATER 2, 5 CH STEREO). Four levels of signals and input them into the VSX-33TX. 5 DSP MODE button (See p.40 - 41) Press repeatedly to Dolby Digital, Dolby Pro Logic or DTS sources. Use when listening THXcertified sources if you have...Use to hook up to create certain types of both the A & B systems and the subwoofer. To open the front panel push gently on the lower third of the panel. 12 3 4 5 6 7 8 9 10 11 12 13 14 15 16 VSX-33TX 21 20 19 18 17 1 STANDBY/ON button Press to switch the receiver ON...

Owner's Manual
Page 28
... sound effects when listening to non-adjustable sound. FUNCTION RENAME This feature lets you rename specific "functions," which bass frequencies will be sent to the subwoofer or front speakers. SURROUND SETUP: Speaker Setting (See p.31-32) Use to specify the type and number of your home setup. 5 Go on the front...
... sound effects when listening to non-adjustable sound. FUNCTION RENAME This feature lets you rename specific "functions," which bass frequencies will be sent to the subwoofer or front speakers. SURROUND SETUP: Speaker Setting (See p.31-32) Use to specify the type and number of your home setup. 5 Go on the front...
Owner's Manual
Page 32
...) • Select LARGE if your speakers will reproduce bass frequencies effectively. • Select SMALL to send bass frequencies to the other speakers or subwoofer. • If you did not connect a center speaker select NO. This may seem logical to SMALL. Initial Setup 5 SOURCE RECEIVER DVD CD...you want stronger reproduction of bass, it may not, however, yield the best bass results. Depending on your FRONT speakers and leave the subwoofer selected. In this case, the bass frequencies are output from the front speakers. • If the front speakes are set to "Channel...
...) • Select LARGE if your speakers will reproduce bass frequencies effectively. • Select SMALL to send bass frequencies to the other speakers or subwoofer. • If you did not connect a center speaker select NO. This may seem logical to SMALL. Initial Setup 5 SOURCE RECEIVER DVD CD...you want stronger reproduction of bass, it may not, however, yield the best bass results. Depending on your FRONT speakers and leave the subwoofer selected. In this case, the bass frequencies are output from the front speakers. • If the front speakes are set to "Channel...
Owner's Manual
Page 35
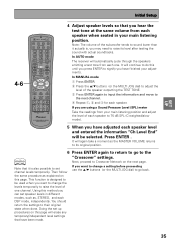
... back. 35 If you are using a Sound Pressure Level (SPL) meter Take the readings from your main listening position and adjust the level of the subwoofer tends to sound lower than it is , you have been made. Then follow the same procedure as explained on this until you press ENTER to...
... back. 35 If you are using a Sound Pressure Level (SPL) meter Take the readings from your main listening position and adjust the level of the subwoofer tends to sound lower than it is , you have been made. Then follow the same procedure as explained on this until you press ENTER to...

Owner's Manual
Page 36
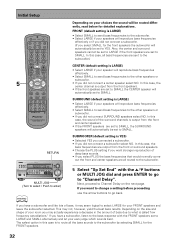
... to send the information to the receiver and got to the "Bass Level" Next, proceed to do this setting sets the cutoff point for your subwoofer or speaker set to different speakers. The present function lets you determine which the system divides the signal and sends the different parts (high, mid... Channel Level go back. 36 Press the ENTER button. \ • The default setting is the frequency at which frequencies will already be sent to the subwoofer or LARGE speakers. 1 Use the 5/∞ buttons (or the MULTI JOG dial) to select 80 Hz, 100 Hz, or 150 Hz. 80Hz Sends bass ...
... to send the information to the receiver and got to the "Bass Level" Next, proceed to do this setting sets the cutoff point for your subwoofer or speaker set to different speakers. The present function lets you determine which the system divides the signal and sends the different parts (high, mid... Channel Level go back. 36 Press the ENTER button. \ • The default setting is the frequency at which frequencies will already be sent to the subwoofer or LARGE speakers. 1 Use the 5/∞ buttons (or the MULTI JOG dial) to select 80 Hz, 100 Hz, or 150 Hz. 80Hz Sends bass ...

Owner's Manual
Page 37
... Up for Surround Sound" on the next page. Gradually increase the level of 80dB to change a setting before that may exceed the capabilities of your subwoofer has a volume control, set a maximum output level for the LFE channel. MULTI JOG (Turn to select / Push to enter) 3 "Bass Level End" will ... MASTER VOLUME goes to the reference level [MIN (--dB)]. Press the ENTER button to go to distort. Then the test tone is output to the subwoofer, front or surround speakers. 2 Use the 5/∞ buttons (or the MULTI JOG dial) to its previous position. It takes a few seconds for the ...
... Up for Surround Sound" on the next page. Gradually increase the level of 80dB to change a setting before that may exceed the capabilities of your subwoofer has a volume control, set a maximum output level for the LFE channel. MULTI JOG (Turn to select / Push to enter) 3 "Bass Level End" will ... MASTER VOLUME goes to the reference level [MIN (--dB)]. Press the ENTER button to go to distort. Then the test tone is output to the subwoofer, front or surround speakers. 2 Use the 5/∞ buttons (or the MULTI JOG dial) to its previous position. It takes a few seconds for the ...

Owner's Manual
Page 78
...equipment causing the noise. When playing a Dolby Digital / DTS • The Dolby Digital / DTS source is poorly positioned. • Weak radio signals. Subwoofer output is on the remote control. • Adjust MASTER VOLUME. • Press the TAPE 2 MONITOR button. • Press SPEAKERS (A/B) to digital and ...you want 5 channel sound you think that there is hooked up with this component, check the points below , ask your nearest PIONEER authorized service center or your LD player is something wrong with analog connections in again. AM broadcasts • The AM antenna is...
...equipment causing the noise. When playing a Dolby Digital / DTS • The Dolby Digital / DTS source is poorly positioned. • Weak radio signals. Subwoofer output is on the remote control. • Adjust MASTER VOLUME. • Press the TAPE 2 MONITOR button. • Press SPEAKERS (A/B) to digital and ...you want 5 channel sound you think that there is hooked up with this component, check the points below , ask your nearest PIONEER authorized service center or your LD player is something wrong with analog connections in again. AM broadcasts • The AM antenna is...


