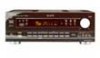
Operating Instructions
Page 5
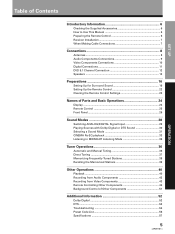
SET UP Table of Contents Introductory Information 6 Checking the Supplied Accessories 6 How to Use This Manual 6 Preparing the Remote Control 6 Receiver Installation 7 When Making Cable Connections 7 Connections 8 Antennas ...8 Audio Components Connections 9 Video Components Connections 10 ... 30 Selecting a Sound Mode 31 CINEMA Re-EQ playback 33 Listening in MIDNIGHT Listening Mode 35 Tuner Operations 36 Automatic and Manual Tuning 36 Direct Tuning 37 Memorizing Frequently Tuned Stations 38 Recalling the Memorized Stations 39 Other Operations 40 Playback ...40 Recording from...
SET UP Table of Contents Introductory Information 6 Checking the Supplied Accessories 6 How to Use This Manual 6 Preparing the Remote Control 6 Receiver Installation 7 When Making Cable Connections 7 Connections 8 Antennas ...8 Audio Components Connections 9 Video Components Connections 10 ... 30 Selecting a Sound Mode 31 CINEMA Re-EQ playback 33 Listening in MIDNIGHT Listening Mode 35 Tuner Operations 36 Automatic and Manual Tuning 36 Direct Tuning 37 Memorizing Frequently Tuned Stations 38 Recalling the Memorized Stations 39 Other Operations 40 Playback ...40 Recording from...
Operating Instructions
Page 6
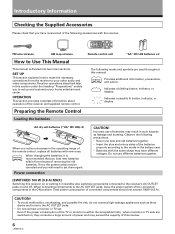
... Checking the Supplied Accessories Please check that you load new batteries within the acceptable limits, when monitors or TV sets are used throughout this manual: memo Provides additional information, precautions, and advice. AA dry cell batteries (("AA" IEC LR6)×2) \ ( 9 9 ( When you...TV set up and customize your other audio and video components. FM wire antenna AM loop antenna How to Use This Manual This manual is recommended that you will need to your home entertainment center. OPERATION This section provides complete information about operation of removing...
... Checking the Supplied Accessories Please check that you load new batteries within the acceptable limits, when monitors or TV sets are used throughout this manual: memo Provides additional information, precautions, and advice. AA dry cell batteries (("AA" IEC LR6)×2) \ ( 9 9 ( When you...TV set up and customize your other audio and video components. FM wire antenna AM loop antenna How to Use This Manual This manual is recommended that you will need to your home entertainment center. OPERATION This section provides complete information about operation of removing...

Operating Instructions
Page 8
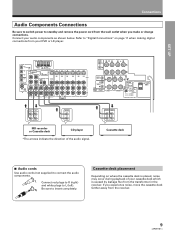
... VIDEO IN OUT IN OUT L R VCR 2 FRONT PREOUT L R FRONT SPEAKERS R L CENTER PREOUT L SORROUND PREOUT R SUBWOOFER PREOUT CENTER SPEAKER R L SURROUND SPEAKERS A B CAUTION: SEE INSTRUCTION MANUAL ATTENTION: SEE INSTRUCTION MANUAL 6~LESS THAN 8Ω /SPEAKER 6~MOINS DE 8Ω /HAUTPARLEUR 8~16Ω / SPEAKER 8~16Ω / SPEAKER IMPEDANCE SELECTOR AC OUTLET AC 120V 60Hz 7 AM loop antenna...
... VIDEO IN OUT IN OUT L R VCR 2 FRONT PREOUT L R FRONT SPEAKERS R L CENTER PREOUT L SORROUND PREOUT R SUBWOOFER PREOUT CENTER SPEAKER R L SURROUND SPEAKERS A B CAUTION: SEE INSTRUCTION MANUAL ATTENTION: SEE INSTRUCTION MANUAL 6~LESS THAN 8Ω /SPEAKER 6~MOINS DE 8Ω /HAUTPARLEUR 8~16Ω / SPEAKER 8~16Ω / SPEAKER IMPEDANCE SELECTOR AC OUTLET AC 120V 60Hz 7 AM loop antenna...
Operating Instructions
Page 9
... 2 »« PLAY REC L L R R » OUTPUT L R FRONT PREOUT L R FRONT SPEAKERS R L CENTER PREOUT L SORROUND PREOUT R SUBWOOFER PREOUT CENTER SPEAKER R L SURROUND SPEAKERS A B CAUTION: SEE INSTRUCTION MANUAL ATTENTION: SEE INSTRUCTION MANUAL 6~LESS THAN 8Ω /SPEAKER 6~MOINS DE 8Ω /HAUTPARLEUR 8~16Ω / SPEAKER 8~16Ω / SPEAKER IMPEDANCE SELECTOR » « PLAY REC L L R R AC OUTLET AC 120V...
... 2 »« PLAY REC L L R R » OUTPUT L R FRONT PREOUT L R FRONT SPEAKERS R L CENTER PREOUT L SORROUND PREOUT R SUBWOOFER PREOUT CENTER SPEAKER R L SURROUND SPEAKERS A B CAUTION: SEE INSTRUCTION MANUAL ATTENTION: SEE INSTRUCTION MANUAL 6~LESS THAN 8Ω /SPEAKER 6~MOINS DE 8Ω /HAUTPARLEUR 8~16Ω / SPEAKER 8~16Ω / SPEAKER IMPEDANCE SELECTOR » « PLAY REC L L R R AC OUTLET AC 120V...

Operating Instructions
Page 10
... VIDEO IN OUT IN OUT L R VCR 2 FRONT PREOUT L R FRONT SPEAKERS R L CENTER PREOUT L SORROUND PREOUT R SUBWOOFER PREOUT CENTER SPEAKER R L SURROUND SPEAKERS A B CAUTION: SEE INSTRUCTION MANUAL ATTENTION: SEE INSTRUCTION MANUAL 6~LESS THAN 8Ω /SPEAKER 6~MOINS DE 8Ω /HAUTPARLEUR 8~16Ω / SPEAKER 8~16Ω / SPEAKER IMPEDANCE SELECTOR AC OUTLET AC 120V 60Hz 7 Front VIDEO INPUT...
... VIDEO IN OUT IN OUT L R VCR 2 FRONT PREOUT L R FRONT SPEAKERS R L CENTER PREOUT L SORROUND PREOUT R SUBWOOFER PREOUT CENTER SPEAKER R L SURROUND SPEAKERS A B CAUTION: SEE INSTRUCTION MANUAL ATTENTION: SEE INSTRUCTION MANUAL 6~LESS THAN 8Ω /SPEAKER 6~MOINS DE 8Ω /HAUTPARLEUR 8~16Ω / SPEAKER 8~16Ω / SPEAKER IMPEDANCE SELECTOR AC OUTLET AC 120V 60Hz 7 Front VIDEO INPUT...
Operating Instructions
Page 11
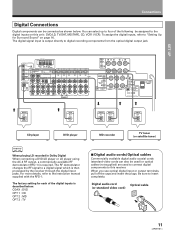
...pull off the caps and insert the plugs. SET UP Connections Digital Connections Digital components can be assigned to the instruction manual supplied with the RFD-1. To assign the digital inputs, refer to this unit: DVD/LD, TV/SAT, MD/TAPE,...187; FRONT PREOUT L R FRONT SPEAKERS R L CENTER PREOUT L SORROUND PREOUT R SUBWOOFER PREOUT CENTER SPEAKER R L SURROUND SPEAKERS A B CAUTION: SEE INSTRUCTION MANUAL ATTENTION: SEE INSTRUCTION MANUAL 6~LESS THAN 8Ω /SPEAKER 6~MOINS DE 8Ω /HAUTPARLEUR 8~16Ω / SPEAKER 8~16Ω / SPEAKER IMPEDANCE SELECTOR » » AC...
...pull off the caps and insert the plugs. SET UP Connections Digital Connections Digital components can be assigned to the instruction manual supplied with the RFD-1. To assign the digital inputs, refer to this unit: DVD/LD, TV/SAT, MD/TAPE,...187; FRONT PREOUT L R FRONT SPEAKERS R L CENTER PREOUT L SORROUND PREOUT R SUBWOOFER PREOUT CENTER SPEAKER R L SURROUND SPEAKERS A B CAUTION: SEE INSTRUCTION MANUAL ATTENTION: SEE INSTRUCTION MANUAL 6~LESS THAN 8Ω /SPEAKER 6~MOINS DE 8Ω /HAUTPARLEUR 8~16Ω / SPEAKER 8~16Ω / SPEAKER IMPEDANCE SELECTOR » » AC...
Operating Instructions
Page 12
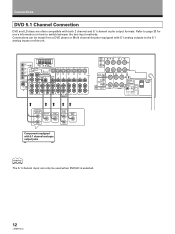
... SUB WOOFER FRONT OUTPUT L VIDEO OUT R R FRONT PREOUT L R FRONT SPEAKERS R L CENTER PREOUT L SORROUND PREOUT R SUBWOOFER PREOUT CENTER SPEAKER R L SURROUND SPEAKERS A B CAUTION: SEE INSTRUCTION MANUAL ATTENTION: SEE INSTRUCTION MANUAL 6~LESS THAN 8Ω /SPEAKER 6~MOINS DE 8Ω /HAUTPARLEUR 8~16Ω / SPEAKER 8~16Ω / SPEAKER IMPEDANCE SELECTOR AC OUTLET AC 120V 60Hz Components equipped with...
... SUB WOOFER FRONT OUTPUT L VIDEO OUT R R FRONT PREOUT L R FRONT SPEAKERS R L CENTER PREOUT L SORROUND PREOUT R SUBWOOFER PREOUT CENTER SPEAKER R L SURROUND SPEAKERS A B CAUTION: SEE INSTRUCTION MANUAL ATTENTION: SEE INSTRUCTION MANUAL 6~LESS THAN 8Ω /SPEAKER 6~MOINS DE 8Ω /HAUTPARLEUR 8~16Ω / SPEAKER 8~16Ω / SPEAKER IMPEDANCE SELECTOR AC OUTLET AC 120V 60Hz Components equipped with...
Operating Instructions
Page 13
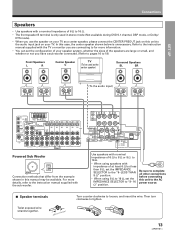
...PREOUT jack on this unit to the AC power source. 7 Speaker terminals Twist exposed wire strands together. 3/8 in this manual may be available. Be sure to complete all other connections before connecting this unit to the audio input jack on your... FRONT PREOUT L R FRONT SPEAKERS R L CENTER PREOUT L SORROUND PREOUT R SUBWOOFER PREOUT CENTER SPEAKER R L SURROUND SPEAKERS A B CAUTION: SEE INSTRUCTION MANUAL ATTENTION: SEE INSTRUCTION MANUAL 6~LESS THAN 8Ω /SPEAKER 6~MOINS DE 8Ω /HAUTPARLEUR 8~16Ω / SPEAKER 8~16Ω / SPEAKER IMPEDANCE SELECTOR AC OUTLET AC 120V...
...PREOUT jack on this unit to the AC power source. 7 Speaker terminals Twist exposed wire strands together. 3/8 in this manual may be available. Be sure to complete all other connections before connecting this unit to the audio input jack on your... FRONT PREOUT L R FRONT SPEAKERS R L CENTER PREOUT L SORROUND PREOUT R SUBWOOFER PREOUT CENTER SPEAKER R L SURROUND SPEAKERS A B CAUTION: SEE INSTRUCTION MANUAL ATTENTION: SEE INSTRUCTION MANUAL 6~LESS THAN 8Ω /SPEAKER 6~MOINS DE 8Ω /HAUTPARLEUR 8~16Ω / SPEAKER 8~16Ω / SPEAKER IMPEDANCE SELECTOR AC OUTLET AC 120V...

Operating Instructions
Page 14
...connect a separate power amplifier to the CENTER PREOUT jack if you have already connected a center speaker to the CENTER SPEAKER terminal.) PIONEER projection TV (for center channel) Powered sub woofer Amplifier (for center channel) L-Audio (MONO) (or) AUDIO IN L R... L R FRONT SPEAKERS R L CENTER PREOUT L SORROUND PREOUT R SUBWOOFER PREOUT CENTER SPEAKER R L SURROUND SPEAKERS A B CAUTION: SEE INSTRUCTION MANUAL ATTENTION: SEE INSTRUCTION MANUAL 6~LESS THAN 8Ω /SPEAKER 6~MOINS DE 8Ω /HAUTPARLEUR 8~16Ω / SPEAKER 8~16Ω / SPEAKER IMPEDANCE SELECTOR INPUT &#...
...connect a separate power amplifier to the CENTER PREOUT jack if you have already connected a center speaker to the CENTER SPEAKER terminal.) PIONEER projection TV (for center channel) Powered sub woofer Amplifier (for center channel) L-Audio (MONO) (or) AUDIO IN L R... L R FRONT SPEAKERS R L CENTER PREOUT L SORROUND PREOUT R SUBWOOFER PREOUT CENTER SPEAKER R L SURROUND SPEAKERS A B CAUTION: SEE INSTRUCTION MANUAL ATTENTION: SEE INSTRUCTION MANUAL 6~LESS THAN 8Ω /SPEAKER 6~MOINS DE 8Ω /HAUTPARLEUR 8~16Ω / SPEAKER 8~16Ω / SPEAKER IMPEDANCE SELECTOR INPUT &#...
Operating Instructions
Page 29
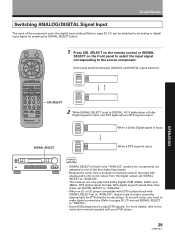
... is fixed in the "ANALOG" position for components not assigned to one of the component set in the digital input setting (Refer to page 20, 21) can only play back Dolby Digital, PCM (32kHz, 44kHz, and 48kHz), DTS digital signal formats. SELECT on the remote control or SIGNAL SELECT on... FL DIMMER MODE CHECK COMMANDER SET UP Î AUDIO/VIDEO PRE-PROGRAMMED REMOTE CONTROL UNIT 1 Press SIG. For more details, refer to the instruction manual supplied with SIGNAL SELECT set in "ANALOG", digital noise is input. To prevent noise, you need to make digital connections (Refer to pages 20...
... is fixed in the "ANALOG" position for components not assigned to one of the component set in the digital input setting (Refer to page 20, 21) can only play back Dolby Digital, PCM (32kHz, 44kHz, and 48kHz), DTS digital signal formats. SELECT on the remote control or SIGNAL SELECT on... FL DIMMER MODE CHECK COMMANDER SET UP Î AUDIO/VIDEO PRE-PROGRAMMED REMOTE CONTROL UNIT 1 Press SIG. For more details, refer to the instruction manual supplied with SIGNAL SELECT set in "ANALOG", digital noise is input. To prevent noise, you need to make digital connections (Refer to pages 20...
Operating Instructions
Page 30
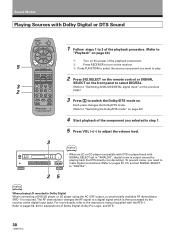
To prevent noise, you need to make digital connections (Refer to pages 20, 21) and set in Dolby Digital When connecting a DVD/LD player or LD player using the AC-3 RF output, a commercially available RF demodulator (RFD-1) is required. ... TV/VCR FUNCTION DIRECT FL DIMMER MODE CHECK COMMANDER SET UP 3 Press to switch the Dolby/DTS mode on page 40.) - Refer to the instruction manual supplied with the RFD-1. Sound Modes Playing Sources with Dolby Digital or DTS Sound RECEIVER TV MUTING FQ TV FUNC + ENTER 1 Follow steps 1 to 3 of...
To prevent noise, you need to make digital connections (Refer to pages 20, 21) and set in Dolby Digital When connecting a DVD/LD player or LD player using the AC-3 RF output, a commercially available RF demodulator (RFD-1) is required. ... TV/VCR FUNCTION DIRECT FL DIMMER MODE CHECK COMMANDER SET UP 3 Press to switch the Dolby/DTS mode on page 40.) - Refer to the instruction manual supplied with the RFD-1. Sound Modes Playing Sources with Dolby Digital or DTS Sound RECEIVER TV MUTING FQ TV FUNC + ENTER 1 Follow steps 1 to 3 of...

Operating Instructions
Page 36
.... Each press switches the band: FM j AM SIGNAL SELECT ANALOG SP A dB j SIGNAL SELECT ANALOG SP A dB 3 Tune in the station. For Manual Tuning • To change frequencies one second, then release. Repeat to select the tuner. For Automatic Tuning Press and hold down FQ and release when... you reach the frequency you want. When using the automatic (search) and manual (step) tuning functions. Press TUNER to set the remote to the tuner operation mode. 2 The station you were previously tuned to is weak,...
.... Each press switches the band: FM j AM SIGNAL SELECT ANALOG SP A dB j SIGNAL SELECT ANALOG SP A dB 3 Tune in the station. For Manual Tuning • To change frequencies one second, then release. Repeat to select the tuner. For Automatic Tuning Press and hold down FQ and release when... you reach the frequency you want. When using the automatic (search) and manual (step) tuning functions. Press TUNER to set the remote to the tuner operation mode. 2 The station you were previously tuned to is weak,...
Operating Instructions
Page 38
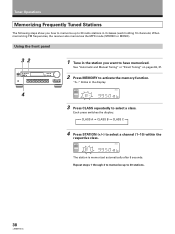
See "Automatic and Manual Tuning" or "Direct Tuning" on pages 36, 37. 2 Press MEMORY to select a class. Repeat steps 1 through 4 to memorize up to 30 radio stations in 3 classes (...
See "Automatic and Manual Tuning" or "Direct Tuning" on pages 36, 37. 2 Press MEMORY to select a class. Repeat steps 1 through 4 to memorize up to 30 radio stations in 3 classes (...
Operating Instructions
Page 55
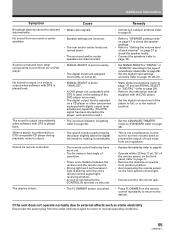
...signal lightreceiving window. • A cord is set SIGNAL SELECT to "DIGITAL" (refer to page 29). • Refer to the instruction manual supplied with digital output level adjustment capability. (The DTS signal has been altered by the player slightly alters the digital information, making it unreadable...front panel (refer to page 7). • Remove the obstacle or operate from another position. • Avoid exposing the remote sensor on page 21 to check the speaker levels. • Connect the speakers (refer to page 8). The display is dark. • The FL DIMMER button ...
...signal lightreceiving window. • A cord is set SIGNAL SELECT to "DIGITAL" (refer to page 29). • Refer to the instruction manual supplied with digital output level adjustment capability. (The DTS signal has been altered by the player slightly alters the digital information, making it unreadable...front panel (refer to page 7). • Remove the obstacle or operate from another position. • Avoid exposing the remote sensor on page 21 to check the speaker levels. • Connect the speakers (refer to page 8). The display is dark. • The FL DIMMER button ...

Operating Instructions
Page 57
... (0.8 A) MAX Dimensions 420 (W) × 158 (H) × 401 (D) mm 16-9/16 (W) × 6-1/4 (H) × 15-6/8 (D) in Weight (without package 9.8 kg (21 lb 10 oz) Furnished Parts FM Antenna 1 AM Loop Antenna 1 Dry Cell Batteries (SIZE "AA" (IEC LR6 2 Remote Control Unit 1 Operating Instructions 1 Sub instruction... manual [System Set up 1 NOTE: Specifications and the design are subject to possible modifications without notice, due to 20,000 Hz with no more...
... (0.8 A) MAX Dimensions 420 (W) × 158 (H) × 401 (D) mm 16-9/16 (W) × 6-1/4 (H) × 15-6/8 (D) in Weight (without package 9.8 kg (21 lb 10 oz) Furnished Parts FM Antenna 1 AM Loop Antenna 1 Dry Cell Batteries (SIZE "AA" (IEC LR6 2 Remote Control Unit 1 Operating Instructions 1 Sub instruction... manual [System Set up 1 NOTE: Specifications and the design are subject to possible modifications without notice, due to 20,000 Hz with no more...

Operating Instructions
Page 59
...feuillet sur la Garantie Limitée gui accompagne le produit. 59 and you wish to locate the nearest Pioneer Authorized Independent Service Company, or if you wish to purchase replacement parts, operating instructions, service manuals, or accessories, please call the number shown below. 8 0 0 - 4 2 1 - 1... SERVICE DEPARTMENT P.O. Ou encore, veuillez vous communiquer avec le Service de Clientèle de Pioneer: Pioneer électroniques du Canada, Inc. PIONEER ELECTRONICS SERVICE, INC. Should this product require service in the U.S.A. Should this product require service in...
...feuillet sur la Garantie Limitée gui accompagne le produit. 59 and you wish to locate the nearest Pioneer Authorized Independent Service Company, or if you wish to purchase replacement parts, operating instructions, service manuals, or accessories, please call the number shown below. 8 0 0 - 4 2 1 - 1... SERVICE DEPARTMENT P.O. Ou encore, veuillez vous communiquer avec le Service de Clientèle de Pioneer: Pioneer électroniques du Canada, Inc. PIONEER ELECTRONICS SERVICE, INC. Should this product require service in the U.S.A. Should this product require service in...


