
Owner's Manual
Page 4
...playback Playing a source...38 Playing an iPod...39 Playing a USB device...40 Listening to the radio...41 Bluetooth ADAPTER for buying this Pioneer product. Contents 01 Before you start Checking what's in the box...8 Installing the receiver...8 Loading the batteries...8 Operating range of remote control... other components...66 Selecting preset codes directly...66 Programming signals from other audio components...27 Connecting AM/FM antennas...27 MULTI-ZONE setup...28 Connecting to the network through these operating instructions so you for Wireless Enjoyment of Music 42 06 Listening to ...
...playback Playing a source...38 Playing an iPod...39 Playing a USB device...40 Listening to the radio...41 Bluetooth ADAPTER for buying this Pioneer product. Contents 01 Before you start Checking what's in the box...8 Installing the receiver...8 Loading the batteries...8 Operating range of remote control... other components...66 Selecting preset codes directly...66 Programming signals from other audio components...27 Connecting AM/FM antennas...27 MULTI-ZONE setup...28 Connecting to the network through these operating instructions so you for Wireless Enjoyment of Music 42 06 Listening to ...
Owner's Manual
Page 6
... (Front height) ! 7.2 channel surround system (Front wide) ! 7.2 channel surround system & Speaker B connection ! 5.2 channel surround system & Front Bi-amping connection (High quality surround) ! 5.2 channel surround system & ZONE 2 connection (Multi Zone) j 3 Connecting the speakers !
... (Front height) ! 7.2 channel surround system (Front wide) ! 7.2 channel surround system & Speaker B connection ! 5.2 channel surround system & Front Bi-amping connection (High quality surround) ! 5.2 channel surround system & ZONE 2 connection (Multi Zone) j 3 Connecting the speakers !
Owner's Manual
Page 11
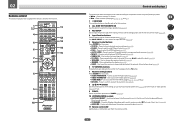
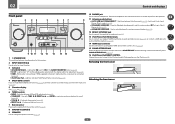
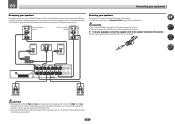
...i/j/k/l/ENTER Use the arrow buttons when setting up your surround sound system (see page 72) and the Audio or Video options (page 58 or 60). 9 ZONE 2 Switch to check selected receiver settings (page 63). ! 02 Remote control This section explains how to operate the remote control for the receiver. 1 2,3 ... 3 AUDIO SIGNAL SEL CH LEVEL 4 5 6 DISP SPEAKERS DIMMER SLEEP 7 8 9 CH D.ACCESS CLASS / CLR 0 ENTER CH AUTO/ALC/ ZONE 2 DIRECT STANDARD ADV SURR Z2 LISTENING MODE 11 12 13 14 15 RECEIVER Controls and displays The remote has been conveniently color-coded according to...
...i/j/k/l/ENTER Use the arrow buttons when setting up your surround sound system (see page 72) and the Audio or Video options (page 58 or 60). 9 ZONE 2 Switch to check selected receiver settings (page 63). ! 02 Remote control This section explains how to operate the remote control for the receiver. 1 2,3 ... 3 AUDIO SIGNAL SEL CH LEVEL 4 5 6 DISP SPEAKERS DIMMER SLEEP 7 8 9 CH D.ACCESS CLASS / CLR 0 ENTER CH AUTO/ALC/ ZONE 2 DIRECT STANDARD ADV SURR Z2 LISTENING MODE 11 12 13 14 15 RECEIVER Controls and displays The remote has been conveniently color-coded according to...
Owner's Manual
Page 12
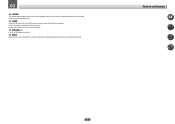
Controls and displays 12 Use to perform operations in the remote control and button operations can be registered using the learning mode. 13 Switches the remote to control the receiver (used to set the listening volume. 15 MUTE Mutes the sound or restores the sound if it has been muted (adjusting the volume also restores the sound). Switch to set up surround sound. 14 VOLUME +/- 02 12 OPTION The preset codes of desired devices can be registered in the main zone. Also use this button to select the white commands).
Controls and displays 12 Use to perform operations in the remote control and button operations can be registered using the learning mode. 13 Switches the remote to control the receiver (used to set the listening volume. 15 MUTE Mutes the sound or restores the sound if it has been muted (adjusting the volume also restores the sound). Switch to set up surround sound. 14 VOLUME +/- 02 12 OPTION The preset codes of desired devices can be registered in the main zone. Also use this button to select the white commands).

Owner's Manual
Page 13
... one channel other than the ones above ! C - SL/SR - Either one of the Neo:6 modes of DTS-HD Master Audio signals. 4 MULTI-ZONE Lights when the MULTI-ZONE feature is active (page 62). 5 SOUND Lights when the DIALOG E (Dialog Enhancement) or TONE (tone controls) features is selected (page 58). 6 PQLS... AUTO SURROUND STREAM DIRECT 2PROLOGIC x Neo:6 ADV.SURROUND STANDARD SP AB SLEEP R 2DIGITAL PLUS DSD PCM TUNED SR 2TrueHD DTS HD ES 96/24 MULTI-ZONE PQLS ALC ATT STEREO S.RTRV SOUND UP MIX OVER MONO XR MSTR CD TUNER iPod DVD TV VIDEO BD DVR HDMI [ 2 ] USB [ 3 ] [ 4 ] 8 ...
... one channel other than the ones above ! C - SL/SR - Either one of the Neo:6 modes of DTS-HD Master Audio signals. 4 MULTI-ZONE Lights when the MULTI-ZONE feature is active (page 62). 5 SOUND Lights when the DIALOG E (Dialog Enhancement) or TONE (tone controls) features is selected (page 58). 6 PQLS... AUTO SURROUND STREAM DIRECT 2PROLOGIC x Neo:6 ADV.SURROUND STANDARD SP AB SLEEP R 2DIGITAL PLUS DSD PCM TUNED SR 2TrueHD DTS HD ES 96/24 MULTI-ZONE PQLS ALC ATT STEREO S.RTRV SOUND UP MIX OVER MONO XR MSTR CD TUNER iPod DVD TV VIDEO BD DVR HDMI [ 2 ] USB [ 3 ] [ 4 ] 8 ...
Owner's Manual
Page 14
Find radio frequencies (page 41). ! STANDARD SURROUND - MULTI-ZONE - Lights when EQ is connected (page 30). 4 MULTI-ZONE controls If you've made MULTI-ZONE connections (page 28) use these controls to ON in the AUDIO PARAMETER menu (page 58). ! TUNER EDIT - When the headphones...13. 6 TUNER controls ! HDMI - Blinks when connecting an HDMI-equipped component; lights when the component is automatically set to control the sub zone from the main zone (page 62). 5 Character display See Display on the iPod (page 39). iPod iPhone iPad - BAND - Use with the display's dimmer ...
Find radio frequencies (page 41). ! STANDARD SURROUND - MULTI-ZONE - Lights when EQ is connected (page 30). 4 MULTI-ZONE controls If you've made MULTI-ZONE connections (page 28) use these controls to ON in the AUDIO PARAMETER menu (page 58). ! TUNER EDIT - When the headphones...13. 6 TUNER controls ! HDMI - Blinks when connecting an HDMI-equipped component; lights when the component is automatically set to control the sub zone from the main zone (page 62). 5 Character display See Display on the iPod (page 39). iPod iPhone iPad - BAND - Use with the display's dimmer ...
Owner's Manual
Page 15
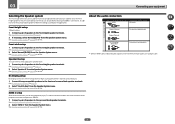
... other video sources 25 Connecting a satellite/cable receiver or other set-top box 26 Connecting other audio components 27 Connecting AM/FM antennas...27 MULTI-ZONE setup...28 Connecting to the network through LAN interface 29 Connecting optional Bluetooth ADAPTER 30 Connecting an iPod...30 Connecting a USB device...30 Connecting an...
... other video sources 25 Connecting a satellite/cable receiver or other set-top box 26 Connecting other audio components 27 Connecting AM/FM antennas...27 MULTI-ZONE setup...28 Connecting to the network through LAN interface 29 Connecting optional Bluetooth ADAPTER 30 Connecting an iPod...30 Connecting a USB device...30 Connecting an...
Owner's Manual
Page 16
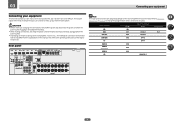
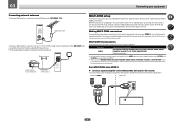
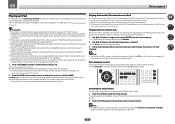
...LAN (DVD) (SAT/CBL) (DVR/BDR) VIDEO MONITOR OUT DVR/BDR DVD IN IN SAT/ CBL IN IN 1 (DVD) ASSIGNABLE Y PB PR COMPONENT VIDEO AUDIO L ZONE 2 OUT R DVR/BDR PRE OUT SUB WOOFER 1 ADAPTER PORT 2 (OUTPUT 5 V 0.1 A MAX) L IN ANTENNA A FRONT R L R AM LOOP L IN R...UNBAL 75 (OUTPUT 5 V 0.6 A MAX) IN 1 IN 2 IN 1 IN 2 (TV) (DVR/BDR) (DVD) (SAT/CBL) CENTER SURROUND R L SURROUND BACK / ZONE 2 R L (Single) FRONT HEIGHT / WIDE / R L B SPEAKERS Note The input functions below are used. 03 Connecting your equipment Connecting your home theater system. Plugging in this...
...LAN (DVD) (SAT/CBL) (DVR/BDR) VIDEO MONITOR OUT DVR/BDR DVD IN IN SAT/ CBL IN IN 1 (DVD) ASSIGNABLE Y PB PR COMPONENT VIDEO AUDIO L ZONE 2 OUT R DVR/BDR PRE OUT SUB WOOFER 1 ADAPTER PORT 2 (OUTPUT 5 V 0.1 A MAX) L IN ANTENNA A FRONT R L R AM LOOP L IN R...UNBAL 75 (OUTPUT 5 V 0.6 A MAX) IN 1 IN 2 IN 1 IN 2 (TV) (DVR/BDR) (DVD) (SAT/CBL) CENTER SURROUND R L SURROUND BACK / ZONE 2 R L (Single) FRONT HEIGHT / WIDE / R L B SPEAKERS Note The input functions below are used. 03 Connecting your equipment Connecting your home theater system. Plugging in this...

Owner's Manual
Page 17
... second subwoofer can be made if you can simultaneously enjoy 5.2-channel surround sound in the main zone when not using the B speakers. 17 The same connections also allow for 7.2-channel surround sound in the main zone with the number of the same sound on the input signal or listening mode. [A] 7.2 channel surround...
... second subwoofer can be made if you can simultaneously enjoy 5.2-channel surround sound in the main zone when not using the B speakers. 17 The same connections also allow for 7.2-channel surround sound in the main zone with the number of the same sound on the input signal or listening mode. [A] 7.2 channel surround...
Owner's Manual
Page 18
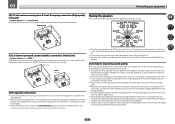
...Place the center speaker above the left / right speakers). ! Front Bi-Amp R L SW 1 SW 2 C SR SL [E] 5.2 channel surround system & ZONE 2 connection (Multi Zone) ! Use less of input devices is best to 90 cm (2 ft. Doing so can be at about ear-level when you can be positioned... for improving sound quality Where you have fewer than the front and center speakers. to 9 ft.) apart, at equal distance from your speakers in ZONE 2. (The selection of an angle for high sound quality with low frequency reproduction capabilities to 3 m (6 ft. If you . ! Some tips...
...Place the center speaker above the left / right speakers). ! Front Bi-Amp R L SW 1 SW 2 C SR SL [E] 5.2 channel surround system & ZONE 2 connection (Multi Zone) ! Use less of input devices is best to 90 cm (2 ft. Doing so can be at about ear-level when you can be positioned... for improving sound quality Where you have fewer than the front and center speakers. to 9 ft.) apart, at equal distance from your speakers in ZONE 2. (The selection of an angle for high sound quality with low frequency reproduction capabilities to 3 m (6 ft. If you . ! Some tips...

Owner's Manual
Page 19
...nominal impedance of external shocks such as a safety measure. Banana plug connections If you want to connect using speaker cables. ! Right ZONE 2 - Make sure that your speakers for details on the speakers themselves. This not only improves sound quality, but you like (... powerful sound reproduction. Left Surround left LINE LEVEL INPUT LINE LEVEL INPUT PRE OUT SUB WOOFER 1 2 A FRONT R L CENTER SURROUND R L SURROUND BACK / ZONE 2 R L (Single) FRONT HEIGHT / WIDE / R L B Note ! To prevent the risk of the speaker cables to 16 W. Front right Front height...
...nominal impedance of external shocks such as a safety measure. Banana plug connections If you want to connect using speaker cables. ! Right ZONE 2 - Make sure that your speakers for details on the speakers themselves. This not only improves sound quality, but you like (... powerful sound reproduction. Left Surround left LINE LEVEL INPUT LINE LEVEL INPUT PRE OUT SUB WOOFER 1 2 A FRONT R L CENTER SURROUND R L SURROUND BACK / ZONE 2 R L (Single) FRONT HEIGHT / WIDE / R L B Note ! To prevent the risk of the speaker cables to 16 W. Front right Front height...
Owner's Manual
Page 20
CAUTION ! Subwoofer 1 LINE LEVEL INPUT Center Subwoofer 2 LINE LEVEL INPUT PRE OUT SUB WOOFER 1 2 A FRONT R L CENTER SURROUND R L SURROUND BACK / ZONE 2 R L (Single) FRONT HEIGHT / WIDE / R L B PRE OUT SUB WOOFER 1 2 A FRONT R L CENTER SURROUND R L SURROUND BACK / ZONE 2 R L (Single) FRONT HEIGHT / WIDE / R L B SPEAKERS Surround right Surround left High Low Low Bi-wiring your speakers to the Low...
CAUTION ! Subwoofer 1 LINE LEVEL INPUT Center Subwoofer 2 LINE LEVEL INPUT PRE OUT SUB WOOFER 1 2 A FRONT R L CENTER SURROUND R L SURROUND BACK / ZONE 2 R L (Single) FRONT HEIGHT / WIDE / R L B PRE OUT SUB WOOFER 1 2 A FRONT R L CENTER SURROUND R L SURROUND BACK / ZONE 2 R L (Single) FRONT HEIGHT / WIDE / R L B SPEAKERS Surround right Surround left High Low Low Bi-wiring your speakers to the Low...
Owner's Manual
Page 21
... and audio signals can be transferred in addition to for the front height speakers. See Standard surround connection on page 19. 2 Select 'ZONE 2' from the Speaker System menu. Bi-Amping setup Bi-amping connection of the front speakers for high sound quality with stereo playback on page.... See Bi-amping your equipment Selecting the Speaker system The front height terminals can be used for bi-amping and ZONE 2 connections, in another component in the main zone with 5.1-channel surround sound. 1 Connect bi-amp compatible speakers to the front and surround back speaker terminals...
... and audio signals can be transferred in addition to for the front height speakers. See Standard surround connection on page 19. 2 Select 'ZONE 2' from the Speaker System menu. Bi-Amping setup Bi-amping connection of the front speakers for high sound quality with stereo playback on page.... See Bi-amping your equipment Selecting the Speaker system The front height terminals can be used for bi-amping and ZONE 2 connections, in another component in the main zone with 5.1-channel surround sound. 1 Connect bi-amp compatible speakers to the front and surround back speaker terminals...
Owner's Manual
Page 28
...any of the INTERNET RADIO, SiriusXM, PANDORA, MEDIA SERVER, FAVORITES, iPod/USB or ADAPTER PORT inputs is selected in the main zone for the sub zone (ZONE 2). You should have made the proper MULTI- You will also need a separate amplifier if you have a pair of vinyl-coated... The following illustration. It is possible to make these connections if you have independent power (the main zone power can be off while sub zone is only possible to ZONE 2: Sub Zone Input functions available ZONE 2 DVD, SAT/CBL, DVR/BDR, INTERNET RADIO, SiriusXM, PANDORA, MEDIA SERVER, FAVORITES, iPod/...
...any of the INTERNET RADIO, SiriusXM, PANDORA, MEDIA SERVER, FAVORITES, iPod/USB or ADAPTER PORT inputs is selected in the main zone for the sub zone (ZONE 2). You should have made the proper MULTI- You will also need a separate amplifier if you have a pair of vinyl-coated... The following illustration. It is possible to make these connections if you have independent power (the main zone power can be off while sub zone is only possible to ZONE 2: Sub Zone Input functions available ZONE 2 DVD, SAT/CBL, DVR/BDR, INTERNET RADIO, SiriusXM, PANDORA, MEDIA SERVER, FAVORITES, iPod/...

Owner's Manual
Page 29
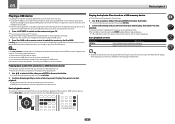
...built-in this way, you have as shown below. For details, see Network Setup menu on your equipment MULTI-ZONE setup using a broadband Internet connection, a contract with a straight LAN cable (CAT 5 or higher). You should ... may differ depending on page 82. 03 Connecting your Internet environment. ! Sub zone (ZONE 2) Main zone A FRONT R L CENTER SURROUND R L SURROUND BACK / ZONE 2 R L (Single) FRONT HEIGHT / WIDE / R L B L R SPEAKERS A FRONT R L CENTER SURROUND R L SURROUND BACK / ZONE 2 R L (Single) FRONT HEIGHT / WIDE / R L B SPEAKERS Connecting...
...built-in this way, you have as shown below. For details, see Network Setup menu on your equipment MULTI-ZONE setup using a broadband Internet connection, a contract with a straight LAN cable (CAT 5 or higher). You should ... may differ depending on page 82. 03 Connecting your Internet environment. ! Sub zone (ZONE 2) Main zone A FRONT R L CENTER SURROUND R L SURROUND BACK / ZONE 2 R L (Single) FRONT HEIGHT / WIDE / R L B L R SPEAKERS A FRONT R L CENTER SURROUND R L SURROUND BACK / ZONE 2 R L (Single) FRONT HEIGHT / WIDE / R L B SPEAKERS Connecting...
Owner's Manual
Page 31
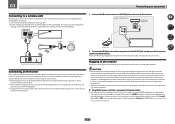
... circuit or electric shock. You cannot carry out any other way. Closet or shelving unit Non-Pioneer component IR IR IN IN OUT IR IN OUT IR receiver 2 Connect the IR IN jack of another zone, you find it to the network is connected to an AC outlet, a 2 second to check ...part. Use the separately sold AS-WL300 for WIRELESS LAN (OUTPUT 5 V 0.6 A MAX) Router Modem Internet WAN 1 Connect the IR receiver sensor to control your nearest Pioneer authorized independent service company for IR compatibility. ! ponent to 10 second HDMI initialization process begins.
... circuit or electric shock. You cannot carry out any other way. Closet or shelving unit Non-Pioneer component IR IR IN IN OUT IR IN OUT IR receiver 2 Connect the IR IN jack of another zone, you find it to the network is connected to an AC outlet, a 2 second to check ...part. Use the separately sold AS-WL300 for WIRELESS LAN (OUTPUT 5 V 0.6 A MAX) Router Modem Internet WAN 1 Connect the IR receiver sensor to control your nearest Pioneer authorized independent service company for IR compatibility. ! ponent to 10 second HDMI initialization process begins.
Owner's Manual
Page 39
...iPod directly. 1 Use i/j to select a category, then press ENTER to browse that category. ! You can be used for music in the main zone. 1 Press u RECEIVER to switch on the remote control to switch the receiver to the iPod/USB operation mode. Basic playback controls This receiver's ...or indirect loss arising from any inconvenience or loss of recorded material resulting from the iPod. See Connecting an iPod on the website of Pioneer (http://pioneer.jp/homeav/support/ios/na/). ! About one playing in the front panel display of this receiver. ! For details, see Switching the...
...iPod directly. 1 Use i/j to select a category, then press ENTER to browse that category. ! You can be used for music in the main zone. 1 Press u RECEIVER to switch on the remote control to switch the receiver to the iPod/USB operation mode. Basic playback controls This receiver's ...or indirect loss arising from any inconvenience or loss of recorded material resulting from the iPod. See Connecting an iPod on the website of Pioneer (http://pioneer.jp/homeav/support/ios/na/). ! About one playing in the front panel display of this receiver. ! For details, see Switching the...
Owner's Manual
Page 40
... drives) and digital audio players (MP3 players) of files stored on a USB device then playing the photo files. 40 Loading appears in the sub zone. 1 Use i/j to select a folder, then press ENTER to browse that you 're ready to play from the USB device. Use a dedicated AC... via USB. ! The selected content is displayed in standby when disconnecting the USB device. 2 Press iPod USB on the front of startup. ! Pioneer cannot guarantee compatibility (operation and/or bus power) with the receiver switched off , then on a USB memory device The maximum number of photo files...
... drives) and digital audio players (MP3 players) of files stored on a USB device then playing the photo files. 40 Loading appears in the sub zone. 1 Use i/j to select a folder, then press ENTER to browse that you 're ready to play from the USB device. Use a dedicated AC... via USB. ! The selected content is displayed in standby when disconnecting the USB device. 2 Press iPod USB on the front of startup. ! Pioneer cannot guarantee compatibility (operation and/or bus power) with the receiver switched off , then on a USB memory device The maximum number of photo files...
Owner's Manual
Page 57
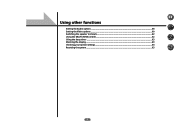
Using other functions Setting the Audio options...58 Setting the Video options...60 Switching the speaker terminals 62 Using the MULTI-ZONE controls...62 Using the sleep timer...63 Dimming the display...63 Checking your system settings...63 Resetting the system...63 57
Using other functions Setting the Audio options...58 Setting the Video options...60 Switching the speaker terminals 62 Using the MULTI-ZONE controls...62 Using the sleep timer...63 Dimming the display...63 Checking your system settings...63 Resetting the system...63 57
Owner's Manual
Page 59
... virtually to behind the display, resulting in a sound field with the same depth as the 3D picture to NO or if Front Bi-Amp or ZONE 2 is selected. 59 When this receiver (amp) or through your front speakers. The presence or absence of your front speakers. You can also not be...
... virtually to behind the display, resulting in a sound field with the same depth as the 3D picture to NO or if Front Bi-Amp or ZONE 2 is selected. 59 When this receiver (amp) or through your front speakers. The presence or absence of your front speakers. You can also not be...


