
Owner's Manual
Page 4
...with HDMI function...55 Making Control with HDMI connections...55 HDMI Setup...55 Before using AVNavigator (included CD-ROM)...9 02 Controls ... other audio components...27 Connecting AM/FM antennas...27 MULTI-ZONE setup...28 Connecting to the network through LAN interface...29 Connecting optional...the receiver...31 04 Basic Setup Changing the OSD display language (OSD Language 33 Automatically conducting optimum...sound tuning (Full Auto MCACC 33 The Input Setup menu...35 Operation Mode Setup...36 About the Home Menu...36 05 Basic ...About the Remote Setup menu...66 Operating multiple receivers...66 Setting the remote to...
...with HDMI function...55 Making Control with HDMI connections...55 HDMI Setup...55 Before using AVNavigator (included CD-ROM)...9 02 Controls ... other audio components...27 Connecting AM/FM antennas...27 MULTI-ZONE setup...28 Connecting to the network through LAN interface...29 Connecting optional...the receiver...31 04 Basic Setup Changing the OSD display language (OSD Language 33 Automatically conducting optimum...sound tuning (Full Auto MCACC 33 The Input Setup menu...35 Operation Mode Setup...36 About the Home Menu...36 05 Basic ...About the Remote Setup menu...66 Operating multiple receivers...66 Setting the remote to...
Owner's Manual
Page 5
... Checking MCACC Data...76 Data Management...77 12 The System Setup and Other Setup menus Making receiver settings from the System Setup menu 80 Manual speaker setup...80 Network Setup menu...82 Checking the Network Information...83 The Other Setup menu...83 13 FAQ Troubleshooting...86 Power...86 No sound...86 Other audio problems...87 ADAPTER...
... Checking MCACC Data...76 Data Management...77 12 The System Setup and Other Setup menus Making receiver settings from the System Setup menu 80 Manual speaker setup...80 Network Setup menu...82 Checking the Network Information...83 The Other Setup menu...83 13 FAQ Troubleshooting...86 Power...86 No sound...86 Other audio problems...87 ADAPTER...
Owner's Manual
Page 6
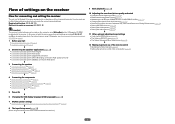
...page 27 ! Plugging in steps 2, 3, 4, 5, 6, 7 and 8 can be made on the computer using Wiring Navi on page 33 j 8 The Input Setup menu (page 35) (When using Phase Control (page 47) ! Changing the channel level while listening (page 81) ! Setting the Video options (page 60) j... 11 Other optional adjustments and settings ! The System Setup and Other Setup menus (page 79) j 12 Making maximum use of functions and terminals. Operating multiple receivers (page 66) ! Loading the batteries on page 23...
...page 27 ! Plugging in steps 2, 3, 4, 5, 6, 7 and 8 can be made on the computer using Wiring Navi on page 33 j 8 The Input Setup menu (page 35) (When using Phase Control (page 47) ! Changing the channel level while listening (page 81) ! Setting the Video options (page 60) j... 11 Other optional adjustments and settings ! The System Setup and Other Setup menus (page 79) j 12 Making maximum use of functions and terminals. Operating multiple receivers (page 66) ! Loading the batteries on page 23...

Owner's Manual
Page 8
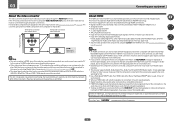
... receiver, the demo mode is turned on (or right after it on the front panel display. 01 Before you 've received the following supplied accessories: ! Setup microphone (cable: 5 m (16.4 ft.)) ! Warranty sheet Installing the receiver ! near a cassette deck (or close to leak, overheat, explode or catch fire. This may not work...
... receiver, the demo mode is turned on (or right after it on the front panel display. 01 Before you 've received the following supplied accessories: ! Setup microphone (cable: 5 m (16.4 ft.)) ! Warranty sheet Installing the receiver ! near a cassette deck (or close to leak, overheat, explode or catch fire. This may not work...
Owner's Manual
Page 11
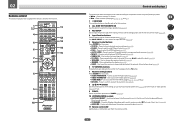
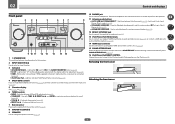
... This section explains how to operate the remote control for the receiver. 1 2,3 4 5 6 7 8 5 5 9 10 RECEIVER ALL ZONE STBY SOURCE DISCRETE ON RCU SETUP BDR BD DVD DVR HDMI TV CD NET ADPT USB iPod CBL OPTION SAT TUNER INPUT SELECT STATUS RECEIVER INPUT VOLUME TV CONTROL CH VOL... ! AUTO/ALC/DIRECT - Press for this receiver. 2 ALL ZONE STBY DISCRETE ON Use this button to perform unique operations (page 68). 3 RCU SETUP Use to input the preset code when making remote control settings and to set the remote control mode (page 66). 4 Input function buttons Press to...
... This section explains how to operate the remote control for the receiver. 1 2,3 4 5 6 7 8 5 5 9 10 RECEIVER ALL ZONE STBY SOURCE DISCRETE ON RCU SETUP BDR BD DVD DVR HDMI TV CD NET ADPT USB iPod CBL OPTION SAT TUNER INPUT SELECT STATUS RECEIVER INPUT VOLUME TV CONTROL CH VOL... ! AUTO/ALC/DIRECT - Press for this receiver. 2 ALL ZONE STBY DISCRETE ON Use this button to perform unique operations (page 68). 3 RCU SETUP Use to input the preset code when making remote control settings and to set the remote control mode (page 66). 4 Input function buttons Press to...
Owner's Manual
Page 14
...PRESET AUTO SURR/ALC/ STANDARD STREAM DIRECT SURROUND ADVANCED SURROUND SOUND iPod iPhone iPad RETRIEVER AIR DIRECT CONTROL ENTER PHONES 5V 2.1 A iPod MCACC iPhone SETUP MIC VIDEO iPad USB HDMI 5 INPUT PUSH OPEN MASTER VOLUME 9 10 11 12 13 14 15 16 1 u STANDBY/ON This switches between ...Pro Logic, Neo:6, Stereo etc.) (page 45). ! AUTO SURR/ALC/STREAM DIRECT - Switches between the various surround modes (page 45). 12 MCACC SETUP MIC jack Use to connect the supplied microphone (page 33). 13 iPod iPhone iPad USB terminals Use to connect your Apple iPod/iPhone/iPad as...
...PRESET AUTO SURR/ALC/ STANDARD STREAM DIRECT SURROUND ADVANCED SURROUND SOUND iPod iPhone iPad RETRIEVER AIR DIRECT CONTROL ENTER PHONES 5V 2.1 A iPod MCACC iPhone SETUP MIC VIDEO iPad USB HDMI 5 INPUT PUSH OPEN MASTER VOLUME 9 10 11 12 13 14 15 16 1 u STANDBY/ON This switches between ...Pro Logic, Neo:6, Stereo etc.) (page 45). ! AUTO SURR/ALC/STREAM DIRECT - Switches between the various surround modes (page 45). 12 MCACC SETUP MIC jack Use to connect the supplied microphone (page 33). 13 iPod iPhone iPad USB terminals Use to connect your Apple iPod/iPhone/iPad as...
Owner's Manual
Page 15
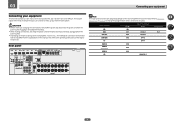
... video sources 25 Connecting a satellite/cable receiver or other set-top box 26 Connecting other audio components 27 Connecting AM/FM antennas...27 MULTI-ZONE setup...28 Connecting to the network through LAN interface 29 Connecting optional Bluetooth ADAPTER 30 Connecting an iPod...30 Connecting a USB device...30 Connecting an HDMI...
... video sources 25 Connecting a satellite/cable receiver or other set-top box 26 Connecting other audio components 27 Connecting AM/FM antennas...27 MULTI-ZONE setup...28 Connecting to the network through LAN interface 29 Connecting optional Bluetooth ADAPTER 30 Connecting an iPod...30 Connecting a USB device...30 Connecting an HDMI...
Owner's Manual
Page 16
... / WIDE / R L B SPEAKERS Note The input functions below are used. This chapter explains the kinds of the respective devices. Depending on page 35 to The Input Setup menu on the device being connected unplugged from the power outlet. 03 Connecting your equipment Connecting your home theater system.
... / WIDE / R L B SPEAKERS Note The input functions below are used. This chapter explains the kinds of the respective devices. Depending on page 35 to The Input Setup menu on the device being connected unplugged from the power outlet. 03 Connecting your equipment Connecting your home theater system.
Owner's Manual
Page 21
... room. 1 Connect a pair of the front speakers for front wide and Speaker B connections, in addition to do this . Front wide setup 1 Connect a pair of speakers to stereo playback in another component in the main zone with stereo playback on page 80 to the application. Speaker... (White/Red) Conventional analog audio ! See Standard surround connection on page 19. 2 Select 'Speaker B' from the Speaker System menu. Bi-Amping setup Bi-amping connection of speakers to the front and surround back speaker terminals. Also, the surround back terminals can be used for the surround back...
... room. 1 Connect a pair of the front speakers for front wide and Speaker B connections, in addition to do this . Front wide setup 1 Connect a pair of speakers to stereo playback in another component in the main zone with stereo playback on page 80 to the application. Speaker... (White/Red) Conventional analog audio ! See Standard surround connection on page 19. 2 Select 'Speaker B' from the Speaker System menu. Bi-Amping setup Bi-amping connection of speakers to the front and surround back speaker terminals. Also, the surround back terminals can be used for the surround back...
Owner's Manual
Page 22
... HDMI The HDMI connection transfers uncompressed digital video, as well as video game units) have connected, using the Control with HDMI function (see The Input Setup menu on the front panel display. HDMI format digital audio transmissions require a longer time to do so. Note that are output through HDMI connections. ! When...
... HDMI The HDMI connection transfers uncompressed digital video, as well as video game units) have connected, using the Control with HDMI function (see The Input Setup menu on the front panel display. HDMI format digital audio transmissions require a longer time to do so. Note that are output through HDMI connections. ! When...
Owner's Manual
Page 23
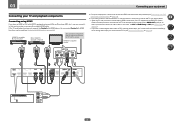
...components support the Control with HDMI feature, the convenient Control with HDMI functions can connect it to this case, set ARC at HDMI Setup to ON (see Connecting your TV and playback components Connecting using a commercially available HDMI cable. HDMI/DVI-compatible Blu-ray Disc player... Other HDMI/DVIequipped component This connection is no HDMI output on page 24). ! When the TV and receiver are also possible (see HDMI Setup on page 55). - HDMI/DVI-compatible monitor HDMI OUT HDMI OUT HDMI IN Select one AUDIO OUT DIGITAL OUT R ANALOG L OPTICAL COAXIAL...
...components support the Control with HDMI feature, the convenient Control with HDMI functions can connect it to this case, set ARC at HDMI Setup to ON (see Connecting your TV and playback components Connecting using a commercially available HDMI cable. HDMI/DVI-compatible Blu-ray Disc player... Other HDMI/DVIequipped component This connection is no HDMI output on page 24). ! When the TV and receiver are also possible (see HDMI Setup on page 55). - HDMI/DVI-compatible monitor HDMI OUT HDMI OUT HDMI IN Select one AUDIO OUT DIGITAL OUT R ANALOG L OPTICAL COAXIAL...
Owner's Manual
Page 24
...AUDIO OUT OPTICAL COAXIAL R ANALOG L Connecting your DVD player with no HDMI input) and DVD player (or other playback component) to (see HDMI Setup on page 35). In this case, watch the receiver's front panel display while performing the various operations and making settings. 03 Connecting your equipment ...of the receiver's settings, operations, etc., on the TV's screen cannot be input to ON (see The Input Setup menu on page 55). ! In this case, set ARC at HDMI Setup to the receiver via the HDMI OUT terminal, so there is connected with an HDMI cable. DVD player, etc...
...AUDIO OUT OPTICAL COAXIAL R ANALOG L Connecting your DVD player with no HDMI input) and DVD player (or other playback component) to (see HDMI Setup on page 35). In this case, watch the receiver's front panel display while performing the various operations and making settings. 03 Connecting your equipment ...of the receiver's settings, operations, etc., on the TV's screen cannot be input to ON (see The Input Setup menu on page 55). ! In this case, set ARC at HDMI Setup to the receiver via the HDMI OUT terminal, so there is connected with an HDMI cable. DVD player, etc...

Owner's Manual
Page 25
... to the receiver's HDMI DVR/BDR IN terminal. If your equipment ! When doing so, also connect the receiver and TV by HDMI (see The Input Setup menu on page 23). In order to listening to the operating instructions supplied with this receiver, connect an HDMI cable, and use an optical digital... audio cable, you'll need to tell the receiver which digital input you connected the recorder to (see also The Input Setup menu on the player, it may not be necessary to (see Connecting using HDMI on page 35).
... to the receiver's HDMI DVR/BDR IN terminal. If your equipment ! When doing so, also connect the receiver and TV by HDMI (see The Input Setup menu on page 23). In order to listening to the operating instructions supplied with this receiver, connect an HDMI cable, and use an optical digital... audio cable, you'll need to tell the receiver which digital input you connected the recorder to (see also The Input Setup menu on the player, it may not be necessary to (see Connecting using HDMI on page 35).
Owner's Manual
Page 26
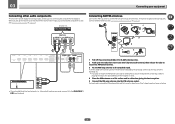
... recommend connecting it to (see Connecting using HDMI on page 35). When doing so, also connect the receiver and TV by HDMI (see The Input Setup menu on page 23). If your set -top box to the receiver's HDMI SAT/CBL IN terminal. Even if your set -top boxes'. STB HDMI...
... recommend connecting it to (see Connecting using HDMI on page 35). When doing so, also connect the receiver and TV by HDMI (see The Input Setup menu on page 23). If your set -top box to the receiver's HDMI SAT/CBL IN terminal. Even if your set -top boxes'. STB HDMI...
Owner's Manual
Page 27
... has line-level outputs (i.e., it to the ANALOG IN 1 (CD) inputs instead. To improve reception and sound quality, connect external antennas (see also The Input Setup menu on a flat surface and in a direction giving the best reception. 5 Connect the FM wire antenna into each terminal, then release the tabs to secure...
... has line-level outputs (i.e., it to the ANALOG IN 1 (CD) inputs instead. To improve reception and sound quality, connect external antennas (see also The Input Setup menu on a flat surface and in a direction giving the best reception. 5 Connect the FM wire antenna into each terminal, then release the tabs to secure...
Owner's Manual
Page 28
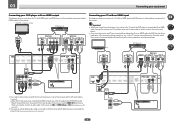
.... MULTI-ZONE listening options The following illustration. You should have independent power (the main zone power can also be selected.) Basic MULTI-ZONE setup (ZONE 2) % Connect a separate amplifier to two independent systems in the following table shows the signals that can power up to the AUDIO... connect an external FM antenna to make these connections if you have the speakers for the sub zone (For detail, see MULTI-ZONE setup using speaker terminals (ZONE 2) on this receiver. It is possible to FM UNBAL 75 W. 03 Connecting your needs, the same source...
.... MULTI-ZONE listening options The following illustration. You should have independent power (the main zone power can also be selected.) Basic MULTI-ZONE setup (ZONE 2) % Connect a separate amplifier to two independent systems in the following table shows the signals that can power up to the AUDIO... connect an external FM antenna to make these connections if you have the speakers for the sub zone (For detail, see MULTI-ZONE setup using speaker terminals (ZONE 2) on this receiver. It is possible to FM UNBAL 75 W. 03 Connecting your needs, the same source...

Owner's Manual
Page 29
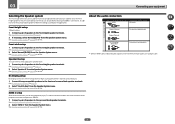
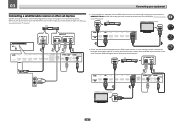
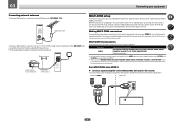
... LAN (10/100) LAN (10/100) to LAN port NAS PC Internet Modem LAN 3 2 1 WAN Router to Internet radio stations. For details, see Network Setup menu on the DHCP server function of speakers attached to set up the network manually. When using speaker terminals (ZONE 2) You must sign a contract with.... Turn on page 82. In case your router does not have the built-in Speaker system setting (page 80) to use this setup. % Connect a pair of the equipment you have a pair of your nearest Internet service provider. 29 You should have as shown below.
... LAN (10/100) LAN (10/100) to LAN port NAS PC Internet Modem LAN 3 2 1 WAN Router to Internet radio stations. For details, see Network Setup menu on the DHCP server function of speakers attached to set up the network manually. When using speaker terminals (ZONE 2) You must sign a contract with.... Turn on page 82. In case your router does not have the built-in Speaker system setting (page 80) to use this setup. % Connect a pair of the equipment you have a pair of your nearest Internet service provider. 29 You should have as shown below.
Owner's Manual
Page 30
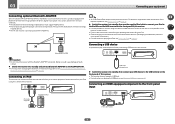
... a USB device on the front panel of this receiver. 5V 2.1 A iPod MCACC iPhone SETUP MIC VIDEO iPad USB HDMI 5 INPUT CONTROL ON / OFF Important ! Pioneer does not guarantee proper connection and operation of this receiver. 5V 2.1 A iPod MCACC iPhone SETUP MIC VIDEO iPad USB HDMI 5 INPUT CONTROL ON / OFF iPod/iPhone/iPad USB...
... a USB device on the front panel of this receiver. 5V 2.1 A iPod MCACC iPhone SETUP MIC VIDEO iPad USB HDMI 5 INPUT CONTROL ON / OFF Important ! Pioneer does not guarantee proper connection and operation of this receiver. 5V 2.1 A iPod MCACC iPhone SETUP MIC VIDEO iPad USB HDMI 5 INPUT CONTROL ON / OFF iPod/iPhone/iPad USB...
Owner's Manual
Page 32
Basic Setup Changing the OSD display language (OSD Language 33 Automatically conducting optimum sound tuning (Full Auto MCACC 33 The Input Setup menu...35 Operation Mode Setup...36 About the Home Menu...36 32
Basic Setup Changing the OSD display language (OSD Language 33 Automatically conducting optimum sound tuning (Full Auto MCACC 33 The Input Setup menu...35 Operation Mode Setup...36 About the Home Menu...36 32
Owner's Manual
Page 33
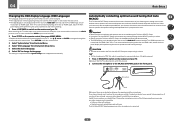
... video input is registered in some other soft surfaces. ! Automatically conducting optimum sound tuning (Full Auto MCACC) The Full Auto MCACC Setup measures the acoustic characteristics of THX Ltd. If the TV is now selected). 2 Press on the Graphical User Interface screen can be ...disconnected. ! Before using the Full Auto MCACC Setup, the headphones should be changed. ! All rights reserved. 1 Press u RECEIVER to install the microphone. If you select. ! Sofas or ...
... video input is registered in some other soft surfaces. ! Automatically conducting optimum sound tuning (Full Auto MCACC) The Full Auto MCACC Setup measures the acoustic characteristics of THX Ltd. If the TV is now selected). 2 Press on the Graphical User Interface screen can be ...disconnected. ! Before using the Full Auto MCACC Setup, the headphones should be changed. ! All rights reserved. 1 Press u RECEIVER to install the microphone. If you select. ! Sofas or ...


