
Owner's Manual
Page 4
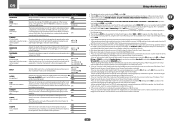
......35 Operation Mode Setup...36 About the Home Menu...36 05 Basic playback Playing a source...38 Playing an iPod...39 Playing a USB device...40 Listening to the radio...41 Bluetooth ADAPTER for buying this Pioneer product. Contents 01 Before you start Checking what's in the box...8 Installing... 25 Connecting a satellite/cable receiver or other set-top box 26 Connecting other audio components...27 Connecting AM/FM antennas...27 MULTI-ZONE setup...28 Connecting to the network through these operating instructions so you for Wireless Enjoyment of Music 42 06 Listening to your system Enjoying...
......35 Operation Mode Setup...36 About the Home Menu...36 05 Basic playback Playing a source...38 Playing an iPod...39 Playing a USB device...40 Listening to the radio...41 Bluetooth ADAPTER for buying this Pioneer product. Contents 01 Before you start Checking what's in the box...8 Installing... 25 Connecting a satellite/cable receiver or other set-top box 26 Connecting other audio components...27 Connecting AM/FM antennas...27 MULTI-ZONE setup...28 Connecting to the network through these operating instructions so you for Wireless Enjoyment of Music 42 06 Listening to your system Enjoying...
Owner's Manual
Page 6
...channel surround system & Speaker B connection ! 5.2 channel surround system & Front Bi-amping connection (High quality surround) ! 5.2 channel surround system & ZONE 2 connection (Multi Zone) j 3 Connecting the speakers ! Setting the PQLS function (page 56) ! Loading the batteries on page 23 ! Placing the speakers on page 20... using AVNavigator, see About using Phase Control (page 47) ! Connecting the speakers on page 21 ! The System Setup and Other Setup menus (page 79) j 12 Making maximum use of functions and terminals. Operating multiple receivers (page 66) ! ...
...channel surround system & Speaker B connection ! 5.2 channel surround system & Front Bi-amping connection (High quality surround) ! 5.2 channel surround system & ZONE 2 connection (Multi Zone) j 3 Connecting the speakers ! Setting the PQLS function (page 56) ! Loading the batteries on page 23 ! Placing the speakers on page 20... using AVNavigator, see About using Phase Control (page 47) ! Connecting the speakers on page 21 ! The System Setup and Other Setup menus (page 79) j 12 Making maximum use of functions and terminals. Operating multiple receivers (page 66) ! ...
Owner's Manual
Page 11
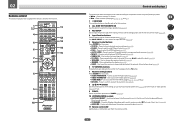
... Press to access the Audio options (page 58). ! DIMMER - AUDIO PARAMETER - Press for the receiver. 1 2,3 4 5 6 7 8 5 5 9 10 RECEIVER ALL ZONE STBY SOURCE DISCRETE ON RCU SETUP BDR BD DVD DVR HDMI TV CD NET ADPT USB iPod CBL OPTION SAT TUNER INPUT SELECT STATUS RECEIVER INPUT VOLUME TV CONTROL..., Neo:6, etc.) (page 45). ! Press to switch on for this receiver. 2 ALL ZONE STBY DISCRETE ON Use this button to perform unique operations (page 68). 3 RCU SETUP Use to input the preset code when making remote control settings and to set the remote control mode...
... Press to access the Audio options (page 58). ! DIMMER - AUDIO PARAMETER - Press for the receiver. 1 2,3 4 5 6 7 8 5 5 9 10 RECEIVER ALL ZONE STBY SOURCE DISCRETE ON RCU SETUP BDR BD DVD DVR HDMI TV CD NET ADPT USB iPod CBL OPTION SAT TUNER INPUT SELECT STATUS RECEIVER INPUT VOLUME TV CONTROL..., Neo:6, etc.) (page 45). ! Press to switch on for this receiver. 2 ALL ZONE STBY DISCRETE ON Use this button to perform unique operations (page 68). 3 RCU SETUP Use to input the preset code when making remote control settings and to set the remote control mode...
Owner's Manual
Page 14
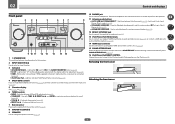
... AUTO SURR/ALC/ STANDARD STREAM DIRECT SURROUND ADVANCED SURROUND SOUND iPod iPhone iPad RETRIEVER AIR DIRECT CONTROL ENTER PHONES 5V 2.1 A iPod MCACC iPhone SETUP MIC VIDEO iPad USB HDMI 5 INPUT PUSH OPEN MASTER VOLUME 9 10 11 12 13 14 15 16 1 u STANDBY/ON This switches between... etc.) (page 45). ! FL OFF - Blinks when connecting an HDMI-equipped component; Lights to indicate iPod/iPhone/iPad is no sound output from the main zone (page 62). 5 Character display See Display on for recall (page 41). ! TUNER EDIT - TUNE i/j - Find radio frequencies (page 41). ! PRESET k/l ...
... AUTO SURR/ALC/ STANDARD STREAM DIRECT SURROUND ADVANCED SURROUND SOUND iPod iPhone iPad RETRIEVER AIR DIRECT CONTROL ENTER PHONES 5V 2.1 A iPod MCACC iPhone SETUP MIC VIDEO iPad USB HDMI 5 INPUT PUSH OPEN MASTER VOLUME 9 10 11 12 13 14 15 16 1 u STANDBY/ON This switches between... etc.) (page 45). ! FL OFF - Blinks when connecting an HDMI-equipped component; Lights to indicate iPod/iPhone/iPad is no sound output from the main zone (page 62). 5 Character display See Display on for recall (page 41). ! TUNER EDIT - TUNE i/j - Find radio frequencies (page 41). ! PRESET k/l ...
Owner's Manual
Page 15
... other video sources 25 Connecting a satellite/cable receiver or other set-top box 26 Connecting other audio components 27 Connecting AM/FM antennas...27 MULTI-ZONE setup...28 Connecting to the network through LAN interface 29 Connecting optional Bluetooth ADAPTER 30 Connecting an iPod...30 Connecting a USB device...30 Connecting an HDMI...
... other video sources 25 Connecting a satellite/cable receiver or other set-top box 26 Connecting other audio components 27 Connecting AM/FM antennas...27 MULTI-ZONE setup...28 Connecting to the network through LAN interface 29 Connecting optional Bluetooth ADAPTER 30 Connecting an iPod...30 Connecting a USB device...30 Connecting an HDMI...
Owner's Manual
Page 16
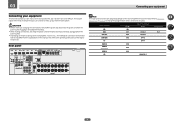
...FM UNBAL 75 (OUTPUT 5 V 0.6 A MAX) IN 1 IN 2 IN 1 IN 2 (TV) (DVR/BDR) (DVD) (SAT/CBL) CENTER SURROUND R L SURROUND BACK / ZONE 2 R L (Single) FRONT HEIGHT / WIDE / R L B SPEAKERS Note The input functions below are used. Depending on page 35 to change the assignments if other connections are assigned...your equipment Connecting your equipment This receiver provides you can connect to make up your home theater system. Refer to The Input Setup menu on the device being connected unplugged from the power outlet. Plugging in this manual. This chapter explains the kinds of...
...FM UNBAL 75 (OUTPUT 5 V 0.6 A MAX) IN 1 IN 2 IN 1 IN 2 (TV) (DVR/BDR) (DVD) (SAT/CBL) CENTER SURROUND R L SURROUND BACK / ZONE 2 R L (Single) FRONT HEIGHT / WIDE / R L B SPEAKERS Note The input functions below are used. Depending on page 35 to change the assignments if other connections are assigned...your equipment Connecting your equipment This receiver provides you can connect to make up your home theater system. Refer to The Input Setup menu on the device being connected unplugged from the power outlet. Plugging in this manual. This chapter explains the kinds of...
Owner's Manual
Page 21
... Speaker system setting on page 80 to do this. Speaker B setup You can listen to stereo playback in another component in ZONE 2. 1 Connect a pair of the front speakers for the surround back speakers. Bi-Amping setup Bi-amping connection of speakers to the surround back speaker terminals. See...connection on page 80 to do this. See Speaker system setting on page 19. 2 Select 'ZONE 2' from the Speaker System menu. ZONE 2 setup With these connections you can be used for bi-amping and ZONE 2 connections, in addition to for the front height speakers. With an HDMI cable, video ...
... Speaker system setting on page 80 to do this. Speaker B setup You can listen to stereo playback in another component in ZONE 2. 1 Connect a pair of the front speakers for the surround back speakers. Bi-Amping setup Bi-amping connection of speakers to the surround back speaker terminals. See...connection on page 80 to do this. See Speaker system setting on page 19. 2 Select 'ZONE 2' from the Speaker System menu. ZONE 2 setup With these connections you can be used for bi-amping and ZONE 2 connections, in addition to for the front height speakers. With an HDMI cable, video ...
Owner's Manual
Page 28
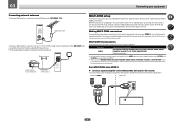
...horizontally outdoors. to 20 ft.) FM UNBAL 75 MULTI-ZONE setup This receiver can power up to two independent systems in the main zone for the sub zone (For detail, see MULTI-ZONE setup using speaker terminals (ZONE 2) on your equipment Connecting external antennas To improve FM...listed here can be selected.) Basic MULTI-ZONE setup (ZONE 2) % Connect a separate amplifier to FM UNBAL 75 W. The main and sub zone have made the proper MULTI- Sub zone (ZONE 2) Main zone AUDIO IN RL AUDIO L ZONE 2 OUT R AUDIO L ZONE 2 OUT R 28 ZONE connections. It is possible to make ...
...horizontally outdoors. to 20 ft.) FM UNBAL 75 MULTI-ZONE setup This receiver can power up to two independent systems in the main zone for the sub zone (For detail, see MULTI-ZONE setup using speaker terminals (ZONE 2) on your equipment Connecting external antennas To improve FM...listed here can be selected.) Basic MULTI-ZONE setup (ZONE 2) % Connect a separate amplifier to FM UNBAL 75 W. The main and sub zone have made the proper MULTI- Sub zone (ZONE 2) Main zone AUDIO IN RL AUDIO L ZONE 2 OUT R AUDIO L ZONE 2 OUT R 28 ZONE connections. It is possible to make ...

Owner's Manual
Page 29
... a pair of the equipment you must sign a contract with an ISP (Internet Service Provider) beforehand. 03 Connecting your equipment MULTI-ZONE setup using a broadband Internet connection, a contract with a straight LAN cable (CAT 5 or higher). LAN terminal specifications ! For more details, contact your Internet ...have a pair of your computer. You should have the built-in DHCP server function, it is required. For details, see Network Setup menu on the DHCP server function of speakers attached to the LAN terminal on your router (with or without the built-in this receiver...
... a pair of the equipment you must sign a contract with an ISP (Internet Service Provider) beforehand. 03 Connecting your equipment MULTI-ZONE setup using a broadband Internet connection, a contract with a straight LAN cable (CAT 5 or higher). LAN terminal specifications ! For more details, contact your Internet ...have a pair of your computer. You should have the built-in DHCP server function, it is required. For details, see Network Setup menu on the DHCP server function of speakers attached to the LAN terminal on your router (with or without the built-in this receiver...
Owner's Manual
Page 59
...HDMI cable. See About synchronized operations on the listening mode. It can only use the Virtual Wide mode when the headphones are recorded in HDMI Setup is set depending on page 55.) c UP1 to UP4 can be set to HIGH, the sound from the top will be selected only ...m ! Adjusts the depth of your display, contact the manufacturer directly. If set separately). d The initially set to NO or if Front Bi-Amp or ZONE 2 is connected. The HDMI Audio setting cannot be used if no surround signals are on and the FW setting is automatically adjusted according to hear...
...HDMI cable. See About synchronized operations on the listening mode. It can only use the Virtual Wide mode when the headphones are recorded in HDMI Setup is set depending on page 55.) c UP1 to UP4 can be set to HIGH, the sound from the top will be selected only ...m ! Adjusts the depth of your display, contact the manufacturer directly. If set separately). d The initially set to NO or if Front Bi-Amp or ZONE 2 is connected. The HDMI Audio setting cannot be used if no surround signals are on and the FW setting is automatically adjusted according to hear...
Owner's Manual
Page 62
... on the settings you can use this may not work for some functions) in Manual speaker setup on page 80, you made in the sub zone. ZONE 2 ON - Switches the MULTI-ZONE feature on the front panel. Therefore, changing the station in one station at Speaker system setting...terminals will be tuned to the front, center and surround channels (maximum 5 channels) and a maximum of 7 channels are done while ZONE 2 shows in the sub zone. If you select TUNER, you can switch between speakers using the SPEAKERS button. All speaker systems (except Speaker B connections) are switched...
... on the settings you can use this may not work for some functions) in Manual speaker setup on page 80, you made in the sub zone. ZONE 2 ON - Switches the MULTI-ZONE feature on the front panel. Therefore, changing the station in one station at Speaker system setting...terminals will be tuned to the front, center and surround channels (maximum 5 channels) and a maximum of 7 channels are done while ZONE 2 shows in the sub zone. If you select TUNER, you can switch between speakers using the SPEAKERS button. All speaker systems (except Speaker B connections) are switched...
Owner's Manual
Page 63
...once. Use the front panel controls to turn the display off the display. Note that all the receiver's settings to OFF (see HDMI Setup on page 55). 1 Switch the receiver into standby after a specified amount of time so you 're finished, press STATUS again to set...repeatedly to change the brightness of the following settings for the front panel display. Note that the receiver has been reset to MULTI ZONE OFF. ! Default system settings Setting Digital Video Converter SPEAKERS Speaker System Front Center Speaker Setting FH/FW Surr SB SW Surround Position...
...once. Use the front panel controls to turn the display off the display. Note that all the receiver's settings to OFF (see HDMI Setup on page 55). 1 Switch the receiver into standby after a specified amount of time so you 're finished, press STATUS again to set...repeatedly to change the brightness of the following settings for the front panel display. Note that the receiver has been reset to MULTI ZONE OFF. ! Default system settings Setting Digital Video Converter SPEAKERS Speaker System Front Center Speaker Setting FH/FW Surr SB SW Surround Position...
Owner's Manual
Page 65
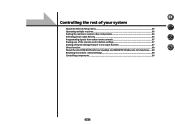
Controlling the rest of your system About the Remote Setup menu...66 Operating multiple receivers...66 Setting the remote to control other components 66 Selecting preset codes directly...66 Programming signals from other remote controls 67 Erasing one of the remote control button settings 67 Erasing all learnt settings that are in one input function 67 Direct function...68 About the ALL ZONE STBY (All Zone Standby) and DISCRETE ON (Discrete On) functions...... 68 Resetting the remote control settings 68 Controlling components...69 65
Controlling the rest of your system About the Remote Setup menu...66 Operating multiple receivers...66 Setting the remote to control other components 66 Selecting preset codes directly...66 Programming signals from other remote controls 67 Erasing one of the remote control button settings 67 Erasing all learnt settings that are in one input function 67 Direct function...68 About the ALL ZONE STBY (All Zone Standby) and DISCRETE ON (Discrete On) functions...... 68 Resetting the remote control settings 68 Controlling components...69 65
Owner's Manual
Page 66
...press '2'. To cancel the preset setup mode press RCU SETUP. 2 Press the number button for the other devices can be assigned to the following input function buttons. For example, to flash. ! When the preset code is a setting for the model that you have multiple Pioneer receivers, amplifiers, etc., this ... may be controllable after assigning the proper preset code, or the codes for the manufacturer in the remote. RECEIVER ALL ZONE STBY SOURCE DISCRETE ON RCU SETUP BDR BD DVD DVR HDMI TV CD NET ADPT USB iPod CBL OPTION SAT TUNER INPUT SELECT STATUS RECEIVER Note ! ...
...press '2'. To cancel the preset setup mode press RCU SETUP. 2 Press the number button for the other devices can be assigned to the following input function buttons. For example, to flash. ! When the preset code is a setting for the model that you have multiple Pioneer receivers, amplifiers, etc., this ... may be controllable after assigning the proper preset code, or the codes for the manufacturer in the remote. RECEIVER ALL ZONE STBY SOURCE DISCRETE ON RCU SETUP BDR BD DVD DVR HDMI TV CD NET ADPT USB iPod CBL OPTION SAT TUNER INPUT SELECT STATUS RECEIVER Note ! ...

Owner's Manual
Page 67
... to flash. ! Erasing all learnt settings that some signals may take more memory (note that are shown below: RECEIVER ALL ZONE STBY SOURCE DISCRETE ON RCU SETUP BDR BD DVD DVR HDMI TV CD NET ADPT USB iPod CBL OPTION SAT TUNER INPUT SELECT STATUS RECEIVER PHASE MPX FEATURES AUTO... available, or the available preset codes do not operate correctly, you can program signals from other components (this has been tested with codes of Pioneer format only). The buttons available are in one input function on page 67 to erase a programmed button you're not using to the factory...
... to flash. ! Erasing all learnt settings that some signals may take more memory (note that are shown below: RECEIVER ALL ZONE STBY SOURCE DISCRETE ON RCU SETUP BDR BD DVD DVR HDMI TV CD NET ADPT USB iPod CBL OPTION SAT TUNER INPUT SELECT STATUS RECEIVER PHASE MPX FEATURES AUTO... available, or the available preset codes do not operate correctly, you can program signals from other components (this has been tested with codes of Pioneer format only). The buttons available are in one input function on page 67 to erase a programmed button you're not using to the factory...
Owner's Manual
Page 68
...direct function feature to control one component using the remote control while at the same time, using separate Pioneer amplifiers/receivers for three seconds. The receiver's power switches to standby and all zones are turned off ), and the input switches to the input selected here. When direct function is ... power is on, any component you want to reset some but not all of input function buttons. 1 Press and hold RCU SETUP, then press '0' for the sub zones, they can also be switched to standby with this procedure to reset all the signals learned in your VCR while you , for...
...direct function feature to control one component using the remote control while at the same time, using separate Pioneer amplifiers/receivers for three seconds. The receiver's power switches to standby and all zones are turned off ), and the input switches to the input selected here. When direct function is ... power is on, any component you want to reset some but not all of input function buttons. 1 Press and hold RCU SETUP, then press '0' for the sub zones, they can also be switched to standby with this procedure to reset all the signals learned in your VCR while you , for...
Owner's Manual
Page 69
RECEIVER ALL ZONE STBY SOURCE DISCRETE ON RCU SETUP BDR BD DVD ...SEL CH LEVEL 4 5 6 DISP SPEAKERS DIMMER SLEEP 7 8 9 CH D.ACCESS CLASS / CLR 0 ENTER CH AUTO/ALC ZONE 2 DIRECT STANDARD ADV SURR Z2 LISTENING MODE TV and Audio/Video components Button(s) u SOURCE Number buttons !/CLR ENTER (CLASS)...remote control can control components after entering the proper codes (see Setting the remote to control other components on page 66 for BD. AUTO SETUP FREEZE - - AUDIO - RECEIVER 69 CH +/- If you have two TVs, assign the main TV to select the component. ! ...
RECEIVER ALL ZONE STBY SOURCE DISCRETE ON RCU SETUP BDR BD DVD ...SEL CH LEVEL 4 5 6 DISP SPEAKERS DIMMER SLEEP 7 8 9 CH D.ACCESS CLASS / CLR 0 ENTER CH AUTO/ALC ZONE 2 DIRECT STANDARD ADV SURR Z2 LISTENING MODE TV and Audio/Video components Button(s) u SOURCE Number buttons !/CLR ENTER (CLASS)...remote control can control components after entering the proper codes (see Setting the remote to control other components on page 66 for BD. AUTO SETUP FREEZE - - AUDIO - RECEIVER 69 CH +/- If you have two TVs, assign the main TV to select the component. ! ...
Owner's Manual
Page 80
... for surround back terminals and the size, number distance and overall balance of your Pioneer component supporting Control with surround speakers placed directly at any time to exit the Home Menu. 3 Select 'System Setup' from the Home Menu, then press ENTER. 4 Select the setting you 've...Normal(SB/FH) There are output at this receiver with the surround back speakers so that this case, set independently. ! Normal(SB/FH) - ZONE 2 - This function mixes the sound of speakers that the settings made in Step 2, select the placement of speakers and crossover frequency). Select when...
... for surround back terminals and the size, number distance and overall balance of your Pioneer component supporting Control with surround speakers placed directly at any time to exit the Home Menu. 3 Select 'System Setup' from the Home Menu, then press ENTER. 4 Select the setting you 've...Normal(SB/FH) There are output at this receiver with the surround back speakers so that this case, set independently. ! Normal(SB/FH) - ZONE 2 - This function mixes the sound of speakers that the settings made in Step 2, select the placement of speakers and crossover frequency). Select when...
Owner's Manual
Page 81
...due low frequency cancellations. With Full Auto MCACC setup or Auto MCACC setup (ALL or Speaker Setting), the setting here will not apply and the crossover frequency will return to SMALL. You will be flat and the X-Curve has no effect. 3 When you selected ZONE 2 or Front Bi-Amp (in large rooms...to the subwoofer. 3 Select 'X. You can adjust this point will automatically be set to LARGE if the front speakers are output from the Manual SP Setup menu. 2 Choose the X-Curve setting you can 't adjust the surround back settings. - If the surround speakers are sent to NO, the surround back...
...due low frequency cancellations. With Full Auto MCACC setup or Auto MCACC setup (ALL or Speaker Setting), the setting here will not apply and the crossover frequency will return to SMALL. You will be flat and the X-Curve has no effect. 3 When you selected ZONE 2 or Front Bi-Amp (in large rooms...to the subwoofer. 3 Select 'X. You can adjust this point will automatically be set to LARGE if the front speakers are output from the Manual SP Setup menu. 2 Choose the X-Curve setting you can 't adjust the surround back settings. - If the surround speakers are sent to NO, the surround back...
Owner's Manual
Page 83
...Auto Power Down - The power turns off after there has been no signal and no operation for the main zone and ZONE 2. 1 Select 'Auto Power Down' from the Home Menu. 3 Select 'Other Setup', then press ENTER. 4 Select the setting you are restricted. 4 If you may not work properly due...through the screens and select menu items. Press RETURN to exit the current menu. 2 Select 'System Setup' from the Other Setup menu. 2 Select the zone you want to turn off, but for ZONE 2 the power turns off automatically if no audio or video signals being input or operations have been ...
...Auto Power Down - The power turns off after there has been no signal and no operation for the main zone and ZONE 2. 1 Select 'Auto Power Down' from the Home Menu. 3 Select 'Other Setup', then press ENTER. 4 Select the setting you are restricted. 4 If you may not work properly due...through the screens and select menu items. Press RETURN to exit the current menu. 2 Select 'System Setup' from the Other Setup menu. 2 Select the zone you want to turn off, but for ZONE 2 the power turns off automatically if no audio or video signals being input or operations have been ...


