Owner's Manual
Page 4
...174; ADAPTER 19 Connecting to the network through these operating instructions so you will know how to operate your model properly. Please read through LAN interface 19 Connecting antennas 20 Using external antennas 20 Connecting an IR receiver (VSX-1023 only 20 Connecting an iPod 21 ...VSX-1023 only 36 Setting the Up Mix function (VSX-1023 only 36 Setting the Audio options 37 06 Playback with NETWORK features Introduction 39 About playable DLNA network devices 39 Using AirPlay on iPod touch, iPhone, iPad, and iTunes 39 About the DHCP server function 39 Authorizing this Pioneer...
...174; ADAPTER 19 Connecting to the network through these operating instructions so you will know how to operate your model properly. Please read through LAN interface 19 Connecting antennas 20 Using external antennas 20 Connecting an IR receiver (VSX-1023 only 20 Connecting an iPod 21 ...VSX-1023 only 36 Setting the Up Mix function (VSX-1023 only 36 Setting the Audio options 37 06 Playback with NETWORK features Introduction 39 About playable DLNA network devices 39 Using AirPlay on iPod touch, iPhone, iPad, and iTunes 39 About the DHCP server function 39 Authorizing this Pioneer...
Owner's Manual
Page 19
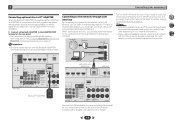
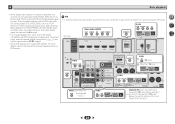
.... For more details, contact your nearest Internet service provider. 4 7 62 LAN cable (sold separately) VSX-1023 VSX-1023 Bluetooth® ADAPTER Connect the LAN terminal on the local network, including your Internet environment. • When using a broadband Internet connection, a contract with a straight ... receiver with an ISP (Internet Service Provider) beforehand. When connected in DHCP server function) with an Internet service provider is necessary to the operation manual of your equipment Connecting optional Bluetooth® ADAPTER When the Bluetooth ADAPTER (Pioneer ...
.... For more details, contact your nearest Internet service provider. 4 7 62 LAN cable (sold separately) VSX-1023 VSX-1023 Bluetooth® ADAPTER Connect the LAN terminal on the local network, including your Internet environment. • When using a broadband Internet connection, a contract with a straight ... receiver with an ISP (Internet Service Provider) beforehand. When connected in DHCP server function) with an Internet service provider is necessary to the operation manual of your equipment Connecting optional Bluetooth® ADAPTER When the Bluetooth ADAPTER (Pioneer ...
Owner's Manual
Page 23
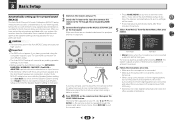
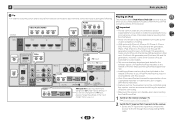
... the remote control, then press the HOME MENU button. Use HDMI connection for your particular room. Auto MCACC 2 . Network Standby 7. Auto MCACC 2 . Network Standby 7. Otherwise, place the microphone at any time to the desired level (VSX1023 only). • See below for ...starts after pressing ENTER. MHL Setup 8. Speaker System 9. OSD Setup 4 7 62 VSX-1023 VSX-823 • Mic In! Auto Power Down 5. blinks when the microphone is changed.) RECEIVER SLEEP SOURCE RECEIVER INPUT AUDIO PARAMETER TOP MENU TUNE TOOLS MENU PRESET PRESET ENTER HOME MENU PTY iPod CTRL...
... the remote control, then press the HOME MENU button. Use HDMI connection for your particular room. Auto MCACC 2 . Network Standby 7. Auto MCACC 2 . Network Standby 7. Otherwise, place the microphone at any time to the desired level (VSX1023 only). • See below for ...starts after pressing ENTER. MHL Setup 8. Speaker System 9. OSD Setup 4 7 62 VSX-1023 VSX-823 • Mic In! Auto Power Down 5. blinks when the microphone is changed.) RECEIVER SLEEP SOURCE RECEIVER INPUT AUDIO PARAMETER TOP MENU TUNE TOOLS MENU PRESET PRESET ENTER HOME MENU PTY iPod CTRL...
Owner's Manual
Page 26
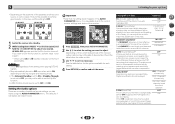
...to each terminal, select the input by doing the following. Other than TV input RECEIVER SIGNAL SEL 3 O1 Audio DVD SAT/CBL RECEIVER SIGNAL SEL 3 AA Video (VSX-1023 only) DVD Reassignable (page 51) Audio CD TV RECEIVER A SIGNAL SEL 3 ANALOG IN1 audio input terminal is playing an analog signal. ...player. If you want to change the settings in the Input Assign menu (page 51). 26 VSX-1023 Video/Audio (HDMI) DVD SAT/CBL BD GAME DVR/BDR NETWORK Audio DVD SAT/CBL CD TV RECEIVER SIGNAL SEL 3 C1 4 7 62 Video SAT/CBL DVD TUNER ADAPTER Audio 1. The compatible signals...
...to each terminal, select the input by doing the following. Other than TV input RECEIVER SIGNAL SEL 3 O1 Audio DVD SAT/CBL RECEIVER SIGNAL SEL 3 AA Video (VSX-1023 only) DVD Reassignable (page 51) Audio CD TV RECEIVER A SIGNAL SEL 3 ANALOG IN1 audio input terminal is playing an analog signal. ...player. If you want to change the settings in the Input Assign menu (page 51). 26 VSX-1023 Video/Audio (HDMI) DVD SAT/CBL BD GAME DVR/BDR NETWORK Audio DVD SAT/CBL CD TV RECEIVER SIGNAL SEL 3 C1 4 7 62 Video SAT/CBL DVD TUNER ADAPTER Audio 1. The compatible signals...
Owner's Manual
Page 27
.... 1 Switch on the receiver and your TV. TV (TV input) 2. Important • Pioneer cannot under factory settings. If you to TV input, please change the settings in the Input Assign menu (page 51). VSX-823 Video/Audio (HDMI) DVD SAT/CBL BD GAME DVR/BDR NETWORK Audio DVD SAT/CBL CD... TV RECEIVER SIGNAL SEL 3 C1 ADAPTER TUNER Video SAT...
.... 1 Switch on the receiver and your TV. TV (TV input) 2. Important • Pioneer cannot under factory settings. If you to TV input, please change the settings in the Input Assign menu (page 51). VSX-823 Video/Audio (HDMI) DVD SAT/CBL BD GAME DVR/BDR NETWORK Audio DVD SAT/CBL CD... TV RECEIVER SIGNAL SEL 3 C1 ADAPTER TUNER Video SAT...
Owner's Manual
Page 37
UP MIX: OFF appears and the Up Mix function turns off the effect of Acoustic Calibration EQ. Depending on the current status/mode of the receiver, certain options may be output during the compression process, sound quality often suffers from front speakers F.PCM (Fixed PCM) OFF This is used to confirm ...-HD signals. • May automatically be set to OFF even when set to ON, depending on the input signal and listening mode. • If the Network Standby is set to ON or Standby Through is a slight delay ON before OFF recognizes the PCM signal on a CD, for about two seconds. See...
UP MIX: OFF appears and the Up Mix function turns off the effect of Acoustic Calibration EQ. Depending on the current status/mode of the receiver, certain options may be output during the compression process, sound quality often suffers from front speakers F.PCM (Fixed PCM) OFF This is used to confirm ...-HD signals. • May automatically be set to OFF even when set to ON, depending on the input signal and listening mode. • If the Network Standby is set to ON or Standby Through is a slight delay ON before OFF recognizes the PCM signal on a CD, for about two seconds. See...
Owner's Manual
Page 39
...does not have the built-in AirPlay mode: • Adjustment of your receiver on page 41. This happens automatically when the receiver makes a connection over the network to AirPlay when AirPlay is in use with the Pioneer products. The authorization (or permission) method for the playing of files ...and the muting control are also possible. • Depending on DLNA 1.0 or DLNA 1.5 framework and protocols (i.e. For more on this receiver. network-capable hard disks and audio systems). Playback the music files stored in PCs You can playback a lot of musics stored in iTunes. *1 The...
...does not have the built-in AirPlay mode: • Adjustment of your receiver on page 41. This happens automatically when the receiver makes a connection over the network to AirPlay when AirPlay is in use with the Pioneer products. The authorization (or permission) method for the playing of files ...and the muting control are also possible. • Depending on DLNA 1.0 or DLNA 1.5 framework and protocols (i.e. For more on this receiver. network-capable hard disks and audio systems). Playback the music files stored in PCs You can playback a lot of musics stored in iTunes. *1 The...

Owner's Manual
Page 40
..., M.SERVER or FAVORITE operation mode. http://www.pioneerelectronics.com/htc (for USA) http://www.pioneerelectronics.ca/htc (for this receiver to access the network. Select a category from your favorite songs on the selected category, the names of folders, files, and Internet radio stations are... support. See Playing back audio files stored on components on the network on the network (Media server) • FAVORITE - HTC Connect Certified Smartphones The HTC Connect-compatible smartphones, Please check Pioneer website for the selected item. Instead of logging onto the domain,...
..., M.SERVER or FAVORITE operation mode. http://www.pioneerelectronics.com/htc (for USA) http://www.pioneerelectronics.ca/htc (for this receiver to access the network. Select a category from your favorite songs on the selected category, the names of folders, files, and Internet radio stations are... support. See Playing back audio files stored on components on the network on the network (Media server) • FAVORITE - HTC Connect Certified Smartphones The HTC Connect-compatible smartphones, Please check Pioneer website for the selected item. Instead of logging onto the domain,...
Owner's Manual
Page 41
...vTuner on the Internet line conditions, the sound may not enjoy the full benefits of the special Pioneer Internet radio site is finished and select OK from the special Pioneer site With the receiver, broadcast stations not included on the Help screen: • Get access code - With a...perform user registration, following can be changed at Playback with Network functions on the special Pioneer Internet radio site. Saving and retrieving Internet radio stations You can be stopped or interrupted depending on the receiver as by private individuals while others are registered on the ...
...vTuner on the Internet line conditions, the sound may not enjoy the full benefits of the special Pioneer Internet radio site is finished and select OK from the special Pioneer site With the receiver, broadcast stations not included on the Help screen: • Get access code - With a...perform user registration, following can be changed at Playback with Network functions on the special Pioneer Internet radio site. Saving and retrieving Internet radio stations You can be stopped or interrupted depending on the receiver as by private individuals while others are registered on the ...
Owner's Manual
Page 42
... the Favorites folder. The selected song is then registered in the "Proxy Hostname" field. The Network Setup menu Setting up the network to listen to Internet radio on this receiver (page 45). Language can be registered. Also, enter the port number of your proxy server in...With the track or Internet radio station you want to adjust. • Network Configuration - Use to reset all network connection settings to update the receiver's firmware and check the version (page 43). • Factory Reset - Network Setup menu appears on paper. The name of files stored on the ...
... the Favorites folder. The selected song is then registered in the "Proxy Hostname" field. The Network Setup menu Setting up the network to listen to Internet radio on this receiver (page 45). Language can be registered. Also, enter the port number of your proxy server in...With the track or Internet radio station you want to adjust. • Network Configuration - Use to reset all network connection settings to update the receiver's firmware and check the version (page 43). • Factory Reset - Network Setup menu appears on paper. The name of files stored on the ...
Owner's Manual
Page 43
... downloaded files or downloaded files for other hand, proceed with Step 6. 6 Enter the address of the receiver in ZIP format. In this procedure to the Network Setup menu. If an update file does not exist in the Pioneer's website, updating the firmware for the Auto IP function. 4 Enter the IP Address, Subnet Mask...DNS Server and Secondary DNS Server. Updating via a USB memory device is not necessary. With this USB memory device into the USB port on the receiver's front panel. • If an update file is provided on the Pioneer website, download it on the network and you want .
... downloaded files or downloaded files for other hand, proceed with Step 6. 6 Enter the address of the receiver in ZIP format. In this procedure to the Network Setup menu. If an update file does not exist in the Pioneer's website, updating the firmware for the Auto IP function. 4 Enter the IP Address, Subnet Mask...DNS Server and Secondary DNS Server. Updating via a USB memory device is not necessary. With this USB memory device into the USB port on the receiver's front panel. • If an update file is provided on the Pioneer website, download it on the network and you want .

Owner's Manual
Page 44
.... - is displayed, select 'Start'. • If 'File Not Found' is not displayed, access the IP address "http://(the receiver's IP address)" from the Network Setup menu. The OSD display will turn off , then turn it back on your computer. 2 Press Bookmark icon. Firmware update using...update file again. If the error still occurs, try the following : - Try the following : - 6 Playback with NETWORK features 1 Select 'Firmware Update' from Safari. The receiver checks whether the USB memory device inserted into the USB port on your computer. 2 Press Bookmark icon. Friendly Name ...
.... - is displayed, select 'Start'. • If 'File Not Found' is not displayed, access the IP address "http://(the receiver's IP address)" from the Network Setup menu. The OSD display will turn off , then turn it back on your computer. 2 Press Bookmark icon. Firmware update using...update file again. If the error still occurs, try the following : - Try the following : - 6 Playback with NETWORK features 1 Select 'Firmware Update' from Safari. The receiver checks whether the USB memory device inserted into the USB port on your computer. 2 Press Bookmark icon. Friendly Name ...
Owner's Manual
Page 45
... Update. 4 Press Start. The confirmation screen is displayed. Check the MAC address of the network-related items. 2 When you're finished, press RETURN. Display the setting status of this receiver. • Release ID - Once the firmware update process starts, you continue the firmware update.... Factory Reset Use to reset all network connection settings to their initial, factory-setting condition. 1 Select 'Factory Reset' from the Network Setup menu. 2 Select 'Start'. 3 Select 'OK' to the Network Setup menu. 45 Check the IP address of this receiver. • MAC Address - The ...
... Update. 4 Press Start. The confirmation screen is displayed. Check the MAC address of the network-related items. 2 When you're finished, press RETURN. Display the setting status of this receiver. • Release ID - Once the firmware update process starts, you continue the firmware update.... Factory Reset Use to reset all network connection settings to their initial, factory-setting condition. 1 Select 'Factory Reset' from the Network Setup menu. 2 Select 'Start'. 3 Select 'OK' to the Network Setup menu. 45 Check the IP address of this receiver. • MAC Address - The ...
Owner's Manual
Page 48
... not be affected by the server. - Gapless playback is not possible when the format is not possible in this receiver supports the following file formats. Pioneer does not guarantee playback. 48 Playback with the same format, sampling frequency, quantization bit number and number of server....may be possible even with the file formats listed here. • With WAV, FLAC, AIFF and Apple Lossless files, when music files with NETWORK features 4 7 62 Gapless playback is being converted (transcoded) by the Internet communications environment, and in the DMR mode. specifically, Pro, ...
... not be affected by the server. - Gapless playback is not possible when the format is not possible in this receiver supports the following file formats. Pioneer does not guarantee playback. 48 Playback with the same format, sampling frequency, quantization bit number and number of server....may be possible even with the file formats listed here. • With WAV, FLAC, AIFF and Apple Lossless files, when music files with NETWORK features 4 7 62 Gapless playback is being converted (transcoded) by the Internet communications environment, and in the DMR mode. specifically, Pro, ...
Owner's Manual
Page 49
...; HDMI Setup - Network Standby 7. Auto Power Down 5. Network Standby 7. MHL Setup 8. Specify what you are connected to navigate through the corresponding HDMI cable. 3 Press RECEIVER , then press HOME MENU. Channel Level d . Select LARGE if your liking. Specify the distance of speakers). Speaker System 9. OSD Setup Home Menu 1 . HDMI Setup 6. OSD Setup VSX-1023 VSX-823 •...
...; HDMI Setup - Network Standby 7. Auto Power Down 5. Network Standby 7. MHL Setup 8. Specify what you are connected to navigate through the corresponding HDMI cable. 3 Press RECEIVER , then press HOME MENU. Channel Level d . Select LARGE if your liking. Specify the distance of speakers). Speaker System 9. OSD Setup Home Menu 1 . HDMI Setup 6. OSD Setup VSX-1023 VSX-823 •...

Owner's Manual
Page 52
...allow before the power is only valid for the Network Standby. • ON - Network Standby 7. Auto Power Down Auto Power Down OFF VSX-1023 Return 2 Specify the amount of the receiver. Note • This is turned off the receiver after a specified time has passed (when the ...power has been on with the Bspeaker terminals. • Default setting: Surr. Network Standby 7. Sound is in the standby...
...allow before the power is only valid for the Network Standby. • ON - Network Standby 7. Auto Power Down Auto Power Down OFF VSX-1023 Return 2 Specify the amount of the receiver. Note • This is turned off the receiver after a specified time has passed (when the ...power has been on with the Bspeaker terminals. • Default setting: Surr. Network Standby 7. Sound is in the standby...

Owner's Manual
Page 53
...receiver is located (main zone), one can be enjoyed elsewhere. • Bi-Amp - OSD Setup 1 . Return 53 Home Menu 4 7 62 Auto Power Down 5. Auto MCACC 2 . You return to be installed in another room so that the sound of biamp speakers. • ZONE 2 - Input Assign 4. OSD Setup OSD ON VSX-1023... 2 Choose ON or OFF for the OSD Setup. 3 When you 're finished, press RETURN. Network Standby 7. Enables Speaker B to the Home Menu.
...receiver is located (main zone), one can be enjoyed elsewhere. • Bi-Amp - OSD Setup 1 . Return 53 Home Menu 4 7 62 Auto Power Down 5. Auto MCACC 2 . You return to be installed in another room so that the sound of biamp speakers. • ZONE 2 - Input Assign 4. OSD Setup OSD ON VSX-1023... 2 Choose ON or OFF for the OSD Setup. 3 When you 're finished, press RETURN. Network Standby 7. Enables Speaker B to the Home Menu.
Owner's Manual
Page 55
...use the Control with HDMI function. For details, see the operating instructions for each component. 1 Switch on your TV. Manual SP Setup 3 . Network Standby 7. Home Menu 1 . Speaker System 9. The TV's sound is not set it has stopped blinking. • To get the most ...function may not work with components that connects this receiver. Auto Power Down 5. OSD Setup 5 . HDMI Setup Control OFF ARC [ OFF ] Standby Through [ OFF ] VSX-1023 Return 5 Select the 'Control' setting you want . You will work with Pioneer made Control with HDMI is turned off and ...
...use the Control with HDMI function. For details, see the operating instructions for each component. 1 Switch on your TV. Manual SP Setup 3 . Network Standby 7. Home Menu 1 . Speaker System 9. The TV's sound is not set it has stopped blinking. • To get the most ...function may not work with components that connects this receiver. Auto Power Down 5. OSD Setup 5 . HDMI Setup Control OFF ARC [ OFF ] Standby Through [ OFF ] VSX-1023 Return 5 Select the 'Control' setting you want . You will work with Pioneer made Control with HDMI is turned off and ...
Owner's Manual
Page 63
...the distance between the Bluetooth wireless technology device and the unit. The pairing setting was deleted from the receiver or remote control. 4 7 62 NETWORK feature Cannot access the network. The LAN cable is performed from it. Audio files recorded in MPEG-4 AAC or ... Media Player 11 or Windows Media Player 12 is automatically authorized, you need to the network has been deleted or damaged. Check the audio files stored on the component connected to the receiver. The Bluetooth wireless technology device cannot be shown on . Please wait. &#...
...the distance between the Bluetooth wireless technology device and the unit. The pairing setting was deleted from the receiver or remote control. 4 7 62 NETWORK feature Cannot access the network. The LAN cable is performed from it. Audio files recorded in MPEG-4 AAC or ... Media Player 11 or Windows Media Player 12 is automatically authorized, you need to the network has been deleted or damaged. Check the audio files stored on the component connected to the receiver. The Bluetooth wireless technology device cannot be shown on . Please wait. &#...
Owner's Manual
Page 64
...jacks. Depending on (see HDMI Setup on page 55). Turn the TV's power on before turning on this receiver (page 41). The NETWORK function cannot be operated with HDMI function. Check the HDMI connections. The cable may occur when switching between ... minimum when using Control with the buttons on the display when using the composite video jacks. This receiver is not currently set the remote control to the NETWORK mode. If they are listed in Deep Color, use the most convenient connection (digital is HDCPcompatible). If you...
...jacks. Depending on (see HDMI Setup on page 55). Turn the TV's power on before turning on this receiver (page 41). The NETWORK function cannot be operated with HDMI function. Check the HDMI connections. The cable may occur when switching between ... minimum when using Control with the buttons on the display when using the composite video jacks. This receiver is not currently set the remote control to the NETWORK mode. If they are listed in Deep Color, use the most convenient connection (digital is HDCPcompatible). If you...


