Owner's Manual
Page 4
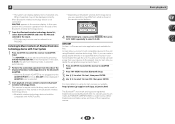
... improving sound quality 11 Connecting the speakers 12 Connect the surround back or front height speakers (In case of VSX-1022 12 Connect the surround back or front height speakers (In case of remote control 10 02 Connecting your equipment Determining the speakers' application 11 Some tips for buying this receiver 38 Playback... Radio 40 Playing back audio files stored on components on iPod touch, iPhone, iPad, and iTunes . . 38 About the DHCP server function 38 Authorizing this Pioneer product.
... improving sound quality 11 Connecting the speakers 12 Connect the surround back or front height speakers (In case of VSX-1022 12 Connect the surround back or front height speakers (In case of remote control 10 02 Connecting your equipment Determining the speakers' application 11 Some tips for buying this receiver 38 Playback... Radio 40 Playing back audio files stored on components on iPod touch, iPhone, iPad, and iTunes . . 38 About the DHCP server function 38 Authorizing this Pioneer product.
Owner's Manual
Page 5
... operations 53 Cautions on the Control with HDMI function 53 09 Controlling the rest of your system Setting the remote to control other components 54 Selecting preset codes directly 54 Clearing all the remote control settings 54 Controls for TVs 55 Controls for other components 55 Preset Code List 55 10 Additional...
... operations 53 Cautions on the Control with HDMI function 53 09 Controlling the rest of your system Setting the remote to control other components 54 Selecting preset codes directly 54 Clearing all the remote control settings 54 Controls for TVs 55 Controls for other components 55 Preset Code List 55 10 Additional...
Owner's Manual
Page 6
... using a digital connection from the Blu-ray Disc/DVD player to the receiver. • About the video converter (VSX-1022 only) (page 16) • About video outputs connection (VSX-822 only) (page 16) • Connecting a TV and playback components (page 17) • Connecting antennas (...8226; Manual speaker setup (page 46) 8 Making maximum use of the remote control • Setting the remote to a device that you've received the following supplied accessories: • Setup microphone • Remote control • AAA size IEC R03 dry cell batteries (to confirm system operation)...
... using a digital connection from the Blu-ray Disc/DVD player to the receiver. • About the video converter (VSX-1022 only) (page 16) • About video outputs connection (VSX-822 only) (page 16) • Connecting a TV and playback components (page 17) • Connecting antennas (...8226; Manual speaker setup (page 46) 8 Making maximum use of the remote control • Setting the remote to a device that you've received the following supplied accessories: • Setup microphone • Remote control • AAA size IEC R03 dry cell batteries (to confirm system operation)...
Owner's Manual
Page 7
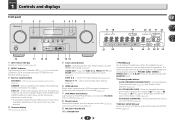
... is selected (page 27). 8 Remote sensor Receives the signals from the remote control (see Operating range of remote control on page 10). 9 MASTER VOLUME dial 10 STANDBY/ON 11 PHONES jack Use to connect headphones. ADVANCED SURROUND - DIMMER - The listening mode, sound volume, Speaker System (VSX-1022)/Pre Out (VSX-822) setting or input name...
... is selected (page 27). 8 Remote sensor Receives the signals from the remote control (see Operating range of remote control on page 10). 9 MASTER VOLUME dial 10 STANDBY/ON 11 PHONES jack Use to connect headphones. ADVANCED SURROUND - DIMMER - The listening mode, sound volume, Speaker System (VSX-1022)/Pre Out (VSX-822) setting or input name...
Owner's Manual
Page 9
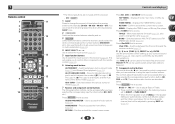
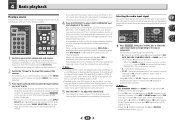
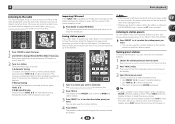
... first to access the Home Menu (page 46). Press to access: BASS +/-, TRE +/- - Confirm and exit the current menu screen. BAND - 1 Remote control 1 RECEIVER SLEEP SOURCE 2 3 RECEIVER 4 INPUT 11 12 5 6 AUDIO PARAMETER TOP 7 MENU TUNE TOOLS MENU PRESET PRESET ENTER 8 HOME MENU PTY...to select preset radio stations (page 32). 9 Component control buttons The main buttons (, , etc.) are not used with the remote control (page 54). 6 Listening mode buttons AUTO/DIRECT - Also use this button to set above these buttons can be adjusted by pressing SLEEP...
... first to access the Home Menu (page 46). Press to access: BASS +/-, TRE +/- - Confirm and exit the current menu screen. BAND - 1 Remote control 1 RECEIVER SLEEP SOURCE 2 3 RECEIVER 4 INPUT 11 12 5 6 AUDIO PARAMETER TOP 7 MENU TUNE TOOLS MENU PRESET PRESET ENTER 8 HOME MENU PTY...to select preset radio stations (page 32). 9 Component control buttons The main buttons (, , etc.) are not used with the remote control (page 54). 6 Listening mode buttons AUTO/DIRECT - Also use this button to set above these buttons can be adjusted by pressing SLEEP...
Owner's Manual
Page 10
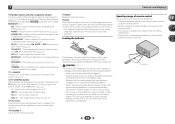
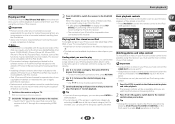
...to switch on page 14. SIGNAL SEL - DIMMER - Loading the batteries The batteries included with another infrared remote control unit. 30° 30° 7 m (23 ft.) 10 When disposing of remote control The remote control may not be displayed, depending on a CD, etc. Thus if you have selected. INPUT -.... 15 MUTE Mutes/unmutes the sound. 16 DISP Switches the display of batteries. The listening mode, sound volume, Speaker System (VSX-1022)/Pre Out (VSX-822) setting or input name can be checked by selecting an input source. • The Speaker System/Pre Out setting may...
...to switch on page 14. SIGNAL SEL - DIMMER - Loading the batteries The batteries included with another infrared remote control unit. 30° 30° 7 m (23 ft.) 10 When disposing of remote control The remote control may not be displayed, depending on a CD, etc. Thus if you have selected. INPUT -.... 15 MUTE Mutes/unmutes the sound. 16 DISP Switches the display of batteries. The listening mode, sound volume, Speaker System (VSX-1022)/Pre Out (VSX-822) setting or input name can be checked by selecting an input source. • The Speaker System/Pre Out setting may...
Owner's Manual
Page 23
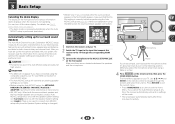
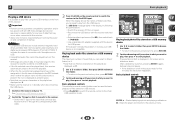
...optimize the speaker settings and equalization for Auto MCACC setup. • The Auto MCACC setup will be selected as an input source. • VSX-1022 only: When both channel delay and channel level. Make sure there are no need to conduct Auto MCACC setup every time the Speaker System ...page 50). (Here is no obstacles between the speakers and the microphone. Otherwise, place the microphone at your TV. Use and ENTER on the remote control to navigate through the corresponding HDMI cable. 3 Connect the microphone to place the microphone so that it's about ear level at ear level...
...optimize the speaker settings and equalization for Auto MCACC setup. • The Auto MCACC setup will be selected as an input source. • VSX-1022 only: When both channel delay and channel level. Make sure there are no need to conduct Auto MCACC setup every time the Speaker System ...page 50). (Here is no obstacles between the speakers and the microphone. Otherwise, place the microphone at your TV. Use and ENTER on the remote control to navigate through the corresponding HDMI cable. 3 Connect the microphone to place the microphone so that it's about ear level at ear level...
Owner's Manual
Page 25
... as a DVD disc) with a digital audio connection, you want multichannel surround sound. 5 Use VOLUME +/- To operate the receiver, first press RECEIVER on the remote control, then press the appropriate button to operate. • The input source can be selected for O1. If you selected the proper input source and...TV so that all sound is possible to check on your TV, make sure that was selected will only hear sound from this case, the remote control won't switch operational modes. Selects an HDMI signal. Selects the analog inputs. • C1/O1 - It is coming from the speakers...
... as a DVD disc) with a digital audio connection, you want multichannel surround sound. 5 Use VOLUME +/- To operate the receiver, first press RECEIVER on the remote control, then press the appropriate button to operate. • The input source can be selected for O1. If you selected the proper input source and...TV so that all sound is possible to check on your TV, make sure that was selected will only hear sound from this case, the remote control won't switch operational modes. Selects an HDMI signal. Selects the analog inputs. • C1/O1 - It is coming from the speakers...
Owner's Manual
Page 27
... responsibility for reproduction of startup. Finding what you can play photos or video on an iPod. • Press iPod/USB to switch the remote control to the iPod/ USB operation mode. Tip • If you're in incompatibility with the iPod shuffle. • This receiver has... been developed and tested for the software version of iPod/iPhone/iPad indicated on the website of Pioneer (http://pioneer.jp/homeav/support/ios/ na/). • Installing software versions other than indicated on the website of recorded material resulting from any inconvenience...
... responsibility for reproduction of startup. Finding what you can play photos or video on an iPod. • Press iPod/USB to switch the remote control to the iPod/ USB operation mode. Tip • If you're in incompatibility with the iPod shuffle. • This receiver has... been developed and tested for the software version of iPod/iPhone/iPad indicated on the website of Pioneer (http://pioneer.jp/homeav/support/ios/ na/). • Installing software versions other than indicated on the website of recorded material resulting from any inconvenience...
Owner's Manual
Page 28
... iPod CTRL TUNE BAND RETURN MUTE ENTER, - When the display shows the names of format FAT16/32. Basic playback controls This receiver's remote control buttons can select in Step 2 (below : • Switch the receiver off, then on again. • Reconnect the USB device with ...file playable. • When the file currently being played back has no responsibility for five minutes, the list screen reappears. Important • Pioneer cannot guarantee compatibility (operation and/or bus power) with all USB mass storage devices and assumes no title assigned to it, the file ...
... iPod CTRL TUNE BAND RETURN MUTE ENTER, - When the display shows the names of format FAT16/32. Basic playback controls This receiver's remote control buttons can select in Step 2 (below : • Switch the receiver off, then on again. • Reconnect the USB device with ...file playable. • When the file currently being played back has no responsibility for five minutes, the list screen reappears. Important • Pioneer cannot guarantee compatibility (operation and/or bus power) with all USB mass storage devices and assumes no title assigned to it, the file ...
Owner's Manual
Page 30
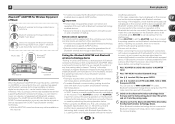
... perform pairing first time you want to performing the pairing operation below . • When using Bluetooth ADAPTER. Important • Pioneer does not guarantee proper connection and operation of this unit with Bluetooth Specification Ver. 2.1, pairing of 0000/1234/8888 PIN codes.... technology device is the step necessary to register Bluetooth wireless technology device to play When the Bluetooth ADAPTER (Pioneer Model No. Remote control operation The remote control supplied with this unit allows you can use Bluetooth wireless technology device and Bluetooth ADAPTER. • ...
... perform pairing first time you want to performing the pairing operation below . • When using Bluetooth ADAPTER. Important • Pioneer does not guarantee proper connection and operation of this unit with Bluetooth Specification Ver. 2.1, pairing of 0000/1234/8888 PIN codes.... technology device is the step necessary to register Bluetooth wireless technology device to play When the Bluetooth ADAPTER (Pioneer Model No. Remote control operation The remote control supplied with this unit allows you can use Bluetooth wireless technology device and Bluetooth ADAPTER. • ...
Owner's Manual
Page 31
...then press ENTER. 4 Use / to ADAPTER input. Other trademarks and trade names are registered trademarks owned by PIONEER CORPORATION is shown in the remote control buttons. 4 While listening to a source, press RECEIVER then press ADV SURR repeatedly to play in Bluetooth wireless technology... device. http://pioneer.jp/support/soft/iapp_airjam/en.html The Bluetooth® word mark and logos are those of Bluetooth...
...then press ENTER. 4 Use / to ADAPTER input. Other trademarks and trade names are registered trademarks owned by PIONEER CORPORATION is shown in the remote control buttons. 4 While listening to a source, press RECEIVER then press ADV SURR repeatedly to play in Bluetooth wireless technology... device. http://pioneer.jp/support/soft/iapp_airjam/en.html The Bluetooth® word mark and logos are those of Bluetooth...
Owner's Manual
Page 32
... do this . Naming preset stations For easier identification, you can memorize the frequency for recall later-see Saving station presets below for more on the remote control to an FM station because the signal is pressed. This saves the effort of your preset stations. 1 Choose the station preset you how to...
... do this . Naming preset stations For easier identification, you can memorize the frequency for recall later-see Saving station presets below for more on the remote control to an FM station because the signal is pressed. This saves the effort of your preset stations. 1 Choose the station preset you how to...
Owner's Manual
Page 38
...files stored on components on page 40. Note • A network environment is required to the instruction manual of the receiver. (Press NETWORK to switch the remote control to the network operation mode.) *1: For more information, see the Apple website (http:// www.apple.com). *2: The receiver's power automatically turns on...video files cannot be played back. • With Windows Media Player 11 or Windows Media Player 12, you must sign a contract with the Pioneer products. This happens automatically when the receiver makes a connection over the network to your router. For more on the...
...files stored on components on page 40. Note • A network environment is required to the instruction manual of the receiver. (Press NETWORK to switch the remote control to the network operation mode.) *1: For more information, see the Apple website (http:// www.apple.com). *2: The receiver's power automatically turns on...video files cannot be played back. • With Windows Media Player 11 or Windows Media Player 12, you must sign a contract with the Pioneer products. This happens automatically when the receiver makes a connection over the network to your router. For more on the...
Owner's Manual
Page 39
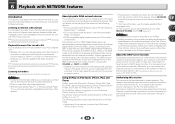
...select the desired folder and audio files. 3 Repeat step 2 to play back, and then press ENTER. Only audio files with the remote control of Internet radio stations on this receiver. See Playing back your favorite songs on page 40 for the selected item. Note that...network (Media server) • FAVORITE - Server components on page 44. Favorite songs currently being played back. Press NETWORK to switch the remote control to the NETRADIO, PANDORA, M.SERVER or FAVORITE operation mode. 6 Playback with NETWORK features Playback with Network functions Important • In case ...
...select the desired folder and audio files. 3 Repeat step 2 to play back, and then press ENTER. Only audio files with the remote control of Internet radio stations on this receiver. See Playing back your favorite songs on page 40 for the selected item. Note that...network (Media server) • FAVORITE - Server components on page 44. Favorite songs currently being played back. Press NETWORK to switch the remote control to the NETRADIO, PANDORA, M.SERVER or FAVORITE operation mode. 6 Playback with NETWORK features Playback with Network functions Important • In case ...
Owner's Manual
Page 40
... then press ENTER. 3 Use / to register selected, press +Favorite. Playing back audio files stored on components on the special Pioneer Internet radio site. 6 Playback with music you already know. Resets all the registered broadcast stations are displayed. • Reset Your WebID/PW ...desired broadcast stations as favorite broadcast stations and can be registered in and from the Favorites folder 1 Press NETWORK to switch the remote control to the M.SERVER or NETRADIO operation mode. 2 With the track or Internet radio station you want to perform user ...
... then press ENTER. 3 Use / to register selected, press +Favorite. Playing back audio files stored on components on the special Pioneer Internet radio site. 6 Playback with music you already know. Resets all the registered broadcast stations are displayed. • Reset Your WebID/PW ...desired broadcast stations as favorite broadcast stations and can be registered in and from the Favorites folder 1 Press NETWORK to switch the remote control to the M.SERVER or NETRADIO operation mode. 2 With the track or Internet radio station you want to perform user ...
Owner's Manual
Page 41
... the IP address. • The IP address determined by the Auto IP function is only one DNS server address provided by your ISP on the remote control to navigate through the screens and select menu items. Press RETURN to exit the current menu. • Press HOME MENU at any time to...
... the IP address. • The IP address determined by the Auto IP function is only one DNS server address provided by your ISP on the remote control to navigate through the screens and select menu items. Press RETURN to exit the current menu. • Press HOME MENU at any time to...
Owner's Manual
Page 46
...8 . Pre Out Setting 5 . Speaker Setting - Analog Input - Specify what you have connected using the speaker terminals (page 49). • Video Parameter (VSX-1022 only) - Aspect - These settings are connected to make detailed settings to switch on page 51). • FL Demo Mode - It is selected. 1 Switch... that can 't use the PRE OUT SURR BACK/FRONT HEIGHT outputs (see Automatically setting up for surround sound (MCACC) on the remote control to navigate through the corresponding HDMI cable. 3 Press RECEIVER , then press HOME MENU. Use HDMI connection for output from the...
...8 . Pre Out Setting 5 . Speaker Setting - Analog Input - Specify what you have connected using the speaker terminals (page 49). • Video Parameter (VSX-1022 only) - Aspect - These settings are connected to make detailed settings to switch on page 51). • FL Demo Mode - It is selected. 1 Switch... that can 't use the PRE OUT SURR BACK/FRONT HEIGHT outputs (see Automatically setting up for surround sound (MCACC) on the remote control to navigate through the corresponding HDMI cable. 3 Press RECEIVER , then press HOME MENU. Use HDMI connection for output from the...
Owner's Manual
Page 48
... Move the test tone manually from the Manual SP Setup menu. 2 . X.Over c . Speaker Setting b . Back R Surr. The Auto setup will be output. 2c . on the remote control. Manual SP Setup a . Tip • You can adjust the overall balance of each speaker to 75 dB SPL (C-weighting/slow reading). • The subwoofer...
... Move the test tone manually from the Manual SP Setup menu. 2 . X.Over c . Speaker Setting b . Back R Surr. The Auto setup will be output. 2c . on the remote control. Manual SP Setup a . Tip • You can adjust the overall balance of each speaker to 75 dB SPL (C-weighting/slow reading). • The subwoofer...
Owner's Manual
Page 52
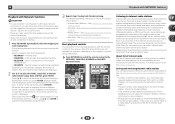
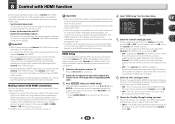
...settings, etc., refer to also the operating instructions for each component. 1 Switch on the remote control to switch the power off and disconnect the power cord from the audio input terminals ... carry out any time to OFF. 52 Video Parameter 6 . You will work with Pioneer made Control with HDMI-compatible components. The Control with HDMI is set this system or ...is played. Network Standby 9 . FL Demo Mode Control ON ARC [ OFF ] Standby Through [ --- ] VSX-1022 Return 5 Select the 'Control' setting you connect your HDMI component not to a TV but rather directly to...
...settings, etc., refer to also the operating instructions for each component. 1 Switch on the remote control to switch the power off and disconnect the power cord from the audio input terminals ... carry out any time to OFF. 52 Video Parameter 6 . You will work with Pioneer made Control with HDMI-compatible components. The Control with HDMI is set this system or ...is played. Network Standby 9 . FL Demo Mode Control ON ARC [ OFF ] Standby Through [ --- ] VSX-1022 Return 5 Select the 'Control' setting you connect your HDMI component not to a TV but rather directly to...


