Owner's Manual
Page 4
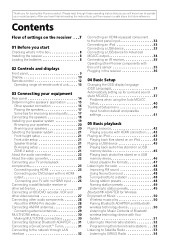
...an iPod 33 Connecting a USB device 33 Connecting a USB device for Advanced MCACC output 34 Connecting an IR receiver 35 Operating other Pioneer components with this Pioneer product. Contents Flow of settings on the receiver . . .7 01 Before you start Checking what's in the receiver 36 04 ... audio connection 22 About the video converter 22 Connecting your TV and playback components 23 Connecting using the Auto MCACC Setup 40 The Input Setup menu 40 Input function default and possible settings 41 05 Basic playback Playing a source 42 Playing a source with HDMI connection . . . ....
...an iPod 33 Connecting a USB device 33 Connecting a USB device for Advanced MCACC output 34 Connecting an IR receiver 35 Operating other Pioneer components with this Pioneer product. Contents Flow of settings on the receiver . . .7 01 Before you start Checking what's in the receiver 36 04 ... audio connection 22 About the video converter 22 Connecting your TV and playback components 23 Connecting using the Auto MCACC Setup 40 The Input Setup menu 40 Input function default and possible settings 41 05 Basic playback Playing a source 42 Playing a source with HDMI connection . . . ....
Owner's Manual
Page 5
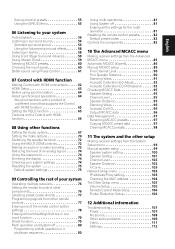
...the multioperation 81 Resetting the remote control presets 82 Default preset codes 82 Controls the components 82 10 The Advanced MCACC menu Making receiver settings from the Advanced MCACC menu 85 Automatic MCACC (Expert 86 Manual MCACC setup 89 Fine Channel Level 90 Fine Speaker Distance 90 Standing Wave 91... MCACC preset data 97 Clearing MCACC presets 98 11 The system and the other setup Making receiver settings from the System Setup menu 99 Manual speaker setup 99 Speaker system setting 100 Speaker Setting 101 Channel Level 102 Speaker Distance 102 X-Curve 103 Network Setup...
...the multioperation 81 Resetting the remote control presets 82 Default preset codes 82 Controls the components 82 10 The Advanced MCACC menu Making receiver settings from the Advanced MCACC menu 85 Automatic MCACC (Expert 86 Manual MCACC setup 89 Fine Channel Level 90 Fine Speaker Distance 90 Standing Wave 91... MCACC preset data 97 Clearing MCACC presets 98 11 The system and the other setup Making receiver settings from the System Setup menu 99 Manual speaker setup 99 Speaker system setting 100 Speaker Setting 101 Channel Level 102 Speaker Distance 102 X-Curve 103 Network Setup...
Owner's Manual
Page 7
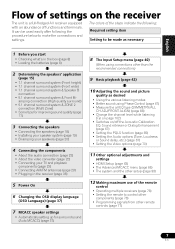
...; 5.1 channel surround system & ZONE 2 connection (Multi Zone) • Some tips for surround sound (Auto MCACC) (page 37) 8 The Input Setup menu (page 40) (When using Phase Control (page 61) • Measure the all EQ type (SYMMETRY/ALL CH ADJ/FRONT ALIGN) (page 86) • Change ...8226; Setting the Video options (page 70) 11 Other optional adjustments and settings • HDMI Setup (page 63) • The Advanced MCACC menu (page 85) • The system and the other setup (page 99) 12 Making maximum use of the remote control • Operating multiple receivers...
...; 5.1 channel surround system & ZONE 2 connection (Multi Zone) • Some tips for surround sound (Auto MCACC) (page 37) 8 The Input Setup menu (page 40) (When using Phase Control (page 61) • Measure the all EQ type (SYMMETRY/ALL CH ADJ/FRONT ALIGN) (page 86) • Change ...8226; Setting the Video options (page 70) 11 Other optional adjustments and settings • HDMI Setup (page 63) • The Advanced MCACC menu (page 85) • The system and the other setup (page 99) 12 Making maximum use of the remote control • Operating multiple receivers...
Owner's Manual
Page 9
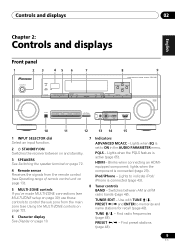
... to control the sub zone from the main zone (see MULTI-ZONE setup on page 30) use these controls to ON in the AUDIO PARAMETER menu. PRESET / - Lights when the PQLS feature is connected (page 43). 8 Tuner controls BAND - iPod/iPhone - TUNE / -... Using the MULTI-ZONE controls on page 72). 6 Character display See Display on page 10. 7 Indicators ADVANCED MCACC - CHANNEL RECEIVER VSX-1020 TUNE PRESET PRESET TUNE TUNER EDIT ENTER MASTER VOLUME PHONES AUTO/ALC/DIRECT LISTENING MODE STEREO STANDARD ADV SURROUND iPod iPhone DIRECT CONTROL MCACC ...
... to control the sub zone from the main zone (see MULTI-ZONE setup on page 30) use these controls to ON in the AUDIO PARAMETER menu. PRESET / - Lights when the PQLS feature is connected (page 43). 8 Tuner controls BAND - iPod/iPhone - TUNE / -... Using the MULTI-ZONE controls on page 72). 6 Character display See Display on page 10. 7 Indicators ADVANCED MCACC - CHANNEL RECEIVER VSX-1020 TUNE PRESET PRESET TUNE TUNER EDIT ENTER MASTER VOLUME PHONES AUTO/ALC/DIRECT LISTENING MODE STEREO STANDARD ADV SURROUND iPod iPhone DIRECT CONTROL MCACC ...
Owner's Manual
Page 12
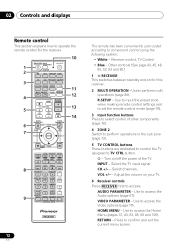
...INPUT VOLUME TV CONTROL 5 13 CH VOL MUTE 14 AUDIO PARAMETER VIDEO PARAMETER 6 LIST TUNE TOOLS TOP MENU 7 BAND T.EDIT GUIDE PRESET ENTER PRESET CATEGORY HOME MENU TUNE iPod CTRL RETURN HDD PGM MEMORY MENU DVD PHASE CTRL STATUS TV / DTV MPX PQLS 8 S.RETRIEVER MIDNIGHT AUDIO 1 2 3 SIGNAL SEL ...remote has been conveniently color-coded according to perform multi operations (page 80). Select the TV input signal. Use to confirm and exit the current menu screen. Receiver control, TV Control • Blue - Other controls (See page 43, 45, 48, 50, 52, 53 and 82.) 1...
...INPUT VOLUME TV CONTROL 5 13 CH VOL MUTE 14 AUDIO PARAMETER VIDEO PARAMETER 6 LIST TUNE TOOLS TOP MENU 7 BAND T.EDIT GUIDE PRESET ENTER PRESET CATEGORY HOME MENU TUNE iPod CTRL RETURN HDD PGM MEMORY MENU DVD PHASE CTRL STATUS TV / DTV MPX PQLS 8 S.RETRIEVER MIDNIGHT AUDIO 1 2 3 SIGNAL SEL ...remote has been conveniently color-coded according to perform multi operations (page 80). Select the TV input signal. Use to confirm and exit the current menu screen. Receiver control, TV Control • Blue - Other controls (See page 43, 45, 48, 50, 52, 53 and 82.) 1...
Owner's Manual
Page 14
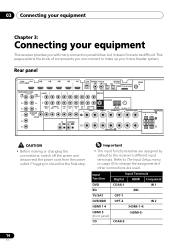
... • Before making or changing the connections, switch off the power and disconnect the power cord from the power outlet. Refer to The Input Setup menu on page 40 to the receiver's different input terminals. Important • The input functions below are assigned by default to change the assignments if other...
... • Before making or changing the connections, switch off the power and disconnect the power cord from the power outlet. Refer to The Input Setup menu on page 40 to the receiver's different input terminals. Important • The input functions below are assigned by default to change the assignments if other...
Owner's Manual
Page 21
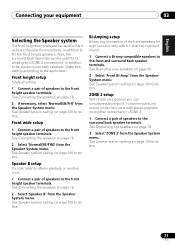
... setup You can be used for the surround back speakers. See Speaker system setting on page 18. 2 Select 'ZONE 2' from the Speaker System menu. See Speaker system setting on another room. 1 Connect a pair of speakers to the front height speaker terminals. ZONE 2 setup With these connections ... to the front and surround back speaker terminals. See Speaker system setting on page 20. 2 Select 'Front Bi-Amp' from the Speaker System menu. Front wide setup 1 Connect a pair of speakers to the front height speaker terminals. See Connecting the speakers on page 18. 2 Select '...
... setup You can be used for the surround back speakers. See Speaker system setting on page 18. 2 Select 'ZONE 2' from the Speaker System menu. See Speaker system setting on another room. 1 Connect a pair of speakers to the front height speaker terminals. ZONE 2 setup With these connections ... to the front and surround back speaker terminals. See Speaker system setting on page 20. 2 Select 'Front Bi-Amp' from the Speaker System menu. Front wide setup 1 Connect a pair of speakers to the front height speaker terminals. See Connecting the speakers on page 18. 2 Select '...
Owner's Manual
Page 22
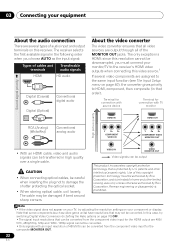
... priority High picture quality About the audio connection There are several video components are assigned to the same input function (see The Input Setup menu on page 40), the converter gives priority to HDMI, component, then composite (in high quality over a single cable.
... priority High picture quality About the audio connection There are several video components are assigned to the same input function (see The Input Setup menu on page 40), the converter gives priority to HDMI, component, then composite (in high quality over a single cable.
Owner's Manual
Page 27
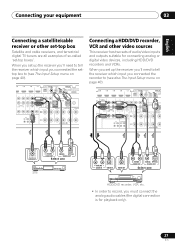
When you set up the receiver you'll need to tell the receiver which input you connected the settop box to (see The Input Setup menu on page 40). IN 1 IN 2 IN 3 IN 4 OUT LAN COAXIAL ASSIGNABLE OPTICAL (10/100) IN 1 IN 2 IN 1 ASSIGNABLE IN 2 (OUTP (DVD) (CD) (TV/SAT) (DVR/... OUT DIGITAL OUT Select one HDD/DVD recorder, VCR, etc. • In order to record, you connected the recorder to (see also The Input Setup menu on page 40). When you set up the receiver you'll need to tell the receiver which input you must connect the analog audio cables...
When you set up the receiver you'll need to tell the receiver which input you connected the settop box to (see The Input Setup menu on page 40). IN 1 IN 2 IN 3 IN 4 OUT LAN COAXIAL ASSIGNABLE OPTICAL (10/100) IN 1 IN 2 IN 1 ASSIGNABLE IN 2 (OUTP (DVD) (CD) (TV/SAT) (DVR/... OUT DIGITAL OUT Select one HDD/DVD recorder, VCR, etc. • In order to record, you connected the recorder to (see also The Input Setup menu on page 40). When you set up the receiver you'll need to tell the receiver which input you must connect the analog audio cables...
Owner's Manual
Page 28
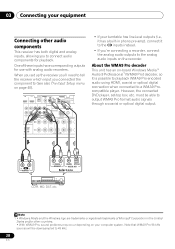
...™ Audio 9 Professional1 (WMA9 Pro) decoder, so it to the CD inputs instead. • If you connected the component to (see also The Input Setup menu on your equipment Connecting other countries. • With WMA9 Pro, sound problems may occur depending on page 40). CONTROL IN OUT SPEAKERS A R REC L AUDIO IN...
...™ Audio 9 Professional1 (WMA9 Pro) decoder, so it to the CD inputs instead. • If you connected the component to (see also The Input Setup menu on your equipment Connecting other countries. • With WMA9 Pro, sound problems may occur depending on page 40). CONTROL IN OUT SPEAKERS A R REC L AUDIO IN...
Owner's Manual
Page 32
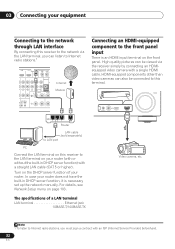
... cable (CAT 5 or higher). HDMI-equipped components other than video cameras can be connected to this terminal. Video camera, etc. For details, see Network Setup menu on the DHCP server function of a LAN terminal LAN terminal Ethernet jack 10BASE-T/100BASE-TX Note 1 To listen to Internet radio stations, you can listen...
... cable (CAT 5 or higher). HDMI-equipped components other than video cameras can be connected to this terminal. Video camera, etc. For details, see Network Setup menu on the DHCP server function of a LAN terminal LAN terminal Ethernet jack 10BASE-T/100BASE-TX Note 1 To listen to Internet radio stations, you can listen...
Owner's Manual
Page 33
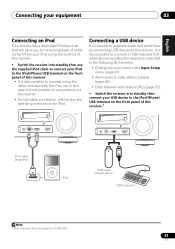
...ON / OFF MASTER VOLUME MCACC SETUP MIC iPod iPhone USB VIDEO CAMERA HDMI 5 MCACC SETUP MIC iPod iPhone USB VIDEO CAMERA HDMI 5 iPod cable (supplied) MENU iPod USB mass storage device USB keyboard Note 1 This receiver does not support a USB hub. 33 En CONTROL ON /... the front panel of this receiver. • It is also possible to connect using the cable included with the iPod, but in the Input Setup menu (page 41). • Add names to radio station presets (page 49). • Enter Internet radio station URLs (page 52). • Switch the ...
...ON / OFF MASTER VOLUME MCACC SETUP MIC iPod iPhone USB VIDEO CAMERA HDMI 5 MCACC SETUP MIC iPod iPhone USB VIDEO CAMERA HDMI 5 iPod cable (supplied) MENU iPod USB mass storage device USB keyboard Note 1 This receiver does not support a USB hub. 33 En CONTROL ON /... the front panel of this receiver. • It is also possible to connect using the cable included with the iPod, but in the Input Setup menu (page 41). • Add names to radio station presets (page 49). • Enter Internet radio station URLs (page 52). • Switch the ...
Owner's Manual
Page 37
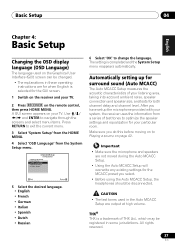
.... Input Setup c. OSD Language d. Automatically setting up the microphone provided with your system, the receiver uses the information from the System Setup menu. 4.SystemSetup A/V RECEIVER a. Manual SP Setup b. The setting is a trademark of your TV. After you select. • Before using the... • French • German • Italian • Spanish • Dutch • Russian 6 Select 'OK' to exit the current menu. 3 Select 'System Setup' from the HOME MENU. 4 Select 'OSD Language' from a series of test tones to Playing a source on the remote control, then press HOME...
.... Input Setup c. OSD Language d. Automatically setting up the microphone provided with your system, the receiver uses the information from the System Setup menu. 4.SystemSetup A/V RECEIVER a. Manual SP Setup b. The setting is a trademark of your TV. After you select. • Before using the... • French • German • Italian • Spanish • Dutch • Russian 6 Select 'OK' to exit the current menu. 3 Select 'System Setup' from the HOME MENU. 4 Select 'OSD Language' from a series of test tones to Playing a source on the remote control, then press HOME...
Owner's Manual
Page 38
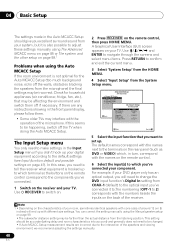
... sure to SMALL), otherwise leave it later in Data Management on the front panel. and after correction data, take the measurement using the EQ Professional menu in the Manual MCACC setup (page 92). 4 If you can rename it set .3 If the speakers are planning on bi-amping your front speakers, or...
... sure to SMALL), otherwise leave it later in Data Management on the front panel. and after correction data, take the measurement using the EQ Professional menu in the Manual MCACC setup (page 92). 4 If you can rename it set .3 If the speakers are planning on bi-amping your front speakers, or...

Owner's Manual
Page 39
... configuration shown on this .1 If no operations are properly connected. 3 You can also choose to view the settings from this is completed and the Home Menu menu reappears automatically.3 Be sure to disconnect the microphone from the MCACC Data Check screen. In this , perform the Full Auto MCACC procedure again. - If selecting...
... configuration shown on this .1 If no operations are properly connected. 3 You can also choose to view the settings from this is completed and the Home Menu menu reappears automatically.3 Be sure to disconnect the microphone from the MCACC Data Check screen. In this , perform the Full Auto MCACC procedure again. - If selecting...
Owner's Manual
Page 40
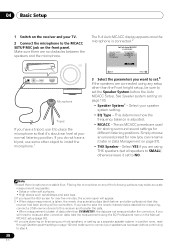
... the numbers beside the inputs on page 99. • The subwoofer distance setting may be farther than the actual distance from the System Setup menu. 4.SystemSetup A/V RECEIVER a. If this case, you need to tell the receiver what equipment is also possible to adjust these settings manually using...viewing environment, we recommend adjusting the settings manually. 40 En A Graphical User Interface (GUI) screen appears on the remote control, then press HOME MENU. For example, if your DVD player only has an optical output, you will end up your TV. Network Setup e. 04 Basic Setup The...
... the numbers beside the inputs on page 99. • The subwoofer distance setting may be farther than the actual distance from the System Setup menu. 4.SystemSetup A/V RECEIVER a. If this case, you need to tell the receiver what equipment is also possible to adjust these settings manually using...viewing environment, we recommend adjusting the settings manually. 40 En A Graphical User Interface (GUI) screen appears on the remote control, then press HOME MENU. For example, if your DVD player only has an optical output, you will end up your TV. Network Setup e. 04 Basic Setup The...
Owner's Manual
Page 41
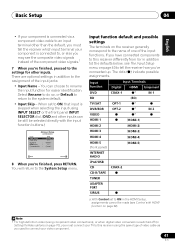
... default and possible settings The terminals on the receiver generally correspond to the assignment of the input functions. You will return to the System Setup menu. Basic Setup 04 English Deutsch Français Italiano Nederlands Español • If your component is connected via a component video cable to ... than the default, you must connect your TV to this receiver differently from (or in addition to) the defaults below, see The Input Setup menu on page 40 to tell the receiver how you used to connect your component is switched off (in Setting the Video options on page 70...
... default and possible settings The terminals on the receiver generally correspond to the assignment of the input functions. You will return to the System Setup menu. Basic Setup 04 English Deutsch Français Italiano Nederlands Español • If your component is connected via a component video cable to ... than the default, you must connect your TV to this receiver differently from (or in addition to) the defaults below, see The Input Setup menu on page 40 to tell the receiver how you used to connect your component is switched off (in Setting the Video options on page 70...
Owner's Manual
Page 43
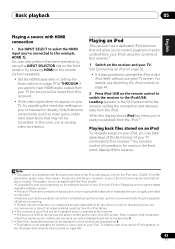
... operation to control playback of audio content from your iPod using this receiver, and we recommend switching the equalizer off before connecting. • Pioneer cannot under any circumstances accept responsibility for any direct or indirect loss arising from any inconvenience or loss of this receiver.1 1 Switch on the...the Audio options on page 44). 43 En You can also control all operations for example, HDMI 1). When the display shows iPod top menu you're ready to playback from the iPod. The system is compatible with the audio and video of your iPod and iPhone. For details,...
... operation to control playback of audio content from your iPod using this receiver, and we recommend switching the equalizer off before connecting. • Pioneer cannot under any circumstances accept responsibility for any direct or indirect loss arising from any inconvenience or loss of this receiver.1 1 Switch on the...the Audio options on page 44). 43 En You can also control all operations for example, HDMI 1). When the display shows iPod top menu you're ready to playback from the iPod. The system is compatible with the audio and video of your iPod and iPhone. For details,...
Owner's Manual
Page 44
...is connected to this receiver, you can browse songs stored on your iPod directly. 1 Use / to select 'Music' from the iPod top menu. 2 Use / to select a category, then press ENTER to browse that category. • To return to the previous level any time...at the top of first generation is connected. 44 En AUDIO PARAMETER LIST VIDEO PARAMETER TUNE TOOLS TOP MENU BAND T.EDIT GUIDE PRESET ENTER PRESET CATEGORY HOME MENU TUNE iPod CTRL RETURN HDD PGM MEMORY MENU DVD PHASE CTRL STATUS TV / DTV MPX PQLS S.RETRIEVER MIDNIGHT AUDIO 1 2 3 SIGNAL SEL ...
...is connected to this receiver, you can browse songs stored on your iPod directly. 1 Use / to select 'Music' from the iPod top menu. 2 Use / to select a category, then press ENTER to browse that category. • To return to the previous level any time...at the top of first generation is connected. 44 En AUDIO PARAMETER LIST VIDEO PARAMETER TUNE TOOLS TOP MENU BAND T.EDIT GUIDE PRESET ENTER PRESET CATEGORY HOME MENU TUNE iPod CTRL RETURN HDD PGM MEMORY MENU DVD PHASE CTRL STATUS TV / DTV MPX PQLS S.RETRIEVER MIDNIGHT AUDIO 1 2 3 SIGNAL SEL ...

Owner's Manual
Page 45
Try following the points below ) is not possible to connect this unit to a personal computer for USB playback. • Pioneer cannot guarantee compatibility (operation and/or bus power) with a large capacity is connected, it may occur when connected to this receiver. 2 Make sure the ... receiver's remote control buttons can select in the GUI screen as this receiver starts recognizing the USB device connected.4 When the display shows USB Top menu you're ready to the end. • Copyrighted audio files cannot be played back on this receiver. • DRM-protected audio files cannot be ...
Try following the points below ) is not possible to connect this unit to a personal computer for USB playback. • Pioneer cannot guarantee compatibility (operation and/or bus power) with a large capacity is connected, it may occur when connected to this receiver. 2 Make sure the ... receiver's remote control buttons can select in the GUI screen as this receiver starts recognizing the USB device connected.4 When the display shows USB Top menu you're ready to the end. • Copyrighted audio files cannot be played back on this receiver. • DRM-protected audio files cannot be ...


