Owner's Manual
Page 4
... 20 Speaker terminals 20 Hints on speaker placement 21 THX speaker system setup 22 AC outlet 22 Power cord caution 23 Operating other Pioneer components 23 04 Controls and displays Front panel 24 Display 26 Remote control 28 Operating range of remote control unit 30 05 Listening ... sources 39 Selecting the multichannel analog inputs 39 Using the sleep timer 39 06 The System Setup menu Making receiver settings from the System Setup menu 40 Surround back speaker setting 40 Manual MCACC speaker setup 41 Fine Channel Level 42 Fine Channel Distance 42 Acoustic Calibration EQ 43...
... 20 Speaker terminals 20 Hints on speaker placement 21 THX speaker system setup 22 AC outlet 22 Power cord caution 23 Operating other Pioneer components 23 04 Controls and displays Front panel 24 Display 26 Remote control 28 Operating range of remote control unit 30 05 Listening ... sources 39 Selecting the multichannel analog inputs 39 Using the sleep timer 39 06 The System Setup menu Making receiver settings from the System Setup menu 40 Surround back speaker setting 40 Manual MCACC speaker setup 41 Fine Channel Level 42 Fine Channel Distance 42 Acoustic Calibration EQ 43...
Owner's Manual
Page 10
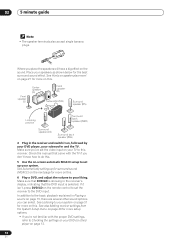
...for surround sound (MCACC) on the next page for more on this receiver. In addition to this . Make sure you don't know how to do this . Check the manual that the DVD input is showing in the receiver and switch it isn't, press DVD/LD on this . 5 Use the... (R) Subwoofer (SW) Surround speaker (RS) Listening position Surround back speaker (SBR) Surround speaker (LS) Surround back speaker (SBL) 4 Plug in the receiver's display, indicating that came with the proper DVD settings, refer to your DVD (or other sound options you can select. Make sure that DVD/LD...
...for surround sound (MCACC) on the next page for more on this receiver. In addition to this . Make sure you don't know how to do this . Check the manual that the DVD input is showing in the receiver and switch it isn't, press DVD/LD on this . 5 Use the... (R) Subwoofer (SW) Surround speaker (RS) Listening position Surround back speaker (SBR) Surround speaker (LS) Surround back speaker (SBL) 4 Plug in the receiver's display, indicating that came with the proper DVD settings, refer to your DVD (or other sound options you can select. Make sure that DVD/LD...
Owner's Manual
Page 11
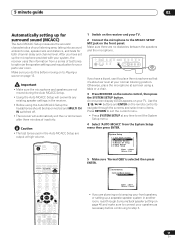
... to navigate through Surround back speaker setting on page 13. AUTO MCACC ] [ 3. MANUAL MCACC ] [ 4. Other Setup ] Enter : Select Return : Exit DVD/LD TV/SAT DVR/VCR TVCONT MULTI CONTROL CD CD-R/TAPE TUNER RECEIVER 5 Make sure 'Normal (SB)' is selected then press ENTER. 2. Important •... Make sure the microphone and speakers are no obstacles between the speakers and the microphone. RECEIVER INPUT SELECT SOURCE 1 Switch on the remote control, then press the SYSTEM SETUP button. Use the / / / buttons and ENTER on the...
... to navigate through Surround back speaker setting on page 13. AUTO MCACC ] [ 3. MANUAL MCACC ] [ 4. Other Setup ] Enter : Select Return : Exit DVD/LD TV/SAT DVR/VCR TVCONT MULTI CONTROL CD CD-R/TAPE TUNER RECEIVER 5 Make sure 'Normal (SB)' is selected then press ENTER. 2. Important •... Make sure the microphone and speakers are no obstacles between the speakers and the microphone. RECEIVER INPUT SELECT SOURCE 1 Switch on the remote control, then press the SYSTEM SETUP button. Use the / / / buttons and ENTER on the...

Owner's Manual
Page 12
... up . • See below for notes regarding high background noise levels and other possible interference. 7 Wait for more test tones to determine the optimum receiver settings for surround back). AUTO MCACC Now Analyzing••• Surround Analyzing Speaker System [ ] Speaker Distance [ ] Channel Level [ ] Acoustic Cal... to the frequency balance of your system, but it is on and the volume is also possible to adjust these settings manually using THX Certified speakers, confirm that all speakers are using the System Setup menu (starting on page 47 is output loudly...
... up . • See below for notes regarding high background noise levels and other possible interference. 7 Wait for more test tones to determine the optimum receiver settings for surround back). AUTO MCACC Now Analyzing••• Surround Analyzing Speaker System [ ] Speaker Distance [ ] Channel Level [ ] Acoustic Cal... to the frequency balance of your system, but it is on and the volume is also possible to adjust these settings manually using THX Certified speakers, confirm that all speakers are using the System Setup menu (starting on page 47 is output loudly...

Owner's Manual
Page 13
... make sure that the TV's video input is set to this receiver. (For example, if you connected this receiver, make sure that may only get digital 2 channel stereo and analog sound. Other problems when using the Manual speaker setup on page 45. • The subwoofer distance setting may... be incorrect. You can correct the setting manually using the Auto MCACC Setup...
... make sure that the TV's video input is set to this receiver. (For example, if you connected this receiver, make sure that may only get digital 2 channel stereo and analog sound. Other problems when using the Manual speaker setup on page 45. • The subwoofer distance setting may... be incorrect. You can correct the setting manually using the Auto MCACC Setup...
Owner's Manual
Page 35
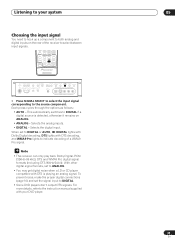
This automatically switches to the instruction manual supplied with your system 05 Choosing the input signal You need to... digital signal formats, set to DIGITAL. • Some DVD players don't output DTS signals. Note • This receiver can only play back Dolby Digital, PCM (32kHz-96 kHz), DTS and WMA9 Pro digital signal formats (including DTS ... L AUDIO R • Press SIGNAL SELECT to select the input signal corresponding to indicate decoding of the receiver to select between input signals. When set the signal input to ANALOG. • You may get digital noise...
This automatically switches to the instruction manual supplied with your system 05 Choosing the input signal You need to... digital signal formats, set to DIGITAL. • Some DVD players don't output DTS signals. Note • This receiver can only play back Dolby Digital, PCM (32kHz-96 kHz), DTS and WMA9 Pro digital signal formats (including DTS ... L AUDIO R • Press SIGNAL SELECT to select the input signal corresponding to indicate decoding of the receiver to select between input signals. When set the signal input to ANALOG. • You may get digital noise...

Owner's Manual
Page 40
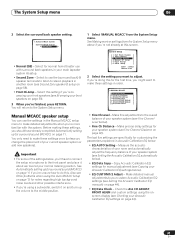
...press the SYSTEM SETUP button. MANUAL MCACC ] [ 4. Surr Back System ] [ 2. MANUAL MCACC ] [ 4. Use the RECEIVER button to switch on the receiver and your TV. Fine tune your surround back speakers (see Manual MCACC speaker setup below ). • AUTO MCACC - See Making receiver settings from the System Setup ...any time to exit the System Setup menu. • Surr Back System - Manual SP Setup ] [ 5. System Setup [ 1. 06 The System Setup menu Chapter 6: The System Setup menu Making receiver settings from the System Setup menu The following section shows you how to make...
...press the SYSTEM SETUP button. MANUAL MCACC ] [ 4. Surr Back System ] [ 2. MANUAL MCACC ] [ 4. Use the RECEIVER button to switch on the receiver and your TV. Fine tune your surround back speakers (see Manual MCACC speaker setup below ). • AUTO MCACC - See Making receiver settings from the System Setup ...any time to exit the System Setup menu. • Surr Back System - Manual SP Setup ] [ 5. System Setup [ 1. 06 The System Setup menu Chapter 6: The System Setup menu Making receiver settings from the System Setup menu The following section shows you how to make...
Owner's Manual
Page 41
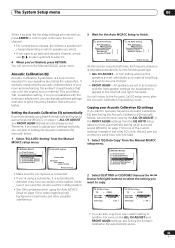
... adjust. Important • For some of the settings below, you change the placement of your speaker system (see Setting the Acoustic Calibration EQ manually on page 11. Make precise delay settings for surround sound (MCACC) on page 44). • EQ Data Check - System Setup [ 1....setup microphone to the System Setup menu. 1 Select 'MANUAL MCACC' from the System Setup menu above if you 're more familiar with surround back speakers in Acoustic Calibration EQ below ). • EQ CUSTOM1/2 Adjust - See Making receiver settings from the System Setup menu. Surround Back System...
... adjust. Important • For some of the settings below, you change the placement of your speaker system (see Setting the Acoustic Calibration EQ manually on page 11. Make precise delay settings for surround sound (MCACC) on page 44). • EQ Data Check - System Setup [ 1....setup microphone to the System Setup menu. 1 Select 'MANUAL MCACC' from the System Setup menu above if you 're more familiar with surround back speakers in Acoustic Calibration EQ below ). • EQ CUSTOM1/2 Adjust - See Making receiver settings from the System Setup menu. Surround Back System...
Owner's Manual
Page 43
...Surround Analyzing Channel Level [ ] Acoustic Cal EQ [ ] Return:Cancel Return:Cancel As the receiver outputs test tones, the frequency balance is given to one of room equalizer for the Auto MCACC Setup to the Manual MCACC setup menu. EQ Data Copy TO FROM CUSTOM1 CUSTOM2 [ ALL CH ADJ. ] [ ... where all the speakers are set . For more on the ALL CH ADJUST and FRONT ALIGN settings, see Setting the Acoustic Calibration EQ manually below ) should already be set in accordance with the automatic adjustment, you want to adjust your Acoustic Calibration EQ settings If you can ...
...Surround Analyzing Channel Level [ ] Acoustic Cal EQ [ ] Return:Cancel Return:Cancel As the receiver outputs test tones, the frequency balance is given to one of room equalizer for the Auto MCACC Setup to the Manual MCACC setup menu. EQ Data Copy TO FROM CUSTOM1 CUSTOM2 [ ALL CH ADJ. ] [ ... where all the speakers are set . For more on the ALL CH ADJUST and FRONT ALIGN settings, see Setting the Acoustic Calibration EQ manually below ) should already be set in accordance with the automatic adjustment, you want to adjust your Acoustic Calibration EQ settings If you can ...

Owner's Manual
Page 45
... in order: 4. Surr Back System ] [ 2 . Input Assign ] [ 6 . The System Setup menu 06 2 Select the setting you want to adjust. Manual speaker setup This receiver allows you 're finished, press RETURN. AUTO MCACC ] [ 3 . Manual SP Setup [ a . THX Audio Setting ] • Speaker Setting - Specify the distance of your current speaker system or add new speakers...
... in order: 4. Surr Back System ] [ 2 . Input Assign ] [ 6 . The System Setup menu 06 2 Select the setting you want to adjust. Manual speaker setup This receiver allows you 're finished, press RETURN. AUTO MCACC ] [ 3 . Manual SP Setup [ a . THX Audio Setting ] • Speaker Setting - Specify the distance of your current speaker system or add new speakers...
Owner's Manual
Page 48
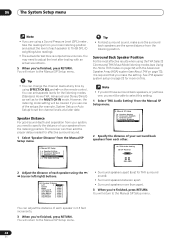
However, the listening mode setting will return to the Manual SP Setup menu. The receiver can set the channel levels at a later date. You will return to the Manual SP Setup menu. 48 En You can then add the proper delay needed for example, System Setup...increments. 3 When you 're finished, press RETURN. Crossover Network ] [ c. THX Audio Setting ] Tip • For best surround sound, make the setting. Manual SP Setup [ a. Speaker Setting ] [ b. See THX speaker system setup on page 22 for THX surround sound). • Surround speakers between apart. •...
However, the listening mode setting will return to the Manual SP Setup menu. The receiver can set the channel levels at a later date. You will return to the Manual SP Setup menu. 48 En You can then add the proper delay needed for example, System Setup...increments. 3 When you 're finished, press RETURN. Crossover Network ] [ c. THX Audio Setting ] Tip • For best surround sound, make the setting. Manual SP Setup [ a. Speaker Setting ] [ b. See THX speaker system setup on page 22 for THX surround sound). • Surround speakers between apart. •...
Owner's Manual
Page 49
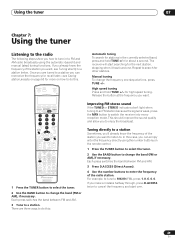
...tuned to a station you can simply enter the frequency directly using the automatic (search) and manual (step) tuning functions. Each press switches the band between FM and AM. 3 Tune to a station. RECEIVER INPUT SELECT SOURCE Automatic tuning To search for stations in to FM and AM radio broadcasts using... STEREO indicators don't light when tuning to an FM station because the signal is weak, press the MPX button to switch the receiver into mono reception mode. The receiver will start over. 49 En Each press switches the band between FM and AM. 3 Press D.ACCESS (Direct Access). 4 Use...
...tuned to a station you can simply enter the frequency directly using the automatic (search) and manual (step) tuning functions. Each press switches the band between FM and AM. 3 Tune to a station. RECEIVER INPUT SELECT SOURCE Automatic tuning To search for stations in to FM and AM radio broadcasts using... STEREO indicators don't light when tuning to an FM station because the signal is weak, press the MPX button to switch the receiver into mono reception mode. The receiver will start over. 49 En Each press switches the band between FM and AM. 3 Press D.ACCESS (Direct Access). 4 Use...
Owner's Manual
Page 50
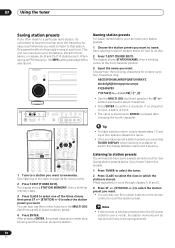
...preset you can memorize up to four characters long. Tip • To erase a station name, simply repeat steps 1-3 and input four spaces instead of manually tuning in three banks, or classes, (A, B and C) of the three classes then press ST +/- (STATION +/-) to select the station preset you want... to that station. 07 Using the tuner Saving station presets If you often listen to a particular radio station, it's convenient to have the receiver store the frequency for easy recall whenever you haven't done this . buttons (remote) to select characters. • Press ENTER to name. ...
...preset you can memorize up to four characters long. Tip • To erase a station name, simply repeat steps 1-3 and input four spaces instead of manually tuning in three banks, or classes, (A, B and C) of the three classes then press ST +/- (STATION +/-) to select the station preset you want... to that station. 07 Using the tuner Saving station presets If you often listen to a particular radio station, it's convenient to have the receiver store the frequency for easy recall whenever you haven't done this . buttons (remote) to select characters. • Press ENTER to name. ...
Owner's Manual
Page 51
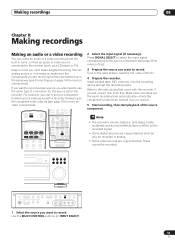
...MIDNIGHT/ AUTO SURR EQ SELECT LOUDNESS SHIFT EFFECT /CH SEL SLEEP DIALOG E RECEIVER 2 Select the input signal (if necessary). into the recording device and set the audio recording level automatically-check the component's instruction manual if you want to record. These cannot be recorded in analog. •...way (see Connecting up on page 14 for more on this . Most video recorders set the recording levels. AUDIO/VIDEO MULTI-CHANNEL RECEIVER VSX-1015X DVD/LD TV/SAT DVR/VCR VIDEO1 CD-R/ CD TAPE/MD TUNER VIDEO2 MASTER VOLUME TUNER CONTROL TUNER EDIT TUNING/ STATION ...
...MIDNIGHT/ AUTO SURR EQ SELECT LOUDNESS SHIFT EFFECT /CH SEL SLEEP DIALOG E RECEIVER 2 Select the input signal (if necessary). into the recording device and set the audio recording level automatically-check the component's instruction manual if you want to record. These cannot be recorded in analog. •...way (see Connecting up on page 14 for more on this . Most video recorders set the recording levels. AUDIO/VIDEO MULTI-CHANNEL RECEIVER VSX-1015X DVD/LD TV/SAT DVR/VCR VIDEO1 CD-R/ CD TAPE/MD TUNER VIDEO2 MASTER VOLUME TUNER CONTROL TUNER EDIT TUNING/ STATION ...

Owner's Manual
Page 59
... speakers as biamping, but additionally, interference effects within the wire could severely damage the amplifier. These must be reduced, producing better sound. See your speaker manual for more information. • If your front left speaker SPEAKERS A R FRONT L CENTER R SURROUND L SURROUND BACK / B R SELECTABLE L (Single) SELECTABLE Bi-wiring your speakers The reasons for... you connect the high frequency driver and low frequency driver of your speakers to different amplifiers (in this case, to the speaker terminal on the receiver.
... speakers as biamping, but additionally, interference effects within the wire could severely damage the amplifier. These must be reduced, producing better sound. See your speaker manual for more information. • If your front left speaker SPEAKERS A R FRONT L CENTER R SURROUND L SURROUND BACK / B R SELECTABLE L (Single) SELECTABLE Bi-wiring your speakers The reasons for... you connect the high frequency driver and low frequency driver of your speakers to different amplifiers (in this case, to the speaker terminal on the receiver.

Owner's Manual
Page 62
... to a certain function (for example, DVD/LD) then any digital inputs previously assigned to that function will return to the Input Assign menu. 62 En MANUAL MCACC ] [ 4. Input Assign [ a . Input Assign [ a . Digital Input Digital - 1 Digital - 2 Digital - 3 Digital - 4 [ TV/SAT ] [ CD-R ] [ DVD/LD ] [ CD ... according to that corresponds with the numbers beside the inputs on your TV. Component Input ] 2 Select the number of the receiver. 5a. Surr Back System ] [ 2. The numbers correspond with the one you have connected equipment using component video cables. ...
... to a certain function (for example, DVD/LD) then any digital inputs previously assigned to that function will return to the Input Assign menu. 62 En MANUAL MCACC ] [ 4. Input Assign [ a . Input Assign [ a . Digital Input Digital - 1 Digital - 2 Digital - 3 Digital - 4 [ TV/SAT ] [ CD-R ] [ DVD/LD ] [ CD ... according to that corresponds with the numbers beside the inputs on your TV. Component Input ] 2 Select the number of the receiver. 5a. Surr Back System ] [ 2. The numbers correspond with the one you have connected equipment using component video cables. ...

Owner's Manual
Page 63
...used component video cords to connect your video equipment you must tell the receiver which you've connected your TV connected to the corresponding inputs on the receiver and your TV. AUTO MCACC ] [ 3. MANUAL MCACC ] [ 4. For more on this, see the S-video or... the component that corresponds with the one you connected to that input. • Use the / (cursor left/right) buttons and ENTER to the receiver using the receiver. Manual SP Setup ] [ 5. Other Settings 11 Assigning the component video inputs • Default settings: Component 1 - Component Input Component-1 [ DVD/LD...
...used component video cords to connect your video equipment you must tell the receiver which you've connected your TV connected to the corresponding inputs on the receiver and your TV. AUTO MCACC ] [ 3. MANUAL MCACC ] [ 4. For more on this, see the S-video or... the component that corresponds with the one you connected to that input. • Use the / (cursor left/right) buttons and ENTER to the receiver using the receiver. Manual SP Setup ] [ 5. Other Settings 11 Assigning the component video inputs • Default settings: Component 1 - Component Input Component-1 [ DVD/LD...
Owner's Manual
Page 66
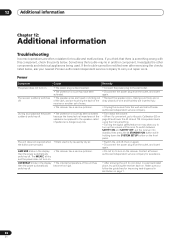
...using the manual setting. • Turning the digital safety feature on page 7. 66 En Sometimes the trouble may allow you think that they are often mistaken for trouble and malfunctions. If the trouble cannot be rectified even after exercising the checks listed below . The receiver suddenly switches... does not turn on . • The power plug is something wrong with this component, check the points below , ask your nearest Pioneer authorized independent service company to the wall outlet. • The protection circuit may have been activated. • Disconnect the power plug from...
...using the manual setting. • Turning the digital safety feature on page 7. 66 En Sometimes the trouble may allow you think that they are often mistaken for trouble and malfunctions. If the trouble cannot be rectified even after exercising the checks listed below . The receiver suddenly switches... does not turn on . • The power plug is something wrong with this component, check the points below , ask your nearest Pioneer authorized independent service company to the wall outlet. • The protection circuit may have been activated. • Disconnect the power plug from...
Owner's Manual
Page 68
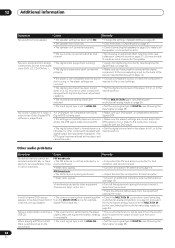
...CD recorder or other equipment (fluorescent lamp, motor, etc.). • Turn off . slightly alters the digital information, making it away from the receiver. • Place the antenna farther away from one speaker. • The speaker setting has been set to ANALOG. • This is wrong....the correct settings. AM broadcasts • The AM antenna is on the DVD player are incorrect • Make sure the player's settings are manual for best reception. • Weak radio signals. • Connect an additional internal or external AM antenna (see page 19). • ...
...CD recorder or other equipment (fluorescent lamp, motor, etc.). • Turn off . slightly alters the digital information, making it away from the receiver. • Place the antenna farther away from one speaker. • The speaker setting has been set to ANALOG. • This is wrong....the correct settings. AM broadcasts • The AM antenna is on the DVD player are incorrect • Make sure the player's settings are manual for best reception. • Weak radio signals. • Connect an additional internal or external AM antenna (see page 19). • ...
Owner's Manual
Page 69
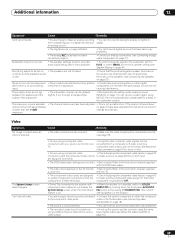
...volume will automatically compensate for a delay in the front panel display) on the TV monitor • Set correctly. Refer to the instruction manual supplied is selected. Everything seems to be heard even • There is electrical interference from a composite or S-video input to a ... or a digital recording of phase. There seems to be converted from another • Check that the positive/negative speaker terminals on the receiver are matched with the TV. • The component video inputs are assigned to a video component connected only to the composite or S-Video ...
...volume will automatically compensate for a delay in the front panel display) on the TV monitor • Set correctly. Refer to the instruction manual supplied is selected. Everything seems to be heard even • There is electrical interference from a composite or S-video input to a ... or a digital recording of phase. There seems to be converted from another • Check that the positive/negative speaker terminals on the receiver are matched with the TV. • The component video inputs are assigned to a video component connected only to the composite or S-Video ...


