
Operating Instructions
Page 1
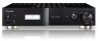
A6 SX-A6-J Stereo Receiver Register your product at: www.pioneerelectronics.com (US) www.pioneerelectronics.ca (Canada) • Protect your new investment The details of your purchase will be on file for reference in the event of an insurance claim such as loss or theft. • Receive ...free tips, updates and service bulletins on your new product • Improve product development Your input helps us continue to design products that meet your needs. • Receive a free Pioneer newsletter Registered customers can opt in to receive a monthly newsletter. Operating...
A6 SX-A6-J Stereo Receiver Register your product at: www.pioneerelectronics.com (US) www.pioneerelectronics.ca (Canada) • Protect your new investment The details of your purchase will be on file for reference in the event of an insurance claim such as loss or theft. • Receive ...free tips, updates and service bulletins on your new product • Improve product development Your input helps us continue to design products that meet your needs. • Receive a free Pioneer newsletter Registered customers can opt in to receive a monthly newsletter. Operating...

Operating Instructions
Page 2
.... D1-4-2-6-1_En NOTE: This equipment has been tested and found to comply with the limits for help. Reorient or relocate the receiving antenna. - D8-10-1-3_EF WARNING - These limits are designed to provide reasonable protection against harmful interference in the literature accompanying ...equipment generates, uses, and can be determined by one or more of the following measures: - Increase the separation between the equipment and receiver. - PREVENT ELECTRIC SHOCK DO NOT USE THIS (POLARIZED) PLUG WITH AN EXTENSION CORD. ATTENTION - D2-4-4-1_EF Downloaded from that to...
.... D1-4-2-6-1_En NOTE: This equipment has been tested and found to comply with the limits for help. Reorient or relocate the receiving antenna. - D8-10-1-3_EF WARNING - These limits are designed to provide reasonable protection against harmful interference in the literature accompanying ...equipment generates, uses, and can be determined by one or more of the following measures: - Increase the separation between the equipment and receiver. - PREVENT ELECTRIC SHOCK DO NOT USE THIS (POLARIZED) PLUG WITH AN EXTENSION CORD. ATTENTION - D2-4-4-1_EF Downloaded from that to...
Operating Instructions
Page 5
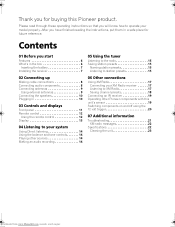
... Other connections Using XM Radio 17 Connecting your model properly. Contents 01 Before you start Features 6 What's in the box 6 Inserting the battery 7 Installing the receiver 7 02 Connecting up Making cable connections 8 Connecting audio components 8 Connecting antennas 9 Using external antennas 9 Connecting the speakers 10 Plugging in a safe place for buying this... Listening to the radio 15 Saving station presets 15 Naming station presets 15 Listening to XM Radio 17 Saving channel presets 18 Connecting an IR receiver 19 Operating other Pioneer components with this...
... Other connections Using XM Radio 17 Connecting your model properly. Contents 01 Before you start Features 6 What's in the box 6 Inserting the battery 7 Installing the receiver 7 02 Connecting up Making cable connections 8 Connecting audio components 8 Connecting antennas 9 Using external antennas 9 Connecting the speakers 10 Plugging in a safe place for buying this... Listening to the radio 15 Saving station presets 15 Naming station presets 15 Listening to XM Radio 17 Saving channel presets 18 Connecting an IR receiver 19 Operating other Pioneer components with this...
Operating Instructions
Page 6
...no feedback' circuitry and low impedence parallel main capacitors characteristicly used in professional audio monitoring. • Twin-mono symmetrical construction This receiver offers a new advancement in stereo imaging with the completely independent construction of left/right power amplification units and twin transformers. &#... • Fine-tuned to world-class standards With the cooperation of the world-class studio engineers at AIR Studios, this receiver provides a quick and easy connection to the improved symmetrical design, the signal path of satellite radio service in the box when...
...no feedback' circuitry and low impedence parallel main capacitors characteristicly used in professional audio monitoring. • Twin-mono symmetrical construction This receiver offers a new advancement in stereo imaging with the completely independent construction of left/right power amplification units and twin transformers. &#... • Fine-tuned to world-class standards With the cooperation of the world-class studio engineers at AIR Studios, this receiver provides a quick and easy connection to the improved symmetrical design, the signal path of satellite radio service in the box when...

Operating Instructions
Page 7
.... • Dispose of batteries. When you start 01 Inserting the battery Insert the lithium battery (CR2025) into the remote control as shown below ). Installing the receiver • When installing this unit is stored in places where there is incorrectly replaced. in extremely hot or cold areas - It can cause batteries to...
.... • Dispose of batteries. When you start 01 Inserting the battery Insert the lithium battery (CR2025) into the remote control as shown below ). Installing the receiver • When installing this unit is stored in places where there is incorrectly replaced. in extremely hot or cold areas - It can cause batteries to...

Operating Instructions
Page 8
... LOOP ANTENNA XM IN IR CONTROL OUT IN OUT SIGNAL GND L L 12V TRIGGER REC PLAY OUT IN TAPE AUX1 AUX2 R CD R PHONO This receiver Important • Before making or changing any other components (such as an iPod1 dock or a portable audio player) to the AUX inputs in the...U.S. L 2 R IN OUT REC PLAY AUDIO IN/OUT 1 OUT R L AUDIO OUT D6 Connecting audio components The number and kind of connections depends on this receiver. 02 Connecting up Chapter 2: Connecting up Making cable connections Make sure not to bend the cables over the top of your CD player (or other...
... LOOP ANTENNA XM IN IR CONTROL OUT IN OUT SIGNAL GND L L 12V TRIGGER REC PLAY OUT IN TAPE AUX1 AUX2 R CD R PHONO This receiver Important • Before making or changing any other components (such as an iPod1 dock or a portable audio player) to the AUX inputs in the...U.S. L 2 R IN OUT REC PLAY AUDIO IN/OUT 1 OUT R L AUDIO OUT D6 Connecting audio components The number and kind of connections depends on this receiver. 02 Connecting up Chapter 2: Connecting up Making cable connections Make sure not to bend the cables over the top of your CD player (or other...

Operating Instructions
Page 9
... loop antenna. b 3 Fix the AM loop antenna to 6 m (15 ft. Make sure the reception is clear. 4 Place the AM antenna on this receiver. One-touch PAL connector FM UNBAL 75 AM LOOP ANTENNA 3 FM UNBAL 75 AM LOOP ANTENNA 5 4 1 2 1 Pull off the protective shields of vinyl...-coated wire to the AM antenna terminal without disconnecting the supplied AM loop antenna. Then connect the audio inputs on this receiver. To improve reception and sound quality, connect external antennas (see Using external antennas below . b) before clipping the loop to connect an external...
... loop antenna. b 3 Fix the AM loop antenna to 6 m (15 ft. Make sure the reception is clear. 4 Place the AM antenna on this receiver. One-touch PAL connector FM UNBAL 75 AM LOOP ANTENNA 3 FM UNBAL 75 AM LOOP ANTENNA 5 4 1 2 1 Pull off the protective shields of vinyl...-coated wire to the AM antenna terminal without disconnecting the supplied AM loop antenna. Then connect the audio inputs on this receiver. To improve reception and sound quality, connect external antennas (see Using external antennas below . b) before clipping the loop to connect an external...

Operating Instructions
Page 10
... connecting this unit to the AC power source. You can use either bare wire connections or banana plugs to do this may cause the receiver to turn off automatically. fig. Once the wire is touching the rear panel, this (see below). Left speaker CONTROL OUT OUT SIGNAL... PHONO AC IN L SPEAKER • Connect the speakers to the speaker terminals as shown above. A). B). B fig. To prevent the risk of the receiver, then plug into a power outlet. 10 En Downloaded from each wire, and the exposed wire strands twisted together (fig. Caution • These speaker terminals ...
... connecting this unit to the AC power source. You can use either bare wire connections or banana plugs to do this may cause the receiver to turn off automatically. fig. Once the wire is touching the rear panel, this (see below). Left speaker CONTROL OUT OUT SIGNAL... PHONO AC IN L SPEAKER • Connect the speakers to the speaker terminals as shown above. A). B). B fig. To prevent the risk of the receiver, then plug into a power outlet. 10 En Downloaded from each wire, and the exposed wire strands twisted together (fig. Caution • These speaker terminals ...

Operating Instructions
Page 11
Controls and displays 03 Chapter 3: Controls and displays Front panel 1 2 3 POWER STANDBY OFF ON PHONES 4 5 6 DIRECT INPUT SELECTOR VOLUME STEREO RECEIVER A6 7 8 1 POWER OFF ON 2 STANDBY indicator 3 Character display (page 13) 4 DIRECT Press to switch the Direct listening feature on or off (page 14). 5 INPUT SELECTOR dial Selects an input source. 6 MASTER VOLUME 7 Remote sensor 8 PHONES jack Use to connect headphones (when connected, there is no sound output from the speakers). 11 En Downloaded from www.Manualslib.com manuals search engine
Controls and displays 03 Chapter 3: Controls and displays Front panel 1 2 3 POWER STANDBY OFF ON PHONES 4 5 6 DIRECT INPUT SELECTOR VOLUME STEREO RECEIVER A6 7 8 1 POWER OFF ON 2 STANDBY indicator 3 Character display (page 13) 4 DIRECT Press to switch the Direct listening feature on or off (page 14). 5 INPUT SELECTOR dial Selects an input source. 6 MASTER VOLUME 7 Remote sensor 8 PHONES jack Use to connect headphones (when connected, there is no sound output from the speakers). 11 En Downloaded from www.Manualslib.com manuals search engine
Operating Instructions
Page 12
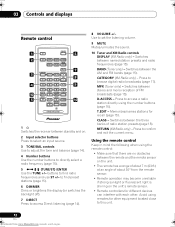
... TUNER AUX1 AUX2 XM DIRECT TONE/BAL L / R / VOL 1 2 3 4 5 6 MUTE 7 DISPLAY BAND ST 8 TUNE ENTER TUNE 9 0 CATEGORY D.ACCESS MPX ST T.EDIT RETURN CLASS STEREO RECEIVER 6 7 8 9 10 1 Switches the receiver between named station presets and radio frequencies (page 15). CLASS - Using the remote control Keep in mind the following when using remotes for...
... TUNER AUX1 AUX2 XM DIRECT TONE/BAL L / R / VOL 1 2 3 4 5 6 MUTE 7 DISPLAY BAND ST 8 TUNE ENTER TUNE 9 0 CATEGORY D.ACCESS MPX ST T.EDIT RETURN CLASS STEREO RECEIVER 6 7 8 9 10 1 Switches the receiver between named station presets and radio frequencies (page 15). CLASS - Using the remote control Keep in mind the following when using remotes for...

Operating Instructions
Page 13
... Lights when an FM frequency is applied. 3 Master volume level 4 FM - BASS - Lights when AM broadcasts are received. Lights when XM radio broadcasts are received. 6 Character display Displays various system information. 7 MHz - Lights when low-range tone adjustment is displayed. STEREO - ...TREBLE - Lights when the MPX button is displayed. 13 En Downloaded from www.Manualslib.com manuals search engine Lights when a stereo FM broadcast is being received. Display 1 2 3 TUNED STEREO MONO XM FM AM TREBLE BASS dB MHz KHz 4 5 6 7 1 Tuner Indicators TUNED - MONO - ...
... Lights when an FM frequency is applied. 3 Master volume level 4 FM - BASS - Lights when AM broadcasts are received. Lights when XM radio broadcasts are received. 6 Character display Displays various system information. 7 MHz - Lights when low-range tone adjustment is displayed. STEREO - ...TREBLE - Lights when the MPX button is displayed. 13 En Downloaded from www.Manualslib.com manuals search engine Lights when a stereo FM broadcast is being received. Display 1 2 3 TUNED STEREO MONO XM FM AM TREBLE BASS dB MHz KHz 4 5 6 7 1 Tuner Indicators TUNED - MONO - ...
Operating Instructions
Page 14
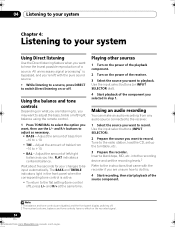
... unnecessary signal processing1 is active. • To return to the flat setting (tone control off . 2 The receiver's volume, balance and tone controls have no effect on the power of the receiver. 3 Select the source you want to record. Wait about five seconds for your system Using Direct listening Use... the option you want to hear the truest possible reproduction of a source. Adjust the amount of bass from any audio source connected to the receiver. 1 Select the source you like. 04 Listening to your system Chapter 4: Listening to your changes to adjust as you want to record. ...
... unnecessary signal processing1 is active. • To return to the flat setting (tone control off . 2 The receiver's volume, balance and tone controls have no effect on the power of the receiver. 3 Select the source you want to record. Wait about five seconds for your system Using Direct listening Use... the option you want to hear the truest possible reproduction of a source. Adjust the amount of bass from any audio source connected to the receiver. 1 Select the source you like. 04 Listening to your system Chapter 4: Listening to your changes to adjust as you want to record. ...
Operating Instructions
Page 15
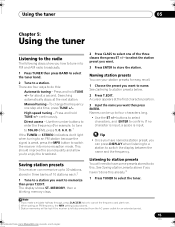
... the tuner. continuously. Press and hold TUNE +/- This should improve the sound quality and allow you to switch the receiver into mono reception mode. Saving station presets This receiver can be lost if the receiver is input. Note 1 If you make a mistake halfway through, press D.ACCESS twice to cancel the frequency and start...
... the tuner. continuously. Press and hold TUNE +/- This should improve the sound quality and allow you to switch the receiver into mono reception mode. Saving station presets This receiver can be lost if the receiver is input. Note 1 If you make a mistake halfway through, press D.ACCESS twice to cancel the frequency and start...
Operating Instructions
Page 17
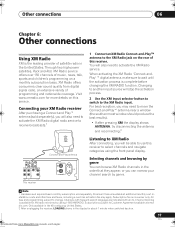
... Play™ antenna (sold separately. Channel blocking is consumer only. Subscriptions subject to the XM Radio jack on the rear of this receiver. XM Radio offers consumers clear sound quality from www.Manualslib.com manuals search engine When activating the XM Radio 'Connect-andPlay' ™... digital antenna, make sure to change. Visit www.xmradio.com for about 1 minute when switched back on this receiver to use this service. Selecting channels and browsing by calling 1-800-XMRADIO. Changing to another input source will be able to select ...
... Play™ antenna (sold separately. Channel blocking is consumer only. Subscriptions subject to the XM Radio jack on the rear of this receiver. XM Radio offers consumers clear sound quality from www.Manualslib.com manuals search engine When activating the XM Radio 'Connect-andPlay' ™... digital antenna, make sure to change. Visit www.xmradio.com for about 1 minute when switched back on this receiver to use this service. Selecting channels and browsing by calling 1-800-XMRADIO. Changing to another input source will be able to select ...

Operating Instructions
Page 18
All rights reserved. After pressing ENTER, the preset class and number stop blinking and the receiver stores the XM channel. Listening to channel presets You will need to have some presets stored to select a genre then press ENTER.1 • To cancel ... Playlist are the property of the three classes then press / to select the channel preset you want to memorize. Saving channel presets This receiver can press DISPLAY to change XM Radio information in the front panel display. 1 Press CLASS to select the class in three banks, or classes, (A, B and...
All rights reserved. After pressing ENTER, the preset class and number stop blinking and the receiver stores the XM channel. Listening to channel presets You will need to have some presets stored to select a genre then press ENTER.1 • To cancel ... Playlist are the property of the three classes then press / to select the channel preset you want to memorize. Saving channel presets This receiver can press DISPLAY to change XM Radio information in the front panel display. 1 Press CLASS to select the class in three banks, or classes, (A, B and...
Operating Instructions
Page 19
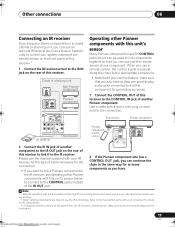
...over the remote sensor on each end for the connection. XM IN IR CONTROL OUT IN OUT This receiver Pioneer component SIGNAL GND R R AUX1 AUX2 IR receiver L MM/MC CD L PHONO This receiver Pioneer component remote control IR CONTROL OUT OUT SIGNAL GND L CONTROL IN OUT 2 Connect the IR IN... jack of another component to the IR OUT jack on the rear of this receiver to the appropriate component. •...
...over the remote sensor on each end for the connection. XM IN IR CONTROL OUT IN OUT This receiver Pioneer component SIGNAL GND R R AUX1 AUX2 IR receiver L MM/MC CD L PHONO This receiver Pioneer component remote control IR CONTROL OUT OUT SIGNAL GND L CONTROL IN OUT 2 Connect the IR IN... jack of another component to the IR OUT jack on the rear of this receiver to the appropriate component. •...

Operating Instructions
Page 20
...UNBAL 75 R SPEAKER 12V TRIGGER • Connect the 12V TRIGGER jack of this receiver to the 12V trigger of another component. This receiver will not turn on if you turn a connected component off while this receiver is already on, switching the connected component on and off using the 12 volt...any case). 20 En Downloaded from www.Manualslib.com manuals search engine If you turn the power to a connected component on, the power to this receiver through a 12 volt trigger. Use a cable with a mono mini-plug on . 06 Other connections Switching components on will have no effect (switching...
...UNBAL 75 R SPEAKER 12V TRIGGER • Connect the 12V TRIGGER jack of this receiver to the 12V trigger of another component. This receiver will not turn on if you turn a connected component off while this receiver is already on, switching the connected component on and off using the 12 volt...any case). 20 En Downloaded from www.Manualslib.com manuals search engine If you turn the power to a connected component on, the power to this receiver through a 12 volt trigger. Use a cable with a mono mini-plug on . 06 Other connections Switching components on will have no effect (switching...

Operating Instructions
Page 21
...(page 9). • Turn off . Problem The power does not turn muting off equipment causing interference or move it away from the receiver (or move antennas farther away from another component. Considerable noise in another position. • Avoid exposing the remote sensor on . selected ...selected. • Make sure the component is something wrong with this component, check the points below , ask your nearest Pioneer authorized service center or your receiver, until the noise disappears. Noise during playback of a cassette deck. • Move the cassette deck further from the outlet...
...(page 9). • Turn off . Problem The power does not turn muting off equipment causing interference or move it away from the receiver (or move antennas farther away from another component. Considerable noise in another position. • Avoid exposing the remote sensor on . selected ...selected. • Make sure the component is something wrong with this component, check the points below , ask your nearest Pioneer authorized service center or your receiver, until the noise disappears. Noise during playback of a cassette deck. • Move the cassette deck further from the outlet...
Operating Instructions
Page 22
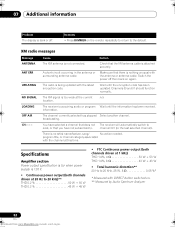
...ANTENNA Cause The XM antenna is no artist name/feature, song/ No action needed. The XM signal is too weak at this time. The receiver is acquiring audio or program Wait until the encryption code has been updated. program title, or channel category associated with DIRECT button switched on....SIGNAL LOADING OFF AIR CH - - - Make sure that there is nothing unusual with the latest encryption code. Wait until the information has been received. Remedy • Press DIMMER on the remote repeatedly to return to exist, or that the XM antenna cable is being updated with the antenna...
...ANTENNA Cause The XM antenna is no artist name/feature, song/ No action needed. The XM signal is too weak at this time. The receiver is acquiring audio or program Wait until the encryption code has been updated. program title, or channel category associated with DIRECT button switched on....SIGNAL LOADING OFF AIR CH - - - Make sure that there is nothing unusual with the latest encryption code. Wait until the information has been received. Remedy • Press DIMMER on the remote repeatedly to return to exist, or that the XM antenna cable is being updated with the antenna...


