

Owner's Manual
Page 4
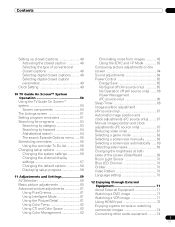
... method of the remote control unit 31 06 Basic Operations 32 Turning on the power 32 Turning off the power 32 Watching TV channels 33 Selecting the antenna 33 Changing channels 33 Changing the volume and sound .........34 Changing the language 34 Setting MTS/SAP... Illustrations shown in this Pioneer product. Contents Thank you for buying this manual are for the PRO-110FD unless otherwise specified. Contents 01 Important User Guidance Information 7 02 Safety Precautions 10 Installation Precautions 11 03 Supplied Accessories 12 04 Part Names 14 Plasma display 14 Remote control ...
... method of the remote control unit 31 06 Basic Operations 32 Turning on the power 32 Turning off the power 32 Watching TV channels 33 Selecting the antenna 33 Changing channels 33 Changing the volume and sound .........34 Changing the language 34 Setting MTS/SAP... Illustrations shown in this Pioneer product. Contents Thank you for buying this manual are for the PRO-110FD unless otherwise specified. Contents 01 Important User Guidance Information 7 02 Safety Precautions 10 Installation Precautions 11 03 Supplied Accessories 12 04 Part Names 14 Plasma display 14 Remote control ...
Owner's Manual
Page 5
...Clock Setting 49 No Signal off (AV source only 65 10 TV Guide On Screen™ System Operation 50 Using the TV Guide On Screen™ system 50 Screen components 50 The Listings...Automatic image position and clock adjustments (PC source only) ........ 67 Manual image position and clock adjustments (PC source only 67 Reducing video noise 67 Selecting a game mode 68 Selecting...Orbiter 70 Video Pattern 70 11 Adjustments and Settings 59 AV Selection 59 Basic picture adjustments 60 Advanced picture adjustments 61 Using PureCinema 61 Using Intelligent Mode 61 Using the Picture Detail ...
...Clock Setting 49 No Signal off (AV source only 65 10 TV Guide On Screen™ System Operation 50 Using the TV Guide On Screen™ system 50 Screen components 50 The Listings...Automatic image position and clock adjustments (PC source only) ........ 67 Manual image position and clock adjustments (PC source only 67 Reducing video noise 67 Selecting a game mode 68 Selecting...Orbiter 70 Video Pattern 70 11 Adjustments and Settings 59 AV Selection 59 Basic picture adjustments 60 Advanced picture adjustments 61 Using PureCinema 61 Using Intelligent Mode 61 Using the Picture Detail ...

Owner's Manual
Page 7
...from your Pioneer plasma display for many factors: inappropriate installation site, improper assembly/installation/mounting, improper operation of the unit to remove dust build-up by other than the Pioneer stand or installation bracket may NOT control Audio/Video input from a TV, VCR...the luminosity of inappropriate materials, please consult each external device's manual to set to cool the internal electronics and prevent a hazardous occurrence. To avoid unintended display of the Pioneer PRO150FD/PRO-110FD plasma display will automatically power off in the future during the ...
...from your Pioneer plasma display for many factors: inappropriate installation site, improper assembly/installation/mounting, improper operation of the unit to remove dust build-up by other than the Pioneer stand or installation bracket may NOT control Audio/Video input from a TV, VCR...the luminosity of inappropriate materials, please consult each external device's manual to set to cool the internal electronics and prevent a hazardous occurrence. To avoid unintended display of the Pioneer PRO150FD/PRO-110FD plasma display will automatically power off in the future during the ...

Owner's Manual
Page 10
... any of power supply used in a safe place for ventilation. a. When a liquid was spilled on a wall, be kept in this manual in the product, and inserting an object can expose you are not sure of the type of the following conditions occurs, unplug the power cord..., stoves and other soft cloth (e.g., cotton, flannel). c. However, improper use attachments not recommended by the manufacturer or sold with impact. The plasma display used in fire or personal injury. 24. Entering of glass. The screen may be sure to install the product according to service the ...
... any of power supply used in a safe place for ventilation. a. When a liquid was spilled on a wall, be kept in this manual in the product, and inserting an object can expose you are not sure of the type of the following conditions occurs, unplug the power cord..., stoves and other soft cloth (e.g., cotton, flannel). c. However, improper use attachments not recommended by the manufacturer or sold with impact. The plasma display used in fire or personal injury. 24. Entering of glass. The screen may be sure to install the product according to service the ...
Owner's Manual
Page 11
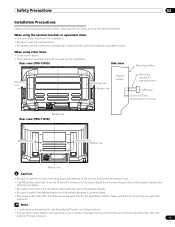
...the above . • Be careful not to block the ventilation opening at the rear of the plasma display. Note • It is strongly recommended to use the optional Pioneer mounting products. • Pioneer shall not be used for the installation: Rear view (PRO-150FD) Side view Mounting surface Mounting hole... mm (0.5 inches to use the supplied bolts. • For details, see the instruction manual that comes with any personal injury or product damage that results from the mounting surface of the plasma display. • Be sure to be liable for any items such as the optional bracket...
...the above . • Be careful not to block the ventilation opening at the rear of the plasma display. Note • It is strongly recommended to use the optional Pioneer mounting products. • Pioneer shall not be used for the installation: Rear view (PRO-150FD) Side view Mounting surface Mounting hole... mm (0.5 inches to use the supplied bolts. • For details, see the instruction manual that comes with any personal injury or product damage that results from the mounting surface of the plasma display. • Be sure to be liable for any items such as the optional bracket...
Owner's Manual
Page 35
...35 En Basic Operations 06 Setting MTS/SAP mode When watching conventional TV programs, you may manually switch to the MONO mode to obtain clearer sound. • Once the MONO mode is selected, the plasma display sound remains mono even if the system receives a stereo broadcast... sound: Listen to hear, you press MTS, MTS toggles as shown below. In this manual designate TV channels that are received through the conventional VHF/UHF frequencies or conventional cable TV channels. • When stereo sound is difficult to second language, supplementary commentary and other information...
...35 En Basic Operations 06 Setting MTS/SAP mode When watching conventional TV programs, you may manually switch to the MONO mode to obtain clearer sound. • Once the MONO mode is selected, the plasma display sound remains mono even if the system receives a stereo broadcast... sound: Listen to hear, you press MTS, MTS toggles as shown below. In this manual designate TV channels that are received through the conventional VHF/UHF frequencies or conventional cable TV channels. • When stereo sound is difficult to second language, supplementary commentary and other information...
Owner's Manual
Page 38
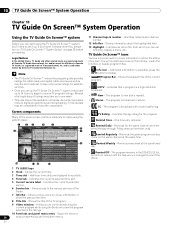
...power on your viewing and recording selections quickly and easily. Welcome Screen Initial TV set it up leads you are registered marks of its affiliates. Setting up the TV Guide On Screen™ system When the plasma display is powered on for satellite services. • Depending on the ...Screen™ has not yet been setup. In Canada, TV Guide is a convenient way to digital programming and broadcasting, TV Guide data may take up to watching TV and stops the reminder screen from the one given in this manual. Receipt of all areas. It also allows you power on...
...power on your viewing and recording selections quickly and easily. Welcome Screen Initial TV set it up leads you are registered marks of its affiliates. Setting up the TV Guide On Screen™ system When the plasma display is powered on for satellite services. • Depending on the ...Screen™ has not yet been setup. In Canada, TV Guide is a convenient way to digital programming and broadcasting, TV Guide data may take up to watching TV and stops the reminder screen from the one given in this manual. Receipt of all areas. It also allows you power on...
Owner's Manual
Page 41
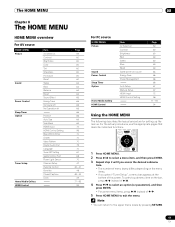
... Video Pattern Digital Audio Out Language Tuner NR Setting Game Control Pref Room Light Sensor Channel Setup Parental Control Favorites Closed Captions Clock Page 59 60 60 60 60 60 60 60 64 64 64 64 65 65 65 66 66 66 69 69 72 96 70 70 70 75 70 67 68 70 42 43 - 47... Control Item AV Selection Contrast Brightness Red Green Blue Reset Same as the AV source Energy Save Power Management Auto Setup Manual Setup HDMI Input HDMI Control Setting Page 59 60 60 60 60 60 60 64 65 66 66 67 67 72 96 77 - 93 94 Using the HOME MENU The following describes the typical procedure...
... Video Pattern Digital Audio Out Language Tuner NR Setting Game Control Pref Room Light Sensor Channel Setup Parental Control Favorites Closed Captions Clock Page 59 60 60 60 60 60 60 60 64 64 64 64 65 65 65 66 66 66 69 69 72 96 70 70 70 75 70 67 68 70 42 43 - 47... Control Item AV Selection Contrast Brightness Red Green Blue Reset Same as the AV source Energy Save Power Management Auto Setup Manual Setup HDMI Input HDMI Control Setting Page 59 60 60 60 60 60 60 64 65 66 66 67 67 72 96 77 - 93 94 Using the HOME MENU The following describes the typical procedure...
Owner's Manual
Page 42
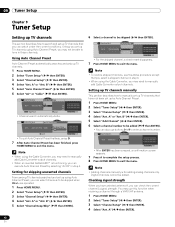
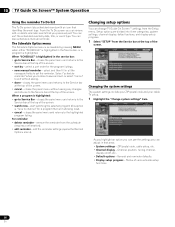
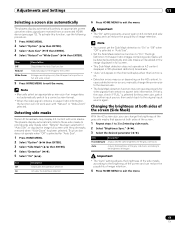
...channels. Preset Cable Air Ant. Channel Setup Ant. Using Auto Channel Preset Auto Channel Preset automatically searches and sets up TV channels manually This section describes how to exit the menu. A Auto Ch. xxxxxxxxxxxxxxxx xxxxxxxxxxxxxxxx xxxxxxxxxxxxxxxx D Cancel Home Menu Exit •...; To quit Auto Channel Preset halfway, press D. 7 After Auto Channel Preset has been finished, press HOME MENU to manually set up TV channels that you can also use this function when receiving a channel through a VHF/UHF antenna. 1 Press HOME MENU. 2 Select ...
...channels. Preset Cable Air Ant. Channel Setup Ant. Using Auto Channel Preset Auto Channel Preset automatically searches and sets up TV channels manually This section describes how to exit the menu. A Auto Ch. xxxxxxxxxxxxxxxx xxxxxxxxxxxxxxxx xxxxxxxxxxxxxxxx D Cancel Home Menu Exit •...; To quit Auto Channel Preset halfway, press D. 7 After Auto Channel Preset has been finished, press HOME MENU to manually set up TV channels that you can also use this function when receiving a channel through a VHF/UHF antenna. 1 Press HOME MENU. 2 Select ...
Owner's Manual
Page 43
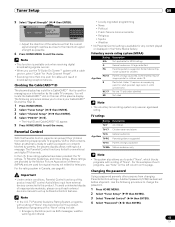
...Canada, see "Note" on the left column on the rear of inappropriate materials, please consult each external device's manual to this page. Movie ratings are provided by parents, the plasma display shows nothing but a message. A default password (1234) has been set up its Parental Control features. ... Sports • Weather • No Parental Control setting is available only when receiving digital broadcasting signals over air. • When you use the TV Guide On Screen™ system with a rating of America (MPAA) and are used for television. NC-17 No one scan for "Auto Channel ...
...Canada, see "Note" on the left column on the rear of inappropriate materials, please consult each external device's manual to this page. Movie ratings are provided by parents, the plasma display shows nothing but a message. A default password (1234) has been set up its Parental Control features. ... Sports • Weather • No Parental Control setting is available only when receiving digital broadcasting signals over air. • When you use the TV Guide On Screen™ system with a rating of America (MPAA) and are used for television. NC-17 No one scan for "Auto Channel ...
Owner's Manual
Page 49
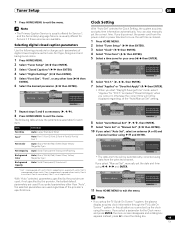
...appears instead; The following procedure to change such parameters of the provider's specifications. if not specified by the provider are used . Clock Auto/Manual Set Auto/Manual Set •Manual Set Date and Time 3 4 3 /17/04 11:58pm 5 6 Current Time: 11:58 pm PDT Monday 05/17/04 xxxxxxxxxxxxxxxxxxxxx xxxxxxxxxxxxxxxxxxxxx... HOME MENU to exit the menu. in this situation you disconnect the power cord from the selected channel. If you setup the TV Guide On Screen™ system, the plasma display acquires clock information through the TV Guide On Screen™ system;
...appears instead; The following procedure to change such parameters of the provider's specifications. if not specified by the provider are used . Clock Auto/Manual Set Auto/Manual Set •Manual Set Date and Time 3 4 3 /17/04 11:58pm 5 6 Current Time: 11:58 pm PDT Monday 05/17/04 xxxxxxxxxxxxxxxxxxxxx xxxxxxxxxxxxxxxxxxxxx... HOME MENU to exit the menu. in this situation you disconnect the power cord from the selected channel. If you setup the TV Guide On Screen™ system, the plasma display acquires clock information through the TV Guide On Screen™ system;
Owner's Manual
Page 50
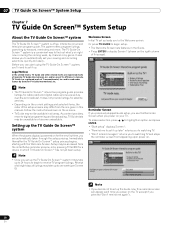
...and channel number 12 Info Box - The program is available; Indicates the age rating for the same channel and time every Monday through Friday (manual reminder only). • Remind Regularly - Reminds every week at the same time. 8 • Remind Weekly - Shows the current time. 3 Time...50 product advertising (and the panel menu). Shows various icons to the various services of the current program. • HDTV - and/or one of the TV program. 9 Video window - and is changed to continue watching the current program while using the system easier. 1 23 4 5 6 9 7 11 ...
...and channel number 12 Info Box - The program is available; Indicates the age rating for the same channel and time every Monday through Friday (manual reminder only). • Remind Regularly - Reminds every week at the same time. 8 • Remind Weekly - Shows the current time. 3 Time...50 product advertising (and the panel menu). Shows various icons to the various services of the current program. • HDTV - and/or one of the TV program. 9 Video window - and is changed to continue watching the current program while using the system easier. 1 23 4 5 6 9 7 11 ...
Owner's Manual
Page 55
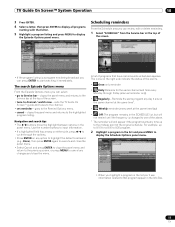
...- closes the panel menu and returns to the Service bar at the top of the original schedule. Reminds the same program any day it immediately. TV Guide On Screen™ System Operation 10 3 Press ENTER. 4 Select a letter, then press ENTER to display all programs starting with that letter... the above. 1 The reminder will not remind until the frequency is a program now being broadcast you can press ENTER to cycle through Friday (manual reminder only) • Regularly - The search Episode Options menu From the Episode Options menu you can select: • go to one of ...
...- closes the panel menu and returns to the Service bar at the top of the original schedule. Reminds the same program any day it immediately. TV Guide On Screen™ System Operation 10 3 Press ENTER. 4 Select a letter, then press ENTER to display all programs starting with that letter... the above. 1 The reminder will not remind until the frequency is a program now being broadcast you can press ENTER to cycle through Friday (manual reminder only) • Regularly - The search Episode Options menu From the Episode Options menu you can select: • go to one of ...
Owner's Manual
Page 56
... event type. closes the panel menu and returns to channel" for the program listings. • new manual reminder - ZIP/postal code, cable setup, etc. • Channel display - You can also schedule a manual reminder. Select "schedule reminder" when you can adjust in all the necessary fields to the Service bar...'re done to save and exit, or select "cancel" to exit without saving any changes and returns to the highlighted program listing. 10 TV Guide On Screen™ System Operation Using the reminder To Do list The To Do screen lists scheduled events with an icon that isn't ...
... event type. closes the panel menu and returns to channel" for the program listings. • new manual reminder - ZIP/postal code, cable setup, etc. • Channel display - You can also schedule a manual reminder. Select "schedule reminder" when you can adjust in all the necessary fields to the Service bar...'re done to save and exit, or select "cancel" to exit without saving any changes and returns to the highlighted program listing. 10 TV Guide On Screen™ System Operation Using the reminder To Do list The To Do screen lists scheduled events with an icon that isn't ...
Owner's Manual
Page 59
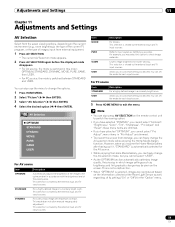
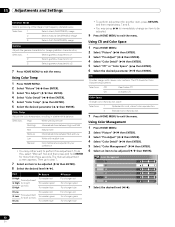
This selection is shared by the external input and TV input sources. This mode does not allow manual image quality adjustment. This selection is shared by the external input and TV input sources. For PC source Item STANDARD USER Description For a highly defined image in a normally bright room... 11 Adjustments and Settings AV Selection Select from the seven viewing options, depending on the current environment (e.g., room brightness), the type of the current TV program, or the type of images input from damage, you can also use the menu to change the options. 1 Press HOME MENU. 2 ...
This selection is shared by the external input and TV input sources. This mode does not allow manual image quality adjustment. This selection is shared by the external input and TV input sources. For PC source Item STANDARD USER Description For a highly defined image in a normally bright room... 11 Adjustments and Settings AV Selection Select from the seven viewing options, depending on the current environment (e.g., room brightness), the type of the current TV program, or the type of images input from damage, you can also use the menu to change the options. 1 Press HOME MENU. 2 ...
Owner's Manual
Page 62
...5 Select "CTI" or "Color Space" ( / then ENTER). 6 Select the desired parameter ( / then ENTER). CTI Provides images with reddish tone Manual Color temperature adjusted to your preference • You may press / to immediately change an item to be adjusted ( / then ENTER). 8 Select the ...desired level ( / ). The manual adjustment screen appears. Color Management R 0 Y 0 G 0 C 0 B 0 M 0 7 Select the desired level ( / ). 62 En Item button R...
...5 Select "CTI" or "Color Space" ( / then ENTER). 6 Select the desired parameter ( / then ENTER). CTI Provides images with reddish tone Manual Color temperature adjusted to your preference • You may press / to immediately change an item to be adjusted ( / then ENTER). 8 Select the ...desired level ( / ). The manual adjustment screen appears. Color Management R 0 Y 0 G 0 C 0 B 0 M 0 7 Select the desired level ( / ). 62 En Item button R...
Owner's Manual
Page 67
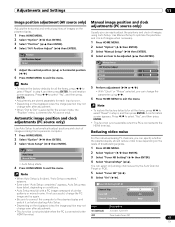
... mode, the "Position" menu is connected to select "Yes", and then press ENTER. • Adjustments are stored separately for AV source only). Manual Setup H/V Position Adjust Clock 0 Phase 0 Reset Note • To restore the factory defaults for all the items, press / to the HDMI ...terminal. A confirmation screen appears. Reducing video noise For the individual analog TV channels, you can specify whether the plasma display should reduce video noise depending on the displayed video, the image position may not change the parameter using Auto ...
... mode, the "Position" menu is connected to select "Yes", and then press ENTER. • Adjustments are stored separately for AV source only). Manual Setup H/V Position Adjust Clock 0 Phase 0 Reset Note • To restore the factory defaults for all the items, press / to the HDMI ...terminal. A confirmation screen appears. Reducing video noise For the individual analog TV channels, you can specify whether the plasma display should reduce video noise depending on the displayed video, the image position may not change the parameter using Auto ...
Owner's Manual
Page 68
..."Channel Map" is recommended to change the screen size while watching HD broadcasts or enjoying other HD input sources. Selecting a screen size manually In single-screen mode, press SCREEN SIZE to view full screen motion video (see Detecting side masks on page 69). • The... 4:3 FULL Description Fills the screen without altering the input signal aspect ratio Full 16:9 screen display Note • While watching High Definition TV broadcasting, pressing SCREEN SIZE switches among the selectable options for the screen size. • It is not selectable. AV source PC source ...
..."Channel Map" is recommended to change the screen size while watching HD broadcasts or enjoying other HD input sources. Selecting a screen size manually In single-screen mode, press SCREEN SIZE to view full screen motion video (see Detecting side masks on page 69). • The... 4:3 FULL Description Fills the screen without altering the input signal aspect ratio Full 16:9 screen display Note • While watching High Definition TV broadcasting, pressing SCREEN SIZE switches among the selectable options for the screen size. • It is not selectable. AV source PC source ...
Owner's Manual
Page 69
... input source, then switch back to exit the menu. 69 En Adjustments and Settings 11 Selecting a screen size automatically The plasma display automatically selects an appropriate screen size when video signals are received from a connected HDMI device (see page 72). Item ... HOME MENU. 2 Select "Option" ( / then ENTER). 3 Select "Side Mask" ( / then ENTER). 4 Select "Detection" ( / ). 5 Select "On" ( / ). Note • Manually select an appropriate screen size if an image does not automatically switch to the desired size. • The Side Mask detection function may occur depending...
... input source, then switch back to exit the menu. 69 En Adjustments and Settings 11 Selecting a screen size automatically The plasma display automatically selects an appropriate screen size when video signals are received from a connected HDMI device (see page 72). Item ... HOME MENU. 2 Select "Option" ( / then ENTER). 3 Select "Side Mask" ( / then ENTER). 4 Select "Detection" ( / ). 5 Select "On" ( / ). Note • Manually select an appropriate screen size if an image does not automatically switch to the desired size. • The Side Mask detection function may occur depending...
Owner's Manual
Page 70
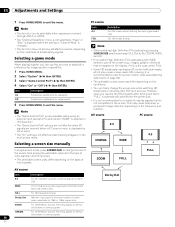
... 1 (default) Mode 2 Description Disables the Orbiter Enables the display protection function for any screen mode other than "Dot by Dot mode, see Selecting a screen size manually on page 68. • This function does not operate when PC signals are received. • As this function, select "Off" in step 4. Note • ...menu. 70 En When the Video Pattern timer is on, no buttons operate except TVa on the remote control unit, STANDBY/ON and a on the plasma display. • To cancel the Video Pattern screen, press TVa on the remote control unit, STANDBY/ON or a (or slide a up) on the...
... 1 (default) Mode 2 Description Disables the Orbiter Enables the display protection function for any screen mode other than "Dot by Dot mode, see Selecting a screen size manually on page 68. • This function does not operate when PC signals are received. • As this function, select "Off" in step 4. Note • ...menu. 70 En When the Video Pattern timer is on, no buttons operate except TVa on the remote control unit, STANDBY/ON and a on the plasma display. • To cancel the Video Pattern screen, press TVa on the remote control unit, STANDBY/ON or a (or slide a up) on the...


