Owner's Manual
Page 10
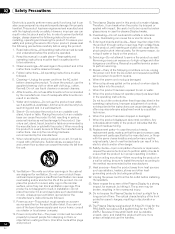
... ceiling mounting-When mounting the product on a wall, be routed properly to the product. The Plasma Display weighs about 31.8 kg (70.1 lbs.) for the PRO-506PU and about 25.8 kg (56.9 lbs.) for built-in the cabinet are not sure of the type of glass. Observe warnings-All warnings on... product, and inserting an object can cause fire or electric shock. 15. Heat sources-Keep the product away from the AC outlet before installing the speakers. 23. The screen may be moved with the highest priority on a cart, it can expose you are designed for example, by the manufacturer...
... ceiling mounting-When mounting the product on a wall, be routed properly to the product. The Plasma Display weighs about 31.8 kg (70.1 lbs.) for the PRO-506PU and about 25.8 kg (56.9 lbs.) for built-in the cabinet are not sure of the type of glass. Observe warnings-All warnings on... product, and inserting an object can cause fire or electric shock. 15. Heat sources-Keep the product away from the AC outlet before installing the speakers. 23. The screen may be moved with the highest priority on a cart, it can expose you are designed for example, by the manufacturer...

Owner's Manual
Page 11
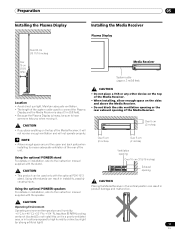
... use them for mounting non-specified products. • Do not mount or remove the Plasma Display to use the optional PIONEER mounting products. • PIONEER shall not be liable for any items such as the optional stand. NOTE • It is strongly recommended to or from...brackets, or equivalent items • Ask your dealer. • The following precautions when installing with any personal injury or product damage that comes with speakers attached. When using other items • Consult your dealer to perform the installation. • Be sure to 0.7 inches) in depth from the...
... use them for mounting non-specified products. • Do not mount or remove the Plasma Display to use the optional PIONEER mounting products. • PIONEER shall not be liable for any items such as the optional stand. NOTE • It is strongly recommended to or from...brackets, or equivalent items • Ask your dealer. • The following precautions when installing with any personal injury or product damage that comes with speakers attached. When using other items • Consult your dealer to perform the installation. • Be sure to 0.7 inches) in depth from the...
Owner's Manual
Page 12
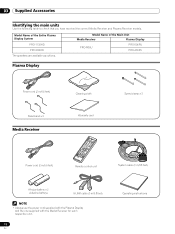
... Media Receiver for each respective unit. 12 En Operating instructions Model Name of the Entire Plasma Display System PRO-1130HD PRO-930HD Model Name of the Main Unit Media Receiver Plasma Display PRO-R06U PRO-506PU PRO-436PU The speakers are available as options. 03 Supplied Accessories Supplied Accessories Identifying the main units Use the following table...
... Media Receiver for each respective unit. 12 En Operating instructions Model Name of the Entire Plasma Display System PRO-1130HD PRO-930HD Model Name of the Main Unit Media Receiver Plasma Display PRO-R06U PRO-506PU PRO-436PU The speakers are available as options. 03 Supplied Accessories Supplied Accessories Identifying the main units Use the following table...
Owner's Manual
Page 13
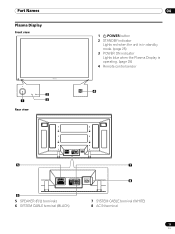
Part Names Part Names Plasma Display Front view 2 1 3 Rear view 04 1 a POWER button 2 STANDBY indicator Lights red when the unit is in standby mode. (page 25) 3 POWER ON indicator Lights blue when the Plasma Display is operating. (page 25) 4 Remote control sensor 4 5 SYSTEM CABLE WHITE BLACK SYSTEM CABLE WHITE BLACK 6 5 SPEAKER (R/L) terminals 6 SYSTEM CABLE terminal (BLACK) 7 8 7 SYSTEM CABLE terminal (WHITE) 8 AC IN terminal 13 En
Part Names Part Names Plasma Display Front view 2 1 3 Rear view 04 1 a POWER button 2 STANDBY indicator Lights red when the unit is in standby mode. (page 25) 3 POWER ON indicator Lights blue when the Plasma Display is operating. (page 25) 4 Remote control sensor 4 5 SYSTEM CABLE WHITE BLACK SYSTEM CABLE WHITE BLACK 6 5 SPEAKER (R/L) terminals 6 SYSTEM CABLE terminal (BLACK) 7 8 7 SYSTEM CABLE terminal (WHITE) 8 AC IN terminal 13 En
Owner's Manual
Page 17
Maintain adequate ventilation. • The length of the Media Receiver, it . Using the optional PIONEER stand For details on installation, refer to the instruction manual supplied with the speaker. Using the optional PIONEER speakers For details on installation, refer to the instruction manual supplied with the stand. STANDBY/ON CAUTION • Do not place a VCR...
Maintain adequate ventilation. • The length of the Media Receiver, it . Using the optional PIONEER stand For details on installation, refer to the instruction manual supplied with the speaker. Using the optional PIONEER speakers For details on installation, refer to the instruction manual supplied with the stand. STANDBY/ON CAUTION • Do not place a VCR...

Owner's Manual
Page 19
... the Plasma Display Plasma Display (rear view) SYSTEM CABLE WHITE BLACK SYSTEM CABLE WHITE BLACK (BLACK) For details on optional PIONEER speaker installation, refer to the instruction manual that came with the speaker. (WHITE) Connecting the system cable to the Media Receiver Media Receiver (rear view) MONITOR OUT ANT/ CABLE A IN INPUT 2 G-LINK...
... the Plasma Display Plasma Display (rear view) SYSTEM CABLE WHITE BLACK SYSTEM CABLE WHITE BLACK (BLACK) For details on optional PIONEER speaker installation, refer to the instruction manual that came with the speaker. (WHITE) Connecting the system cable to the Media Receiver Media Receiver (rear view) MONITOR OUT ANT/ CABLE A IN INPUT 2 G-LINK...

Owner's Manual
Page 24
... on your routing system. At that the cables are installed on the sides (rear view) SYSTEM CABLE WHITE BLACK Speaker cable Speed clamp Speed clamp Cable binder (supplied with the stand)* Speaker cable Attaching speed clamps to the main unit Attach the speed clamps using the 2 holes marked with the stand,... put the speaker and system cables together so that time be difficult to undo once in place. Speed clamps are supplied for bunching cables. Please attach them ...
... on your routing system. At that the cables are installed on the sides (rear view) SYSTEM CABLE WHITE BLACK Speaker cable Speed clamp Speed clamp Cable binder (supplied with the stand)* Speaker cable Attaching speed clamps to the main unit Attach the speed clamps using the 2 holes marked with the stand,... put the speaker and system cables together so that time be difficult to undo once in place. Speed clamps are supplied for bunching cables. Please attach them ...

Owner's Manual
Page 62
...the optimum contrast characteristics for both video and still images. NOTE • For the I -P Mode Performs optimum conversion from the right speaker. On Activates the ACL. Gamma Adjusts the gamma characteristics (image gradation characteristics). See page 58. 1 Press HOME MENU. 2 Select ...to be adjusted. ( / then ENTER) • You can select "3DYC" or "I -P Mode 1 Press HOME MENU. 2 Select "Picture". ( / then ENTER) 3 Select "Pro Adjust". ( / then ENTER) 4 Select "Others". ( / then ENTER) 5 Select an item to be adjusted. ( / ) 4 Select the desired level. ( / ) ...
...the optimum contrast characteristics for both video and still images. NOTE • For the I -P Mode Performs optimum conversion from the right speaker. On Activates the ACL. Gamma Adjusts the gamma characteristics (image gradation characteristics). See page 58. 1 Press HOME MENU. 2 Select ...to be adjusted. ( / then ENTER) • You can select "3DYC" or "I -P Mode 1 Press HOME MENU. 2 Select "Picture". ( / then ENTER) 3 Select "Pro Adjust". ( / then ENTER) 4 Select "Others". ( / then ENTER) 5 Select an item to be adjusted. ( / ) 4 Select the desired level. ( / ) ...

Owner's Manual
Page 89
...Troubleshooting Problem • No power. • Blue and red rectangles appear on the screen, check the corresponding items in the table. from either speaker has been disconnected. (See pages 13 and 19.) • Sound is output from only a single • Has the balance been correctly adjusted...Is picture adjustment correct? (See page 59.) • Audio is output but no image is reversed between the right and • Check if the speaker cable connections have selected "Picture Off" for Energy Save. Powering off . • Is the image position correct? (See page 64.) • ...
...Troubleshooting Problem • No power. • Blue and red rectangles appear on the screen, check the corresponding items in the table. from either speaker has been disconnected. (See pages 13 and 19.) • Sound is output from only a single • Has the balance been correctly adjusted...Is picture adjustment correct? (See page 59.) • Audio is output but no image is reversed between the right and • Check if the speaker cable connections have selected "Picture Off" for Energy Save. Powering off . • Is the image position correct? (See page 64.) • ...


